


Unity3D 游戏引擎之IOS自定义游戏摇杆与飞机平滑的移动
雨松MOMO原创文章如转载,请注明:转载自雨松MOMO的博客原文地址:http://blog.csdn.net/xys289187120/article/details/6941061
移动开发游戏中使用到的触摸游戏摇杆在iPhone上是非常普遍的,毕竟是全触摸屏手机,今天MOMO 通过一个小例子和大家讨论Unity3D 中如何自定义一个漂亮的全触摸游戏摇杆。
值得高兴的是,Unity3D 游戏引擎的标准资源中已经帮助我们封装了一个游戏摇杆脚本,所以实现部分的代码可以完全借助它的,具体调用需要我们自己来。
Joystick.js是官方提供的脚本,具体代码如下,有兴趣的朋友可以仔细研究研究,MOMO就不多说啦。哇咔咔~
// // Joystick.js // Penelope iPhone Tutorial // // Joystick creates a movable joystick (via GUITexture) that // handles touch input, taps, and phases. Dead zones can control // where the joystick input gets picked up and can be normalized. // // Optionally, you can enable the touchPad property from the editor // to treat this Joystick as a TouchPad. A TouchPad allows the finger // to touch down at any point and it tracks the movement relatively // without moving the graphic // @script RequireComponent( GUITexture ) // A simple class for bounding how far the GUITexture will move class Boundary { var min : Vector2 = Vector2.zero; var max : Vector2 = Vector2.zero; } static private var joysticks : Joystick[]; // A static collection of all joysticks static private var enumeratedJoysticks : boolean = false; static private var tapTimeDelta : float = 0.3; // Time allowed between taps var touchPad : boolean; // Is this a TouchPad? var touchZone : Rect; var deadZone : Vector2 = Vector2.zero; // Control when position is output var normalize : boolean = false; // Normalize output after the dead-zone? var position : Vector2; // [-1, 1] in x,y var tapCount : int; // Current tap count private var lastFingerId = -1; // Finger last used for this joystick private var tapTimeWindow : float; // How much time there is left for a tap to occur private var fingerDownPos : Vector2; private var fingerDownTime : float; private var firstDeltaTime : float = 0.5; private var gui : GUITexture; // Joystick graphic private var defaultRect : Rect; // Default position / extents of the joystick graphic private var guiBoundary : Boundary = Boundary(); // Boundary for joystick graphic private var guiTouchOffset : Vector2; // Offset to apply to touch input private var guiCenter : Vector2; // Center of joystick function Start() { // Cache this component at startup instead of looking up every frame gui = GetComponent( GUITexture ); // Store the default rect for the gui, so we can snap back to it defaultRect = gui.pixelInset; defaultRect.x += transform.position.x * Screen.width;// + gui.pixelInset.x; // - Screen.width * 0.5; defaultRect.y += transform.position.y * Screen.height;// - Screen.height * 0.5; transform.position.x = 0.0; transform.position.y = 0.0; if ( touchPad ) { // If a texture has been assigned, then use the rect ferom the gui as our touchZone if ( gui.texture ) touchZone = defaultRect; } else { // This is an offset for touch input to match with the top left // corner of the GUI guiTouchOffset.x = defaultRect.width * 0.5; guiTouchOffset.y = defaultRect.height * 0.5; // Cache the center of the GUI, since it doesn't change guiCenter.x = defaultRect.x + guiTouchOffset.x; guiCenter.y = defaultRect.y + guiTouchOffset.y; // Let's build the GUI boundary, so we can clamp joystick movement guiBoundary.min.x = defaultRect.x - guiTouchOffset.x; guiBoundary.max.x = defaultRect.x + guiTouchOffset.x; guiBoundary.min.y = defaultRect.y - guiTouchOffset.y; guiBoundary.max.y = defaultRect.y + guiTouchOffset.y; } } function Disable() { gameObject.active = false; enumeratedJoysticks = false; } function ResetJoystick() { // Release the finger control and set the joystick back to the default position gui.pixelInset = defaultRect; lastFingerId = -1; position = Vector2.zero; fingerDownPosition = Vector2.zero; if ( touchPad ) gui.color.a = 0.025; } function IsFingerDown() : boolean { return (lastFingerId != -1); } function LatchedFinger( fingerId : int ) { // If another joystick has latched this finger, then we must release it if ( lastFingerId == fingerId ) ResetJoystick(); } function Update() { if ( !enumeratedJoysticks ) { // Collect all joysticks in the game, so we can relay finger latching messages joysticks = FindObjectsOfType( Joystick ); enumeratedJoysticks = true; } var count = Input.touchCount; // Adjust the tap time window while it still available if ( tapTimeWindow > 0 ) tapTimeWindow -= Time.deltaTime; else tapCount = 0; if ( count == 0 ) ResetJoystick(); else { for(var i : int = 0;i < count; i++) { var touch : Touch = Input.GetTouch(i); var guiTouchPos : Vector2 = touch.position - guiTouchOffset; var shouldLatchFinger = false; if ( touchPad ) { if ( touchZone.Contains( touch.position ) ) shouldLatchFinger = true; } else if ( gui.HitTest( touch.position ) ) { shouldLatchFinger = true; } // Latch the finger if this is a new touch if ( shouldLatchFinger && ( lastFingerId == -1 || lastFingerId != touch.fingerId ) ) { if ( touchPad ) { gui.color.a = 0.15; lastFingerId = touch.fingerId; fingerDownPos = touch.position; fingerDownTime = Time.time; } lastFingerId = touch.fingerId; // Accumulate taps if it is within the time window if ( tapTimeWindow > 0 ) tapCount++; else { tapCount = 1; tapTimeWindow = tapTimeDelta; } // Tell other joysticks we've latched this finger for ( var j : Joystick in joysticks ) { if ( j != this ) j.LatchedFinger( touch.fingerId ); } } if ( lastFingerId == touch.fingerId ) { // Override the tap count with what the iPhone SDK reports if it is greater // This is a workaround, since the iPhone SDK does not currently track taps // for multiple touches if ( touch.tapCount > tapCount ) tapCount = touch.tapCount; if ( touchPad ) { // For a touchpad, let's just set the position directly based on distance from initial touchdown position.x = Mathf.Clamp( ( touch.position.x - fingerDownPos.x ) / ( touchZone.width / 2 ), -1, 1 ); position.y = Mathf.Clamp( ( touch.position.y - fingerDownPos.y ) / ( touchZone.height / 2 ), -1, 1 ); } else { // Change the location of the joystick graphic to match where the touch is gui.pixelInset.x = Mathf.Clamp( guiTouchPos.x, guiBoundary.min.x, guiBoundary.max.x ); gui.pixelInset.y = Mathf.Clamp( guiTouchPos.y, guiBoundary.min.y, guiBoundary.max.y ); } if ( touch.phase == TouchPhase.Ended || touch.phase == TouchPhase.Canceled ) ResetJoystick(); } } } if ( !touchPad ) { // Get a value between -1 and 1 based on the joystick graphic location position.x = ( gui.pixelInset.x + guiTouchOffset.x - guiCenter.x ) / guiTouchOffset.x; position.y = ( gui.pixelInset.y + guiTouchOffset.y - guiCenter.y ) / guiTouchOffset.y; } // Adjust for dead zone var absoluteX = Mathf.Abs( position.x ); var absoluteY = Mathf.Abs( position.y ); if ( absoluteX < deadZone.x ) { // Report the joystick as being at the center if it is within the dead zone position.x = 0; } else if ( normalize ) { // Rescale the output after taking the dead zone into account position.x = Mathf.Sign( position.x ) * ( absoluteX - deadZone.x ) / ( 1 - deadZone.x ); } if ( absoluteY < deadZone.y ) { // Report the joystick as being at the center if it is within the dead zone position.y = 0; } else if ( normalize ) { // Rescale the output after taking the dead zone into account position.y = Mathf.Sign( position.y ) * ( absoluteY - deadZone.y ) / ( 1 - deadZone.y ); } }
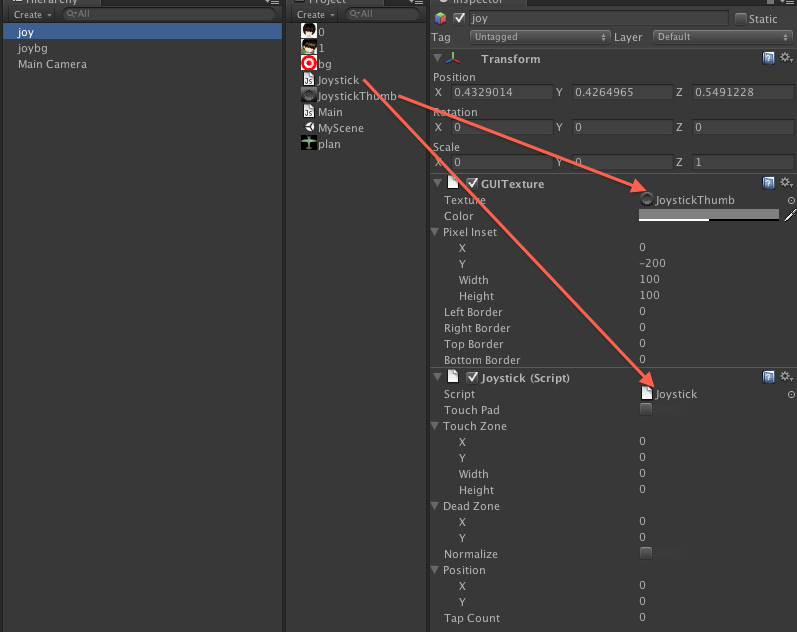
单击Create 创建一个GUI Texture,命名为Joy ,它用来显示游戏摇杆,如下图所示将摇杆的图片资源,与摇杆的脚本连线赋值给Joy. Pixel Inset 中可以设置摇杆的显示位置与显示宽高。
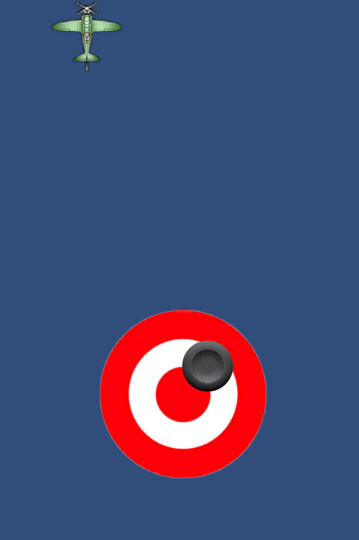
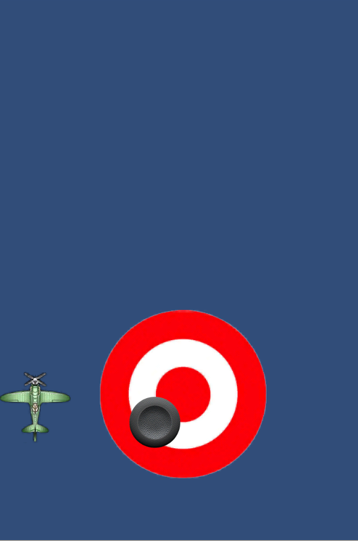
到这一步 build and run 就可以在iPhone上看到这个游戏摇杆,并且可以通过触摸它,360度平滑过度。
在屏幕中绘制一个飞机,通过游戏摇杆去控制飞机的移动。
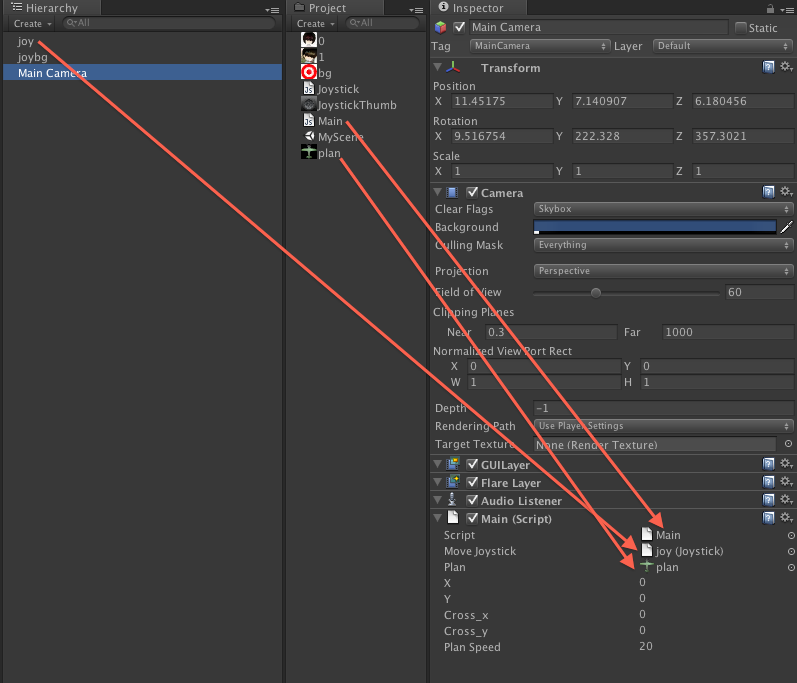
创建一个脚本,命名为Main.js 如下图所示 将 Main.js 、joy、plan 分别 绑定在Main Camera 上。
moveJoystick.position.x;
moveJoystick.position.y;
这两个值是非常重要的两个信息,它们的取值范围是 -1 到 +1 ,表示 用户触摸摇杆的位置, 上 下 左 右 的信息。
//游戏摇杆对象 var moveJoystick : Joystick; //飞机的贴图 var plan : Texture; //飞机在屏幕中的坐标 var x = 0; var y = 0; //避免飞机飞出屏幕,分别是X、Y最大坐标,最小坐标是0、0 var cross_x = 0; var cross_y = 0; //飞机移动的速度 var planSpeed = 20; function Start() { //初始化赋值 x = 100; y = 100; cross_x = Screen.width - plan.width; cross_y = Screen.height - plan.height; } function Update () { //得到游戏摇杆的反馈信息,得到的值是 -1 到 +1 之间 var touchKey_x = moveJoystick.position.x; var touchKey_y = moveJoystick.position.y; //摇杆向左 if(touchKey_x == -1){ x -= planSpeed; } //摇杆向右 else if(touchKey_x == 1){ x += planSpeed; } //摇杆向上 if(touchKey_y == -1){ y += planSpeed; } //摇杆向下 else if(touchKey_y == 1){ y -= planSpeed; } //防止飞机飞出屏幕,出界检测 if(x < 0){ x = 0; }else if(x > cross_x){ x = cross_x; } if(y < 0){ y = 0; }else if(y > cross_y){ y = cross_y; } } function OnGUI () { //将飞机绘制在屏幕中 GUI.DrawTexture(Rect(x,y,128,128),plan); }
导出 build and run 看看在iPhone 上的效果,通过触摸游戏摇杆可以控制飞机的移动啦,不错吧,哇咔咔~~
最后欢迎各位盆友可以和MOMO一起讨论Unity3D游戏开发,最近感冒的盆友越来越多,大家要多多注意身体健康噢。哇咔咔~~~ 附上Unity3D工程的下载地址,Xcode项目我就不上传了,须要的自己导出。


 1450
1450

 被折叠的 条评论
为什么被折叠?
被折叠的 条评论
为什么被折叠?
 到【灌水乐园】发言


