


学习遗忘曲线
In 1990, a dynamic neural network architecture by Scott E. Fahlman and Christian Lebiere called “Cascade-Correlation” [1] outperformed static neural networks in training speed, accuracy, and size. In a recent lecture, Fahlman actually called it the first approach to use something like ‘deep’ learning.With this algorithm, they successfully competed on the ‘two spirals’ categorization task and artificial grammar learning problems.
1990年,Scott E. Fahlman和Christian Lebiere提出的动态神经网络架构称为“ Cascade-Correlation” [1],其训练速度,准确性和大小均优于静态神经网络。 在最近的一次演讲中 ,Fahlman实际上将其称为使用``深度''学习之类的第一种方法,通过这种算法,他们成功地竞争了``两个螺旋''分类任务和人工语法学习问题。
And yet their work was largely forgotten or treated as a side note of history. Even though the idea itself is quite close in spirit to what we, by now, refer to as the ‘boosting’ family of machine learning algorithms — techniques that perform better than deep learning on certain sets of problems. These — just like Cascade-Correlation — are based on the idea of iteratively improving a classifier by stacking specialized learners, trained one at a time.
然而,他们的工作在很大程度上被遗忘了或被视为历史的记录。 即使这个想法本身在精神上与我们现在所称的“先进”机器学习算法家族非常接近,它们在某些问题上的表现比深度学习要好 。 就像Cascade-Correlation(层叠相关)一样,它们基于通过堆叠专门学习者(每次训练一个)来迭代地改进分类器的思想。
More than enough reason to understand and implement Fahlman’s approach — and put it to the test on various domains and challenges! Let’s investigate if, where, and how it can still compete with modern machine learning tools.
有足够的理由来理解和实施Fahlman的方法-并在各种领域和挑战上进行测试! 让我们研究它是否,在什么地方以及如何与现代机器学习工具竞争。
This article is part one of a series with a focus on (Recurrent) Cascade-Correlation.
本文是系列文章的第一部分,重点介绍(递归)级联相关性。
In this first part, we’ll look in detail on how a simple, forward-only Cascade-Correlation (or CasCor for short) network can be implemented using Python and PyTorch. We’ll also see some results of applying it to a simplistic problem domain.
在第一部分中,我们将详细介绍如何使用Python和PyTorch实现简单的仅向前的Cascade-Correlation(简称CasCor)网络。 我们还将看到将其应用于简单问题域的一些结果。
In the next parts, we’ll investigate how to better automate and optimize the algorithm. We’ll also implement and train a recurrent version of it and benchmark CasCor against standard machine learning solutions.
在接下来的部分中,我们将研究如何更好地自动化和优化算法。 我们还将针对标准机器学习解决方案实施并训练其复发版本和基准CasCor。
To follow along with this article, you should be familiar with how neural networks can be trained using back-propagation of the loss gradient (as of 2020, a widely used approach). That is, you should understand how the gradient is usually calculated and applied to the parameters of a network to try to iteratively achieve convergence of the loss to a global minimum.
要继续本文,您应该熟悉如何使用损失梯度的反向传播来训练神经网络(截至2020年,这是一种广泛使用的方法)。 也就是说,您应该了解通常如何计算梯度并将其应用于网络的参数,以尝试迭代地将损耗收敛到全局最小值。
第1部分:级联相关 (Part 1: Cascade Correlation)
Without further ado, let’s implement a simplistic version of CasCor! Since we are working with Python, we need to import some basics and PyTorch:
事不宜迟,让我们实现一个简单的CasCor版本! 由于我们正在使用Python,因此我们需要导入一些基础知识和PyTorch:
总览 (Overview)
The CasCor algorithm starts off with a one-layer network (only output neurons). It then follows these steps:
CasCor算法从一层网络(仅输出神经元)开始。 然后,执行以下步骤:
- Train (only!) the output neurons until reaching a plateau 训练(仅!)输出神经元,直到达到稳定状态
- If the residual error is good enough, stop; 如果残留误差足够好,则停止;
- Otherwise, freeze all weights of the existing network 否则,冻结现有网络的所有权重
- Then train a new hidden neuron, by optimizing the correlation between its output and the last measured residual error (see below) 然后,通过优化其输出与最后测得的残差之间的相关性来训练新的隐藏神经元(请参见下文)
- Go back to step 1— rinse & repeat 返回第1步-冲洗并重复
Step 4. is the most important and most complicated part of CasCor, illustrated also in the figure below. Until the training has finished, the hidden neuron is disconnected from the network. We statically feed all the original inputs and the values of earlier layers as a weighted sum to its activation function. Then the training algorithm optimizes the neuron’s weights to achieve the best possible correlation of its output value with the sample set residual error, measured in an earlier iteration.To train for optimum correlation, we will need to use the correlation measure instead of some standard loss function, but more on that later.
步骤4.是CasCor最重要和最复杂的部分,也如下图所示。 在训练结束之前,隐藏的神经元将从网络断开。 我们以静态方式将所有原始输入和早期图层的值作为加权总和静态地提供给其激活函数。 然后训练算法优化神经元的权重,以实现其输出值与样本集残差的最佳可能相关性(在较早的迭代中进行测量)。要训练最佳相关性,我们将需要使用相关性度量代替一些标准损失功能,但稍后会详细介绍。
After the training finished, we can add the hidden neuron to the network. The output neurons will now receive its value as an additional input, and we need to train their new weights, so we jump back to step 1.
训练完成后,我们可以将隐藏的神经元添加到网络中。 现在,输出神经元将作为附加输入接收其值,我们需要训练它们的新权重,因此我们跳回到步骤1。
The CasCor paper [1] illustrates the resulting network (with shortcuts) and the process of adding a hidden neuron, in a similar fashion to this:
CasCor的论文[1]以类似于以下的方式说明了生成的网络(带有快捷方式)和添加隐藏神经元的过程:

In this article, we focus on the two major parts of CasCor: Steps 1. and 4., i.e. training the outputs and training a hidden neuron. The rest we’ll simply do manually.
在本文中,我们重点介绍CasCor的两个主要部分:步骤1和4.。即训练输出并训练隐藏的神经元。 其余的我们将简单地手动完成。
测试集 (Test Set)
For simplicity, we use a 2D categorization task for testing (It’s easier to debug). Our network will thus have 2 input dimensions — the coordinates of the grid — and 1 output dimension — a value between 0 and 1.We’ll train on the following data sets (without test sets), where 0 values are black and 1 values are white:
为简单起见,我们使用2D分类任务进行测试(调试起来更容易)。 因此,我们的网络将具有2个输入维度(网格坐标)和1个输出维度(介于0和1之间的值)。我们将训练以下数据集(不包含测试集),其中0个值是黑色,而1个值是白色的:


To actually feed the input and output into our training function, we also need to convert these to a ‘long’ form and add a static bias value of 1.Plus, testing showed that CasCor and quickprop perform better when the inputs are normalized, so let’s do that as well.
为了将输入和输出实际输入到我们的训练函数中,我们还需要将它们转换为“长”形式,并添加静态偏差值1.Plus。测试表明,对输入进行归一化后,CasCor和quickprop的性能更好,因此让我们也这样做。
快速道具 (Quickprop)
To train the units in the CasCor network, they use a technique that was also invented by Fahlman in 1988 [2] called quickprop.Quickprop is an alternative to back-propagation that uses a variation of Newton’s method. For more info on this aside from the original paper, this useful blog post by Giuseppe Bonaccorso also describes it quite well.
为了训练CasCor网络中的单元,他们使用了Fahlman于1988年发明的技术[2],称为quickprop。Quickprop是牛顿方法变种的反向传播的替代方法 。 除了原始论文之外,有关此方面的更多信息,Giuseppe Bonaccorso的这篇有用的博客文章也对此进行了很好的描述。
Note that quickprop is not strictly necessary to implement CasCor. However, to stick close to the original paper and for maximized learning, we’ll use it here as well. It is actually an interesting topic all on its own, and I encourage you to investigate it!If you couldn’t care less about quickprop, skip ahead to the next section and treat any further mention of it simply as ‘training neuron weights based on given input & expected output pairs’.
请注意,实施CasCor并非严格必需quickprop。 但是,为了紧贴原始论文并最大程度地学习,我们也在这里使用它。 实际上,这本身就是一个有趣的话题,如果您对Quickprop不太关心,请跳至下一部分,并将其进一步提及视为``根据给定输入和预期输出对。
Our implementation is based on the blog post — but since we don’t want to focus on quickprop in this article, we’ll just peek at some adjustments to their code instead of diving into the maths.
我们的实现是基于博客文章的-但由于我们不想在本文中专注于quickprop,因此,我们只是对它们的代码进行一些调整,而不是深入研究数学。
Flexibility. The code from the post uses a fixed activation and loss function and statically implements their gradient. For CasCor, we need to be a bit more flexible (at least when it comes to the loss) so we pass these functions as parameters.
灵活性。 帖子中的代码使用固定的激活和损失函数,并静态实现其梯度。 对于CasCor,我们需要更加灵活(至少在损失方面),因此我们将这些函数作为参数传递。
Automatic Gradient Computation. Since the activation and loss function are now variable, we’ll run into trouble when trying to build their gradient. But, using PyTorch, we can easily skip over that and let the autograd do the heavy lifting.
自动梯度计算。 由于激活和损失函数现在是可变的,因此在尝试构建梯度时会遇到麻烦。 但是,使用PyTorch,我们可以轻松地跳过它,让autograd繁重的工作。
Convergence. Giuseppe’s code tests the change in weights per iteration to determine convergence. Some quick tests found that to be troublesome since it often seems to get stuck on saddle points and local minima. So instead of that, we’ll use the residual error.Specifically, we’ll calculate a running mean of the residual error, and check if the difference in mean per iteration is smaller than a given tolerance.Last but not least, if the error diverges or converges too slowly, quickprop simply gives up after a certain amount of iterations (it runs out of patience, see the function parameter).
收敛。 朱塞佩(Giuseppe)的代码测试每次迭代的权重变化以确定收敛。 一些快速测试发现这很麻烦,因为它似乎经常卡在鞍点和局部最小值上。 因此,我们将使用残差来代替残差,具体来说,我们将计算残差的运行平均值,并检查每次迭代的均值差是否小于给定的tolerance错误发散或收敛太慢,quickprop只是在经过一定数量的迭代后就放弃了(它失去了patience ,请参见function参数)。
输出训练 (Output Training)
With quickprop implemented, let’s get to the fun part!CasCor starts with a one-layer network, i.e. we will be using a single output neuron and connect that to our input (and bias). To start training this neuron, we take sets of input (x) and output (y) samples and create newly initialized (random) weights, all of which we feed into quickprop.
实施quickprop后,我们开始有趣的部分!CasCor从一个单层网络开始,即,我们将使用单个输出神经元,并将其连接到我们的输入(和偏置)。 要开始训练该神经元,我们需要获取输入( x )和输出( y )样本集,并创建新初始化的(随机)权重,所有这些权重都将馈入quickprop。
Note that this approach does not care whether the network is single-layer or deeper — since we are only training the output weights, we could also have run the inputs through a number of hidden layers and use that as the x for the training.
请注意,这种方法并不关心网络是单层的还是更深的网络-因为我们只训练输出权重,所以我们也可以通过许多隐藏层运行输入并将其用作 训练 的 x 。
Let’s test this with the training sets.
让我们用训练集对此进行测试。
Looks good for the simple one!
看起来很简单!
Unsurprisingly, this doesn’t match up so well, since we only trained a single unit. But it is a good enough approximation for now.
不足为奇的是,由于我们只训练了一个单元,因此效果并不理想。 但这对于现在来说已经足够好了。
隐藏的神经元训练 (Hidden Neuron Training)
As we have seen, our simple one-neuron model approximates the second shape with quite a bit of error. To achieve a better fit, we’ll need to add hidden layer(s). When we add a hidden neuron, we:
正如我们所看到的,我们简单的单神经元模型近似第二形状具有相当大的误差。 为了达到更好的拟合度,我们需要添加隐藏层。 当我们添加一个隐藏的神经元时,我们:
- Freeze all other parameters (including output) 冻结所有其他参数(包括输出)
- Run the training sample forward through the net and use the input values and other hidden unit values as the input of the new unit 通过网络向前运行训练样本,并使用输入值和其他隐藏的单位值作为新单位的输入
- Train the new neuron such that its value best correlates with the residual errors calculated in an earlier run 训练新神经元,使其值与早期运行中计算出的残留误差最佳相关
The covariance function S (we’ll use it instead of correlation; more details on that in [1]) is given by:
协方差函数S(我们将使用它代替相关性; [1]中的更多细节)由下式给出:

Where phi is the activation function of the neuron, V is the value of it, and E is the residual error (the earlier prediction minus the actual target). The bar-terms are the means and o and p are indices of output values and samples respectively.
其中phi是神经元的激活函数,V是神经元的值,E是残余误差(较早的预测减去实际目标)。 条形项是平均值,o和p分别是输出值和样本的索引。
With this as our ‘loss’ function, we can simply run quickprop again.
以此作为我们的“损失”功能,我们可以简单地再次运行quickprop。
Note that in hindsight, using quickprop here was a bit dangerous, since it uses an approximation of the second-order derivative under the hood. This fails to be a good solution, since the first-order derivative of S is not continuous due to the magnitude calculation. In the CasCor paper, Fahlman et al. actually use gradient ascent for training the neuron.
请注意,事后看来,此处使用quickprop有点危险,因为它使用了引擎盖下的二阶导数的近似值。 这不是一个好的解决方案,因为 S的 一阶导数 由于幅度计算而不连续。 在CasCor论文中,Fahlman等人。 实际上使用梯度上升来训练神经元。
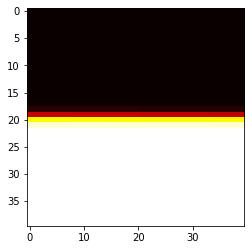
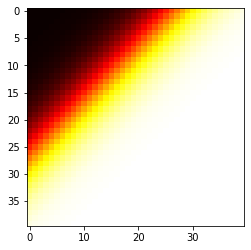
Let’s run this with the one-layer net predictions (pred) of the last sample set!
让我们使用最后一个样本集的单层网络预测( pred )来运行它!


This shows us pretty nicely where the error currently is biggest (very dark or very bright spots in the first plot) and what the neuron tries to do to correlate with that (second plot).
这很好地向我们显示了当前最大的错误(在第一幅图中非常暗或非常亮的点)以及神经元试图与该误差相关的操作(第二幅)。
组合隐藏和输出神经元 (Combining Hidden & Output Neurons)
As the last step (of this article) we now train our output layer again, additionally based on the values (neuron_value) computed by our newly trained neuron. To do so, we need to include these values as input to the output neurons (x2).
作为本文的最后一步,我们现在再次基于新近训练的神经元计算出的值( neuron_value )再次训练输出层。 为此,我们需要将这些值包括为输出神经元( x2 )的输入。

Pretty!
漂亮!
The output neuron can now approximate the shape because it can base its regression on the additional value of the hidden neuron. And since that correlates with the error we got from the earlier optimum, adding it has the effect of reducing the problem the output neuron has to solve by one dimension.
现在,输出神经元可以近似形状,因为它可以基于隐藏神经元的附加值进行回归。 并且由于这与我们从较早的最优方法获得的误差相关,因此添加误差可以减少输出神经元必须解决的问题。
注意事项 (Caveats)
All the pictures are the result of executing the code snippets, however, what you cannot see is how often they were run until they generated those images. Particularly, training the neuron only converges with a very low probability to the weights that produce the displayed values, i.e. I had to run the algorithm a couple of times until I got that particular output.This can presumably be attributed in part to the usage of quickprop here, since it relies on some properties of the loss function, like being continuous in its first derivative. As I mentioned above, Fahlman et. al. actually use gradient ascent in [1] to train the hidden neurons.
所有图片都是执行代码段的结果,但是,您看不到它们在生成这些图片之前运行的频率。 特别是,训练神经元只能以极低的概率收敛到产生显示值的权重,即我不得不运行算法几次直到获得特定输出为止,这可能部分归因于在这里使用quickprop,因为它依赖于损失函数的某些属性,例如其一阶导数是连续的。 如上所述,Fahlman等 等 实际上在[1]中使用梯度上升来训练隐藏的神经元。
But there are more problems with quickprop that the simple implementation above does not address properly. From Fahlman’s paper [2] and another, more recent comparison of quickprop with back-propagation [3] it becomes clear that a) it will need some more adjustments to yield good results more reliably, and b) it doesn’t perform equally well on all domains. Specifically, it fails to compete with back-prop on bias and variance in some real-world image classification problems.
但是quickprop存在更多的问题,即上面的简单实现无法正确解决。 从Fahlman的论文[2]和另一个最新的quickprop与反向传播比较[3]中可以明显看出,a)需要更多的调整才能更可靠地产生良好的结果,并且b)效果不那么好在所有域上。 具体而言,在某些现实世界中的图像分类问题中,它无法与反向支持在偏差和方差上竞争。
That said, a comparable network structure (1 hidden, 1 output neuron) trained with standard back-propagation and using the Adam optimizer never even converged to the above result during the test runs (it needed at least one other neuron to converge to that), but this could be bad luck since it wasn’t a controlled test setup.
就是说,在测试运行期间,经过类似的网络结构(1个隐藏的,1个输出神经元)经过标准反向传播训练并使用Adam优化器,甚至从未收敛到上述结果(它需要至少一个其他神经元才能收敛)。 ,但这可能不是很幸运,因为它不是受控的测试设置。
Another problem of CasCor in general is the thinness of the network vs. its depth. Since GPUs can handle matrices very efficiently, it is faster to run through broader networks that are less deep (i.e. that can better be represented as matrices), as compared to thinner and deeper networks, such as CasCor generates by default.This is of course not so much of a problem with our little example, but it might become a problem when the generated network solves a more complicated task.
通常,CasCor的另一个问题是网络的薄弱与其深度。 由于GPU可以非常有效地处理矩阵,因此与较薄和较深的网络(例如默认情况下由CasCor生成)相比,在较浅的较深网络(即可以更好地表示为矩阵)中运行更快。在我们的小例子中,这并不是什么大问题,但是当生成的网络解决更复杂的任务时,这可能会成为问题。
Which brings us to the next section.
这将使我们进入下一部分。
未来的改进 (Future Improvements)
As we have seen, this basic implementation of CasCor in fact works! :)However, we are still missing a lot of boilerplate code that automates the process, and some optimization of the training method, to find a global optimum with higher probability.That is why, in the next parts of this series, we’ll see how we can:
如我们所见,CasCor的这种基本实现实际上是可行的! :)但是,我们仍然缺少大量可自动执行该过程的样板代码,以及一些优化的训练方法,以找到具有较高概率的全局最优值。因此,在本系列的下一部分中,我们将看看我们如何:
Automate the output -> hidden -> output -> hidden -> … training cycle
自动化输出->隐藏->输出->隐藏->…训练周期
- Change quickprop to deliver more stable results and to train a set of new nodes instead of only one (and pick the best) 更改quickprop以提供更稳定的结果并训练一组新节点,而不是仅训练一个(并选择最佳节点)
- Further improve that process to pick more than one node (i.e. have ‘broader’ layers) 进一步改进该过程以选择多个节点(即具有“更广泛”的层)
- Change the problem domain to some more interesting/challenging ones (e.g. domains that can only be solved with deeper and/or recurrent networks) 将问题域更改为一些更有趣/更具挑战性的域(例如,只能通过更深层和/或递归网络解决的域)
- Benchmark it against other machine learning methods in a controlled setting 在可控的环境中将其与其他机器学习方法进行基准测试
Part 2 of the series is currently in progress and will be linked here when it is published.All finished notebooks and code of this series are also available on Github . Please feel encouraged to leave feedback and suggest improvements.
该系列的第2部分目前正在进行中,发布时将链接在这里。该系列的所有完成的笔记本和代码也可以在Github上获得 。 请鼓励您留下反馈意见并提出改进建议。
[1] S. E. Fahlman and C. Lebiere, The cascade-correlation learning architecture (1990), Advances in neural information processing systems (pp. 524–532)
[1] SE Fahlman和C. Lebiere, 级联相关学习体系结构 (1990年),神经信息处理系统的进展(第524-532页)。
[2] S. E. Fahlman, An empirical study of learning speed in back-propagation networks (1988), Carnegie Mellon University, Computer Science Department
[2] SE Fahlman, 反向传播网络中学习速度的实证研究 (1988年),卡内基梅隆大学,计算机科学系
[3] C. A. Brust, S. Sickert, M. Simon, E. Rodner and J. Denzler, Neither Quick Nor Proper — Evaluation of QuickProp for Learning Deep Neural Networks (2016), arXiv preprint arXiv:1606.04333
[3] CA Brust,S。Sickert,M。Simon,E。Rodner和J. Denzler,《 既不快速也不正确—评估用于学习深度神经网络的QuickProp》 (2016年),arXiv预印本arXiv:1606.04333
翻译自: https://towardsdatascience.com/cascade-correlation-a-forgotten-learning-architecture-a2354a0bec92
学习遗忘曲线


 543
543

 被折叠的 条评论
为什么被折叠?
被折叠的 条评论
为什么被折叠?
 到【灌水乐园】发言


