


印度英语口音
One of the first attempts to make computers recognize speech was focused on recognizing numbers! Bell Laboratories in 1952 designed the Audrey System, which could recognize a single voice speaking digits. There have been numerous other experiments since then which are well documented in this Wikipedia article. Fast forward to today, we have state-of-the-art Automatic Speech Recognition Engines (ASR) like Apple’s Siri, Google Assistant, and Amazon’s Alexa.
使计算机识别语音的最初尝试之一就是识别数字! 贝尔实验室(Bell Laboratories)在1952年设计了奥黛丽系统( Audrey System) ,该系统可以识别单个语音数字。 已经有自那以后许多其他的实验,其在有据可查的这个维基百科文章。 时至今日,我们拥有最先进的自动语音识别引擎(ASR),例如Apple的Siri,Google Assistant和Amazon的Alexa。
For a long-time, Google’s Speech-to-text API (STT) was the de facto choice for any ASR task. This slowly changed when open-source alternatives like Mozilla DeepSpeech came out in late 2017. It’s based on the original Deep Speech research paper by Baidu and is trained using (mostly) American English datasets, resulting in poor generalizability to other English accents.
长期以来,Google的语音文本API(STT)实际上是任何ASR任务的选择。 当Mozilla DeepSpeech之类的开源替代方案于2017年底问世时,这种情况慢慢改变了。它基于百度原始的Deep Speech研究论文,并使用(主要是)美国英语数据集进行了训练,从而导致对其他英语口音的通用性很差。
For a recent internship, I had to integrate an ASR engine for a video-conferencing platform, which was to be used majorly by the Indian population. We were preferably looking for open-source alternatives, but most of the general ones performed poorly in real-time meetings. That’s when I came across DeepSpeech and the Indic TTS project by IITM.
对于最近的实习,我必须为视频会议平台集成一个ASR引擎,该平台主要由印度人使用。 我们最好是在寻找开源替代方案,但是大多数常规替代方案在实时会议中的表现都很差。 那是我遇到DeepSpeech和Indic TTS的时候 IITM的项目。
The Indic dataset contains more than 50 GB of speech samples with speakers from 13 Indian states. It comprises of 10000+ spoken English sentences of both Male and Female native speakers. These files are available in .wav format along with the corresponding text.
印度数据集包含来自印度13个州的超过50 GB的语音样本。 它包含10000多个以英语为母语的母语人士和女性的英语口语句子。 这些文件以.wav格式以及相应的文本提供。
In this article, I’ll walk you through the process of fine-tuning DeepSpeech using the Indic dataset, but you can easily follow this for other English datasets too. You can signup on the IITM website and request them for the dataset.
在本文中,我将引导您完成使用Indic数据集对DeepSpeech进行微调的过程,但是您也可以轻松地对其他英语数据集进行此操作。 您可以在IITM网站上注册并向他们索取数据集。
Prerequisites: Familiarity with ASR Engines, Speech Processing, and a basic understanding of Recurrent Neural Networks and TensorFlow.
先决条件:熟悉ASR引擎,语音处理以及对递归神经网络和TensorFlow的基本了解。
Note: All my training and pre-processing was done on Google Colab with DeepSpeech version 0.7.4
注意:我所有的培训和预处理工作都是在Google Colab上使用的DeepSpeech 0.7.4版进行的
预处理数据集(Pre-Processing the Dataset)
After you request the dataset, IITM will give you access to their Google Drive links for seven days. Because I needed the data for an extended period, I transferred all the ZIP files to a Google Cloud Bucket. Each ZIP file will have a folder containing the .wav files and the corresponding metadata file named txt.done.data.
请求数据集后,IITM将为您提供7天的Google云端硬盘链接访问权限。 由于我需要较长时间的数据,因此我将所有ZIP文件都传输到了Google Cloud Bucket。 每个ZIP文件都有一个文件夹,其中包含.wav文件和名为txt.done.data的相应元数据文件。
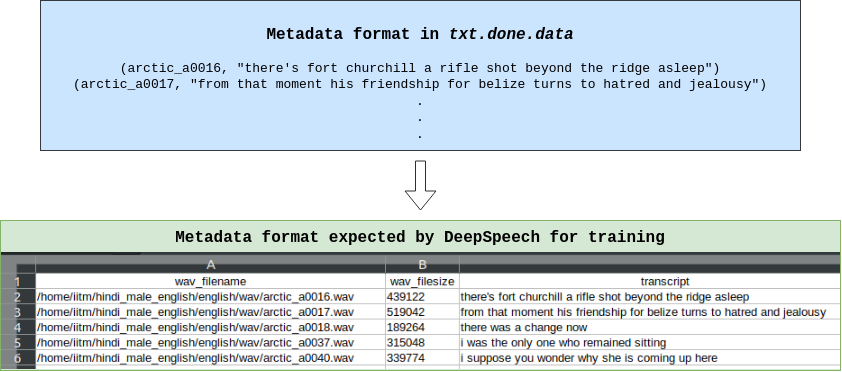
We need to process the metadata file and generate train/dev/test splits for the dataset. We can either train the model for a single state at a time or group a couple of states and then train the model. The diagram below shows how the metadata is to be processed.
我们需要处理元数据文件并为数据集生成训练/开发/测试拆分。 我们既可以一次为单个状态训练模型,也可以将几个状态分组,然后训练模型。 下图显示了如何处理元数据。
The GitHub gist given below contains the entire code to generate a single CSV file, which we later need to split. Most of the code is self-explanatory, with sufficient comments. Make sure to install Librosa and num2words first.
下面给出的GitHub要点包含了用于生成单个CSV文件的全部代码,我们稍后将其拆分。 大多数代码是不言自明的,带有足够的注释。 确保首先安装Librosa和num2words 。
The script is executed with the wav parameter pointing to the folder containing all the audio files and the meta parameter pointing to the folder containing the txt.done.data file. Here, the first part copies the data from Google Bucket to Colab. The second part creates a CSV file, and the last command appends to this CSV and so on. If you want to train each ZIP file individually, run only one command and proceed to split the CSV (although I don’t recommend it). Take care to comment out Line 45 if appending to the same file.
使用指向包含所有音频文件的文件夹的wav参数和指向包含txt.done.data文件的文件夹的meta参数执行脚本。 在这里,第一部分将数据从Google Bucket复制到Colab。 第二部分创建一个CSV文件,最后一个命令附加到该CSV上,依此类推。 如果要单独训练每个ZIP文件,请仅运行一个命令并继续拆分CSV(尽管我不建议这样做)。 如果附加到同一文件,请小心注释掉第45行。
$ gsutil cp gs://bucket-name/hindi_female_english.zip /content/hindi_female_english.zip
$ gsutil cp gs://bucket-name/hindi_male_english.zip /content/hindi_male_english.zip$ unzip hindi_female_english.zip -d /content/hindi_female_english
$ unzip hindi_male_english.zip -d /content/hindi_male_english--------------------------------------------------------------------$ python preProcess.py --wav /content/hindi_female_english/english/wav --meta /content/hindi_female_english/english$ python preProcess.py --wav /content/hindi_male_english/english/wav --meta /content/hindi_male_english/english
import os
import string
import csv
import argparse
import librosa # pip install librosa==0.7.2
import num2words # pip install num2words
def replace_func(text):
"""Remove extra characters from the transcript which are not in DeepSpeech's alphabet.txt
"""
for ch in ['\\','`','‘','’','*','_',',','"','{','}','[',']','(',')','>','#','+','-','.','!','$',':',';','|','~','@','*','<','?','/']:
if ch in text:
text = text.replace(ch,"")
elif ch == '&':
text = text.replace(ch,"and")
return text
def get_audio_info(file_name):
"""Return specified audio file duration and sample rate
"""
return librosa.get_duration(filename=file_name), librosa.get_samplerate(file_name)
def main():
parser = argparse.ArgumentParser(description="Pre Process File")
parser.add_argument('--wav', required=True,
help='WAV Folder')
parser.add_argument('--meta', required=True,
help='Path to file with metadata')
args = parser.parse_args()
# File containing audio file name and transcript
in_file = open(os.path.join(args.meta, 'txt.done.data'), 'r')
# Create target CSV file to write metadata info as per DeepSpeech requirements
# Define a writer object to write rows to file
out_file = open(os.path.join(os.getcwd(),'output.csv'), 'a', newline='')
csv_writer = csv.writer(out_file)
# All CSV files must contain the following as the first line. Only run once
csv_writer.writerow(['wav_filename', 'wav_filesize', 'transcript'])
# Keep track of total audio files and files not added to CSV due to them being too long or invalid sample rate
total_count = 0
row_count = 0
try:
for line in in_file:
total_count += 1
try:
fname, ftext, _ = line.split("\"")
# Separate file name and transcript from metadata file. Preprocess transcript and get audio info too
# convert all numbers to text using num2words
fname = fname.strip()[1:].strip() + '.wav'
ftext = ftext.strip().lower()
ftext = replace_func(ftext).replace(" "," ").strip()
ftext = re.sub(r"(\d+)", lambda x: num2words.num2words(int(x.group(0))), ftext)
fdur, fsr = get_audio_info(str(os.path.join(args.wav, fname)))
# Don't add files which don't fit into model specifications
# Either not 48kHz or longer than 10 secs
if fsr != 48000:
print("Different SR:", fname)
continue
if fdur > 10:
print("Too Long:", fname)
continue
if ftext == '':
print("No Transcript found")
continue
# Write each row to CSV with size info
fsize = os.path.getsize(os.path.join(args.wav, fname))
print(fname, fsize, ftext)
csv_writer.writerow([os.path.join(args.wav, fname), fsize, ftext])
row_count += 1
except Exception as e:
print(str(e))
except Exception as e:
print(str(e))
print("Added Rows:", row_count)
print("Total Rows:", total_count,"\n")
in_file.close()
out_file.close()
if __name__ == "__main__":
main()import numpy as np
import pandas as pd
file = "output.csv"
df1 = pd.read_csv(file)
df1['split'] = np.random.randn(df1.shape[0], 1)
# Split ratio for training set
msk = np.random.rand(len(df1)) <= 0.8
train = df1[msk]
inter = df1[~msk]
train.to_csv('train.csv', index=False)
inter.to_csv('intermediate.csv', index=False)
df2 = pd.read_csv('intermediate.csv')
df2['split'] = np.random.randn(df2.shape[0], 1)
# Split ratio for dev and test
msk = np.random.rand(len(df2)) <= 0.5
dev = df2[msk]
test = df2[~msk]
dev.to_csv('dev.csv', index=False)
test.to_csv('test.csv', index=False)So now, we have a CSV file and need to split it into three individual files. In the gist to the left, we first split the main CSV file into train and intermediate and then split intermediate into dev and test. Then we finally have three files corresponding to the three splits DeepSpeech requires for training.
因此,现在,我们有了一个CSV文件,需要将其分为三个单独的文件。 在左侧的要点中,我们首先将主要CSV文件拆分为train和中间体,然后将中间体拆分为dev和test 。 然后,我们最终有了三个文件,它们对应于DeepSpeech训练所需的三个分割。
微调DeepSpeech (Fine-Tuning DeepSpeech)
The official training documentation is given here. It is very detailed but skips over some fine details that might hold you up for a frustratingly long time 😩. I’m assuming that you’ve transferred the dataset to a Google Cloud bucket and have a proper internet connection as Colab terminates your instance if you don’t reconnect quickly. All the steps below are taken from the training notebook available here on Colab.
此处提供了官方培训文档。 它非常详细,但跳过了一些细微的细节,可能会使您沮丧地长时间long。 我假设您已将数据集转移到Google Cloud存储桶中,并且如果您没有快速重新连接,则Colab会终止您的实例,因此互联网连接正常。 以下所有步骤均取自Colab上此处提供的培训笔记本。
Authorize Colab to access your Google Cloud Bucket: Download your project’s IAM access credentials file and upload them to Colab.
授权Colab访问您的Google Cloud Bucket:下载项目的IAM访问凭据文件,并将其上传到Colab。
import os
from google.colab import authauth.authenticate_user()os.environ["GOOGLE_APPLICATION_CREDENTIALS"] = "creds.json"#ensure the path is set correctly
!echo $GOOGLE_APPLICATION_CREDENTIALSproject_id = '<gcloud-project-id>'
bucket_name = 'gs://<bucket-name>'
!gcloud config set project {project_id}
2. Clone DeepSpeech v0.7.4 from GitHub: And download the corresponding checkpoint.
2.从GitHub克隆DeepSpeech v0.7.4:并下载相应的检查点。
!git clone --branch v0.7.4 https://github.com/mozilla/DeepSpeech!wget https://github.com/mozilla/DeepSpeech/releases/download/v0.7.4/deepspeech-0.7.4-checkpoint.tar.gz!tar -xvf deepspeech-0.7.4-checkpoint.tar.gz -C \
/content/model_checkpoints/
3. Install DeepSpeech Dependencies: There are multiple things we’ll need to install every time we train our model. The detailed steps are given in the notebook here.
3.安装DeepSpeech依赖关系:每次训练模型时,我们都需要安装很多东西。 详细的步骤在此处的笔记本中给出。
4. Set default CUDA version: This part is going to be extremely frustrating if you don’t get it right the first time 😤. For some reason, whenever you try to set the default CUDA version as 10.0 (DeepSpeech requires CUDA 10.0 and CuDNN v7.6) in Colab, it always tries to revert to 10.1 🤷. I’ve found a sequence of steps that seem to work but I can’t guarantee it’ll work every time — you might need to dig a little to get it just right. The detailed steps are given in the notebook here. If you still can’t get it to work, I’d be more than willing to help :)
4.设置默认的CUDA版本:如果您第一次没有正确使用part,这部分将非常令人沮丧。 出于某种原因,每当您尝试在Colab中将默认CUDA版本设置为10.0(DeepSpeech要求CUDA 10.0和CuDNN v7.6)时,它总是尝试恢复为10.1🤷。 我发现了一系列似乎可行的步骤,但我不能保证每次都能奏效-您可能需要花点时间才能使它正确。 详细的步骤在此处的笔记本中给出。 如果您仍然无法使用它,我非常乐于提供帮助:)
5. Install TensorFlow-GPU:
5.安装TensorFlow-GPU:
!pip3 uninstall tensorflow
!pip3 install 'tensorflow-gpu==1.15.2'
6. Copy data to Colab from Google Bucket: You need to be careful here and copy the files to exactly the place they were when you generated the CSV files because the model uses the absolute path to the audio files as stated in the CSV file.
6.从Google Bucket将数据复制到Colab:您需要在这里小心,并将文件复制到生成CSV文件时的确切位置,因为模型使用了CSV文件中所述的音频文件的绝对路径。
%cd /content/!gsutil cp gs://bucket-name/hindi_female_english.zip /content/hindi_female_english.zip
!gsutil cp gs://bucket-name/hindi_male_english.zip /content/hindi_male_english.zip!unzip hindi_female_english.zip -d /content/hindi_female_english
!unzip hindi_male_english.zip -d /content/hindi_male_english
7. Check for extra characters not in alphabet.txt: This file (present in /DeepSpeech/data) defines the alphabet of the language that DeepSpeech is being trained on. For our task since the language is the same, we don’t need to change it. If we want to train a new model in a completely different language, we need to redefine the alphabet and follow these steps. Upload the three CSV files to /content/ and run check_parameters.py on them.
7.检查是否没有在Alphabet.txt中出现的其他字符:此文件( / DeepSpeech / data中存在)定义了DeepSpeech所使用的语言的字母。 对于我们的任务,因为语言是相同的,所以我们不需要更改它。 如果我们想使用完全不同的语言来训练新模型,则需要重新定义字母并遵循以下步骤。 将三个CSV文件上传到/ content / ,然后对它们运行check_parameters.py 。
!python3 /content/DeepSpeech/training/deepspeech_training/util/check_characters.py -csv /content/train.csv -alpha!python3 /content/DeepSpeech/training/deepspeech_training/util/check_characters.py -csv /content/dev.csv -alpha!python3 /content/DeepSpeech/training/deepspeech_training/util/check_characters.py -csv /content/test.csv -alphaNote: You might need to comment out some lines in check_characters.py to get it to work. After commenting out some lines, this is how line 44 in that file should look like
注意:您可能需要注释掉check_characters.py某些行才能使其正常工作。 注释掉几行之后,这就是该文件中第44行的样子
if not args.disable_unicode_variants:
  unicode_transcript = unicodedata.normalize("NFKC", row[2])
  #if row[2] != unicode_transcript:
    #print("Your input file", in_file, "contains at least one transript with unicode chars on more than one code-point: '{}'. Consider using NFKC normalization: unicodedata.normalize('NFKC', str).".format(row[2]))
    #sys.exit(-1)
all_text |= set(row[2])
8. Training the model (Finally 😌): This step is pretty straightforward. Try out different hyper-parameters and double-check the paths. The augmentation parameters can help your model generalize a bit better.
8.训练模型(最后😌):此步骤非常简单。 试用不同的超参数,然后仔细检查路径。 扩充参数可以帮助您的模型更好地概括。
%cd /content/DeepSpeech


!python3 DeepSpeech.py --train_cudnn True --early_stop True --es_epochs 6 --n_hidden 2048 --epochs 30 \
  --export_dir /content/models/ --checkpoint_dir /content/model_checkpoints/ \
  --train_files /content/train.csv --dev_files /content/dev.csv --test_files /content/test.csv \
  --learning_rate 0.0001 --train_batch_size 64 --test_batch_size 32 --dev_batch_size 32 --export_file_name 'ft_model' \
  --augment reverb[p=0.2,delay=50.0~30.0,decay=10.0:2.0~1.0] \
  --augment volume[p=0.2,dbfs=-10:-40] \
  --augment pitch[p=0.2,pitch=1~0.2] \
  --augment tempo[p=0.2,factor=1~0.5]
9. Exporting the model for inference: After the training process is done, a .pb model file is exported to export_dir. But this model is very big (~700MB) and not very efficient with batch predictions. Luckily, there’s an option to convert the exported model to a memory-mapped model, after which we get a .pbmm model file.
9.导出模型以进行推断:训练过程完成后, .pb模型文件被导出到export_dir 。 但是,此模型很大(〜700MB),并且批处理预测效率不高。 幸运的是,有一个选项可以将导出的模型转换为内存映射模型,此后我们得到一个.pbmm模型文件。
%cd /content/DeepSpeech/!python3 util/taskcluster.py --source tensorflow --artifact convert_graphdef_memmapped_format --branch r1.15 --target .!./convert_graphdef_memmapped_format --in_graph=/content/models/ft_model.pb --out_graph=/content/models/ft_model.pbmmThis .pbmm file is relatively smaller (~180MB) and efficient and can be used with the corresponding scorer file to improve inference results.
该.pbmm文件相对较小( 〜180MB ),效率很高,可以与相应的得分工具一起使用,以改善推理结果。
结论 (Conclusion)
Phew! That was a long article 😵. If you’ve reached till here, thank you for sticking along :)
! 那是一篇很长的文章。 如果您到这里为止,谢谢您的支持:)
From my time working with DeepSpeech, I’ve found it to be one of the easiest libraries to work with for ASR. I hope this article helps anyone trying out things on their own.
从与DeepSpeech一起工作的时间开始,我发现它是与ASR一起使用的最简单的库之一。 我希望本文能帮助任何人自己尝试一些事情。
翻译自: https://towardsdatascience.com/automatic-speech-recognition-for-the-indian-accent-91bb011ad169
印度英语口音


 1053
1053

 被折叠的 条评论
为什么被折叠?
被折叠的 条评论
为什么被折叠?
 到【灌水乐园】发言


