


figma 安装插件
** The code for this section is here.**
**此部分的代码 在这里 。**
In this chapter we are going to be manipulating the UI based on the updates we receive from the plugin sandbox. Go ahead and open up ui.html if you don’t have it open already and update it like this:
在本章中,我们将基于从插件沙箱收到的更新来操作UI。 如果尚未打开ui.html ,请继续打开它,并按如下所示进行更新:
<div id="background">
  <h3 id="foreground">The quick brown fox</h3>
</div>
<h2 id="contrast"> </h2>
<script>
window.onmessage = async event => {
  const message = event.data.pluginMessage
  console.log(message)
  if (message.type === 'selectionChange') {
    const background = document.getElementById('background')
    const foreground = document.getElementById('foreground')
    const contrast = document.getElementById('contrast')
    background.style = `background-color: ${message.background};`
    foreground.style = `color: ${message.foreground};`
    contrast.textContent = message.contrast
  }
}
</script>
We added some html to display some of our results and in <script/> we are using some browser methods to find and alter those html elements when we receive a new message.
我们添加了一些html来显示一些结果,并且在<script/>当我们收到一条新消息时,我们正在使用一些浏览器方法来查找和更改这些html元素。
If we click around we should see the plugin UI update:
如果单击,我们应该会看到插件UI更新:

🔁交换前景和背景 (🔁 Swapping the Foreground and Background)
If you are like me, you’ll be a bit annoyed that we can’t swap the two colours around. This is especially annoying because the order of the layers in figma.currentPage.selection is basically random so we can’t reliably pick which layer will be which.
如果您像我一样,您会为我们无法交换两种颜色而感到恼火。 这尤其令人讨厌,因为figma.currentPage.selection中的层顺序基本上是随机的,因此我们无法可靠地选择哪一层是哪一层。
To solve this we are going to add a button to the UI to swap the current colours around. When the button is clicked we want to post a message back to the sandbox to swap those colours around. This is what the message posting looks like on this end:
为了解决这个问题,我们将向UI添加一个按钮以交换当前的颜色。 单击该按钮后,我们要向沙箱中发布一条消息,以交换这些颜色。 这是此消息发布的外观:
// ...
<button id="swap"></button>
<script>
window.onmessage = async event => {
 //...
}
document.getElementById('swap').onclick = () => {
  parent.postMessage({ pluginMessage: { type: 'swap' } }, '*')
}
</script>
We get the button and assign an onclick handler to it. This handler fires off parent.postMessage to send a message from the iframe and give it a type of swap.
我们得到按钮,并为其分配一个onclick处理程序。 此处理程序会触发parent.postMessage以从iframe发送消息,并为其提供type swap type 。
Then in the code.js we need to listen for the message using figma.ui.onmessage listener:
然后在code.js我们需要使用figma.ui.onmessage监听器监听消息:
figma.ui.onmessage = msg => {
  if (msg.type === 'swap') {
      console.log(msg)
    }
  }
}
If we run the plugin now and press the swap button we should see console logging out the message with type swap.
如果我们现在运行插件并按swap按钮,我们应该看到控制台注销了类型为swap的消息。
So we are getting the message but how are we going to swap the colours around? Well we have been moving the current colours into variables at the top of the code.js file for this reason. Every time a selection changes we assign the relevant colours to these variables so now all we need to do is swap those variable values around and calculate the contrast again.
因此,我们正在收到消息,但是我们将如何交换颜色呢? 出于这个原因,我们一直将当前颜色移到code.js文件顶部的变量中。 每次选择更改时,我们都会为这些变量分配相关的颜色,因此现在我们要做的就是交换这些变量值,然后再次计算对比度。
//..
let foregroundAlpha
let backgroundAlpha
//...
  if (msg.type === 'swap') {
    if (figma.currentPage.selection.length > 1) {
      ;[foregroundColor, backgoundColor, foregroundAlpha, backgroundAlpha] = [
        backgoundColor,
        foregroundColor,
        backgroundAlpha,
        foregroundAlpha,
      ]
      const contrast = calculateContrast(foregroundColor, foregroundAlpha, backgoundColor)
      sendContrastInfo(contrast, foregroundColor, backgoundColor)
    }
  }
}
One of the ways we can do this is like this ☝. ️Using arrays to swap the values of the variables without having to use a bunch of temporary variables. This is called Destructuring Assignment Array Matching, which really rolls off the tongue. Notice that we have also added a backgroundAlpha variable so that swapping the colours provides the right opacity.
我们可以做到这一点的方法之一就是这样。 ️使用数组交换变量的值,而不必使用一堆临时变量。 这就是所谓的Destructuring Assignment Array Matching ,它确实可以解决问题。 请注意,我们还添加了backgroundAlpha变量,以便交换颜色可提供正确的不透明度。
In fact, if it weren’t that we need to handle foreground opacity, we wouldn’t have to re-calculate the contrast at all. The contrast ratio between two solid colours never changes, regardless of foreground or background position.
实际上,如果不是我们需要处理前景不透明性,则根本不必重新计算对比度。 无论前景或背景位置如何,两种纯色之间的对比度都不会改变。
Go ahead and open this up in Figma and test it out. You should see the foreground and background colours swapping:
继续并在Figma中打开它并进行测试。 您应该看到前景色和背景色交换:
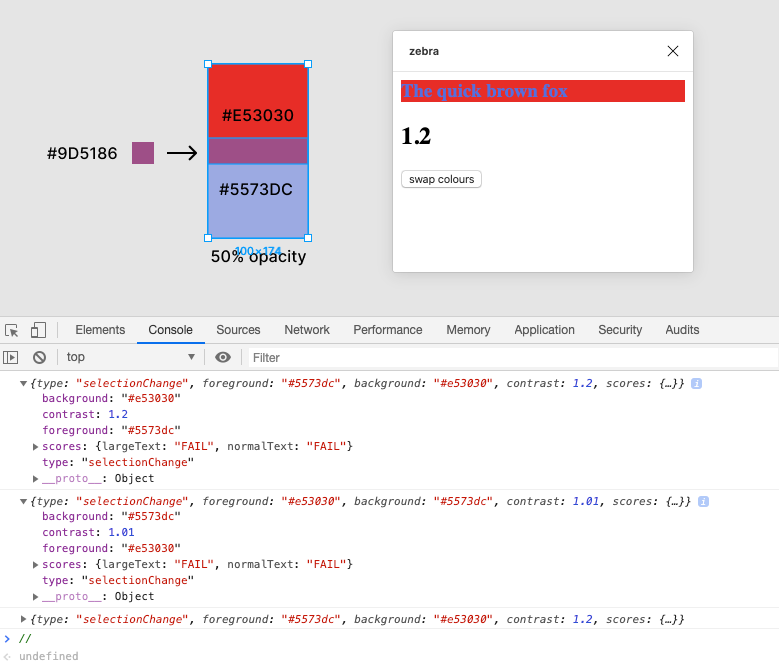
This is awesome. The colours are swapping and the score is being recalculated — which we can see when testing on colours with opacity.
这太棒了。 颜色在交换,分数正在重新计算-在测试具有不透明度的颜色时可以看到。
🩺解决结构问题 (🩺 Fixing a Structural Problem)
There is one problem though. The foreground colour is being sent as the original solid colour instead of the new blended colour we produce from our overlay() function. Why? Well that’s because when we call sendContrastInfo() we are calling it with our global colour variables and we haven’t updated that to have our new blended colour.
不过有一个问题。 foreground将作为原始纯色发送,而不是由overlay()函数产生的新混合色发送。 为什么? 那是因为当我们调用sendContrastInfo()时,我们使用全局颜色变量对其进行了调用,而我们尚未对其进行更新以具有新的混合颜色。
So how can we fix this? Well this is a bit of a structural hole we have dug ourselves but the clear solution is to move our sendContrastInfo() call to be inside the calculateContrast() function. This will give it access to the new overlaid colour. The downside of this is now calculateContrast() does more than one thing which is not super clean code. For now we are just going to deal with that by renaming the function so that it’s clear it has side effects:
那么我们该如何解决呢? 好吧,这是我们自己挖的一个结构性漏洞,但是明确的解决方案是将sendContrastInfo()调用移到calculateContrast()函数内部。 这将使它能够使用新的覆盖色。 不利的一面是, calculateContrast()所做的事情不止是超级干净的代码。 现在,我们将通过重命名该函数来解决该问题,以使其明显具有副作用:
function calculateAndSendContrast(foreground, alpha, backgound) {
// ...
  let contrast = foregroundLuminance / backgroundLuminance
  if (backgroundLuminance > foregroundLuminance) {
    contrast = 1 / contrast
  }
  contrast = Math.floor(contrast * 100) / 100
  return sendContrastInfo(contrast, foreground, backgound)
}
Remember to call it with the locally scoped foreground and background parameters as arguments and not the globally scoped foregroundColor and backgroundColor. Then we remove the sendContrastInfo() call from our listeners:
请记住使用局部作用域的foreground和background参数作为参数来调用它,而不是全局作用域的foregroundColor和backgroundColor颜色来调用它。 然后,从侦听器中删除sendContrastInfo()调用:
figma.on('selectionchange', () => {
  if (figma.currentPage.selection.length > 1) {
    // assigning values from selection
    calculateAndSendContrast(foregroundColor, foregroundAlpha, backgoundColor)
  }
})
figma.ui.onmessage = msg => {
  if (msg.type === 'swap') {
    // swapping variable values
      calculateAndSendContrast(foregroundColor, foregroundAlpha, backgoundColor)
    }
  }
}
Now in Figma we can see the right colour value is being sent to the UI:
现在在Figma中,我们可以看到正确的颜色值正在发送到UI:

Phew 😓. That was a lot. But the good news is that is all the sandbox functionality we need!
ew。 好多 但是好消息是这是我们需要的所有沙盒功能!
翻译自: https://blog.prototypr.io/figma-plugin-tutorial-5-6-1eff3c1077c7
figma 安装插件


 1911
1911


 被折叠的 条评论
为什么被折叠?
被折叠的 条评论
为什么被折叠?
 到【灌水乐园】发言


