


Root detection in Android apps has always been a cat and mouse game. Developers come up with new checks, or a new library comes out; the attackers then bypass these checks or hide root from the filesystem. Despite all the work that goes into coming up with new techniques for either side, root detection remains one of the first hurdles of a defence in depth solution for mobile applications; and as security researchers, one we see all the time.
Android应用程序中的根目录检测一直是猫捉老鼠的游戏。 开发人员提出新的检查,或者提出新的库; 攻击者然后绕过这些检查或从文件系统隐藏根。 尽管双方都想出新技术,但根源检测仍然是移动应用程序深度防御解决方案的首要障碍之一。 作为安全研究人员,我们无时无刻不在见。
生根 (Rooting)
This post isn’t meant to educate about rooting or the act of obtaining root, but it is useful to understand the concepts surrounding it. To root a device means to gain access to the super user account on the operating system, in Android, which is based on Linux, this user is called ‘root’.
这篇文章并不是要教育生根或获得生根的行为,但有助于理解其周围的概念。 根设备意味着在操作系统(基于Linux的Android)中获得对超级用户帐户的访问权限,该用户称为“ root ”。
Rooting is the act of opening up the system, to break the operating system “chains”.
生根是打开系统,破坏操作系统“链”的行为。
Being the super user, this account can do anything, view, edit, modify anything; but in the modern age when smartphones likely have more personal data than our other devices, being able to view any file is not always a good thing from a privacy perspective. To break out of the operating system ‘chains’ the device requires certain modifications, either through vendor approved unlocking, or device exploitation.
作为超级用户,此帐户可以执行任何操作,查看,编辑,修改任何内容; 但是在现代时代,智能手机可能比我们的其他设备拥有更多的个人数据,从隐私的角度来看,能够查看任何文件并不总是一件好事。 要突破操作系统的“链条”,需要对设备进行某些修改,方法是通过供应商认可的解锁或利用设备。
This is where root detection comes in. Developers add techniques into their app code to check whether this root user is accessible, whether the device has been modified, or if its possible to view files that are usually restricted and then take certain actions based on the result of these checks.
这是进行根检测的地方。开发人员将技术添加到他们的应用代码中,以检查该根用户是否可访问,设备是否已被修改,或者是否有可能查看通常受限制的文件,然后根据这些检查的结果。
However, the downfall to this is that most of these checks are done badly, perhaps the strings are hardcoded, the result relies on a single Boolean return value, or incorrect logic means the checks don’t even run at all. By identifying and manipulating these flaws in the logic, we can tamper with this detection allowing apps to run as expected on our modified devices.
但是,这样做的缺点是,大多数检查都做得不好,也许字符串是经过硬编码的,结果依赖于单个布尔返回值,或者逻辑不正确意味着检查根本不运行。 通过识别和处理逻辑中的这些缺陷,我们可以篡改此检测,从而允许应用程序在修改后的设备上按预期运行。
By leveraging development flaws, we can bypass these checks and allow apps to run on modified devices
通过利用开发缺陷,我们可以绕过这些检查,并允许应用程序在经过修改的设备上运行
We’re going to take a look at two examples of flawed implementations as well as explaining the smali patches involved to avoid having root detected.
我们将看一下有缺陷的实现的两个示例,并解释所涉及的smali补丁程序以避免检测到root。
返回值 (Return Values)
Its understandable that you need a return value to return the result of the checks, however this value can become a single point of failure if it’s badly implemented. Nesting if statements and then returning a single Boolean return makes for a very quick patch to easily bypass a multitude of different protections. However they’re not always simple, is it return void, return false, return the value of an object; and this is where understanding the syntax and having knowledge of smali really helps.
可以理解,您需要一个返回值来返回检查结果,但是,如果实现不当,则该值可能会成为单点故障。 嵌套if语句,然后返回单个布尔值返回值,可以非常快速地修补程序,从而轻松绕过许多不同的保护措施。 然而,它们并不总是那么简单,是返回void,返回false,返回对象的值? 在这里,了解语法和掌握smali确实很有帮助。
In this first example we’ll look at these return statements in an app that is unobfuscated and uses a very common root detection method, checking for the presence of root utilities with hardcoded names. The lack of code obfuscation on class and method names make finding the root detection code easy.
在第一个示例中,我们将在一个未混淆的应用程序中查看这些return语句,该应用程序使用非常常见的根检测方法,检查是否存在带有硬编码名称的根实用程序。 在类和方法名称上缺少代码混淆,这使得查找根检测代码变得容易。
Java (Java)
In this first root detection mechanism, it is clear what the app attempts to achieve and what the root detection does.
在第一种根检测机制中,很清楚应用程序试图实现什么以及根检测做了什么。
Two specific root checks are implemented:
实现了两个特定的根检查:
checkRootMethod1() searches for strings representing files that maybe present on a rooted device, such as “Superuser.apk”, “sbin/su” etc
checkRootMethod1 ()搜索表示可能存在于有根设备上的文件的字符串,例如“ Superuser.apk”,“ sbin / su”等
checkRootMethod2() attempts to execute the command “su” by means of the Java getRuntime() method.
checkRootMethod2 ()尝试通过Java getRuntime()方法执行命令“ su”。
These 2 methods are called inside other methods above, which are named testIsRooted() and isRooted()
这两个方法在上面的其他方法中被称为testIsRooted ()和isRooted ()

What is important to notice here is that these methods do not change any part of the underlying app structure, they are called and merely return the values based on the results. We have two options for this patch to achieve the same outcome.
在此需要注意的重要一点是,这些方法不会更改基础应用程序结构的任何部分,它们会被调用,仅根据结果返回值。 对于此补丁,我们有两种选择来实现相同的结果。

Both checkRootMethod1() and checkRootMethod2() return a Boolean. We could amend this to only return False.
checkRootMethod1 ()和checkRootMethod2 ()均返回布尔值。 我们可以将其修改为仅返回False。
Patch the calling methods, isRooted() to return False and testIsRooted() void before it calls the real methods.
补丁调用方法,isRooted()返回false和testIsRooted()无效它调用真正的方法之前。
斯马里语 (Smali)
Due to the low level that smali works at, it is usually best to modify at the highest point of the calling functions causing the least changes to the codebase. Making changes to specific methods may require more complex patches.
由于smali的工作水平较低,通常最好在调用函数的最高点进行修改,以使对代码库的更改最少。 对特定方法进行更改可能需要更复杂的补丁。
Let us now look at the checkRootMethod1() to get an idea of some of the syntax used.
现在让我们看一下checkRootMethod1 (),以了解所使用的某些语法。
It is generally better to perform the most ‘lazy’ approach, causing minimal changes where possible.
通常最好执行最“懒惰”的方法,并尽可能减少更改。
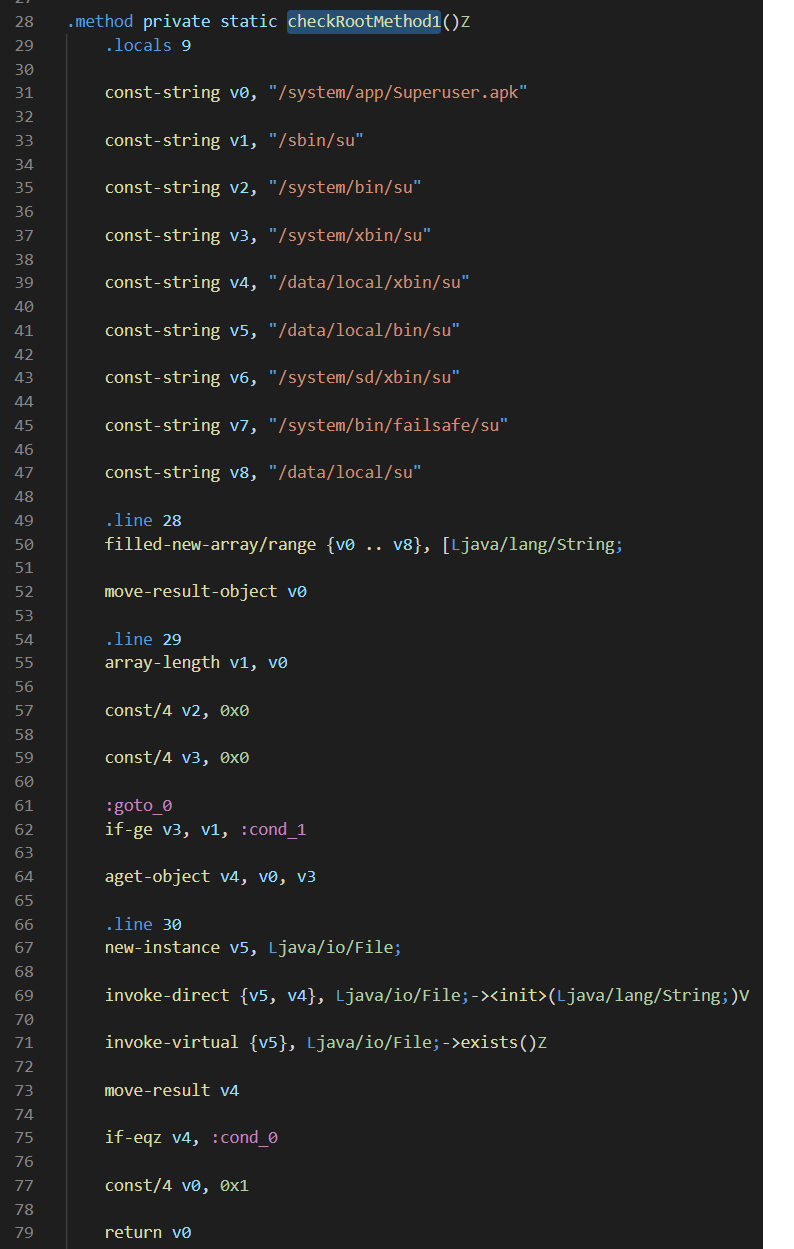
The smali for the first root detection method is shown.
显示了用于第一种根检测方法的smali。
Method code can be identified with the key word .method, and return type character; in this instance a Boolean (Z).
可以使用关键字.method标识方法代码, 并返回类型字符; 在这种情况下为布尔值(Z)。
We see the way the code creates String objects using local variables, v0…v8. Then creates a new String array with this range. {v0 .. v8}, [Ljava/lang/String;
我们看到了代码使用局部变量v0…v8创建String对象的方式。 然后使用此范围创建一个新的String数组。 {v0 .. v8},[Ljava / lang / String;
The array length is calculated, initialisation of other variables and a check, if v3 > v1, cond_1
计算数组长度,初始化其他变量并检查, 如果v3> v1,cond_1
On line 67–71, we create a new File class, signified with L prefix; and check if the hardcoded file paths exists.
在第67-71行,我们创建一个新的File类,用L前缀表示; 并检查是否存在硬编码的文件路径。
- If the path exists, put the value 0x1 (True) into the v0 local variable, line 77. 如果路径存在,则将值0x1(True)放入v0局部变量的第77行。
- We then return the value of v0 to the calling method. 然后,我们将v0的值返回给调用方法。

It is worth showing both return calls here; only if the file path exists will line 77–79 be executed as it follows the flow of code.
值得在这里显示两个回叫。 仅当文件路径存在时,才会按照代码流程执行第77–79行。
If no path exists, if v4 == 0, line 75, branch the code to cond_0, add 0x1 to v3 and follow the goto_0 back to line 62.
如果不存在路径, 则在第75行v4 == 0的情况下 ,将代码分支到cond_0 ,将0x1添加到v3,然后按照goto_0返回第62行。
###line 62
:goto_0
if-ge v3, v1, :cond_1
The variable v1 (paths left in array - 0) is now less than v3 (0x1) and thus the code jumps to cond_1, whereby return v2 is run. v2 is 0 (False) as previously initialised on line 57 with 0x0.
变量v1(数组0中剩余的路径)现在小于v3(0x1),因此代码跳转到cond_1 ,从而运行返回v2 。 如先前在第57行使用0x0初始化的,v2为0(假)。
Note: const/4 [r] [v] puts the numerical value (v) into the specific register (r) as we have seen. The /4 stands for 4 bits and thus the value (v) has a maximum value of 0x15, 0b1111.const/8 (255) and const/16 (65535) can also be used.
注意:正如我们所见,const / 4 [r] [v]将数值(v)放入特定的寄存器(r)中。 / 4代表4位,因此值(v)的最大值为0x15、0b1111。const / 8(255)和const / 16(65535)也可以使用。
打补丁 (Patching)
Now we have covered some of the syntax and opcodes used, let us now consider the actual methods that we are going to patch. Despite the complexities involved in learning this new language, the patches in this first example are very straight forward.The first part of the patch involves bypassing the method which calls the actual root detection code.
现在我们已经介绍了一些使用的语法和操作码,让我们现在考虑将要修补的实际方法。 尽管学习这种新语言很复杂,但第一个示例中的补丁非常简单明了。补丁的第一部分涉及绕过调用实际根检测代码的方法。
We can see by the (V) type that this method returns void, this is also evident in the return-void statement on line 184.Simply moving this statement to before the root check methods are called, from line 184 to line 179 bypasses this function completely.
通过(V)类型可以看到此方法返回void,这在第184行的return-void语句中也很明显。只需将此语句移动到调用根检查方法之前,从第184行到第179行就可以绕过此方法完全发挥作用。


We now need to target the second method, isRooted(), as seen in the method call, this returns a Boolean (Z).This time rather than moving lines, we can add in our own code to perform the desired behaviour. We want to ensure we return 0x0 or False before the actual detection is called.
现在我们需要定位第二个方法isRooted (),如方法调用所示,它返回一个布尔值(Z)。这一次我们可以添加自己的代码来执行所需的行为,而不是移动行。 我们要确保在调用实际检测之前返回0x0或False。
In this instance, we can manually write some new code to put a 0 into a local variable, and instantly return this before any other code is run. This can be seen on lines 143–145 in the second image.
在这种情况下,我们可以手动编写一些新代码以将0放入本地变量,并在运行任何其他代码之前立即将其返回。 可以在第二张图片的第143-145行看到。
const/4 v0, 0x0
return v0### original code continues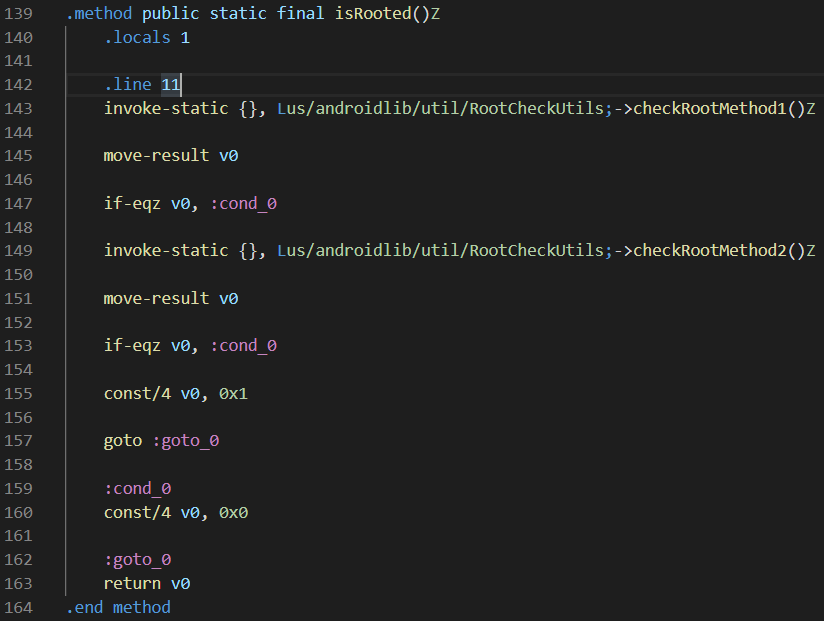
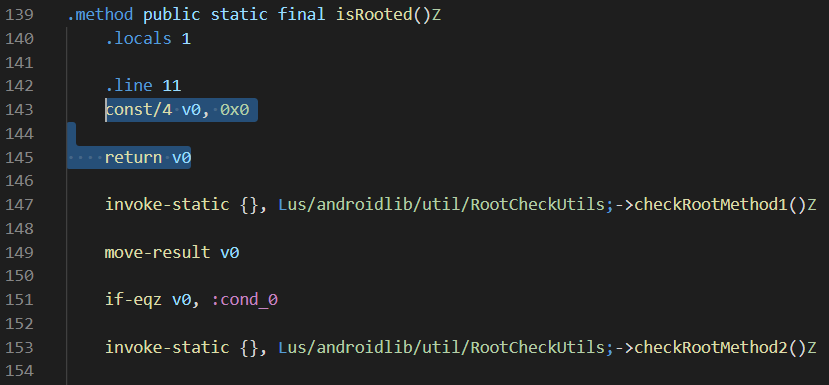
Before we move onto the next example we should point out, in case it wasn’t already obvious. None of the original smali code has been modified or overwritten, we have simply moved or added statements to alter the way the application flows.
在进入下一个示例之前,我们应该指出,以防万一,这不是很明显。 原始的smali代码都没有被修改或覆盖,我们只是移动或添加了语句来更改应用程序的流动方式。
代码修改 (Code Modification)
When we say code modification we don’t mean we plan to write swathes of complex smali ourself, we simply modify the code to suit our requirements; remember, the lazy approach is the best one.
当我们说代码修改时,我们并不是要计划自己编写大量复杂的代码,我们只是修改代码来满足我们的要求。 记住,懒惰的方法是最好的方法。
Read, interpret and modify… The lazy approach is best.
阅读,解释和修改...惰性方法是最好的。
In this next example the application is heavily obfuscated, it involves numerous checks both in Java and native C and doesn’t return just a single Boolean value at the end; however the methodology is generally the same, read, interpret and modify.
在下一个示例中,应用程序非常混乱,它涉及Java和本机C语言中的大量检查,并且最后不仅仅返回单个布尔值; 但是,方法通常是相同的,可以阅读,解释和修改。
When dealing with obfuscated apps, usually the very first steps consist of identifying where the root check is performed, where the root check is implemented, and where it is actually called from. Usually we have 2 options to accomplish this:
在处理混淆的应用程序时,通常第一步通常是确定执行根检查的位置,实施根检查的位置以及从何处实际调用根检查。 通常,我们有2种选择来完成此任务:
- We could search for strings such as “/su” and root package manager apps like “magisk” and then follow the flow. Generally quite time consuming and could lead to rabbit holes. 我们可以搜索诸如“ / su”之类的字符串以及诸如“ magisk”之类的根包管理器应用,然后按照流程进行操作。 通常非常耗时,并且可能导致兔子洞。
A more general approach, consists of running the app and then tracing back any error messages that are shown when the detection check fails. For root detection this is generally on launch.
更通用的方法包括运行应用程序,然后追溯检测检测失败时显示的所有错误消息。 对于根检测,通常是在启动时。
When we say “tracing back”, it relies on an associated positive or negative outcome to a specific check. For example, in a positive outcome the app would continue loading and the user would be able to use the app as normal. A negative outcome we may expect an error message, either by displaying the user a pop-up window or a toast, then the app closing. If we are lucky and this error message is visible, we can trace back this pop-up by searching for the string displayed; usually this links to a resource having a similar name defined in a xml file with an associated ID. Using the ID tag we can search for this in the smali code to identify where it is used and the workflow to obtain these actions.
当我们说“ 追溯 ”时,它依赖于特定检查的相关正面或负面结果。 例如,以肯定的结果,该应用将继续加载,并且用户将能够正常使用该应用。 如果结果是负面的,我们可能会收到一条错误消息,即向用户显示一个弹出窗口或一个祝酒词,然后关闭应用程序。 如果很幸运,并且此错误消息是可见的,则可以通过搜索显示的字符串来追溯此弹出窗口。 通常,它链接到在xml文件中定义的具有相似名称的资源,并具有关联的ID。 使用ID标记,我们可以在smali代码中进行搜索,以识别其使用位置以及获取这些操作的工作流程。
Java (Java)
Let us now examine this second example with the obfuscated app implementing a more sophisticated root check. After having decompiled the app, we search for the string “su” and “magisk” and we manage to find both in a large method named a() which is located in the obfuscated class: m.f.a.c.i
现在让我们使用实现更复杂的根检查的模糊应用程序来检查第二个示例。 对该应用程序进行反编译后,我们搜索字符串“ su”和“ magisk”,并设法在一个名为a()的大型方法中找到了这两个方法,该方法位于混淆的类中: mfaci


Despite the fact the method within this class file failed to decompile correctly we can still ascertain that the method returns a String and takes 2 Strings as input arguments. We also notice that although unclear at current, the String ‘su’ and ‘magisk’ have been hardcoded; this can also be seen when we examine the smali, however there seem to be numerous returns from multiple methods and return values of different values so we have to take a different approach compared to the previous example.
尽管事实上该类文件中的方法未能正确地反编译,但我们仍然可以确定该方法返回一个String并将2个String作为输入参数。 我们还注意到,尽管目前尚不清楚,但字符串' su '和' magisk '已经过硬编码。 当我们检查smali时也可以看到这一点,但是,从多种方法返回的结果似乎很多,并且返回不同值的值,因此与前面的示例相比,我们必须采用不同的方法。
斯马里语 (Smali)
Despite not fully understanding the code from the Java point of view we can make some assumptions based on the smali opcodes.
尽管没有从Java的角度完全理解代码,但是我们可以基于smali操作码做出一些假设。

Already noted are the hardcoded strings in const-string vx, “str”
已经注意到的是const-string vx中的硬编码字符串“ str”
Use of invoke-virtual, signifies that the method call is not private, static or final. They are generally used for native library loading.
使用invoke-virtual表示方法调用不是私有的,静态的或最终的。 它们通常用于本地库加载。
The {} from invoke-virtual specify the arguments that are given to the method.
来自invoke-virtual的{}指定给该方法的参数。
Based on the names where the actual checkForRoot() method is called, we know it is definitely using a native library — RootBeerNative
基于实际checkForRoot ()方法被调用的名称,我们知道它肯定是在使用本机库— RootBeerNative
Based on the above code snippets, and the bad decompilation of the Java, it is not totally understandable what the code does at this point. However we have found these hardcoded strings which relate to rooting tools or binaries so can guess that the code is searching for these at some stage.
基于以上代码片段以及Java的反编译,目前尚无法完全理解代码的功能。 但是,我们发现了这些与根工具或二进制文件有关的硬编码字符串,因此可以猜测代码正在某个阶段搜索这些字符串。
What if we just modify these strings to something else? Something that doesn’t exist and so they will always return False?
如果我们只是将这些字符串修改为其他内容,该怎么办? 不存在的东西,因此它们将始终返回False?
The modification of these two strings was the only necessary adjustments to defeat this detection and use the app as normal. You could be fooled into thinking “that was easy”, however, to get to the stage to find that it was these two strings that were being used was the biggest effort, tracing back, reading over the smali to understand the methods and return values all takes time.
修改这两个字符串是唯一可以克服此检测并正常使用该应用程序的必要调整。 您可能会愚蠢地认为“这很容易”,但是要登上舞台,要发现正在使用的正是这两个字符串是最大的努力,要追溯,仔细阅读smali以了解方法和返回值都需要时间。
Just by changing two string values the root detection was defeated, but its not always that simple.
仅通过更改两个字符串值,根检测就失败了,但这并不总是那么简单。


In this post we have covered two different ways to defeat root detection by patching the smali code. We looked at modifying the return values to manipulate the behaviour without modifying the original code; and we looked at a method whereby through small changes we can trick the app into looking for a file that we know doesn’t exist and therefore making the check fail.
在这篇文章中,我们介绍了通过修补smali代码来打败根检测的两种不同方法。 我们着眼于修改返回值以在不修改原始代码的情况下操纵行为。 我们研究了一种方法,通过小的更改,我们可以欺骗应用程序以寻找我们不知道的文件,从而使检查失败。
Root detection remains the first step of a defence in depth measure but it needs to be implemented correctly. It needs to have multiple steps and multiple different checks in order to avoid a single point of failure. Using server side verification with tools such as Google SafetyNet Attestation API¹ is a good way to move checks away from the client; however the cat is always chasing the mouse, and even SafetyNet can be bypassed with certain tools.
根源检测仍然是深度防御措施的第一步,但需要正确实施。 为了避免单点故障,它需要具有多个步骤和多个不同的检查。 将服务器端验证与Google SafetyNet AttestationAPI¹等工具配合使用,是将支票从客户端转移出去的好方法。 但是,猫总是在追赶鼠标,甚至某些工具也可以绕过SafetyNet。
¹ SafetyNet Attestation — https://developer.android.com/training/safetynet/attestation
¹SafetyNet认证-https: //developer.android.com/training/safetynet/attestation
翻译自: https://medium.com/swlh/defeating-android-root-detection-with-smali-patching-46c082c27a81


 6152
6152

 被折叠的 条评论
为什么被折叠?
被折叠的 条评论
为什么被折叠?
 到【灌水乐园】发言


