


 本文详细介绍了如何在React应用中实现引人注目的打字机效果,为用户界面增添动态感。通过翻译并结合原文,展示了在React项目中创建这种效果的步骤和技术要点。
react 打字机效果
In the previous part of the article (https://medium.com/@SzybkiSasza/react-electron-typescript-a-dev-experience-part-1-f507e98dd4d9) we created a foundation for the future app:
在文章的前一部分( https://medium.com/@SzybkiSasza/react-electron-typescript-a-dev-experience-part-1-f507e98dd4d9 ),我们为将来的应用程序创建了基础:
- Preparing Typescript-based Create React App 准备基于打字稿的Create React App
- Adding Material UI 添加材质UI
- Adding example service for storing image files (in browser storage, using localforage). 添加用于存储图像文件的示例服务(在浏览器存储中,使用localforage)。
- Coinfiguring ESLint and Stylelint for properly linting whole codebase 将ESLint和Stylelint结合使用以正确整理整个代码库
The next step is adding Electron to the mix — our goal is to create a unified experience for seamlessly working with both Electron and React, without the hassle of running multiple scripts at different times.
下一步是将Electron添加到混合中-我们的目标是创建一个统一的体验,以无缝地使用Electron和React,而不必在不同时间运行多个脚本。
只要给我代码! (Just give me the code!)
You can find the workshop code at https://github.com/SzybkiSasza/gdg-react-workshop
您可以在https://github.com/SzybkiSasza/gdg-react-workshop中找到研讨会代码。
准备电子 (Preparing the Electron)
Before we start, we need to install all the dependencies that are needed for Electron, in particular — main package and the tool called Electron Builder that creates final platform bundle:
在开始之前,我们需要安装Electron所需的所有依赖项,特别是-主程序包和称为Electron Builder的工具,该工具创建最终的平台捆绑包:
yarn add --dev electron electron-builder cross-env nodemon foremanWe also installed some additional tools:
我们还安装了一些其他工具:
CrossEnv that’ll allow for injecting environment variables to NPM scripts regardless of operating system
CrossEnv ,无论操作系统如何,都可以将环境变量注入NPM脚本
Nodemon for observing changes in the code and re-running the app on every code change (occurring either in Create React App or Electron)
Nodemon用于观察代码中的更改并在每次代码更改时重新运行应用程序(在Create React App或Electron中发生)
Foreman for gluing all the scripts together so that they can be run in parallel from one script
工头将所有脚本粘合在一起,以便可以从一个脚本并行运行
让我们对应用程序进行电子化! (Let’s electron-ify the app!)
Using Electron is simple — it boils down to a few steps:
使用Electron很简单-归纳为以下几个步骤:
Creating the so-called Application (a special NodeJS wrapper around Chromium)
创建所谓的应用程序 (Chromium周围的特殊NodeJS包装器)
Managing Application lifecycles (e.g. activating on Mac, App Ready, App windows closed) that are closely tied to system events
管理与系统事件密切相关的应用程序生命周期 (例如,在Mac上激活,App Ready,App窗口关闭)
In proper lifecycle methods, building and destroying Browser Window (you can think of it as a headless Chromium browser running in a dedicated window)
使用适当的生命周期方法,构建和销毁浏览器窗口 (您可以将其视为在专用窗口中运行的无头Chromium浏览器)
TL;DR — you spawn the Browser inside the App window and display content that is served by React (either by React Dev server in development or ready-to-serve production bundle).
TL; DR —在App窗口中生成浏览器并显示由React提供的内容(由开发中的React Dev服务器或可立即提供的生产包)。
To start with, we’ll need a few files:
首先,我们需要一些文件:
- new tsconfig.json that will define Typescript pipeline for Electron files (it’ll be much simpler than the one used by React!) 新的tsconfig.json,它将为Electron文件定义Typescript管道(它将比React使用的管道简单得多!)
main.tsfile housing our Electron Appmain.ts我们电子应用程序的main.ts文件menu.tsfile that will be a simple configuration for our menu (things that usually show in the top bar of the app or in case of some environments — at the top of the active display)menu.ts文件,它将是我们菜单的简单配置(通常显示在应用程序顶部栏中或在某些情况下(在活动显示屏顶部)的内容)connect-electron.tsfile that will tell our scripts when Electron can connect to React Dev Server so that Electron window is ready on timeconnect-electron.ts文件,该文件将告诉我们的脚本何时Electron可以连接到React Dev Server,以便及时打开Electron窗口
We’ll put all the files in a new directory so that our project structure looks like this:
我们将所有文件放在一个新目录中,以便我们的项目结构如下所示:
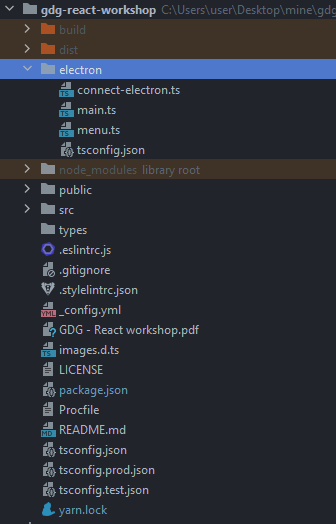
In this structure:
在此结构中:
buildwill represent transpiled electron files ready to be bundled as a standalone system installerbuild将代表准备好捆绑为独立系统安装程序的转译电子文件distwill hold both Electron and Create React app production filesdist将同时保存Electron和Create React应用的生产文件electronis a container for all the Electron-related codeelectron是所有电子相关代码的容器publicandsrcare CRA-related directoriespublic和src是与CRA相关的目录
运行第一个桌面应用 (Running the first desktop App)
Let’s start by running the Electron and Create React App separately — we’ll focus on optimizing the pipeline later.
让我们从分别运行Electron和Create React App开始-我们稍后将集中精力优化管道。
We’ll begin with creating tsconfig.json for the Electron App:
我们将从为Electron App创建tsconfig.json开始:
The most important part of the config is information about where to put the output of the Typescript compilation (`build/electron`) and module format (different than the one for CRA).
配置中最重要的部分是有关Typescript编译 (“ build / electron”)和模块格式 (与CRA 格式不同)的输出位置的信息。
Having that ready, let’s prepare a basic Electron bootstrap code in main.ts :
准备好之后,让我们在main.ts准备一个基本的Electron引导程序代码:
For now, we’ll skip setting up the menu (Electron will auto-generate the default menu for us) — you can check the menu structure here: https://github.com/SzybkiSasza/gdg-react-workshop/blob/master/electron/menu.ts.
现在,我们将跳过菜单的设置(Electron将自动为我们生成默认菜单)—您可以在此处检查菜单结构: https : //github.com/SzybkiSasza/gdg-react-workshop/blob/主/电子/菜单
The code below is rather straightforward:
下面的代码非常简单:
Defines the
createWindowfunction that will set-up the App定义将设置应用程序的
createWindow函数Attaches the function to proper lifecycles of the App (where
activateis Mac-only state of clicking on an inactive app icon, hence — we re-create window then)将功能附加到应用程序的适当生命周期(其中
activate是单击非活动应用程序图标的纯Mac状态,因此-然后我们重新创建窗口)
Let’s focus on specific parts:
让我们专注于特定部分:
- Function checks if one has an external display connected and displays the app on it. Otherwise, it’s displayed on the main screen Function检查是否已连接外部显示器并在其上显示应用程序。 否则,它会显示在主屏幕上
The app itself occupies
1280x1024pixels (some libraries allow for remembering last window size, but it’s out of the scope of this article)该应用程序本身占用
1280x1024像素(某些库允许记住上一个窗口的大小,但这超出了本文的范围)Bootstraps the app by calling
loadURL, using either environment variable (for dev mode) or the location of CRA bundle entry file (index.htmlin the same directory as the transpiled file, e.g.dist/index.html)通过调用自举该应用
loadURL,使用任一环境变量(dev的模式)或CRA束条目文件的位置(index.html在相同的目录中transpiled文件,例如dist/index.html)
To run the code we just need to inform Electron where to find the final main.js (note the extension!) transpiled file. We’ll do it by creating a special entry in package.json :
要运行代码,我们只需要通知Electron在哪里可以找到最终的main.js ( 请注意扩展名! )已转译的文件。 我们将通过在package.json创建一个特殊条目来做到这一点:
...
"main": "build/electron/main.js",
...
This tells the Electron to run the file in that particular directory, but we still need to build it. To do so, we’ll run three separate scripts:
这告诉Electron在该特定目录中运行文件,但是我们仍然需要构建它。 为此,我们将运行三个单独的脚本:
cross-env BROWSER=none react-scripts start— this will run react itself, informing it that it’s not run in standard browser context (henceBROWSER=none)cross-env BROWSER=none react-scripts start—它将自行运行react,从而通知它不在标准浏览器上下文中运行 (因此BROWSER=none)tsc --project electron/tsconfig.jsonthat will transpile Electron files and put them inbuilddirectorytsc --project electron/tsconfig.json将转换Electron文件并将其放在build目录中electron .that will instruct Electron to look for the config in the current directory (project directory) and bootstrap the app based on themainentryelectron .它将指示Electron在当前目录(项目目录)中查找配置,并根据main条目引导应用程序
For now, Electron expects that main.js file will be already available — wait for the Typescript to transpile the file first!
目前,Electron希望main.js文件已经可用—等待Typescript首先转换该文件!
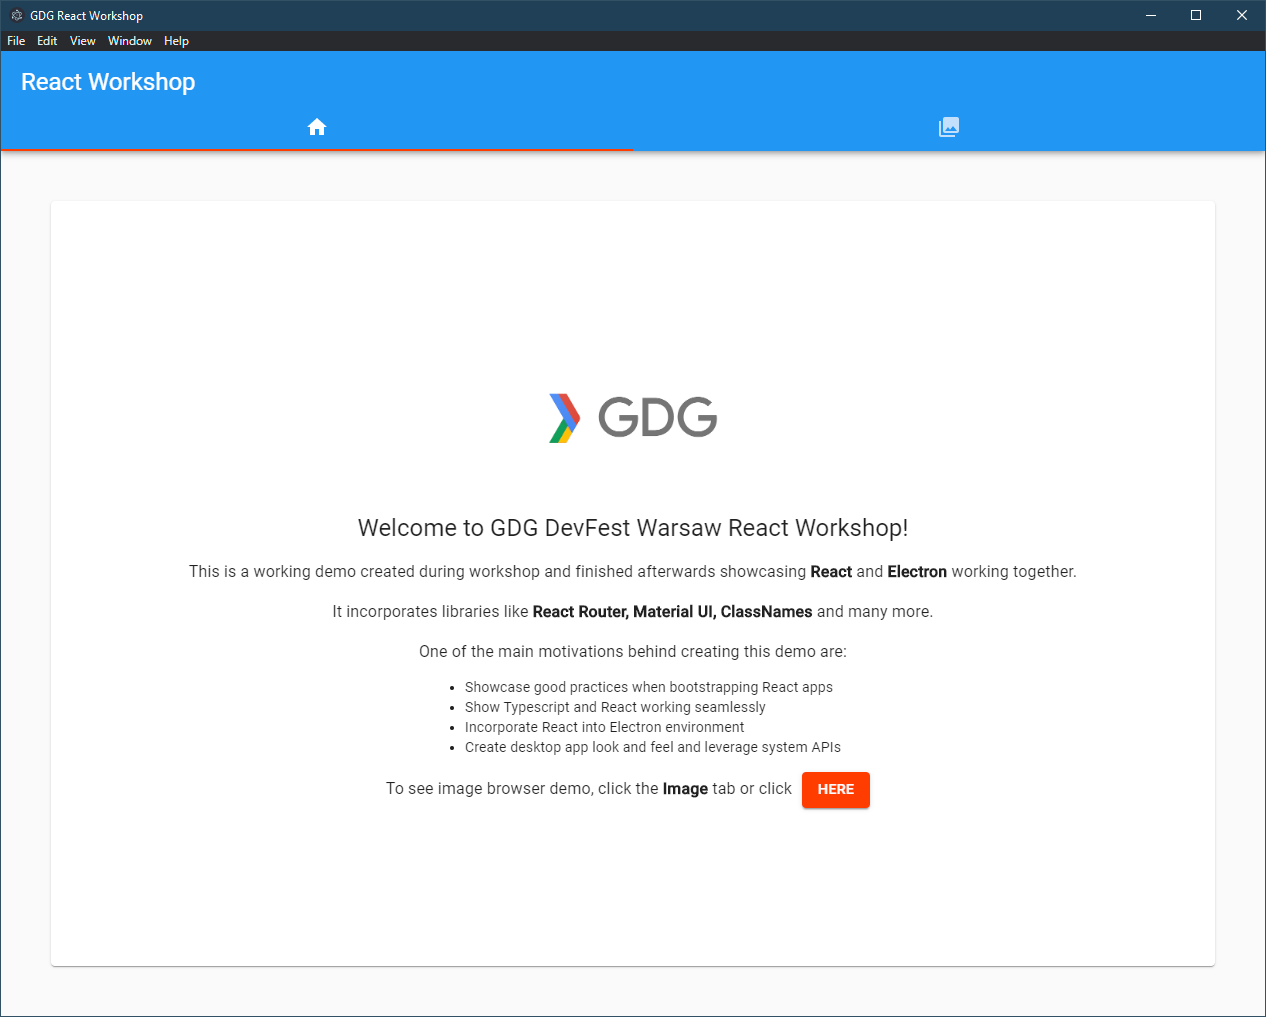
This should be enough to get the app up and running — the result should look like that:
这应该足以启动并运行应用程序-结果应如下所示:
Current dev experience isn’t the best one — we need to run 3 separate scripts in order to run the app. Let’s streamline it a bit!
当前的开发经验并不是最好的-我们需要运行3个单独的脚本才能运行该应用程序。 让我们简化一下!
开发管道-一个脚本来统治一切! (Dev pipeline — one script to rule them all!)
Let’s start with development —to run the whole environment in one go we have to run all the three scripts from the previous step together. We’ll use Foreman for that. Create a new file in the project tree called Procfile and put the following content inside:
让我们从开发开始-要一次性运行整个环境,我们必须一起运行上一步中的所有三个脚本。 为此,我们将使用工头 。 在名为Procfile的项目树中创建一个新文件,并将以下内容放入其中:
react: npm run start-react
start-electron: npm run start-electron
watch-electron: npm run watch-electron
This file tells the Foreman what should be run in parallel. We run all three scripts together. Names before colons will be the ones showing up in Foreman logs as script descriptors.
该文件告诉工头应该并行运行什么。 我们一起运行所有三个脚本。 冒号之前的名称将作为脚本描述符显示在Foreman日志中。
Let’s create each of the scripts in package.json now:
让我们现在在package.json创建每个脚本:
...
"start-react": "cross-env BROWSER=none react-scripts start",
"start-electron": "ts-node --skip-project electron/connect-electron.ts",
"watch-electron": "tsc --watch --project electron/tsconfig.json"
...
Each of the scripts is related to previously mentioned tasks, but we still need to properly bootstrap electron app using connect-electron.ts . It’ll take care of waiting until React is ready and restarting the Electron then:
每个脚本都与前面提到的任务有关,但是我们仍然需要使用connect-electron.ts正确引导电子应用程序。 它会等到React准备好后再重新启动Electron,然后:
As Create React App bootstraps React Dev Server on the particular port, we can assume once there’s TCP connection on that port, React is ready.
当Create React App在特定端口上引导React Dev Server时,我们可以假定该端口上一旦建立了TCP连接,React就准备好了。
Once the connection is available, we use Nodemon to run the Electron, based on previously built files.
连接可用后,我们将使用Nodemon基于先前构建的文件运行Electron。
There’s a slight inconvenience regarding that implementation — there won’t be
main.jsfile available at the first run and therefore — Electron script may fail. Just run it again and it’ll work properly from now on.该实现有一些不便之处-第一次运行时不会提供
main.js文件,因此main.js脚本可能会失败。 只需再次运行它,即可从现在开始正常运行。
A small note on using Nodemon to reload Electron — there are special libraries that allow for reloading Electron code from within Electron (without using Nodemon), but they cause a bit of a hassle in Windows environments — they spawn a new CMD window every time Electron is being reloaded. To circumvent it, we use a slightly slower method of re-running the code on file system level, using Nodemon.
关于使用Nodemon重新加载Electron的小提示 -有一些特殊的库允许从Electron内部重新加载Electron代码(不使用Nodemon),但是它们在Windows环境中会带来一些麻烦- 每次Electron都会产生一个新的CMD窗口正在重新加载。 为了避免这种情况,我们使用稍微慢一点的方法,即使用Nodemon在文件系统级别上重新运行代码。
最后一点-工头脚本 (The final touch — Foreman script)
As we already prepared Foreman config and Electron bootstrap script, we can run all the scripts together, using Foreman. Add another script to your package.json to be able to do so:
当我们已经准备好Foreman config和Electron引导脚本时,我们可以使用Foreman一起运行所有脚本。 将另一个脚本添加到您的package.json即可:
"start": "nf start -p 3000"That’s all there is! Now Foreman should spawn all the scripts in parallel and prepare the app:
这就是全部! 现在,工头应并行生成所有脚本并准备应用程序:

Note how each of the scripts is highlighted with unique color and prefix — thanks to that you can easily tell what’s going on once one of the scripts throws the error.
请注意,每个脚本是如何用唯一的颜色和前缀突出显示的-借助它,您可以很容易地判断出其中一个脚本引发错误后的情况。
It’s all that is! We use one script to run all the dev pipelines together and can listen to changes in any of the files live! Time to prepare a production build.
这就是全部! 我们使用一个脚本来一起运行所有开发管道,并且可以实时监听任何文件中的更改! 是时候准备生产了。
准备发货—添加安装程序 (Ready to ship — adding the installer)
We’re one step away from being able to ship our app — it’s time to build the application and bundle it as a standalone installer. Similar to the DEV pipeline, we need to run three scripts together:
我们距离发布应用程序还有一步之遥-是时候构建应用程序并将其捆绑为独立安装程序了。 与DEV管道类似,我们需要一起运行三个脚本:
CRA builder
CRA建设者
Electron Typescript transpiler
电子打字稿翻译器
Electron Builder script that will bundle the application
Electron Builder脚本将捆绑应用程序
In order to be able to bundle the app, add following config to your package.json :
为了能够捆绑该应用程序,请将以下配置添加到package.json :
"build": {"appId": "com.electron.gdg-react-workshop",
  "directories": {"buildResources": "public"}
}
This describes Electron project for the Bundler — tells what’s the ID of the app and where do static resources reside. This is enough for this article, you can find more at https://github.com/electron-userland/electron-builder .
这描述了Bundler的Electron项目-告诉应用程序的ID是什么以及静态资源在哪里。 这对于本文来说足够了,您可以在https://github.com/electron-userland/electron-builder中找到更多信息。
Now it’s time to prepare final build scripts. Final configuration may look like that (unrelated scripts removed for brevity):
现在是时候准备最终的build脚本了。 最终配置看起来像这样(为简洁起见,删除了不相关的脚本):
"scripts": {"build": "react-scripts build",
  "start": "nf start -p 3000",
  "test": "react-scripts test",
  "build-electron": "tsc --project electron/tsconfig.json",
  "start-electron": "ts-node --skip-project electron/connect-electron.ts",
  "watch-electron": "tsc --watch --project electron/tsconfig.json",
  "start-react": "cross-env BROWSER=none react-scripts start",
  "dist": "npm run build && npm run build-electron && electron-builder build -c.extraMetadata.main=build/electron/main.js"},
By running yarn dist we’ll prepare the final production build. Once it’s finished, you can find the app installer inside dist directory:
通过运行yarn dist我们将准备最终的生产版本。 完成后,您可以在dist目录中找到应用安装程序:
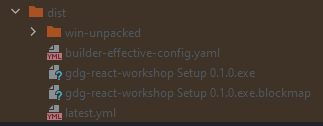
Now we can run the installer! It’ll unpack the App and make it available in your system environment!
现在我们可以运行安装程序了! 它将解压缩该应用程序并使其在您的系统环境中可用!
总结一下… (To sum up…)
We added Electron to the project and configured whole environment to be able to bootstrap whole app with one script. Finally, we created the installer/builder script that prepares the installer that can be used as any other setup/wizard.
我们将Electron添加到项目中并配置了整个环境,以便能够使用一个脚本来引导整个应用程序。 最后,我们创建了安装程序/生成器脚本,该脚本准备了可用作任何其他安装程序/向导的安装程序。
Whole code can be found here: https://szybkisasza.github.io/gdg-react-workshop
完整的代码可以在这里找到: https : //szybkisasza.github.io/gdg-react-workshop
Feel free to port the code according to your needs and migrate it however you want, as long as you give me kudos 😉
可以根据您的需要随意移植代码,并根据需要进行迁移,只要您给我荣誉即可。
翻译自: https://medium.com/swlh/react-electron-typescript-a-dev-experience-part-2-1dbbce43fcee
react 打字机效果


 1651
1651

 被折叠的 条评论
为什么被折叠?
被折叠的 条评论
为什么被折叠?
 到【灌水乐园】发言


