


xgboost多分类实践
介绍 (Introduction)
XGBoost stands for eXtreme Gradient Boosting and it’s an open-source implementation of the gradient boosted trees algorithm. It has been one of the most popular machine learning techniques in Kaggle competitions, due to its prediction power and ease of use. It is a supervised learning algorithm that can be used for regression or classification tasks.
XGBoost代表X极限G辐射增强 ,它是梯度增强树算法的开源实现。 由于它的预测能力和易用性,它已成为Kaggle竞赛中最受欢迎的机器学习技术之一。 它是一种监督学习算法,可用于回归或分类任务。
Regardless of its futuristic name, it’s actually not that hard to understand, as long as we first go through a few concepts: decision trees and gradient boosting. If you are already familiar with those, feel free to skip to “How XGBoost works”.
不管它的未来名称如何,只要我们首先经历一些概念( 决策树和梯度提升) ,它实际上并不难理解。 如果您已经熟悉这些内容,请随时跳至“ XGBoost的工作原理 ”。
决策树 (Decision trees)
Decision trees are arguably the most easily interpretable ML algorithms you can find and, if used in combination with the right techniques, can be quite powerful.
决策树可以说是您可以找到的最容易解释的ML算法,如果与正确的技术结合使用,决策树将非常强大。
A decision tree has this name because of its visual shape, which looks like a tree, with a root and many nodes and leaves. Imagine you take a list of the Titanic’s survivors, with some information such as their age and gender, and a binary variable telling who survived the disaster and who didn’t. You now want to create a classification model, to predict who will survive, based on this data. A very simple one would look like this:
决策树之所以具有此名称,是因为它的视觉形状看起来像一棵树,具有根,许多节点和叶子。 想象一下,您列出了泰坦尼克号幸存者的名单 ,并提供了一些信息,例如他们的年龄和性别,以及一个二进制变量,告诉谁在灾难中幸存了,谁没有幸免。 现在,您想要创建一个分类模型,以根据这些数据预测谁将幸存下来。 一个非常简单的示例如下所示:
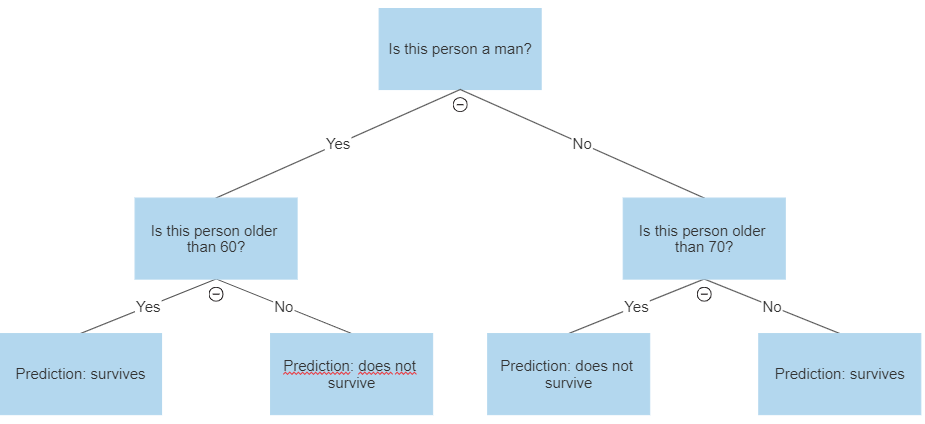
As you can see, decision trees are just a sequence of simple decision rules that, combined, produce a prediction of the desired variable.
如您所见,决策树只是一系列简单的决策规则,这些规则组合在一起就可以生成所需变量的预测。
梯度提升 (Gradient boosting)
Boosting is an ensemble method, meaning it’s a way of combining predictions from several models into one. It does that by taking each predictor sequentially and modelling it based on its predecessor’s error (giving more weight to predictors that perform better):
Boosting是一种集成方法 ,这意味着它是将来自多个模型的预测合并为一个的方法。 通过按顺序获取每个预测变量并根据其前任的错误对其进行建模,可以做到这一点(对表现更好的预测变量赋予更大的权重):
- Fit a first model using the original data 使用原始数据拟合第一个模型
- Fit a second model using the residuals of the first model 使用第一个模型的残差拟合第二个模型
- Create a third model using the sum of models 1 and 2 使用模型1和2的总和创建第三个模型
Gradient boosting is a specific type of boosting, called like that because it minimises the loss function using a gradient descent algorithm.
梯度增强是一种特殊类型的增强,之所以这样称呼,是因为它使用梯度下降算法将损耗函数降至最低。
XGBoost如何工作 (How XGBoost works)
Now that you understand decision trees and gradient boosting, understanding XGBoost becomes easy: it is a gradient boosting algorithm that uses decision trees as its “weak” predictors. Beyond that, its implementation was specifically engineered for optimal performance and speed.
现在您了解了决策树和梯度提升 ,了解XGBoost变得很容易:它是一种梯度提升算法,将决策树用作其“弱”预测因子。 除此之外,它的实现是为获得最佳性能和速度而专门设计的。
Historically, XGBoost has performed quite well for structured, tabular data. If you are dealing with non-structured data such as images, neural networks are usually a better option.
从历史上看,XGBoost在结构化表格数据方面的表现非常出色。 如果您正在处理诸如图像非结构化数据, 神经网络通常是一个更好的选择。
超参数 (Hyperparameters)
What are the most important hyperparamaters to choose when implementing XGBoost, and how to tune them?
实施XGBoost时,最重要的超参数选择是什么,以及如何对其进行调整?
助推器 (booster)
booster is the boosting algorithm, for which you have 3 options: gbtree, gblinear or dart . The default option is gbtree , which is the version I explained in this article. dart is a similar version that uses dropout techniques to avoid overfitting, and gblinear uses generalized linear regression instead of decision trees.
booster是boosting算法,为此您有3个选项: gbtree , gblinear或dart 。 默认选项是gbtree ,这是我在本文中介绍的版本。 dart是类似的版本,它使用辍学技术来避免过度拟合,而gblinear使用广义线性回归而不是决策树。
reg_alpha和reg_lambda (reg_alpha and reg_lambda)
reg_alpha and reg_lambda are L1 and L2 regularisation terms, respectively. The greater these numbers, the more conservative (less prone to overfitting but might miss relevant information) the model becomes. Recommended values lie between 0–1000 for both.
reg_alpha和reg_lambda分别是L1和L2正则化项。 这些数字越大,模型就越保守(越不容易拟合,但可能会丢失相关信息)。 两者的推荐值都在0-1000之间。
max_depth (max_depth)
max_depth sets the maximum depth of the decision trees. The greater this number, the less conservative the model becomes. If set to 0, then there is no limit for trees’ depth.
max_depth设置max_depth的最大深度。 该数字越大,模型变得越不保守。 如果设置为0,则树木的深度没有限制。
子样本 (subsample)
subsample is the size of the sample ratio to be used when training the predictors. Default is 1, meaning there is no sampling and we use the whole data. If set to 0.7, for instance, then 70% of the observations would be randomly sampled to be used in each boosting iteration (a new sample is taken for each iteration). It can help to prevent overfitting.
subsample是训练预测变量时要使用的样本比率的大小。 默认值为1,表示不进行采样,我们将使用整个数据。 例如,如果设置为0.7,则将随机采样70%的观察值,以用于每次增强迭代(每次迭代都会获取一个新样本)。 它可以帮助防止过度拟合。
num_estimators (num_estimators)
num_estimators sets the number of boosting rounds, which equals setting the number of boosted trees to use. The greater this number, the greater the risk of overfitting (but low numbers can also lead to low performance).
num_estimators设置增强轮的数量,等于设置要使用的增强树的数量。 该数字越大,过度拟合的风险就越大(但数字越小,也可能导致性能降低)。
如何使用XGBoost (How to use XGBoost)
To show how XGBoost works in practice, let’s do a simple exercise by trying to actually predict Titanic survivors on a Kaggle competition, using Python.
为了展示XGBoost在实际中是如何工作的,让我们做一个简单的练习,尝试使用Python实际预测Kaggle比赛中的泰坦尼克号幸存者。
After downloading our data from Kaggle, we’ll import all the necessary libraries and our training data:
从Kaggle下载数据后,我们将导入所有必要的库和培训数据:
IN:import pandas as pd
from xgboost import XGBClassifier
from sklearn.model_selection import train_test_split
from sklearn.metrics import accuracy_scoredf = pd.read_csv("C:/Users/p005520/Downloads/titanic/train.csv")
Please note from xgboost import XGBClassifier . That only works because we have previously installed xgboost on our computer by runningpip install xgboost from our terminal. XGBClassifier is used here because it’s a classification problem. For regression problems, use XGBRegressor instead. The other libraries used for treating our data and calculating performance metrics.
请注意, from xgboost import XGBClassifier 。 这仅行得通,因为我们之前已经通过从终端运行pip install xgboost在计算机上pip install xgboost 。 这里使用XGBClassifier是因为它是分类问题。 对于回归问题,请改用XGBRegressor 。 其他用于处理我们的数据和计算性能指标的库。
IN:
dummies = pd.get_dummies(df['Sex'])
df = pd.concat([df, dummies], axis=1)X = df[[‘Age’,’female’,’male’]]
y = df[‘Survived’]seed = 42
test_size = 0.3
X_train, X_test, y_train, y_test = train_test_split(X, y, test_size=test_size, random_state=seed)
We have many variables in our data but, this time, we’ll stick to the same two from our previous example: ‘Sex’ and ‘Age’.
我们的数据中有很多变量,但是这次,我们将继续使用上一个示例中的两个变量:“性别”和“年龄”。
The first two lines of this block create dummy variables from ‘Sex’. This is needed to turn ‘Sex’ from string to integers, becoming two different variables: ‘male’ and ‘female’, which are equal to 1 or 0 depending on the passenger’s sex.
该块的前两行从“性”创建虚拟变量。 这需要将“性别”从字符串转换为整数 ,成为两个不同的变量:“男性”和“女性”,根据乘客的性别,其等于1或0。
The next 2 lines define our target variable (‘Survived’) and the variables we’ll use for predicting it. The last 4 lines are for splitting our train and test sets: our train set will be used to create our XGBoost model, while the test set will be used to measure its performance.
接下来的2行定义了我们的目标变量(“生存”)以及用于预测目标变量的变量。 最后4行用于拆分训练集和测试集:训练集将用于创建XGBoost模型,而测试集将用于测量其性能。
IN:model = XGBClassifier(subsample = 0.7, max_depth = 4)
model.fit(X_train, y_train)
print(model)y_pred = model.predict(X_test)accuracy = accuracy_score(y_test, y_pred)
print(“Accuracy: %.2f%%” % (accuracy * 100.0))OUT:XGBClassifier(base_score=0.5, booster='gbtree', colsample_bylevel=1,
              colsample_bynode=1, colsample_bytree=1, gamma=0,
              learning_rate=0.1, max_delta_step=0, max_depth=4,
              min_child_weight=1, missing=None, n_estimators=100, n_jobs=1, nthread=None, objective='binary:logistic', random_state=0,
              reg_alpha=0, reg_lambda=1, scale_pos_weight=1, seed=None,silent=None, subsample=1, verbosity=1)Accuracy: 80.60%
Here’s where we actually train our XGBoost, in the first 2 lines. Note subsample = 0.7 and max_depth = 4 where I’m manually defining some of my hyperparameters. If you want to set new hyperparameters differently from the default option, just add them to that list. Our model yields a 80.6% accuracy in the test set, now let’s see how to apply it to new data:
这是我们在前2行中实际训练XGBoost的地方。 注意subsample = 0.7和max_depth = 4 ,在这里我手动定义了一些超参数。 如果要与默认选项不同地设置新的超参数,只需将它们添加到该列表中即可。 我们的模型在测试集中的准确率达到80.6%,现在让我们看看如何将其应用于新数据:
submission_input = pd.read_csv("C:/Users/p005520/Downloads/titanic/test.csv")dummies = pd.get_dummies(submission_input[‘Sex’])
submission_input = pd.concat([submission_input, dummies], axis=1)submission_X = submission_input[[‘Age’,’female’,’male’]]submission = model.predict(submission_X)
submission_df = pd.DataFrame({‘PassengerId’:submission_input[‘PassengerId’],
 ‘Survived’:submission})
submission_df.to_csv(‘submission.csv’, index = False)
In this block we have imported Kaggle’s submission file, done the same dummy treatment as in our training set, applied our trained predictor with model.predict(submission_X) and then saved it to a csv. How does it score on Kaggle’s leaderboard?
在此块中,我们导入了Kaggle的提交文件,进行了与训练集中相同的虚拟处理,将训练有素的预测变量与model.predict(submission_X) ,然后将其保存到csv中。 在Kaggle的排行榜上如何得分?
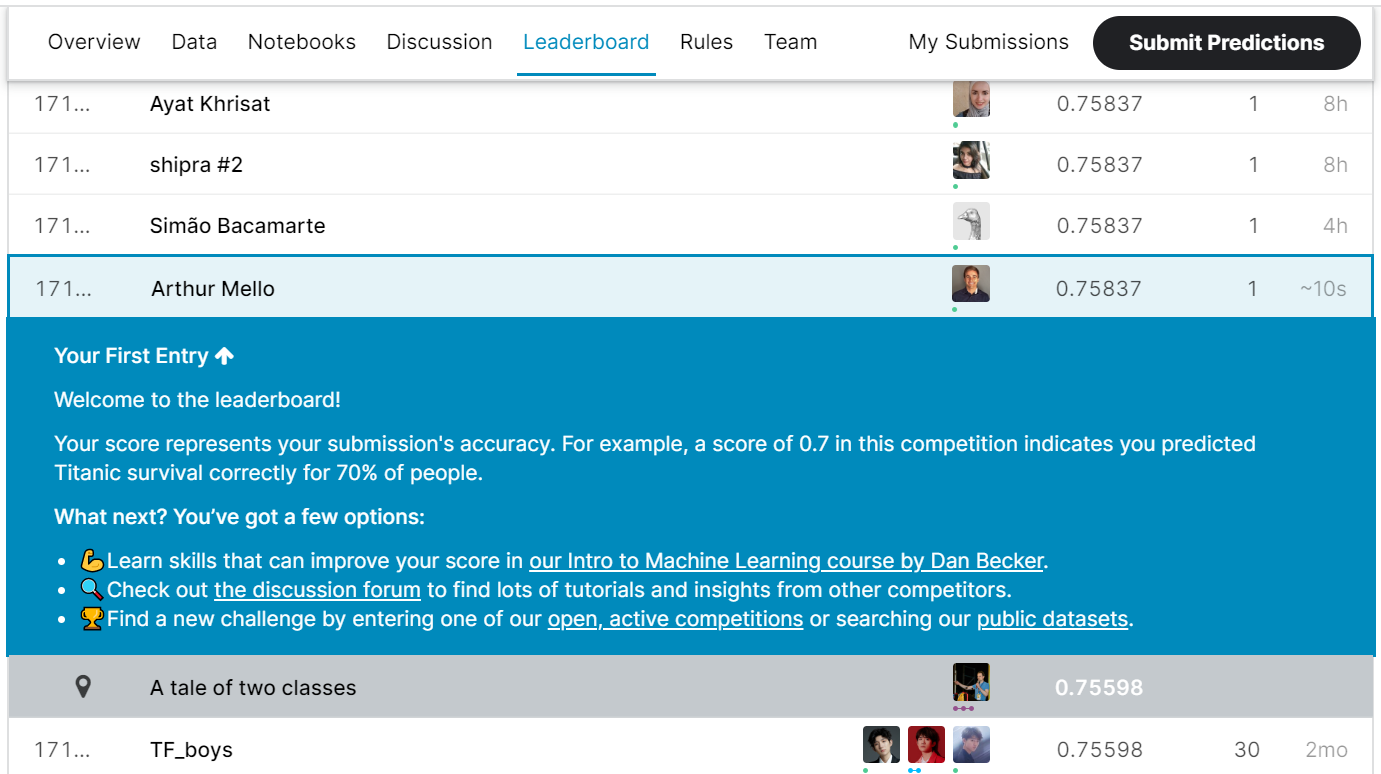
As you can see, we are far from the top of the leaderboard but we have still managed to predict survival correctly for 76% of people, using only two features, no feature engineering and no hyperparameter tuning, which would be the logical next steps for our work.
如您所见,我们距离排行榜的位置还很遥远,但我们仍然设法仅使用两个功能,不进行功能工程和不进行超参数调整就可以正确预测76%的人的生存率,这将是合理的下一步我们的工作。
I hope you now understand how XGBoost works and how to apply it to real data. Despite XGBoost’s inherent performance, hyperparameter tuning and feature engineering can make a huge difference in your results.
我希望您现在了解XGBoost的工作原理以及如何将其应用于真实数据。 尽管XGBoost具有固有的性能,但超参数调整和功能工程可以使您的结果产生巨大的变化。
If you want to learn more about feature engineering to improve your predictions, you should read this article, which outlines the main techniques you can use to transform your variables and create new ones:
如果您想了解更多有关功能工程的知识以改善预测,请阅读本文,其中概述了可用于转换变量和创建新变量的主要技术:
Feel free to reach out to me on LinkedIn if you would like to discuss further, it would be a pleasure (honestly).
如果您想进一步讨论,请 随时在 LinkedIn 上与我联系 ,这是一种荣幸(诚实)。
翻译自: https://towardsdatascience.com/xgboost-theory-and-practice-fb8912930ad6
xgboost多分类实践


 2万+
2万+


 被折叠的 条评论
为什么被折叠?
被折叠的 条评论
为什么被折叠?
 到【灌水乐园】发言


