


 本文介绍了Flutter应用的颤振稳定性测试,通过叶瓣图来观察和理解应用的性能和稳定性。文章从颤振测试的重要性出发,阐述了如何利用叶瓣图进行测试和分析,帮助开发者提升Flutter应用的质量。
颤振稳定性叶瓣图
Flutter automated testing enables you to achieve higher responsiveness in your app because it helps to find bugs and other issues occurring in your app. It is also important in other perspectives like credibility as a developer.
Flutter自动化测试使您能够在应用程序中获得更高的响应速度,因为它有助于发现应用程序中的错误和其他问题。 在其他方面(例如作为开发人员的信誉)也很重要。
Here comes a question which may come to your mind:
这是您可能想到的一个问题:
How can you know if your app is working or not if you have changed or added any features? And the answer is by writing test cases. So let’s understand how to do it.
如果更改或添加了任何功能,如何知道您的应用程序是否正常运行? 答案是通过编写测试用例。 因此,让我们了解如何去做。
We have 3 different testing features available
我们提供3种不同的测试功能
- Unit Test 单元测试
- Widget Test 小部件测试
- Integration Test 整合测试
单元测试 (Unit Tests)
A unit test can be understood by its name, in the Unit test we test small parts of our code like single function, method or a class and it is very handy to do. It can be implemented by importing test package and if you want additional utilities for test flutter_test can be used.
单元测试的名称可以理解,在单元测试中,我们测试代码的一小部分,例如单个函数,方法或类,这非常方便。 它可以通过导入test包来实现,并且如果您想使用其他测试实用程序,可以使用flutter_test 。
Steps to Implement Unit Testing
实施单元测试的步骤
Add the
testorflutter_testdependency.添加
test或flutter_test依赖项。- Create a test file. 创建一个测试文件。
- Create a class to test. 创建一个类进行测试。
Write a
testfor our class.为我们的班级写一个
test。Combine multiple tests in a
group.一个在合并多个测试
group。- Run the tests. 运行测试。
Till now we have understood how to import dependency so and let’s understand about the project structure
到目前为止,我们已经了解了如何导入依赖项,并且让我们了解了项目结构
counter_app/
 lib/testing_class.dart
 test/
 unit_test.dart
Now in your project, you can see that there is already a test folder in which we will create our own class for testing,
现在在您的项目中,您会看到已经有一个测试文件夹,我们将在其中创建我们自己的测试类,
Let’s create a file testing_class.dart in which we will be multiplying two digits
让我们创建一个文件testing_class.dart ,其中将两个数字相乘
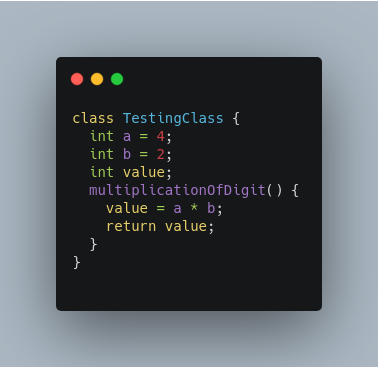
Now write a class unit_test.dart in the test folder, where we will write this set of code, in this file there is a main() function and inside this function, we will write code for testing, as you can see in the “test” method object of testing class has been created and with the help of reference variable method of the testing class has been called and we are expecting the output value which should be the exact result.
现在,在测试文件夹中编写一个unit_test.dart类,我们将在其中编写此代码集,该文件中有一个main()函数,并且在此函数内部,我们将编写用于测试的代码,如您在“已创建测试类的“测试”方法对象,并在引用变量的帮助下调用了测试类的方法,我们期望输出值应该是准确的结果。

And to test this code we will run the command(given below) in the terminal and observe the output of this.
为了测试此代码,我们将在终端中运行命令(如下所示)并观察其输出。
flutter test test/widget_test.dartNow let us understand the testing with the help of Mockito
现在让我们在Mockito的帮助下了解测试
Mockito is used to mock interfaces so that a dummy functionality can be added to a mock interface that can be used in unit testing.
Mockito用于模拟接口,以便可以将虚拟功能添加到可以在单元测试中使用的模拟接口。
Here we are going to understand how can we implement it.
在这里,我们将了解如何实现它。
Let’s understand it step by step
让我们逐步了解它
Create a simple project then delete the sample code from the main.dart file. then fix all the errors of class.
创建一个简单的项目,然后从main.dart文件中删除示例代码。 然后修复所有的类错误。
import 'package:flutter/material.dart';import 'package:flutter_test_demo/home_page.dart';void main() => runApp(MyApp());class MyApp extends StatelessWidget {
  @override
  Widget build(BuildContext context) {return MaterialApp(
      title: 'Flutter Demo',
      theme: ThemeData(
        primarySwatch: Colors.blue,
      ),
      home: HomePage(),
    );
  }
}
Now we are going to test our HTTP request and for this, we are using JSONPlaceholder to find the API link then we create a model class by using the response. you can also create it by using different JSON to dart converter sites.
现在,我们将测试我们的HTTP请求 ,为此,我们使用JSONPlaceholder查找API链接,然后使用响应创建一个模型类。 您还可以通过使用不同的JSON到Dart转换器站点来创建它。
// To parse this JSON data, do
//
//     final userInfoModel = userInfoModelFromJson(jsonString);import 'dart:convert';UserInfoModel userInfoModelFromJson(String str) => UserInfoModel.fromJson(json.decode(str));String userInfoModelToJson(UserInfoModel data) => json.encode(data.toJson());class UserInfoModel {
  int userId;
  int id;
  String title;
  String body;  UserInfoModel({this.userId,this.id,this.title,this.body,
  });  factory UserInfoModel.fromJson(Map<String, dynamic> json) => UserInfoModel(
    userId: json["userId"],
    id: json["id"],
    title: json["title"],
    body: json["body"],
  );  Map<String, dynamic> toJson() => {
    "userId": userId,
    "id": id,
    "title": title,
    "body": body,
  };
}
Now we have a model class, after this, we need to make a separate class to make requests and get responses and for this, we would implement the most popular technique HTTP in api_provider class.
现在我们有了一个模型类,此后,我们需要创建一个单独的类来发出请求和获取响应,为此,我们将在api_provider类中实现最流行的HTTP技术。
import 'package:flutter_test_demo/src/models/user_info_model.dart';import 'package:http/http.dart' show Client;import 'dart:convert';class ApiProvider {
  Client client = Client();
  fetchData() async {final response = await client.get("https://jsonplaceholder.typicode.com/posts/1");
    UserInfoModel userInfoModel = UserInfoModel.fromJson(json.decode(response.body));return userInfoModel;
  }
}
Now its time to create a test class for testing, so we would be creating a file in the Test folder. when you will open this folder you will get an auto-generated file but we will delete this and create our own you can give any name to the file but remember one thing your file name should contain “_test” like api_provider_test.dart because if you don't write then flutter would not be able to find it as a test file.
现在该创建一个用于测试的测试类了,因此我们将在Test文件夹中创建一个文件。 当您打开此文件夹时,您将获得一个自动生成的文件,但是我们将删除该文件并创建自己的文件,您可以为该文件指定任何名称,但请记住您的文件名应包含“ api_provider_test.dart ”,例如api_provider_test.dart因为如果不要写,然后flutter将无法找到它作为测试文件。
Now you need to import a few Packages to complete all the tests.
现在,您需要导入一些软件包以完成所有测试。
import 'package:flutter_test/flutter_test.dart';import 'package:http/http.dart';import 'package:http/testing.dart';import 'dart:convert';Here HTTP package is used to use tools to mock HTTP requests and the flutter_test provides methods for testing.
这里的HTTP包用于使用工具来模拟HTTP请求,而flutter_test提供了测试方法。
Now it’s time to create a method for tests in api_provider_test.dart
现在是时候在api_provider_test.dart创建测试方法了
import 'package:flutter_test/flutter_test.dart';import 'package:flutter_test/flutter_test.dart';import 'package:http/http.dart';import 'package:http/testing.dart';import 'dart:convert';import 'package:flutter_test_demo/src/resources/api_provider.dart';void main(){
  test("Testing the network call", () async{
    //setup the testfinal apiProvider = ApiProvider();
    apiProvider.client = MockClient((request) async {final mapJson = {'id':1};return Response(json.encode(mapJson),200);
    });final item = await apiProvider.fetchData();
    expect(item.id, 1);
  });
}
Here in the main() function we write the test method in which first we give a description of our test then we create the object of that api_provider class and by using its reference variable we will change the client() object into MockClient() actually MockClient is a package provided by ‘package:http/testing.dart’ which imitates an HTTP request instead of real request to the server as you can see in the above code.
在main()函数中,我们编写了测试方法,其中首先给出测试描述,然后创建该api_provider类的对象,并使用其引用变量将client()对象实际上更改为MockClient() MockClient是'package:http/testing.dart'提供的一个程序包,它模仿对服务器的HTTP请求,而不是对服务器的实际请求,如您在上面的代码中看到的那样。
In HTTP calls we make requests and get responses and we have already defined requests here.
在HTTP调用中,我们发出请求并获取响应,并且我们已经在此处定义了请求。
apiProvider.client = MockClient((request) { });
apiProvider.client = MockClient((request) { });
And then we create response objects in this MockClient function
然后,我们在此MockClient函数中创建响应对象
final mapJson = {'id':1};return Response(json.encode(mapJson),200);Here you can see the response object is returning the JSON object which is the body of the response and the second object is status code which is the success code of the response then we call the fetchData() which returns UserInfoModel object contains the Key ‘id’ and value “1” or not. Then in the expect method which is provided by test.dart package will compare the result we are expecting from fetchData() method.
在这里你可以看到响应对象返回JSON对象,它是响应和第二对象的身体状态码是响应的成功代码则称fetchData()返回UserInfoModel对象包含键 “id '和值 ‘1’的决定。 然后,在test.dart包提供的Expect方法中,将比较fetchData()方法所期望的结果。
Now let's check whether the test cases are passing or not by running this command in your terminal.
现在,通过在终端中运行此命令来检查测试用例是否通过。
flutter test test/api_provider_test.dartHere api_provider_test.dart is your class name which you created for testing if your test cases pass the test you will get this response.
这里api_provider_test.dart是您创建的用于测试的类名,如果您的测试用例通过测试,您将得到此响应。

So this was all about unit testing in Flutter. Stay tuned for more articles related to other testing types.
这就是Flutter中的单元测试。 请继续关注与其他测试类型有关的更多文章。
Thanks for reading this article.
感谢您阅读本文。
If you find it interesting Please Clap! and if you found anything wrong please let me know I would appreciate it for your contribution.
如果您觉得有趣,请拍手! 如果您发现任何错误,请告诉我,感谢您的贡献。
Connect with me on GitHub repositories.
在GitHub仓库上与我联系。
Feel free to connect with usAnd read more articles from FlutterDevs.com
随时与10:12连接阅读更多的文章FlutterDevs.com
FlutterDevs team of Flutter developers to build high-quality and functionally-rich apps. Hire flutter developer for your cross-platform Flutter mobile app project on an hourly or full-time basis as per your requirement! You can connect with us on Facebook, GitHub, and Twitter for any flutter related queries.
FlutterDevs的Flutter开发人员团队可构建高质量且功能丰富的应用程序。 根据您的要求,每小时或全时为您的跨平台Flutter移动应用程序项目雇用flutter开发人员 ! 您可以在Facebook , GitHub和Twitter上与我们联系,以获取与抖动相关的任何查询。

翻译自: https://medium.com/flutterdevs/flutter-testing-lets-observe-544ec4347406
颤振稳定性叶瓣图


 374
374

 被折叠的 条评论
为什么被折叠?
被折叠的 条评论
为什么被折叠?
 到【灌水乐园】发言


