


 本文档介绍了如何在Google Colab环境中利用Tensorflow 2的Object Detection API进行对象检测。通过此教程,读者将学习到如何在Python中设置环境并运行模型来识别图像中的特定对象。
谷歌 colab
逐步指南(STEP BY STEP GUIDE)
In this tutorial, we will use Google Colab (for model training) and Google Drive (for storage).
在本教程中,我们将使用Google Colab(用于模型训练)和Google Drive(用于存储)。
Colab is a free Jupyter NoteBook environment hosted by Google that runs on the cloud. Google Colab provides free access to GPUs (Graphical Processing Units) and TPUs (Tensor Processing Units).
Colab是Google托管的免费Jupyter NoteBook环境,可在云上运行。 Google Colab提供免费访问GPU(图形处理单元)和TPU(张量处理单元)的权限。
You can read more about Google Colab on their Intro and FAQ page.
您可以在其简介和常见问题解答页面上详细了解Google Colab。
NOTE:Sessions on Google Colab are 12 hours long. After 12 hours everything on Colab storage is wiped out (Notebooks will also disconnect from Virtual Machines if they are left idle for too long). So, it is advisable to use Google Drive for storage rather than using Colab’s storage.
注意:在Google Colab上的会话为时12小时。 12小时后,Colab存储上的所有内容都会被清除(如果笔记本计算机闲置时间过长,它们也会与虚拟机断开连接)。 因此,建议使用Google云端硬盘进行存储,而不要使用Colab的存储。
Considering that you know the basics of Colab, let’s start with our Object Recognition Model!
考虑到您了解Colab的基础知识,让我们从对象识别模型开始!
步骤1-前提条件(收集/标签图像,创建label_map…) (Step 1- Prerequisites (Gather/Label images, Create label_map… ))
Gather and Label images
收集并标记图像
We need to provide properly labeled images to the Object Detection API. These images will be used to train our model.
我们需要向对象检测API提供正确标记的图像。 这些图像将用于训练我们的模型。
The first step is to gather images for all the objects you want your model to classify. You can collect images from the internet, or use some public datasets. You can search for public datasets using Google’s Dataset Search.
第一步是为要模型分类的所有对象收集图像。 您可以从互联网上收集图像,或使用一些公共数据集。 您可以使用Google的数据集搜索来搜索公共数据集。
Next, we need to label all the desired objects in the collected images. LabelImg is a superb tool for annotating images. You can find the installation and usage instructions on its GitHub page. (skip this step if you are using a public dataset and you already have labeled images)
接下来,我们需要在收集的图像中标记所有所需的对象。 LabelImg是用于注释图像的绝佳工具。 您可以在其GitHub页面上找到安装和使用说明。 (如果您使用的是公共数据集,并且已经标记了图像,请跳过此步骤)
After labeling, divide the dataset into two parts- train (80% of images with their corresponding XML files) and test (remaining 20% of images with their corresponding XML files).
标记后,分割数据集分成两个零件-列车(及其相应的XML文件的图像的80%)和测试(在保持与它们相应的XML文件的图像的20%)。
For this tutorial, I am using Fruit Image for Object Detection Dataset from Kaggle. The database already contains labeled images divided into two sets (train and test).
Create label_map.pbtxt
创建label_map.pbtxt
A label_map maps each class(label) to an int value. label_map file should have the extension as .pbtxt.
label_map将每个类(标签)映射到一个int值。 label_map文件的扩展名应为.pbtxt。
Below is the label_map file for the Fruit Detection dataset:
以下是水果检测数据集的label_map文件:
item {
      id: 1
      name: ‘apple’
}
item {
     id: 2
     name: ‘orange’
}
item {
     id: 3
     name: ‘banana’
}
Similarly, you must make a label_map.pbtxt file for your dataset.
同样,您必须为数据集创建一个label_map.pbtxt文件。
Download a pre-trained model to apply transfer learning
下载预训练的模型以应用迁移学习
We will use pre-trained models provided by TensorFlow for training.Download any per-trained model of your choice from the TensorFlow 2 Detection Model Zoo. (just click on the name of the model you want to use to start the download)
我们将使用TensorFlow提供的预训练模型进行训练。从TensorFlow 2 Detection Model Zoo中下载您选择的任何按训练模型。 (只需单击要用于开始下载的模型的名称)
For this tutorial, I am using the SSD Resnet50 V1 FPN 640X640 model.
对于本教程,我使用的是SSD Resnet50 V1 FPN 640X640模型。
Download generate_tfrecords.py script
下载generate_tfrecords.py脚本
This script(generate_tfrecords.py) will be used to covert the annotations into the TFRecord format. Download the script from here.
该脚本(generate_tfrecords.py)将用于将注释转换为TFRecord格式。 从此处下载脚本。
Huge thanks to Lyudmil Vladimirov for allowing me to use some of the content from their amazing TensorFlow 2 Object Detection API Tutorial for Local Machines!
非常感谢Lyudmil Vladimirov允许我使用其令人惊叹的TensorFlow 2 Object Detection API Tutorial for Local Machines中的某些内容!
第2步-在Google云端硬盘上设置目录结构 (Step 2- Set up the directory structure on Google Drive)
Go to your Google Drive and make a new folder named “TensorFlow”.
转到您的Google云端硬盘,并新建一个名为“ TensorFlow ”的文件夹。
Make a directory structure in your TensorFlow folder as shown below.(You can give names of your choice to folders. If you are using different names, change all the paths in Jupyter NoteBook according to your folder names)
如下所示,在TensorFlow文件夹中建立目录结构。(您可以为文件夹指定名称。如果使用其他名称,请根据文件夹名称更改Jupyter NoteBook中的所有路径)
TensorFlow
├───scripts
│   └───preprocessing
└───workspace
    └───training_demo
        ├───annotations
        ├───exported-models
        ├───images
        │   ├───test
        │   └───train
        ├───models
        └───pre-trained-models
We will now add all the collected files (from Step 1) to their respective directories.
现在,我们将所有收集的文件(来自步骤1)添加到它们各自的目录中。
Add the train and test images (with their corresponding XMLfiles) to ‘training_demo/images/train’ and ‘training_demo/images/test’ folder respectively.
将训练和测试图像(及其对应的XML文件)分别添加到“ training_demo / images / train”和“ training_demo / images / test”文件夹中。
Add the label_map.pbtxt file to ‘training_demo/annotations’.
将label_map.pbtxt文件添加到'training_demo / annotations'中。
Add the generate_tfrecord.py script to ‘scripts/preprocessing’.
将generate_tfrecord.py脚本添加到'scripts / preprocessing'中。
Extract the downloaded pre-trained-model and add the extracted folder to ‘training_demo/pre-trained-models’.
提取下载的pre-trained-model并将提取的文件夹添加到'training_demo / pre-trained-models'中。
Go to ‘training_demo/models’ and make a new folder named ‘my_ssd_resnet_v1_fpn’ (name the folder according to the pre-trained-model you have downloaded)
转到“ training_demo / models”,并新建一个名为“ my_ssd_resnet_v1_fpn”的文件夹(根据您下载的预先训练的模型命名该文件夹)
Copy the
复制
pipeline.config file from ‘training_demo/pre-trained-models/ssd_resnet50_v1_fpn_640x640_coco17_tpu-8’ (or from the respective folder of the pre-trained-model you have downloaded and extracted) and paste it into the newly created ‘my_ssd_resnet_v1_fpn’ folder (or the folder new you created in ‘training_demo/models’ according to your pre-trained-model).
来自“ training_demo / pre-trained-models / ssd_resnet50_v1_fpn_640x640_coco17_tpu-8”的pipeline.config文件(或从已下载并提取的预训练模型的相应文件夹中)并将其粘贴到新创建的“ my_ssd_resnet_v1_fpn”文件夹中(或根据您的预训练模型在“ training_demo /模型”中创建的新文件夹)。
After uploading all the files, this is how your directory structure should look like: (new files and folders highlighted in bold)
上传所有文件后,目录结构应如下所示:(新文件和文件夹以粗体突出显示)
TensorFlow
├───scripts
│   └───preprocessing
│     └───generate_tfrecord.py
└───workspace
    └───training_demo
        ├───annotations
        │   └───label_map.pbtxt
        ├───exported-models
        ├───images
        │   ├───test
        │   │     └───test images with corresponding XML files
        │   └───train
        │         └───train images with corresponding XML files
        ├───models
        │   └───my_ssd_resnet50_v1_fpn
        │     └───pipeline.config
        └───pre-trained-models
            └───ssd_resnet50_v1_fpn_640x640_coco17_tpu-8
We will now do most of the steps on Google Colab.
现在,我们将在Google Colab上执行大多数步骤。
I have made a Notebook containing all the steps and relevant codes. (Run the cell with a particular step number to execute that step)You can download the NoteBook from my GitHub Repository.
我制作了一个包含所有步骤和相关代码的笔记本。 (运行具有特定步骤号的单元以执行该步骤)您可以从我的GitHub Repository下载NoteBook。
Open Colab and load the downloaded Notebook.
打开Colab并加载下载的Notebook。
步骤3-选择硬件加速器 (Step 3- Select the Hardware Accelerator)
On Colab, go to Runtime→Change Runtime Type and select Hardware accelerator as GPU.
在Colab上,转到“运行时”→“更改运行时类型”,然后选择“硬件加速器”作为GPU。
NOTE:If you have given different names to your folders and files, don’t forget to change the paths in cells according to your files and folder in Colab Notebook!
注意:如果您为文件夹和文件指定了不同的名称,请不要忘记根据Colab Notebook中的文件和文件夹更改单元格中的路径!
第4步-挂载Google云端硬盘 (Step 4- Mount Google Drive)
from google.colab import drive
drive.mount('/content/gdrive')
You will be given a URL and you will be asked to enter an authentication code to mount your google drive.
系统会为您提供一个URL,并会要求您输入身份验证代码以挂载Google驱动器。
步骤5-下载TensorFlow模型花园 (Step 5- Download TensorFlow Model Garden)
#cd into the TensorFlow directory in your Google Drive
%cd '/content/gdrive/My Drive/TensorFlow'#and clone the TensorFlow Model Garden repository
!git clone https://github.com/tensorflow/models.git
You should now have a new folder named ‘models’ in your TensorFlow directory!
现在您应该在TensorFlow目录中有一个名为' models '的新文件夹!
第6步-安装一些必需的库和工具 (Step 6- Install some required libraries and tools)
!apt-get install protobuf-compiler python-lxml python-pil
!pip install Cython pandas tf-slim
第7步-编译Protobuf库 (Step 7- Compile the Protobuf libraries)
#cd into 'TensorFlow/models/research'
%cd '/content/gdrive/My Drive/TensorFlow/models/research/'!protoc object_detection/protos/*.proto --python_out=.
步骤8:设置环境 (Step 8- Set the environment)
import os
import sysos.environ['PYTHONPATH']+=":/content/gdrive/My Drive/TensorFlow/models"sys.path.append("/content/gdrive/My Drive/TensorFlow/models/research")
第9步-构建并安装setup.py (Step 9- Build and Install setup.py)
!python setup.py build
!python setup.py install
步骤10-测试安装 (Step 10- Test the Installation)
#cd into 'TensorFlow/models/research/object_detection/builders/'
%cd '/content/gdrive/My Drive/TensorFlow/models/research/object_detection/builders/'!python model_builder_tf2_test.py
from object_detection.utils import label_map_util
from object_detection.utils import visualization_utils as viz_utils
print('Done')
If all the installations were successful, you should see output similar to the one shown below.
如果所有安装均成功,您将看到类似于以下所示的输出。
…
[       OK ] ModelBuilderTF2Test.test_invalid_model_config_proto
[ RUN      ] ModelBuilderTF2Test.test_invalid_second_stage_batch_size
[       OK ] ModelBuilderTF2Test.test_invalid_second_stage_batch_size
[ RUN      ] ModelBuilderTF2Test.test_session
[  SKIPPED ] ModelBuilderTF2Test.test_session
[ RUN      ] ModelBuilderTF2Test.test_unknown_faster_rcnn_feature_extractor
[       OK ] ModelBuilderTF2Test.test_unknown_faster_rcnn_feature_extractor
[ RUN      ] ModelBuilderTF2Test.test_unknown_meta_architecture
[       OK ] ModelBuilderTF2Test.test_unknown_meta_architecture
[ RUN      ] ModelBuilderTF2Test.test_unknown_ssd_feature_extractor
[       OK ] ModelBuilderTF2Test.test_unknown_ssd_feature_extractor
----------------------------------------------------------------------
Ran 20 tests in 42.274sOK (skipped=1)
Done
步骤11-生成Tfrecords (Step 11- Generate Tfrecords)
#cd into preprocessing directory
%cd '/content/gdrive/My Drive/TensorFlow/scripts/preprocessing'#run the cell to generate test.record and train.record!python generate_tfrecord.py -x '/content/gdrive/My Drive/TensorFlow/workspace/training_demo/images/train' -l '/content/gdrive/My Drive/TensorFlow/workspace/training_demo/annotations/label_map.pbtxt' -o '/content/gdrive/My Drive/TensorFlow/workspace/training_demo/annotations/train.record'!python generate_tfrecord.py -x '/content/gdrive/My Drive/TensorFlow/workspace/training_demo/images/test' -l '/content/gdrive/My Drive/TensorFlow/workspace/training_demo/annotations/label_map.pbtxt' -o '/content/gdrive/My Drive/TensorFlow/workspace/training_demo/annotations/test.record'# !python generate_tfrecord.py -x '[path_to_train_folder]' -l '[path_to_annotations_folder]/label_map.pbtxt' -o '[path_to_annotations_folder]/train.record'# !python generate_tfrecord.py -x '[path_to_test_folder]' -l '[path_to_annotations_folder]/label_map.pbtxt' -o '[path_to_annotations_folder]/test.record'
You should now have two new files “test.record” and “train.record” in ‘workspace/training_demo/annotations’ folder.
您现在应该在'workspace / training_demo / annotations'文件夹中有两个新文件“ test.record ”和“ train.record ”。
步骤12-复制一些文件 (Step 12- Copying some files)
Copy the “model_main_tf2.py” file from “TensorFlow\models\research\object_detection” and paste it in training_demo folder. We will need this file for training the model.
从“ TensorFlow \ models \ research \ object_detection”复制“ model_main_tf2.py ”文件,并将其粘贴到training_demo文件夹中。 我们将需要此文件来训练模型。
Copy the “exporter_main_v2.py” file from “TensorFlow\models\research\object_detection” and paste it in training_demo folder. We will need this file to export the trained model.
从“ TensorFlow \ models \ research \ object_detection”中复制“ exporter_main_v2.py ”文件,并将其粘贴到training_demo文件夹中。 我们将需要此文件来导出经过训练的模型。
步骤13-配置管道文件 (Step 13- Configure the pipeline file)
Go to ‘training_demo/models/my_ssd_resnet50_v1_fpn’. (or the folder you have created for the downloaded model in your ‘training_demo/models’ directory)
转到“ training_demo /模型/ my_ssd_resnet50_v1_fpn”。 (或您在“ training_demo / models”目录中为下载的模型创建的文件夹)
Open the pipeline.config file. (you can open a file in Colab by simply double-clicking it)
打开pipeline.config文件。 (您只需双击即可在Colab中打开文件)
Change the lines shown below according to your dataset. (set paths according to your folders name and downloaded pre-trained-model)
根据您的数据集更改以下所示的行。 (根据您的文件夹名称和下载的预训练模型设置路径)
Line 3:
num_classes: 3 (#number of classes your model can classify/ number of different labels)Line 131:
batch_size: 16 (#you can read more about batch_size here)Line 161:
fine_tune_checkpoint: "pre-trained-models/ssd_resnet50_v1_fpn_640x640_coco17_tpu-8/checkpoint/ckpt-0" (#path to checkpoint of downloaded pre-trained-model)Line 162:
num_steps: 250000 (#maximum number of steps to train model, note that this specifies the maximum number of steps, you can stop model training on any step you wish)Line 167:
fine_tune_checkpoint_type: "detection" (#since we are training full detection model, you can read more about model fine-tuning here)Line 168:
use_bfloat16: false (#Set this to true only if you are training on a TPU)Line 172:
label_map_path: "annotations/label_map.pbtxt" (#path to your label_map file)Line 174:
input_path: "annotations/train.record" (#path to train.record)Line 182:
label_map_path: "annotations/label_map.pbtxt" (#path to your label_map file)Line 186:
input_path: "annotations/test.record" (#Path to test.record)
第14步-启动TensorBoard (Step 14- Start TensorBoard)
TensorBoard allows you to track and visualize various training metrics while training is ongoing.You can read more about TensorBoard here.
TensorBoard允许您在培训进行期间跟踪和可视化各种培训指标。您可以在此处阅读有关TensorBoard的更多信息。
#cd into training_demo
%cd '/content/gdrive/My Drive/TensorFlow/workspace/training_demo'#start the Tensorboard
%load_ext tensorboard
%tensorboard --logdir=models/my_ssd_resnet50_v1_fpn# %load_ext tensorboard
# %tensorboard --logdir=models/[name_of_pre-trained-model_you_downloaded]
Initially, you will get a message saying “No dashboards are active for the current data set”.But once the training start, you will see various training metrics.
最初,您会收到一条消息,提示“当前数据集没有活动的仪表板”。但是,一旦开始培训,您将看到各种培训指标。
第15步-训练模型 (Step 15- Train the Model)
!python model_main_tf2.py --model_dir=models/my_ssd_resnet50_v1_fpn --pipeline_config_path=models/my_ssd_resnet50_v1_fpn/pipeline.config# !python model_main_tf2.py --model_dir=models/[name_of_pre-trained-model_you_downloaded] --pipeline_config_path=models/[name_of_pre-trained-model_you_downloaded]/pipeline.configOnce your model training starts, you should see output similar to one shown below:
一旦模型训练开始,您应该会看到类似于以下所示的输出:
INFO:tensorflow:Step 100 per-step time 1.154s loss=0.899
I0918 04:22:33.549013 140442778175360 model_lib_v2.py:652] Step 100 per-step time 1.154s loss=0.899
INFO:tensorflow:Step 200 per-step time 1.133s loss=0.861
I0918 04:24:27.194712 140442778175360 model_lib_v2.py:652] Step 200 per-step time 1.133s loss=0.861
INFO:tensorflow:Step 300 per-step time 1.138s loss=0.685
I0918 04:26:20.992518 140442778175360 model_lib_v2.py:652] Step 300 per-step time 1.138s loss=0.685
INFO:tensorflow:Step 400 per-step time 1.131s loss=0.546
I0918 04:28:14.755549 140442778175360 model_lib_v2.py:652] Step 400 per-step time 1.131s loss=0.546
…
You can see various training parameters/metrics (like classification_loss, total_loss,learning_rate…) in your TensorBoard. The training log displays loss once after every 100 steps.
您可以在TensorBoard中查看各种训练参数/指标(例如,classification_loss,total_loss,learning_rate…)。 训练日志每100步显示一次损失。
Training time depends on several factors, such as batch_size, the complexity of objects, hyper-parameters, etc; so be patient and don’t cancel the process.
训练时间取决于几个因素,例如batch_size,对象的复杂性,超参数等; 请耐心等待,不要取消该过程。
A new checkpoint file is saved every 1000 steps. (These checkpoints can be used to restore training progress and continue model training)
每隔1000个步骤将保存一个新的检查点文件。 (这些检查点可用于恢复训练进度并继续进行模型训练)
It is advisable to train the model until the loss is constantly below 0.3! If you do not achieve good results, you can continue training the model (the checkpoints will allow you to restore training progress) until you get satisfactory results!
建议对模型进行训练,直到损失始终低于0.3! 如果效果不佳,则可以继续训练模型(检查点将使您恢复训练进度),直到获得满意的结果为止!
第16步-导出训练好的模型 (Step 16- Export the Trained Model)
We have finished training our model, it’s time to extract our saved_model. This saved_model will be used to perform object recognition.
我们已经完成了对模型的训练,现在该提取我们保存的模型了。 该save_model将用于执行对象识别。
!python exporter_main_v2.py --input_type image_tensor --pipeline_config_path ./models/my_ssd_resnet50_v1_fpn/pipeline.config --trained_checkpoint_dir ./models/my_ssd_resnet50_v1_fpn/ --output_directory ./exported-models/my_model# !python exporter_main_v2.py --input_type image_tensor --pipeline_config_path ./models/[name_of_pre-trained-model you downloaded]/pipeline.config --trained_checkpoint_dir ./models/[name_of_pre-trained-model_you_downloaded]/ --output_directory ./exported-models/my_modelYou should now have a new folder named ‘my_model’ inside your ‘training_demo/exported-models’ directory. This folder contains our saved_model.
您现在应该在自己的文件夹中有一个名为“ my_model ”的新文件夹。 'training_demo / exported-models'目录。 此文件夹包含我们的saved_model。
Now it’s time to test our trained model!
现在该测试我们训练有素的模型了!
步骤17-测试模型(加载saved_model) (Step 17- Testing the model (Loading saved_model))
#Loading the saved_model(change the path according to your directory names)import tensorflow as tf
import time
from object_detection.utils import label_map_util
from object_detection.utils import visualization_utils as viz_utilsPATH_TO_SAVED_MODEL="/content/gdrive/My Drive/TensorFlow/workspace/training_demo/exported-models/my_model/saved_model"print('Loading model...', end='')# Load saved model and build the detection function
detect_fn=tf.saved_model.load(PATH_TO_SAVED_MODEL)print('Done!')
步骤18-测试模型(加载label_map) (Step 18- Testing the model (Loading label_map))
#Loading the label_map
category_index=label_map_util.create_category_index_from_labelmap("/content/gdrive/My Drive/TensorFlow/workspace/training_demo/annotations/label_map.pbtxt",use_display_name=True)#category_index=label_map_util.create_category_index_from_labelmap([path_to_label_map],use_display_name=True)
步骤19-测试模型(加载图像) (Step 19- Testing the model (Loading images))
#Loading the image
img=['/content/img1.jpg','/content/img2.jpg']
print(img)#list containing paths of all the images
步骤20-运行推理 (Step 20- Running the Inference)
import numpy as np
from PIL import Image
import matplotlib.pyplot as plt
import warnings
warnings.filterwarnings('ignore')def load_image_into_numpy_array(path):
return np.array(Image.open(path))for image_path in img:print('Running inference for {}... '.format(image_path), end='')
image_np=load_image_into_numpy_array(image_path)input_tensor=tf.convert_to_tensor(image_np)
input_tensor=input_tensor[tf.newaxis, ...]detections=detect_fn(input_tensor)num_detections=int(detections.pop('num_detections'))
detections={key:value[0,:num_detections].numpy()
for key,value in detections.items()}
detections['num_detections']=num_detectionsdetections['detection_classes']= detections['detection_classes'].astype(np.int64)image_np_with_detections=image_np.copy()viz_utils.visualize_boxes_and_labels_on_image_array(
image_np_with_detections,
detections['detection_boxes'],
detections['detection_classes'],
detections['detection_scores'],
category_index,
use_normalized_coordinates=True,
max_boxes_to_draw=100,
min_score_thresh=.5,
agnostic_mode=False)%matplotlib inline
plt.figure()
plt.imshow(image_np_with_detections)
print('Done')
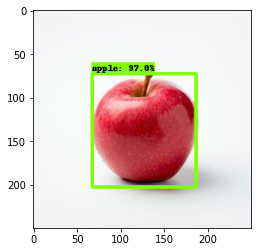
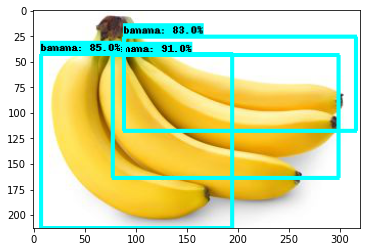
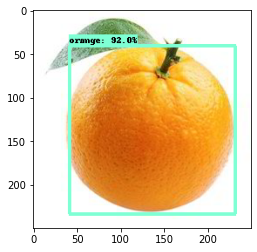
plt.show()If everything is successful, you should see your loaded images with bounding boxes, labels, and accuracy!
如果一切成功,则应该看到已加载的图像以及边界框,标签和准确性!
致谢和参考: (Acknowledgments and References:)
Huge Thanks to Lyudmil Vladimirov for allowing me to use some of the content from their amazing TensorFlow 2 Object Detection API for Local Machines!Link to their GitHub Repository.
非常感谢Lyudmil Vladimirov允许我使用其令人惊叹的TensorFlow 2对象检测API用于本地计算机的某些内容!链接到其GitHub存储库。
翻译自: https://medium.com/@nisargkapkar/tensorflow-2-object-detection-api-with-google-colab-b2af171e81cc
谷歌 colab


 212
212

 被折叠的 条评论
为什么被折叠?
被折叠的 条评论
为什么被折叠?
 到【灌水乐园】发言


