


熊猫压缩怎么使用
If you work in the data analysis world, chances are you do a lot of data wrangling. If you use pandas in your data workflow, you’ve probably noticed that you often write the same bits of code.
如果您在数据分析领域工作,那么您很可能会处理大量数据。 如果在数据工作流程中使用熊猫,您可能已经注意到经常编写相同的代码。
Although some complex datasets or data exploratory require going to Jupyter notebooks, on the other hand, some datasets require simple processing, going through the process of setting up an environment, and creating a new notebook can be a little overwhelming.
尽管某些复杂的数据集或数据探索需要使用Jupyter笔记本,但另一方面, 某些数据集需要简单的处理 ,设置环境的过程以及创建新笔记本的工作可能会有些麻烦。
So you probably end up opening it in a spreadsheet. However if spreadsheets are accommodating, they are difficult to automate and do not offer as many features as pandas.
因此,您最终可能会在电子表格中打开它。 但是,如果可以容纳电子表格,则它们很难实现自动化,并且无法提供与熊猫一样多的功能。
How to take advantage of the features of pandas while keeping the flexibility of spreadsheets?
如何在保持电子表格灵活性的同时利用熊猫的功能?
By wrapping pandas functions in a command-line interface with chainable commands. A command-line interface or CLI allows us to quickly open a terminal and start typing in commands to execute some tasks. Chainable commands mean the result of one command is passed to another, which is particularly interesting in processing data.
通过将熊猫函数包装在带有可链接命令的命令行界面中 。 命令行界面或CLI允许我们快速打开终端并开始输入命令来执行某些任务 。 可链接命令意味着将一个命令的结果传递给另一命令,这在处理数据时特别有趣。
In this article, we will use Click to build a CLI. Click is a Python package to quickly build CLI without having to parse the command line arguments with native python libraries.
在本文中,我们将使用Click来构建CLI。 Click是一个Python软件包,可快速构建CLI,而无需使用本地python库解析命令行参数。
We will first install a template Click project taken from Click documentation that allows chaining commands. Then I will walk you through writing commands to read, filter, display, and write files using pandas under the hood. In the end, you would be able to write your own commands to fit your needs.
我们将首先安装一个来自Click文档的 C lick项目模板,该项目允许链接命令。 然后,我将引导您完成使用引擎盖下的熊猫编写的读取,过滤,显示和写入文件的命令。 最后,您将能够编写自己的命令来满足您的需求。

要求 (Requirements)
Before going further you will need to have Python 3.7 or greater installed on your environment.
在继续之前,您需要在您的环境中安装Python 3.7或更高版本 。
获取和安装项目 (Getting and installing the project)
You will found the template in this Github repository, you can either download the zip or clone it using git. Now that you have the source code let’s install it.
您将在此Github存储库中找到模板,您可以下载zip或使用git克隆它。 现在您已经有了源代码,让我们安装它。
- Open a terminal/IDE inside the folder you have clone/download 在您具有克隆/下载的文件夹中打开终端/ IDE
Create a Python virtual environment :
python -m venv venv创建P ython虚拟环境 :
python -m venv venvInstall the project dependencies with :
pip install --editable .使用以下命令安装项目依赖项:
pip install --editable .To see if the project is successfully installed type:
pdIt should print some pieces of information about how to use the CLI.要查看项目是否已成功安装,请输入:
pd它应该打印一些有关如何使用CLI的信息。
Note: The project will install Click, pandas, and xlrd as dependencies.
注意:该项目将安装Click,pandas和xlrd作为依赖项。
Once the project is installed, let’s review its structure.
安装项目后,让我们查看其结构。
了解项目的文件夹结构。 (Understanding the folder structure of the project.)
At the root directory, you’ll find the setup.py. This file is responsible for installing the project dependencies and also allows you to specify an entry point for the CLI, in our case pd .
在根目录下,您会找到setup.py。 该文件负责安装项目依赖项,还允许您为CLI指定入口点,在本例中为pd 。
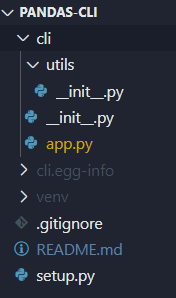
Finally, we have the cli folder, it contains an app.py file and a utils subfolder. The app.py is where we will write our commands and the utils folders will contain Python files to store custom utilities function/classes when the CLI will grow.
最后,我们有cli文件夹,它包含一个app.py文件和一个utils子文件夹。 在app.py中,我们将编写命令,而utils文件夹将包含Python文件,以便在CLI增长时存储自定义实用程序的功能/类。
快速开始点击 (Quick start to Click)
I will not do a full detailed tutorial on Click. That being said if you’ve never used Click before, let’s write a first command to understand how Click works.
我不会在Click上做完整的详细教程。 话虽如此,如果您以前从未使用过Click,那么让我们编写第一个命令来了解Click的工作原理。
Click is based on the decorator pattern. You’ll use decorators to declare commands, arguments, options, and more. This pattern makes it possible for the user to concentrate on the important part of the code rather than spending time parsing, checking command line inputs.
单击基于装饰器模式 。 您将使用装饰器声明命令,参数,选项等。 这种模式使用户可以专注于代码的重要部分,而不用花费时间分析,检查命令行输入。
Copy-paste the code from quickstart.py below to the bottom of your cli/app.py in your project directory.
从quickstart.py 复制粘贴代码 在项目目录中cli / app.py的底部下方。
Now if you type pdin a terminal, you should see “hello" in the command section.It means our hello_cmd has successfully been registered with the @cli.command("hello") decorator. The name passed to @cli.commandis the one you will use in the console to run this command. So, if you type pd hello you will see hello world printed in your console.
现在,如果您在终端中键入pd ,您将在命令部分看到“ hello ”。这意味着我们的hello_cmd已成功通过@cli.command("hello")装饰器注册。传递给@cli.command的名称是您将在控制台中使用该命令来运行此命令。因此,如果键入pd hello您将在控制台中看到hello world 。
You’ll notice the very explicit decorators @click.option , it is used to pass options to our commands like so : pd hello -n random here -n is the option and random the value of the -n option.Options can be configured so that they can be required, have a default value for all possible parameters see here. The important thing to note here is that the name of the parameter given to the hello_cmd function matches the name of the option.
您会注意到非常明确的装饰器@click.option ,它用于将选项传递给我们的命令,如下所示: pd hello -n random这里-n是选项,而random是-n option的值。可以配置选项为使它们成为必需,请为所有可能的参数提供默认值,请参见此处 。 这里要注意的重要一点是, 赋予hello_cmd函数的参数名称与选项名称匹配。
Now, you are probably wondering why we have our command decorated with the decorator generator and a yield statement. This is what we will see right now.
现在,您可能想知道为什么我们要用装饰器生成器和yield语句装饰命令。 这就是我们现在所看到的。
Note: you can remove the code from the hello command we will no longer need it.
注意 :您可以从hello命令中删除代码,我们将不再需要它。
可链接的命令:全局 (Chainable commands: the big picture)
Click documentation provides an example repository that shows how to make a CLI with chainable commands. The chainable process is handled by three components that you can see in the app.py file:
单击文档提供了一个示例存储库 ,该存储库显示了如何使用可链接命令制作CLI。 可链接过程由app.py文件中的三个组件处理:
- cli.resultcallback cli.callback
- processor decorator 处理器装饰器
- generator decorator 发电机装饰器
Chainable commands are based on two intermediate topics in python Decorators and Generators. The use of Generators makes it possible to produce flows. Let’s look at a simpler example to understand how to create a stream using Generators.
可链接命令基于python Decorators和Generators中的两个中间主题。 使用发生器可以产生流量。 让我们看一个更简单的示例,以了解如何使用Generators创建流。
Note: Names can be confusing, but the generator decorator in app.py is not a Python Generator.
注意 :名称可能会造成混淆,但是app.py中的生成器装饰器不是Python Generator 。
We are creating three Generators thanks to yieldstatement. The generator function is pushing data to feed the stream whereas processor_one and processor_two are processing data and passes updated values downstream.
由于yield语句,我们正在创建三个Generator。 生成器功能正在推送数据以馈送流,而processor_one和processor_two正在处理数据并向下游传递更新的值。
Then lines 25–27 we are creating a stream by wrapping Generators with each other.Note that the stream is actually consumed only in lines 30–31. Before, nothing is pulled off the stream because Generators are lazily evaluated.
然后,在第25-27行中,我们通过将Generators相互包装来创建流。请注意, 实际上仅在第30-31行中使用了该流。 以前,没有任何东西可以从流中撤出,因为对Generators的评估是懒惰的 。
The chainable commands process is based on the same mechanism. commands decorated with the generator decorator will not receive a value from the stream as input and will feed the stream with a new value. Commands decorated with the processor decorator will receive as first input the value of the stream and will feed the stream with the updated value.
可链接命令过程基于相同的机制。 用生成器装饰器装饰的命令将不会从流中接收值作为输入,而会将新值提供给流。 用处理器装饰器装饰的命令将首先接收流的值,并将更新后的值提供给流。
Both decorators send our commands to the cli.resultcallback where the stream is first constructed and then consumed. Finally, all our commands need to be Python Generators, that why in the earlier hello command we were yielding even if nothing was pushed to the stream.
两个装饰器都将我们的命令发送到cli.resultcallback ,在此首先构造流,然后使用该流。 最后, 我们所有的命令都必须是Python Generators ,这就是为什么在以前的hello命令中,即使没有任何内容推送到流中,我们也要屈服。
Note: This is a fairly simplistic approach. The objective is only to give you the keys so that later you would know which decorator to use.
注意:这是一种相当简单的方法。 目的只是给您密钥,以便以后您知道要使用哪个装饰器。
Now that we know how chainable commands works, let’s finally write useful commands with pandas under the hood.
既然我们知道了可链接命令的工作原理,那么最后让我们在幕后用熊猫编写有用的命令。
读取和打印数据框 (Reading and printing DataFrames)
We are going to code a command that will allow us to read files and put in the stream a DataFrame for the following commands and one to display the head of the DataFrame in the console.
我们将编写一个命令,该命令将允许我们读取文件并将以下命令的DataFrame放入流中,并在控制台中显示DataFrame的头部。
Note: If you copy-paste the following code in your app.py make sure to move imports ,
CONFIGandargs_to_dictat the very top of the file, read and head commands at the bottom of it.注意:如果将以下代码复制粘贴到app.py中,请确保将imports,
CONFIG和args_to_dict文件的最顶部,并在其底部读取并执行命令。
Let’s break the code down, we first create a dictionary to map the file extension to the matching pandas’ read function. Then we make it possible to pass parameters to the pandas read function thanks toargs_to_dict which converts a string to a dict of parameters. As you can see, I make use of the literal eval function for converting a string into a Python Object.
让我们分解代码,我们首先创建一个字典,将文件扩展名映射到匹配的熊猫的read函数。 然后, args_to_dict ,我们可以将参数传递给pandas read函数,该函数将字符串转换为参数dict 。 如您所见,我利用文字eval函数将字符串转换为Python对象。
Then starting from line 26 we defined our read command. The read command is decorated with the generator decorator because it will feed the stream and doesn’t need to process value from it.You can notice there are two options defined, one for the filename and one for parameters. The body of the read command is pretty straightforward, we get the right pandas’ read function by extracting the file extension from the input and then execute it.
然后从第26行开始,我们定义了read命令 。 read命令使用生成器装饰器进行装饰,因为它将馈送流,并且不需要处理流中的值。您会注意到定义了两个选项 ,一个用于文件名 ,一个用于参数 。 read命令的主体非常简单,我们通过从输入中提取文件扩展名然后执行它来获得正确的pandas的read函数。
Note: For now, only CSV and xlsx file extensions are implemented in this example.
注意 :在此示例中,目前仅实现CSV和xlsx文件扩展名。
Starting from line 56 we create a head command to display the head of a DataFrame. This command is decorated with the processor decorator because it pulls a value from the stream (the DataFrame) and processes it (display it).
从第56行开始,我们创建一个head命令来显示DataFrame的头部。 此命令由处理器装饰器修饰,因为它从流 (DataFrame)中提取一个值并对其进行处理 (显示)。
Now, if you type pd in a terminal, you should see that read and head commands are available. You can test them with :pd read -f you_file.csv -p 'name_param=value|name_param=value' head This command will read a CSV file with some parameters and forward the resulting DataFrame to the head command that will display the first five lines of it.
现在,如果在终端中键入pd ,您应该看到read和head命令可用。 您可以使用以下命令进行测试: pd read -f you_file.csv -p 'name_param=value|name_param=value' head此命令将读取包含某些参数的CSV文件,并将结果DataFrame转发到head命令,该命令将显示前五个行。
Now, let’s see how we can filter a DataFrame from the command line.
现在,让我们看看如何从命令行过滤DataFrame。
过滤数据框 (Filtering DataFrames)
To filter a DataFrame we will be using the query method from pandas’ DataFrame class. Like the literal eval function used in the read command, the query function allows you to parse strings and transform them into boolean expression.
为了过滤DataFrame,我们将使用pandas的DataFrame类中的查询方法 。 类似于read命令中使用的文字eval函数,查询函数使您可以解析字符串并将其转换为布尔表达式。
The code is pretty simple, it just about wrapping the query method and forward to it the expression received from the option.
该代码非常简单,只需包装查询方法并将从选项接收的表达式转发给它即可。
You will now be able to filter a DataFrame with an expression such as colname == condtion & colname > condition and because our commands are chainable, you can chain multiple filters: pd read filename.csv filter -e 'colname == x' filter -e 'colname > y' .
现在,您将能够使用诸如colname == condtion & colname > condition这样的表达式来过滤DataFrame,并且由于我们的命令是可链接的,因此您可以链接多个过滤器: pd read filename.csv filter -e 'colname == x' filter -e 'colname > y' 。
Note : If you are working with strings conditions like
colname == "string"then you will need to escape it in your command like thispd read -f filename.csv filter -e 'colname == \"string\"'(powershell).注意:如果使用的是诸如
colname == "string"类的字符串条件,则需要像这样pd read -f filename.csv filter -e 'colname == \"string\"'(powershell)在命令中对其进行转义)。
Finally, let’s write a command to export DataFrames.
最后,让我们编写一个导出DataFrames的命令。
导出数据框 (Exporting DataFrames)
To conclude our workflow, we need to be able to export our DataFrames. Let’s see what the command to do it looks like.
要结束我们的工作流程,我们需要能够导出我们的DataFrames。 让我们看看执行该命令的样子。
Note: make sure to update the CONFIG dict at the top of file with the new one provided here.
注意:请确保使用此处提供的新内容更新文件顶部的CONFIG dict。
Unlike the read command, the write command is decorated with the processor decorator as it needs to have the DataFrame to process it.
与read命令不同,write命令由处理器装饰器装饰,因为它需要DataFrame对其进行处理。
Similar to what we did with the read command, we map the name of the output file with the associated pandas’ function.
与使用read命令相似,我们将输出文件的名称与关联的pandas函数映射 。
Then we forward the input parameters that we received and transformed beforehand.Finally, we are yielding no value as the write command marks the end of the pipeline.
然后我们转发预先接收并转换的输入参数。 最后,由于写入命令标记了管道的结尾,因此没有任何价值 。
Now it is possible to export DataFrame with commands like : pd read -f import.csv to -f export.csv -p 'sep=;|index=False'
现在可以使用以下命令将DataFrame导出: pd read -f import.csv to -f export.csv -p 'sep=;|index=False' -p'sep pd read -f import.csv to -f export.csv -p 'sep=;|index=False'
结论和下一步 (Conclusion & next steps)
You now have the basics understanding of how Click works and how it is possible to chain commands. With that in mind, you are now able to implement other pandas commands that can simplify your daily life. Command-line also gives you the possibility to automate some workflow by creating bash scripts.
现在,您已基本了解Click的工作方式以及如何链接命令。 考虑到这一点,您现在可以实现其他熊猫命令来简化您的日常生活。 命令行还使您可以通过创建bash脚本来自动化某些工作流程。
In my previous story, I showed how to integrate Vue.js with Python to create a report with data visualization and send it by email.
在我以前的故事中,我展示了如何将Vue.js与Python集成在一起以创建具有数据可视化的报告并通过电子邮件发送报告。
Based on this, it is possible to create a command that exports a DataFrame to a data table in HTML format and open it in our Browser or send it by email.
基于此,可以创建一个以HTML格式将DataFrame导出到数据表并在我们的浏览器中打开它或通过电子邮件发送的命令。

That will be all for this article, Thank you for reading.
这就是本文的全部内容,谢谢阅读。
翻译自: https://towardsdatascience.com/start-using-pandas-from-the-command-line-5dcae6b2ccca
熊猫压缩怎么使用


 7720
7720


 被折叠的 条评论
为什么被折叠?
被折叠的 条评论
为什么被折叠?
 到【灌水乐园】发言


