


In this tutorial, we will explore how to build and train deep autoencoders using Keras and Tensorflow.
在本教程中,我们将探索如何使用Keras和Tensorflow构建和训练深度自动编码器。
The primary reason I decided to write this tutorial is that most of the tutorials out there, including the official Keras and TensorFlow ones, use the MNIST data for the training. I have been asked numerous times to show how to train autoencoders using our own images that may be large in number.
我决定编写此教程的主要原因是那里的大多数教程(包括官方的Keras和TensorFlow教程)都使用MNIST数据进行培训。 我无数次被要求展示如何使用我们自己的图像(可能数量很多)来训练自动编码器。
I will try to keep this tutorial brief and will not get into the details of how autoencoder works. Therefore, having a basic knowledge of autoencoders is the prerequisite to understand the code presented in this tutorial (needless to say that you must know how to program in Python, Keras and TensorFlow).
我将尝试使本教程简短,而不会深入探讨自动编码器的工作原理。 因此,具有自动编码器的基础知识是理解本教程中提供的代码的先决条件(不必说您必须知道如何使用Python,Keras和TensorFlow进行编程)。
自动编码器 (Autoencoders)
Autoencoders are unsupervised neural networks that learn to reconstruct its input. Denoising an image is one of the uses of autoencoders. Denoising is very useful for OCR. Autoencoders are also also used for image compression.
自动编码器是无监督的神经网络,可以学习重建其输入。 对图像进行降噪是自动编码器的用途之一。 去噪对于OCR非常有用。 自动编码器也用于图像压缩。
As shown in Figure 1, an autoencoder consists of:
如图1所示,自动编码器包括:
- Encoder: The encoder takes an image as input and generates an output which is much smaller dimension compared to the original image. The output from the encoders is also called as the latent representation of the input image. 编码器:编码器将图像作为输入并生成输出,该输出的尺寸比原始图像小得多。 编码器的输出也称为输入图像的潜在表示。
- Decoder: The decoder takes the output from the encoder (aka the latent representation of the input image) and reconstructs the input image. 解码器:解码器从编码器获取输出(又称输入图像的潜在表示)并重建输入图像。
Both encoders and decoders are convolutional neural networks with the difference that the encoders dimensions reduce with each layer and the decoders dimensions increase with each layer until the output layer where the dimensions match with the original image.
编码器和解码器都是卷积神经网络,不同之处在于编码器的尺寸随每一层减小,而解码器的尺寸随每一层增大,直到输出层的尺寸与原始图像匹配为止。
培训自动编码器 (Training Autoencoders)
We will use our own images for training and testing the autoencoders. For the purpose of this tutorial, we will use a dataset that contains scanned images of restaurant receipts. The dataset is freely available from the link https://expressexpense.com/large-receipt-image-dataset-SRD.zip uner MIT License.
我们将使用自己的图像来训练和测试自动编码器。 在本教程中,我们将使用包含餐厅收据扫描图像的数据集。 可从MIT许可中的链接https://expressexpense.com/large-receipt-image-dataset-SRD.zip免费获得该数据集。
Although this dataset does not have a large number of images, we will write code that will work for both small and large datasets.
尽管此数据集没有大量图像,但我们将编写适用于小型和大型数据集的代码。
The code below is divided into 4 parts.
下面的代码分为4部分。
- Data preparation: Images will be read from a directory and fed as inputs to the encoder block. 数据准备:将从目录中读取图像,并将其作为输入提供给编码器块。
- Neural network configuration: We will write a function that takes certain parameters and return the encoder, decoder and autoencoder convolutional neural networks 神经网络配置:我们将编写一个带有某些参数的函数,并返回编码器,解码器和自动编码器卷积神经网络
- Training the neural networks: The code that triggers the training, monitors the progress and saves the trained models. 训练神经网络:触发训练,监视进度并保存训练后模型的代码。
- Prediction: The code block that uses the trained models and predicts the output. 预测:使用经过训练的模型并预测输出的代码块。
I will use Google Colaboratory (https://colab.research.google.com/) to execute the code. You can use your favorite IDE to write and run the code. The code below works both for CPUs and GPUs, I will use the GPU based machine to speed up the training. Google Colab offers a free GPU based virtual machine for education and learning.
我将使用Google Colaboratory( https://colab.research.google.com/ )执行代码。 您可以使用自己喜欢的IDE编写和运行代码。 下面的代码适用于CPU和GPU,我将使用基于GPU的机器来加快培训速度。 Google Colab提供了免费的基于GPU的虚拟机,用于教育和学习。
If you use a Jupyter notebook, the steps below will look very similar.
如果您使用Jupyter笔记本,则以下步骤看起来非常相似。
First we create a notebook project, AE Demo for example.
首先,我们创建一个笔记本项目,例如AE Demo。
Before we start the actual code, let’s import all dependencies that we need for our project. Here is a list of imports that we will need.
在开始实际代码之前,让我们导入项目所需的所有依赖项。 这是我们需要的进口清单。
# Import the necessary packages
#导入必要的软件包
import tensorflow as tf
将tensorflow作为tf导入
from google.colab.patches import cv2_imshow
从google.colab.patches导入cv2_imshow
from tensorflow.keras.layers import BatchNormalization
从tensorflow.keras.layers导入BatchNormalization
from tensorflow.keras.layers import Conv2D
从tensorflow.keras.layers导入Conv2D
from tensorflow.keras.layers import Conv2DTranspose
从tensorflow.keras.layers导入Conv2DTranspose
from tensorflow.keras.layers import LeakyReLU
从tensorflow.keras.layers导入LeakyReLU
from tensorflow.keras.layers import Activation
从tensorflow.keras.layers导入激活
from tensorflow.keras.layers import Flatten
从tensorflow.keras.layers导入Flatten
from tensorflow.keras.layers import Dense
从tensorflow.keras.layers导入Dense
from tensorflow.keras.layers import Reshape
从tensorflow.keras.layers导入重塑
from tensorflow.keras.layers import Input
从tensorflow.keras.layers导入输入
from tensorflow.keras.models import Model
从tensorflow.keras.models导入模型
from tensorflow.keras import backend as K
从tensorflow.keras将后端导入为K
from tensorflow.keras.optimizers import Adam
从tensorflow.keras.optimizers导入Adam
import numpy as np
将numpy导入为np
Listing 1.1: Import the necessary packages.
代码清单1.1:导入必要的软件包
数据准备: (Data Preparation:)
Our receipt images are in a directory. We will use ImageDataGenerator class, provided by Keras API, and create training and test iterators as shown in the listing 1.2 below.
我们的收据图像位于目录中。 我们将使用Keras API提供的ImageDataGenerator类,并创建训练和测试迭代器,如下面清单1.2所示。
trainig_img_dir = “inputs”
trainig_img_dir =“输入”
height = 1000
高度= 1000
width = 500
宽度= 500
channel = 1
频道= 1
batch_size = 8
batch_size = 8
datagen = tf.keras.preprocessing.image.ImageDataGenerator(validation_split=0.2, rescale=1. / 255.)
datagen = tf.keras.preprocessing.image.ImageDataGenerator(validation_split = 0.2,rescale = 1. / 255。)
train_it = datagen.flow_from_directory(
train_it = datagen.flow_from_directory(
trainig_img_dir,
trainig_img_dir,
target_size=(height, width),
target_size =(高度,宽度),
color_mode=’grayscale’,
color_mode ='灰度',
class_mode=’input’,
class_mode ='输入',
batch_size=batch_size,
batch_size =批量大小,
subset=’training’) # set as training data
subset ='training')#设置为训练数据
val_it = datagen.flow_from_directory(
val_it = datagen.flow_from_directory(
trainig_img_dir,
trainig_img_dir,
target_size=(height, width),
target_size =(高度,宽度),
color_mode=’grayscale’,
color_mode ='灰度',
class_mode=’input’,
class_mode ='输入',
batch_size=batch_size,
batch_size =批量大小,
subset=’validation’) # set as validation data
subset ='validation')#设置为验证数据
Listing 1.2: Image input preparation. Load images in batches from a directory.
代码清单1.2:图像输入准备 从目录中批量加载图像。
Important notes about Listing 1.2:
有关清单1.2的重要说明:
- training_img_dir = “inputs” is the parent directory that contains the receipt images. In other words, receipts are in a subdirectory under the “inputs” directory. training_img_dir =“输入”是包含收据图像的父目录。 换句话说,收据位于“输入”目录下的子目录中。
- color_mode=’grayscale’ is important if you want to convert your input images into grayscale. 如果要将输入图像转换为灰度,color_mode =“灰度”非常重要。
All other parameters are self explanatory.
所有其他参数不言自明。
配置自动编码器神经网络 (Configure Autoencoder Neural Networks)
As shown in Listing 1.3 below, we have created an AutoencoderBuilder class that provides a function build_ae(). This function takes the following arguments:
如下面的清单1.3所示,我们创建了一个AutoencoderBuilder类,该类提供了一个build_ae()函数。 此函数采用以下参数:
- height of the input images, 输入图像的高度,
- width of the input images, 输入图像的宽度,
- depth (or the number of channels) of the input images. 输入图像的深度(或通道数)。
- filters as a tuple with the default as (32,64) 过滤为元组,默认为(32,64)
- latentDim which represents the dimension of the latent vector latentDim,代表潜在向量的维数
class AutoencoderBuilder:
AutoencoderBuilder类:
@staticmethod
@staticmethod
def build_ae(height, width, depth, filters=(32, 64), latentDim=16):
def build_ae(高度,宽度,深度,过滤器=(32,64),latentDim = 16):
#Initialize the input shape.
#初始化输入形状。
inputShape = (height, width, depth)
inputShape =(高度,宽度,深度)
chanDim = -1
chanDim = -1
# define the input to the encoder
#定义编码器的输入
inputs = Input(shape=inputShape)
输入=输入(shape = inputShape)
x = inputs
x =输入
# loop over the filters
#遍历过滤器
for filter in filters:
用于过滤器中的过滤器:
# Build network with Convolutional with RELU and BatchNormalization
#使用RELU和BatchNormalization通过卷积构建网络
x = Conv2D(filter, (3, 3), strides=2, padding=”same”)(x)
x = Conv2D(过滤器,(3,3),步幅= 2,填充=“相同”)(x)
x = LeakyReLU(alpha=0.2)(x)
x = LeakyReLU(alpha = 0.2)(x)
x = BatchNormalization(axis=chanDim)(x)
x =批次归一化(axis = chanDim)(x)
# flatten the network and then construct the latent vector
#展平网络,然后构造潜在向量
volumeSize = K.int_shape(x)
volumeSize = K.int_shape(x)
x = Flatten()(x)
x = Flatten()(x)
latent = Dense(latentDim)(x)
潜伏=密集(latentDim)[x)
# build the encoder model
#建立编码器模型
encoder = Model(inputs, latent, name=”encoder”)
编码器=型号(输入,潜伏,名称=“编码器”)
# We will now build the the decoder model which takes the output from the encoder as its inputs
#现在,我们将构建解码器模型,该模型将编码器的输出作为输入
latentInputs = Input(shape=(latentDim,))
latentInputs =输入(shape =(latentDim,))
x = Dense(np.prod(volumeSize[1:]))(latentInputs)
x =密集(np.prod(volumeSize [1:]))(latentInputs)
x = Reshape((volumeSize[1], volumeSize[2], volumeSize[3]))(x)
x =重塑((volumeSize [1],volumeSize [2],volumeSize [3]))(x)
# We will loop over the filters again but in the reverse order
#我们将再次循环过滤器,但顺序相反
for filter in filters[::-1]:
用于过滤器中的过滤器[::-1]:
# In the decoder, we will apply a CONV_TRANSPOSE with RELU and BatchNormalization operation
#在解码器中,我们将通过RELU和BatchNormalization操作应用CONV_TRANSPOSE
x = Conv2DTranspose(filter, (3, 3), strides=2,
x = Conv2DTranspose(filter,(3,3),strides = 2,
padding=”same”)(x)
填充=“相同”)(x)
x = LeakyReLU(alpha=0.2)(x)
x = LeakyReLU(alpha = 0.2)(x)
x = BatchNormalization(axis=chanDim)(x)
x =批次归一化(axis = chanDim)(x)
# Now, we want to recover the original depth of the image. For this, we apply a single CONV_TRANSPOSE layer
#现在,我们要恢复图像的原始深度。 为此,我们应用一个CONV_TRANSPOSE层
x = Conv2DTranspose(depth, (3, 3), padding=”same”)(x)
x = Conv2DTranspose(depth,(3,3),padding =“ same”)(x)
outputs = Activation(“sigmoid”)(x)
输出=激活(“ sigmoid”)(x)
# Now build the decoder model
#现在建立解码器模型
decoder = Model(latentInputs, outputs, name=”decoder”)
解码器=模型(latentInputs,输出,名称=“解码器”)
# Finally, the autoencoder is the encoder + decoder
#最后,自动编码器是编码器+解码器
autoencoder = Model(inputs, decoder(encoder(inputs)),
autoencoder =模型(输入,解码器(编码器(输入)),
name=”autoencoder”)
名称=“自动编码器”)
# return a tuple of the encoder, decoder, and autoencoder models
#返回编码器,解码器和自动编码器模型的元组
return (encoder, decoder, autoencoder)
返回(编码器,解码器,自动编码器)
Listing 1.3: Builder class to create autoencoder networks.
代码清单1.3:用于创建自动编码器网络的Builder类
培训自动编码器 (Training Autoencoders)
The following code Listing 1.4 starts the autoencoder training.
以下代码清单1.4开始自动编码器训练。
# initialize the number of epochs to train for and batch size
#初始化要训练的时期数和批量大小
EPOCHS = 300
EPOCHS = 300
BATCHES = 8
批次= 8
MODEL_OUT_DIR = “ae_model_dir”
MODEL_OUT_DIR =“ ae_model_dir”
# construct our convolutional autoencoder
#构造我们的卷积自动编码器
print(“[INFO] building autoencoder…”)
打印(“ [[INFO] Building autoencoder ...”)
(encoder, decoder, autoencoder) = AutoencoderBuilder().build_ae(height,width,channel)
(编码器,解码器,自动编码器)= AutoencoderBuilder()。build_ae(高度,宽度,通道)
opt = Adam(lr=1e-3)
opt =亚当(lr = 1e-3)
autoencoder.compile(loss=”mse”, optimizer=opt)
autoencoder.compile(loss =“ mse”,Optimizer = opt)
# train the convolutional autoencoder
#训练卷积自动编码器
history = autoencoder.fit(
历史= autoencoder.fit(
train_it,
train_it,
validation_data=val_it,
validation_data = val_it,
epochs=EPOCHS,
epochs = EPOCHS,
batch_size=BATCHES)
batch_size = BATCHES)
autoencoder.save(MODEL_OUT_DIR+”/ae_model.h5”)
autoencoder.save(MODEL_OUT_DIR +” / ae_model.h5”)
Listing 1.4: Training autoencoder model.
代码清单1.4:训练自动编码器模型
可视化培训指标 (Visualizing the Training Metrics)
The code listing 1.5 shows how to display a graph of loss/accuracy per epoch of both training and validation. Figure 2 shows a sample output of the code Listing 1.5
代码清单1.5显示了如何显示训练和验证的每个时期的损失/准确性图。 图2显示了代码清单1.5的示例输出。
# set the matplotlib backend so figures can be saved in the background
#设置matplotlib后端,以便可以将图形保存在后台
import matplotlib
导入matplotlib
import matplotlib.pyplot as plt
导入matplotlib.pyplot作为plt
%matplotlib inline
%matplotlib内联
# construct a plot that plots and displays the training history
#构造一个绘制并显示训练历史的图
N = np.arange(0, EPOCHS)
N = np.arange(0,EPOCHS)
plt.style.use(“ggplot”)
plt.style.use(“ ggplot”)
plt.figure()
plt.figure()
plt.plot(N, history.history[“loss”], label=”train_loss”)
plt.plot(N,history.history [“ loss”],label =“ train_loss”)
plt.plot(N, history.history[“val_loss”], label=”val_loss”)
plt.plot(N,history.history [“ val_loss”],label =“ val_loss”)
plt.title(“Training Loss and Accuracy”)
plt.title(“培训损失和准确性”)
plt.xlabel(“Epoch #”)
plt.xlabel(“ Epoch#”)
plt.ylabel(“Loss/Accuracy”)
plt.ylabel(“损失/准确性”)
plt.legend(loc=”lower left”)
plt.legend(loc =“左下角”)
# plt.savefig(plot)
#plt.savefig(图)
plt.show(block=True)
plt.show(block = True)
Listing 1.5: Display a plot of training loss and accuracy vs epochs
清单1.5:显示训练损失和准确性与历时的关系图
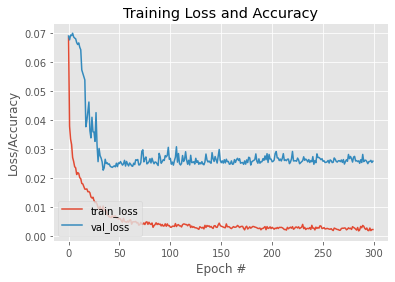
Figure 1.2: Plot of loss/accuracy vs epoch
图1.2:损失/准确性与时期的关系图
作出预测 (Make Predictions)
Now that we have a trained autoencoder model, we will use it to make predictions. The code listing 1.6 shows how to load the model from the directory location where it was saved. We use predict() function and pass the validation image iterator that we created before. Ideally we should have a different image set for prediction and testing.
现在我们有了训练有素的自动编码器模型,我们将使用它来进行预测。 代码清单1.6显示了如何从保存模型的目录位置加载模型。 我们使用predict()函数并传递之前创建的验证图像迭代器。 理想情况下,我们应该为预测和测试设置不同的图像集。
Here is the code to do the prediction and display.
这是执行预测和显示的代码。
from google.colab.patches import cv2_imshow
从google.colab.patches导入cv2_imshow
# use the convolutional autoencoder to make predictions on the
#使用卷积自动编码器对
# validation images, then display those predicted image.
#验证图像,然后显示那些预测图像。
print(“[INFO] making predictions…”)
打印(“ [INFO]做出预测…”)
autoencoder_model = tf.keras.models.load_model(MODEL_OUT_DIR+”/encoder_decoder_model.h5")
autoencoder_model = tf.keras.models.load_model(MODEL_OUT_DIR +” / encoder_decoder_model.h5“)
decoded = autoencoder_model.predict(train_it)
解码= autoencoder_model.predict(train_it)
decoded = autoencoder.predict(val_it)
解码= autoencoder.predict(val_it)
examples = 10
例子= 10
# loop over a few samples to display the predicted images
#循环几个样本以显示预测的图像
for i in range(0, examples):
对于我在范围内(0,示例):
predicted = (decoded[i] * 255).astype(“uint8”)
预测=(decoded [i] * 255).astype(“ uint8”)
cv2_imshow(predicted)
cv2_imshow(预测)
Listing 1.6: Code to predict and display the images
代码清单1.6:预测和显示图像的代码
In the above code listing, I have used the cv2_imshow package which is very specific to Google Colab. If you are Jupyter or any other IDE, you may have to simply import the cv2 package. To display the image, use cv2.imshow() function.
在上面的代码清单中,我使用了cv2_imshow软件包,该软件包非常特定于Google Colab。 如果您是Jupyter或任何其他IDE,则可能只需导入cv2软件包。 要显示图像,请使用cv2.imshow()函数。
结论 (Conclusion)
In this tutorial, we built autoencoder models using our own images. We also explored how to save the model. We loaded the saved model and made the predictions. We finally displayed the predicted images.
在本教程中,我们使用自己的图像构建了自动编码器模型。 我们还探讨了如何保存模型。 我们加载了保存的模型并做出了预测。 我们最终显示了预测的图像。


 4721
4721

 被折叠的 条评论
为什么被折叠?
被折叠的 条评论
为什么被折叠?
 到【灌水乐园】发言


