


VHDL全名Very-High-Speed Integrated Circuit Hardware Description Language ,是一种标准硬件描述语言。下面通过60进制计数器来分析VHDL的语法,以及一些硬件设计的理解。
60进制计数器,顾名思义,是每60个时间单位输出一个脉冲信号。60进制可以利用小于60进制的计数器的累加来达成相应的功能。主要有以下两种思路:
一种是直接其中的一个计数器通过时钟型号累加,另一个则是接受第一个计数器的进位信号,而进行加法计数。他们共用一个时钟信号,为并行进位。
一种是高位计数器的时钟连着低位计数器的进位信号,从而进行增加。
这里取第二种思路,通过一个10进制的计数器和一个6进制的计数器来实现60进制计数器。
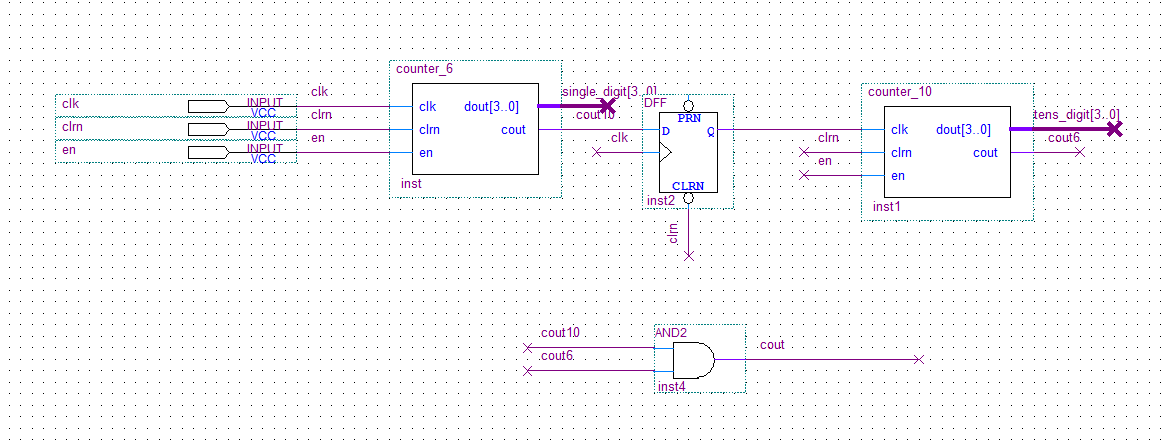
顶层图如下
下面我们用VHDL语言来实现。
首先是6进制计数器。
注意!!器件最好不要以数字作为开头
library ieee;
use ieee.std_logic_1164.all;
use ieee.std_logic_unsigned.all;
这部分是库的声明。1164库中包括了大部分标准的类型,器件。
而unsigned中则包括了如加法等器件。
entity counter_6 is
port(
clk,clrn,en:in std_logic;
dout:out std_logic_vector (3 downto 0);
cout:out std_logic);
end counter_6;
这部分为这个文件所描述的总器件端口的声明,类似编程中主函数的声明。
architecture counter_6_arch of counter_6 is这下面就是器件内部的描述内容、类似编程中的主函数实现。
signal douti:std_logic_vector (3 downto 0);
begin
    process(en,clk,clrn,en)
    begin
        if clrn = '0' then
            douti <= "0000";
        elsif clk'event and clk = '1' and en = '1' then
            if douti < 5 then
                douti <= douti+1;
            else douti <= "0000";
            end if;
        end if;

        if douti = 5 then
            cout <= '1';
        else cout <= '0';
        end if;
    dout <= douti;
    end process;
end counter_6_arch;
十进制的计数器和六进制的类似,代码如下。
library ieee;
use ieee.std_logic_1164.all;
use ieee.std_logic_unsigned.all;

entity counter_10 is
port(
clk,clrn,en:in std_logic;
dout:out std_logic_vector (3 downto 0);
cout:out std_logic);
end counter_10;

architecture counter_10_arch of counter_10 is
signal douti:std_logic_vector (3 downto 0);
begin
    process(en,clk,clrn,en)
    begin
        if clrn = '0' then
            douti <= "0000";
        elsif clk'event and clk = '1' and en = '1' then
            if douti < 9 then
                douti <= douti+1;
            else douti <= "0000";
            end if;
        end if;

        if douti = 9 then
            cout <= '1';
        else cout <= '0';
        end if;
    dout <= douti;
    end process;
end counter_10_arch;
将以上两个进制计数器编写完成后,复制到总工程目录下,开始编写上面顶层图所描述的内容。
这部分代码与之前的类似
library ieee;
use ieee.std_logic_1164.all;
use ieee.std_logic_unsigned.all;
use ieee.std_logic_arith.all;

entity counter_60 is
port(
    CLK,EN,CLRN:in std_logic;
    tens_digit:out std_logic_vector(3 downto 0);
    single_digit:out std_logic_vector(3 downto 0);
    cout:out std_logic);
end counter_60;

architecture rout1 of counter_60 is
这里就是对包含的器件进行声明了。其中包含哪些端口,是那种类型的数据,要和之前的命名的一样。
这里的d触发器直接调用系统提供的了,记得导包。可以自己用VHDL写一个或者定制一个,然后把VHD文件粘贴到本工程下面引用。
类似编程中间对引用的函数的声明。
component counter_10 is
port(
    clk,en,clrn:in std_logic;
    dout:out std_logic_vector(3 downto 0);
    cout:out std_logic);
end component;
component counter_6 is
port(
clk,en,clrn:in std_logic;
dout:out std_logic_vector(3 downto 0);
cout:out std_logic);
end component;
component dff is
port(
clk,d,clrn:in std_logic;
q:out std_logic);
end component;
signal tens_wire,single_wire: std_logic_vector(3 downto 0);
signal cout_10,cout_6: std_logic;
signal dff_out: std_logic;
begin
ctr10 : counter_10 port map(clk=>CLK,en=>EN,clrn=>CLRN,dout=>single_wire,cout=>cout_10);这里就是对线路的说明了,之前定义了好多线,在这里连上即可。
类似实例化上面引用的函数。格式如下:
实例化后器件的名字:要实现的器件名 port map (port名=>接上的线或端口,port名=>接上的线或端口,…);
    my_dff : dff port map(d=>cout_10,clk=>CLK,clrn=>CLRN,q=>dff_out);
    ctr6 : counter_6 port map(clk=>dff_out,en=>EN,clrn=>CLRN,dout=>tens_wire,cout=>cout_6);
    tens_digit<=tens_wire;
    single_digit<=single_wire;
    cout<= cout_10 and cout_6;
end rout1;
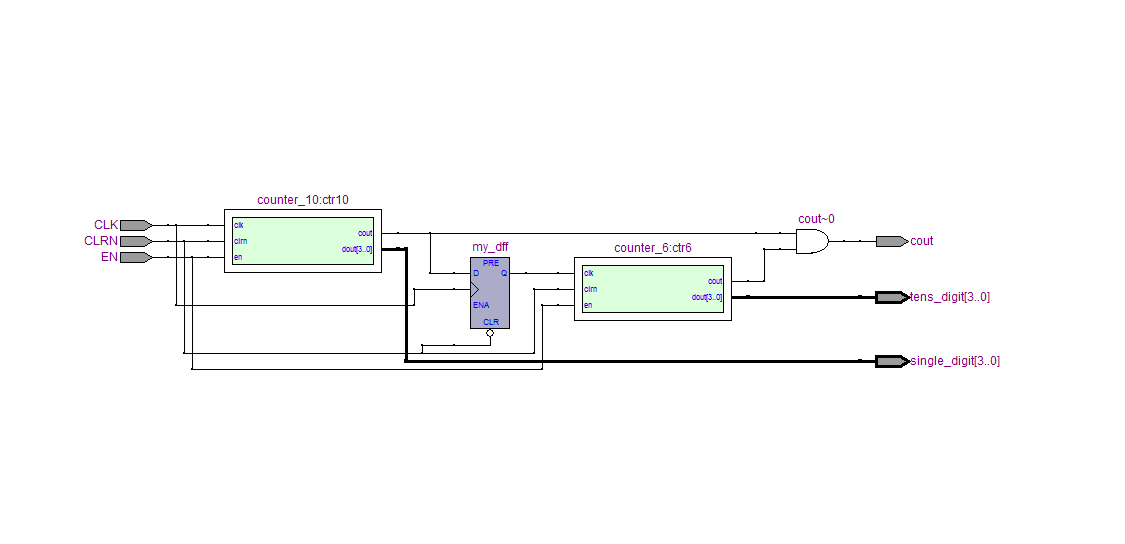
可以生成RTL看看对不对
这是总器件的图
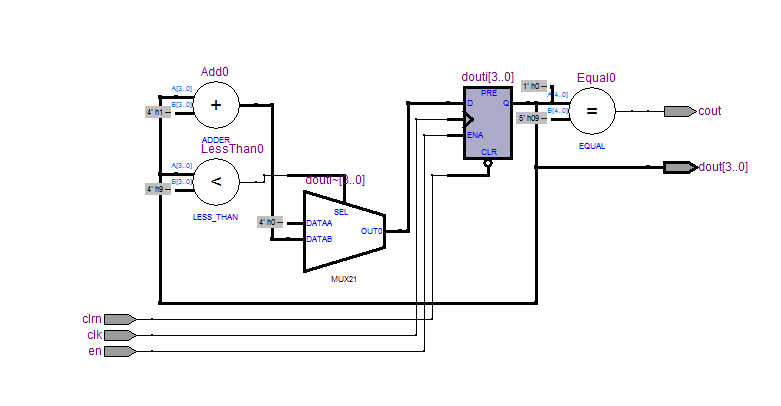
这是10进制加法器的图
最后自己愉快的仿真下就好了。
敲了有一阵VHDL的代码了,下面是一些杂七杂八的东西。
首先,所有语言都是通的,VHDL其实和一些面向过程的语言非常类似,而且最后打包成黑箱,还可以直接实例化调用,有些面向对象的感觉了。最先开始比较喜欢利用顶层图直接设计,比较直观,但是当工程复杂起来,VHDL的优势就显现出来了。强逻辑性,无需了解细节上面的电路实现,还有比较灵活的模块关系。
VHDL还有几种实现方式,一种是类似上面,把目标分成模块,一个模块一个模块的实现,最后把东西连起来达到最终目的。另一种就是直接列出真值表,利用when else 直接根据输入,输出相应结果。最后一种是数据流描述,说直白点,就是类似面向过程的编程,有一定的逻辑语句和处理。以上几种方式组合起来,根据不同的设计要求,利用合适的方式完成就好了。


 1万+
1万+

 被折叠的 条评论
为什么被折叠?
被折叠的 条评论
为什么被折叠?
 到【灌水乐园】发言


