


 本文介绍了使用Intel RealSense D435深度相机进行人脸识别和距离测量的过程。通过OpenCV和RealSense SDK,实现了从摄像头获取深度和彩色帧,然后利用Haar级联分类器检测人脸并计算距离。当光照条件不佳或相机出现问题时,可能会影响功能的正常运行。该方法适用于物体测距和基于深度学习的框架扩展。
CV_3 活用 InterDepthCamera-d435
一. 初衷
最近博主决定开始着手对深度相机的研究,恰好研究室有这么一台:Inter-Depth-camera-d435 相机,于是拿来把玩一番,顺便记录一些心得体会。
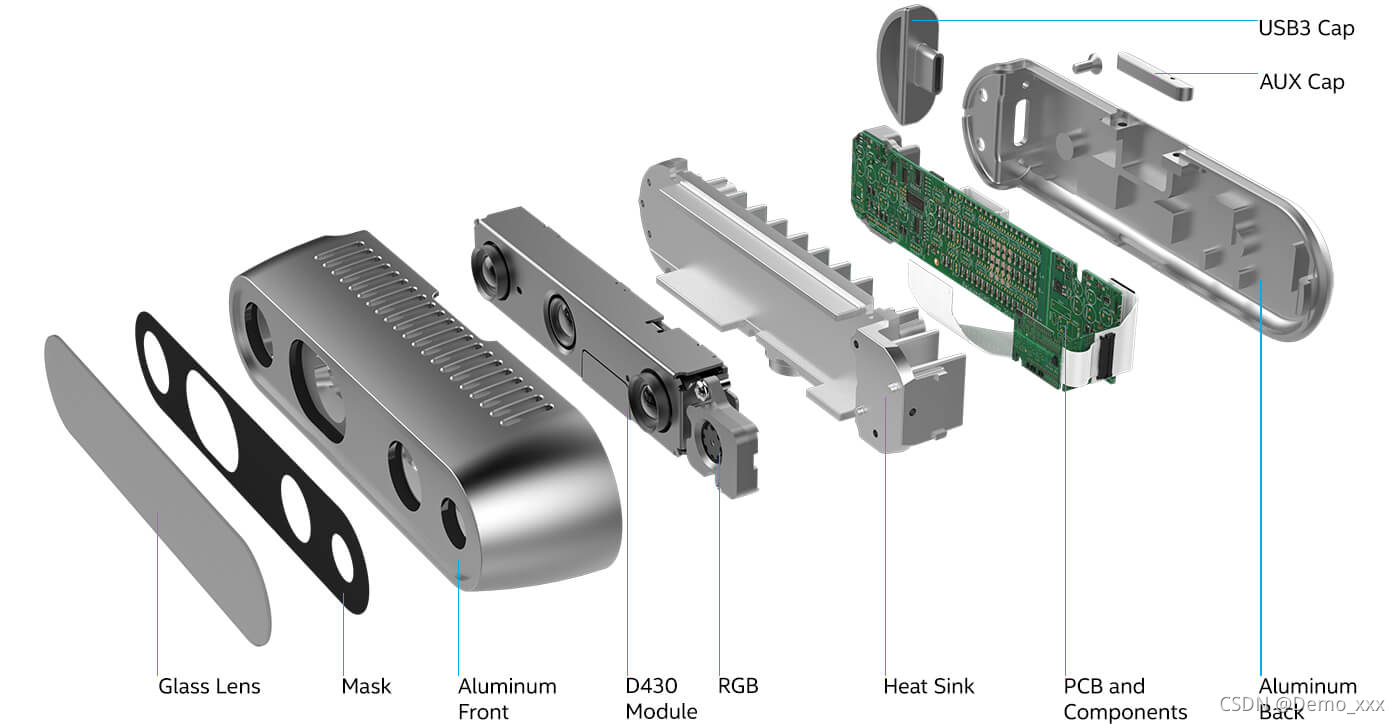
二. 相机介绍
英特尔® 实感™ 深度摄像头 D435 (Inter-Depth-camera-d435)是一款立体追踪解决方案,可为各种应用提供高质量深度。它的宽视场非常适合机器人或增强现实和虚拟现实等应用,在这些应用中,尽可能扩大场景视角至关重要。这款外形小巧的摄像头拍摄范围高达 10 米,可轻松集成到任何解决方案中,而且配置齐全,采用英特尔实感 SDK 2.0,并提供跨平台支持。深度测量精度:10cm~2m 间测距误差最大2cm。
三. 环境配置
- Python版本:3.7
- 功能包:opencv-python (4.5.3.56)、pyrealsense (2.49.0.3474)
- 一台 Inter-Depth-camera-d435 相机
- 提前下载好用于识别的cascade文件,链接在此,博主在这里用的是里边的面部识别文件:haarcascade_frontalface_default.xml。
- 文件夹配置:

四. 源码如下
- 调用功能文件:realsense_depth.py
import pyrealsense2 as rs
import numpy as np


class DepthCamera:
    def __init__(self):
        # Configure depth and color streams
        self.pipeline = rs.pipeline()
        config = rs.config()

        # Get device product line for setting a supporting resolution
        pipeline_wrapper = rs.pipeline_wrapper(self.pipeline)
        pipeline_profile = config.resolve(pipeline_wrapper)
        device = pipeline_profile.get_device()
        device_product_line = str(device.get_info(rs.camera_info.product_line))

        config.enable_stream(rs.stream.depth, 640, 480, rs.format.z16, 30)
        config.enable_stream(rs.stream.color, 640, 480, rs.format.bgr8, 30)

        # Start streaming
        self.pipeline.start(config)

    def get_frame(self):
        frames = self.pipeline.wait_for_frames()
        depth_frame = frames.get_depth_frame()
        color_frame = frames.get_color_frame()

        depth_image = np.asanyarray(depth_frame.get_data())
        color_image = np.asanyarray(color_frame.get_data())
        if not depth_frame or not color_frame:
            return False, None, None
        return True, depth_image, color_image

    def release(self):
        self.pipeline.stop()
- 检测文件 faceDistanceDetection.py
import cv2
from realsense_depth import *
# 初始化 Inter D435 摄像头
dc = DepthCamera()
# 读取 cascade 文件
faceCascade = cv2.CascadeClassifier("haarcascade_frontalface_default.xml") # 改成自己存放.xml文件的路径
# 对视频中的每一帧进行人脸的捕捉和添加 bounding box 操作
while True:
ret, depth_frame, color_frame = dc.get_frame()
frameGray = cv2.cvtColor(color_frame, cv2.COLOR_BGR2GRAY) # 转换为灰度图像
detectionResult = faceCascade.detectMultiScale(frameGray, scaleFactor=1.2, minNeighbors=3, minSize=(32, 32)) # 人脸识别
if len(detectionResult) > 0: # 如果识别到人脸的话
for detection in detectionResult:
x, y, w, h = detection
cv2.rectangle(color_frame, (x, y), (x + w, y + h),
(255, 0, 0), 2) # 加 bounding box
center = (x + int(0.5 * w), y + int(0.5 * h)) # 找到bbox的中心点
cv2.circle(color_frame, center, 5, (0, 0, 255), cv2.FILLED) # 画出人脸中心点
distance = depth_frame[center[1], center[0]] # 从距离图像中获取距离信息
print(f"距离为 : {distance} mm")
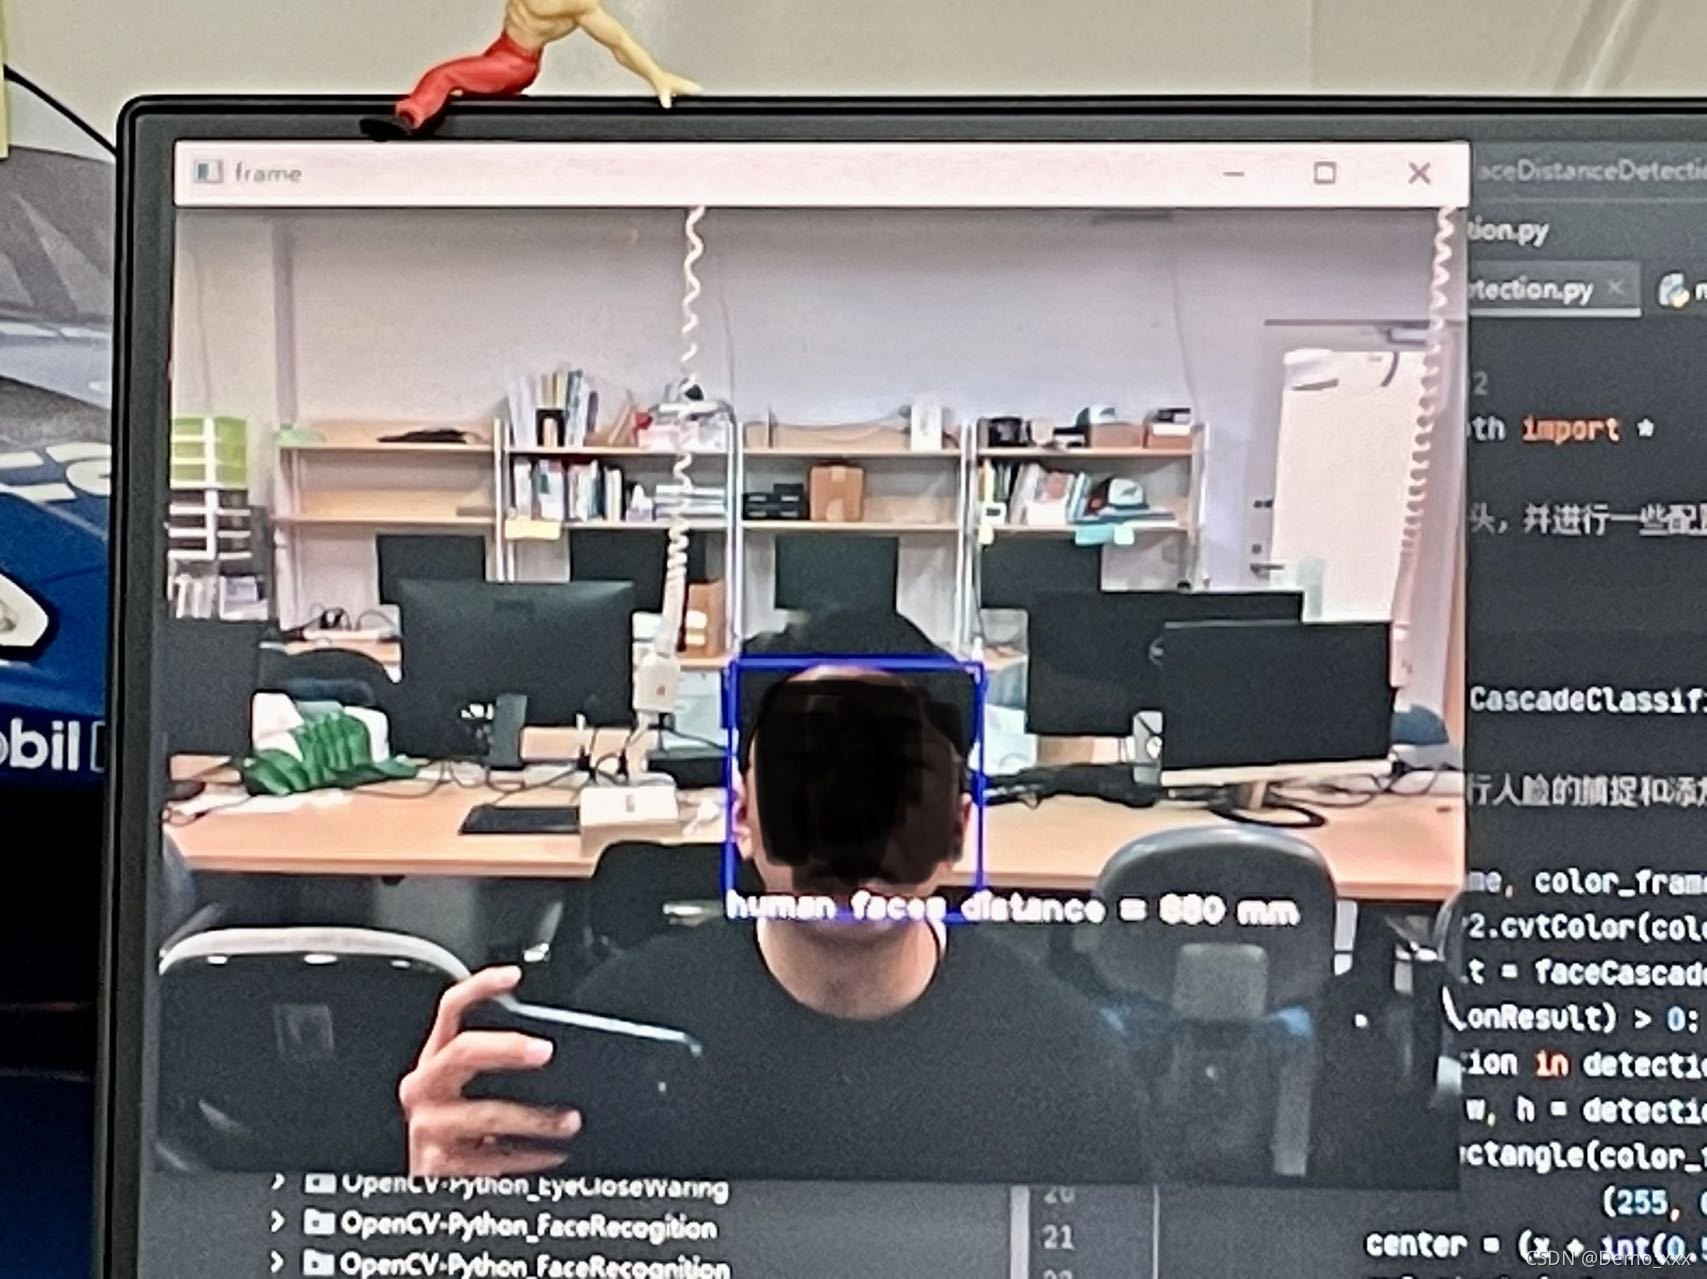
cv2.putText(color_frame, f"human faces distance = {distance} mm", (x, y + h), cv2.FONT_HERSHEY_PLAIN, 1,
(255, 255, 255), 2) # 给 bounding box 加注解
cv2.imshow("frame", color_frame)
if cv2.waitKey(1) & 0xFF == ord("q"): # 按“q”键退出程序
break
五. 结果展示
六. 感悟与分享
- 由于测距的方式是测量boundingbox中心点到相机的实际距离,所以对于检测不同的物体,可以去更换不同的cascade文件,甚至可以直接将方法套用到更高级、精度更高的基于深度学习的框架中,从而完成测距工作。
- 仅使用相机完成识别加测距的功能,最容易遇到的问题就是当相机成像效果(光照差,相机破损)出现问题时,将丢失掉全部的功能。
- 相机很好玩,功能很强大。详情:https://www.intelrealsense.com/zh-hans/depth-camera-d435/


 被折叠的 条评论
为什么被折叠?
被折叠的 条评论
为什么被折叠?
 到【灌水乐园】发言


