


文章目录
前言
DetectoRS提出了将FPN输出特征进行反馈利用的思想(RFP)和在特征提取时自适应选择不同感受野大小进行卷积的操作(SAC)
论文地址:https://arxiv.org/abs/2006.02334
文中所提供的代码来自:https://github.com/open-mmlab/mmdetection
DetectoRS主要创新部分
detectors_resnet
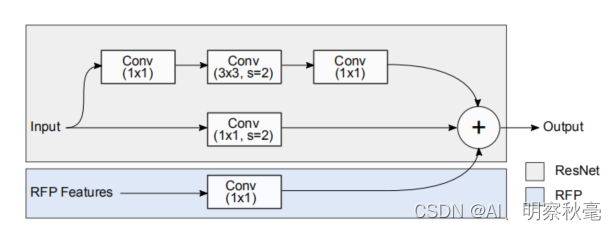
对ResNet主干进行了更改,允许它同时将x和R(f)作为输入。ResNet有四个阶段,每个阶段都由几个类似的块组成。只对每个阶段的第一个块进行更改,仅仅是加上了一个1x1卷积将FPN输出的256通道数的特征层升到指定维度,作为残差相加。
detectors_resnet的前向传播
1.第一次特征提取,就是通过resnet的前向传播,将图片信息插入输出的特征层里
def forward(self, x):
    """Forward function."""
    outs = list(super(DetectoRS_ResNet, self).forward(x))
    if self.output_img:
        outs.insert(0, x)	# 将图片信息插入输出的特征层,反馈时要用到
    return tuple(outs)
2.反馈回来的(C1,FPN输出后每层经过ASPP的5层)
def rfp_forward(self, x, rfp_feats):
     """Forward function for RFP."""
     if self.deep_stem:
         x = self.stem(x)
     else:
         x = self.conv1(x)
         x = self.norm1(x)
         x = self.relu(x)
     x = self.maxpool(x)
     outs = []
     for i, layer_name in enumerate(self.res_layers):
         res_layer = getattr(self, layer_name)
         rfp_feat = rfp_feats[i] if i > 0 else None	# layer1里rfp_feat=None,所以前面C2没经过ASPP
         for layer in res_layer:
             x = layer.rfp_forward(x, rfp_feat)
         if i in self.out_indices:
             outs.append(x)
     return tuple(outs)
bottleneck的前向传播
def rfp_forward(self, x, rfp_feat):
    """The forward function that also takes the RFP features as input."""
    def _inner_forward(x):
        identity = x
        out = self.conv1(x)
        out = self.norm1(out)
        out = self.relu(out)
        if self.with_plugins:
            out = self.forward_plugin(out, self.after_conv1_plugin_names)
        out = self.conv2(out)
        out = self.norm2(out)
        out = self.relu(out)
        if self.with_plugins:
            out = self.forward_plugin(out, self.after_conv2_plugin_names)
        out = self.conv3(out)
        out = self.norm3(out)
        if self.with_plugins:
            out = self.forward_plugin(out, self.after_conv3_plugin_names)
        if self.downsample is not None:
            identity = self.downsample(x)
        out += identity	# 残差相加
        return out
    if self.with_cp and x.requires_grad:
        out = cp.checkpoint(_inner_forward, x)
    else:
        out = _inner_forward(x)
    if self.rfp_inplanes:	# 前面都和resnet一样,主要看这个self.rfp_inplanes=[None,256,256,256,256]
        rfp_feat = self.rfp_conv(rfp_feat)	# 还原回原来resnet每层的输出通道,256-512,256-1024...
        out = out + rfp_feat	# 这样才能更好的相加
    out = self.relu(out)
    return out
SAC
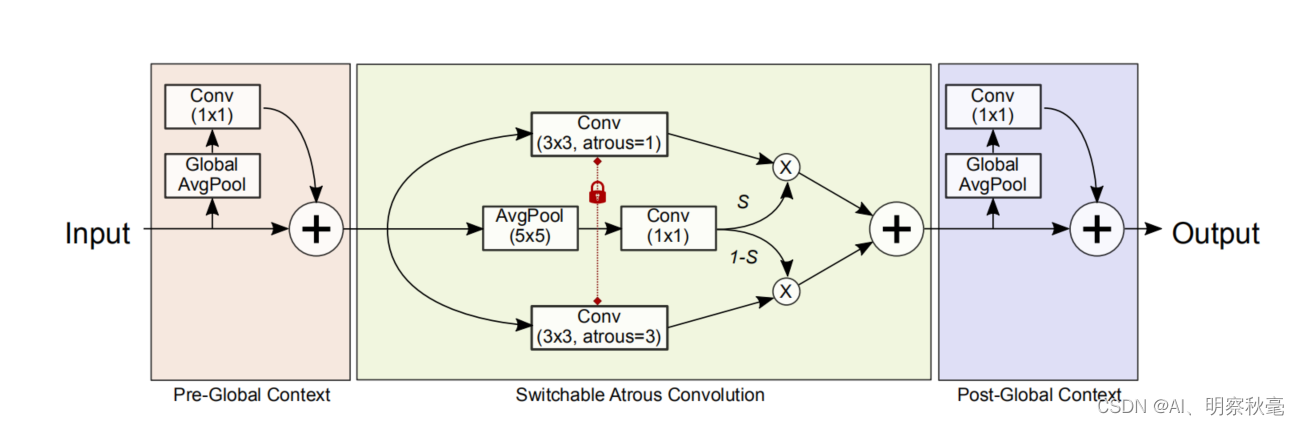
将主干ResNet中的每3x3卷积层转换为SAC,它可以在不同的空洞之间温和地切换不同感受野的卷积计算。
S(·)被实现为一个平均池化层,其中有一个5x5的内核,然后是一个1x1的卷积层
#
self.switch = nn.Conv2d(self.in_channels, 1, kernel_size=1, stride=stride, bias=True)
......
avg_x = F.avg_pool2d(avg_x, kernel_size=5, stride=1, padding=0)	# 5X5池化
switch = self.switch(avg_x)	# 就是对应图上的1x1卷积,压缩到1个通道,为什么不使用sigmoid呢?
......
out = switch * out_s + (1 - switch) * out_l	# 这里没用类似sigmoid的激活函数,仍使用(1 - switch),
# RFP里也有类似的选择模块,但是是加了sigmoid的激活函数的,这样才能将权重限制在0-1之间
SAC的前向传播
这部分代码在:.conda/envs/openmmlab/lib/python3.7/site-packages/mmcv/ops/saconv.py
def forward(self, x):
# pre-context
avg_x = F.adaptive_avg_pool2d(x, output_size=1)
avg_x = self.pre_context(avg_x)
avg_x = avg_x.expand_as(x) # 复制到x大小,相当于上采样
x = x + avg_x # 对应图上的相加,
# switch
avg_x = F.pad(x, pad=(2, 2, 2, 2), mode='reflect') # 先进行reflect,padding,防止丢失边缘信息
avg_x = F.avg_pool2d(avg_x, kernel_size=5, stride=1, padding=0) # 5X5池化
switch = self.switch(avg_x) # 就是对应图上的1x1卷积,
# sac
weight = self._get_weight(self.weight) # 对初始化的权重做归一化,需要理解下为什么要这样做
zero_bias = torch.zeros(
self.out_channels, device=weight.device, dtype=weight.dtype)
if self.use_deform: # 是否使用可变形卷积
offset = self.offset_s(avg_x)
out_s = deform_conv2d(x, offset, weight, self.stride, self.padding,
self.dilation, self.groups, 1)
else:
if (TORCH_VERSION == 'parrots'
or digit_version(TORCH_VERSION) < digit_version('1.5.0')):
out_s = super().conv2d_forward(x, weight)
elif digit_version(TORCH_VERSION) >= digit_version('1.8.0'):
# bias is a required argument of _conv_forward in torch 1.8.0
out_s = super()._conv_forward(x, weight, zero_bias)
else:
out_s = super()._conv_forward(x, weight)
ori_p = self.padding
ori_d = self.dilation
self.padding = tuple(3 * p for p in self.padding)
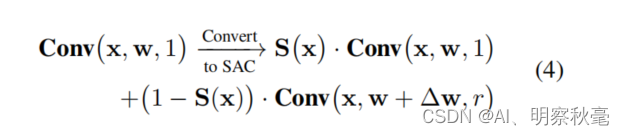
self.dilation = tuple(3 * d for d in self.dilation)
weight = weight + self.weight_diff # self.weight_diff对应论文中的∆w
if self.use_deform:
offset = self.offset_l(avg_x)
out_l = deform_conv2d(x, offset, weight, self.stride, self.padding,
self.dilation, self.groups, 1)
else:
if (TORCH_VERSION == 'parrots'
or digit_version(TORCH_VERSION) < digit_version('1.5.0')):
out_l = super().conv2d_forward(x, weight)
elif digit_version(TORCH_VERSION) >= digit_version('1.8.0'):
# bias is a required argument of _conv_forward in torch 1.8.0
out_l = super()._conv_forward(x, weight, zero_bias)
else:
out_l = super()._conv_forward(x, weight)
out = switch * out_s + (1 - switch) * out_l # 这里没用类似sigmoid的激活函数,仍使用(1 - switch)
self.padding = ori_p
self.dilation = ori_d
# post-context
avg_x = F.adaptive_avg_pool2d(out, output_size=1)
avg_x = self.post_context(avg_x)
avg_x = avg_x.expand_as(out)
out = out + avg_x
return out
weight的归一化
self.weight = Parameter(torch.Tensor(
                out_channels, in_channels // groups, *kernel_size))
def _get_weight(self, weight):
    weight_flat = weight.view(weight.size(0), -1)
    mean = weight_flat.mean(dim=1).view(-1, 1, 1, 1)
    std = torch.sqrt(weight_flat.var(dim=1) + 1e-5).view(-1, 1, 1, 1)
    weight = (weight - mean) / std
    weight = self.weight_gamma * weight + self.weight_beta	#
    return weight
这部分为什么要归一化,暂时还未理解,有知道的可以在评论区交流讨论下!
RFP
结构
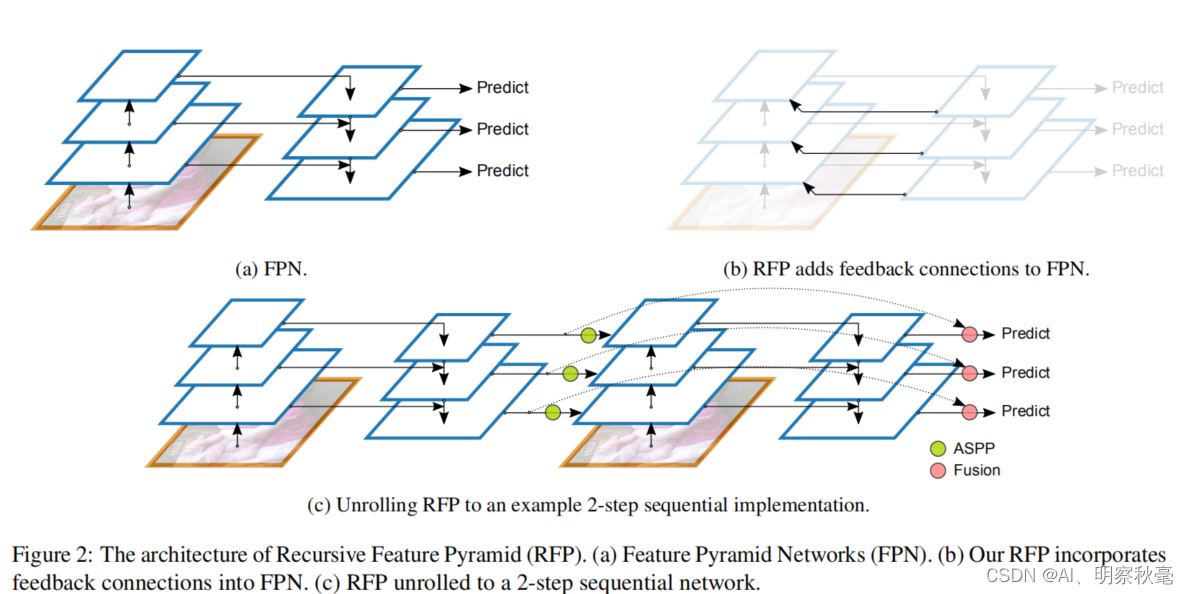
RFP的前向传播
def forward(self, inputs):
inputs = list(inputs) #特征提取网络的4层输出+img。转成列表方便操作,这里的inputs有5个长度
assert len(inputs) == len(self.in_channels) + 1 # +1 for input image
img = inputs.pop(0) #是一个就地操作,出栈,img=inputs[0]
# FPN forward
x = super().forward(tuple(inputs)) #通过FPN得到out:x,5层
for rfp_idx in range(self.rfp_steps - 1): #2-1=1 :0
rfp_feats = [x[0]] + list( #列表相加[C2+ASPP(C3,C4,C5,C6)],5层
self.rfp_aspp(x[i]) for i in range(1, len(x)))
x_idx = self.rfp_modules[rfp_idx].rfp_forward(img, rfp_feats) #(img,5层)返回反馈操作后的
# FPN forward
x_idx = super().forward(x_idx) #将其再次使用FPN
x_new = []
for ft_idx in range(len(x_idx)): # 5
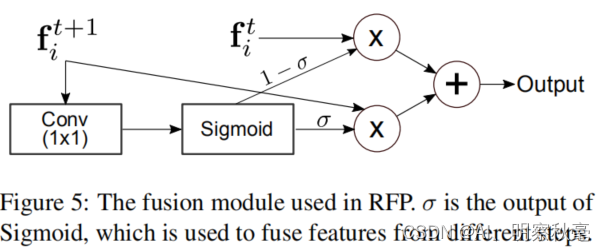
add_weight = torch.sigmoid(self.rfp_weight(x_idx[ft_idx])) #将输出的进行sigmoid
x_new.append(add_weight * x_idx[ft_idx] + #分配原来的和经过反馈的各自占的权重
(1 - add_weight) * x[ft_idx]) # 特征融合权重分配,类似于EMA(指数加权平均)
x = x_new
return x
上图中的fusion上面代码中的特征融合权重分配的操作。
RFP中使用的ASPP改善代码
class ASPP(BaseModule):
    Args:
        in_channels (int): Number of input channels.
        out_channels (int): Number of channels produced by this module
        dilations (tuple[int]): Dilations of the four branches.
            Default: (1, 3, 6, 1)
        init_cfg (dict or list[dict], optional): Initialization config dict.
    """
    def __init__(self,
                 in_channels,   # 256
                 out_channels,  # 64
                 dilations=(1, 3, 6, 1),
                 init_cfg=dict(type='Kaiming', layer='Conv2d')):
        super().__init__(init_cfg)
        assert dilations[-1] == 1
        self.aspp = nn.ModuleList()
        for dilation in dilations:
            kernel_size = 3 if dilation > 1 else 1
            padding = dilation if dilation > 1 else 0
            conv = nn.Conv2d(
                in_channels,
                out_channels,
                kernel_size=kernel_size,
                stride=1,
                dilation=dilation,
                padding=padding,
                bias=True)
            self.aspp.append(conv)
        self.gap = nn.AdaptiveAvgPool2d(1)
    def forward(self, x):
        avg_x = self.gap(x)
        out = []
        for aspp_idx in range(len(self.aspp)): #4
            inp = avg_x if (aspp_idx == len(self.aspp) - 1) else x  #最后一层用平均池花层
            out.append(F.relu_(self.aspp[aspp_idx](inp)))       #1X1卷集全局池花层
        out[-1] = out[-1].expand_as(out[-2])   #
        out = torch.cat(out, dim=1)
        return out
实验细节和结果
使用SAC初始化
def init_weights(self):
    constant_init(self.switch, 0, bias=1)	# 开关S中的权重被初始化为0,并且偏置被设置为1
    self.weight_diff.data.zero_()	# ∆w的初始化值为0
    constant_init(self.pre_context, 0)	# 全局上下文模块中的权重和偏差用0初始化。
    constant_init(self.post_context, 0)
    if self.use_deform:
        constant_init(self.offset_s, 0)	# 可变形卷积的偏移初始化为0
        constant_init(self.offset_l, 0)
在ResNet上采用SAC及其变体,替换了主干中的所有3x3卷积层。使用可变形的卷积替换了上面SAC图上的那两个卷积操作。全局上下文模块中的权重和偏差用0初始化。开关S中的权重被初始化为0,并且偏置被设置为1。∆w的初始化值为0。上述初始化策略保证了在ImageNet上加载预训练的主干时,在对COCO进行任何训练之前,将所有3x3卷积层转换为SAC不会改变输出。
RFP和SAC的消融实验
RFP和SAC细节上的消融实验
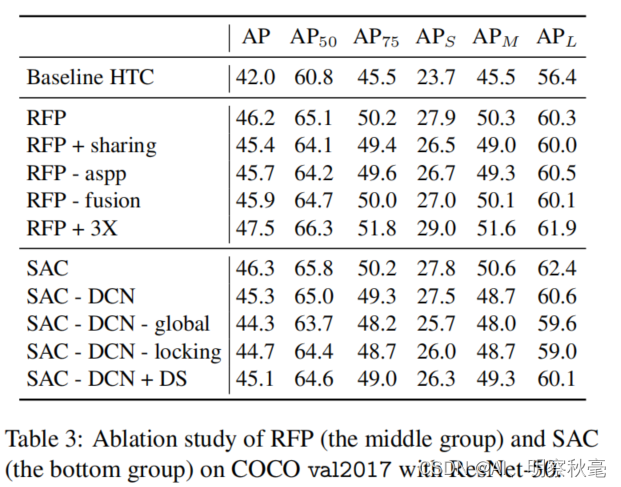
从表中,我们可以看出RFP中,RFP + sharing(C1和反馈的C1共享权重)性能会下降,RFP - aspp不采用aspp也会下降,RFP - fusion不进行特征融合也会下降。RFP + 3X:反馈一次变为两次(加上原来的就3次):性能会进一步提升。
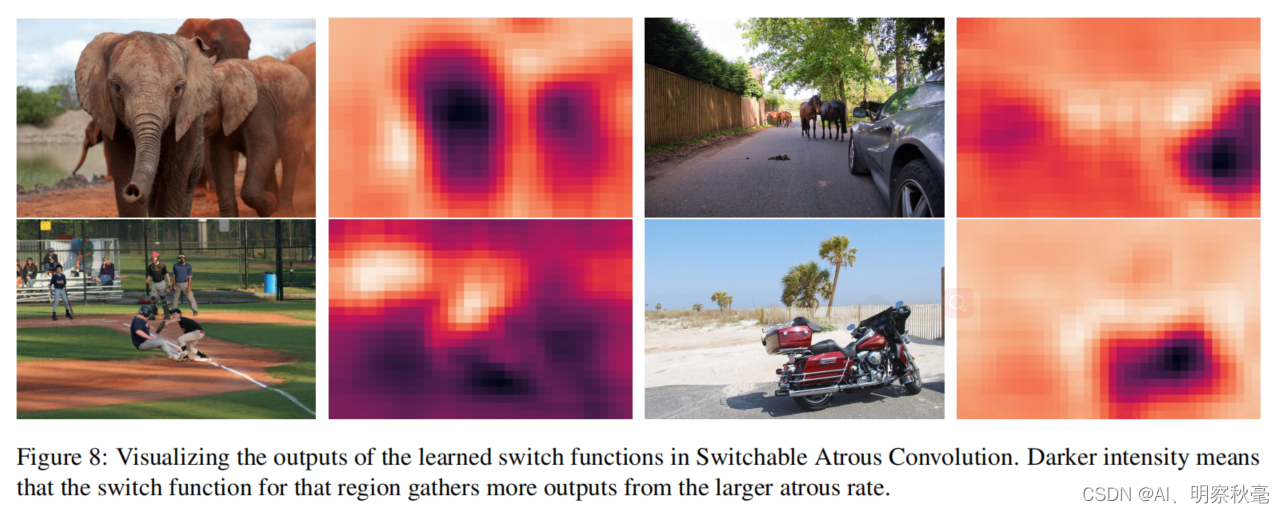
SAC的作用可视化
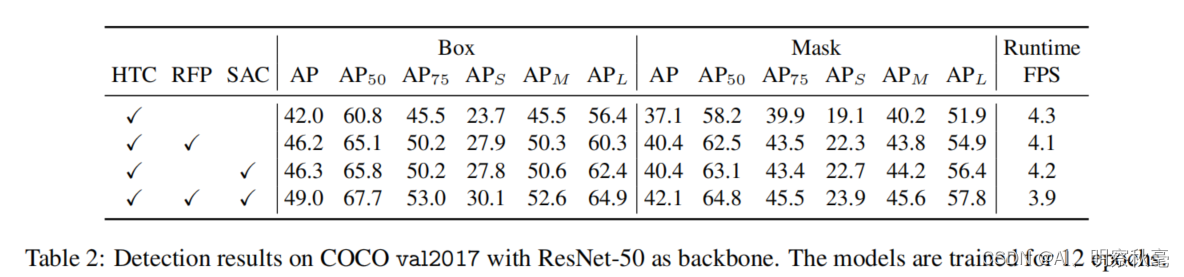
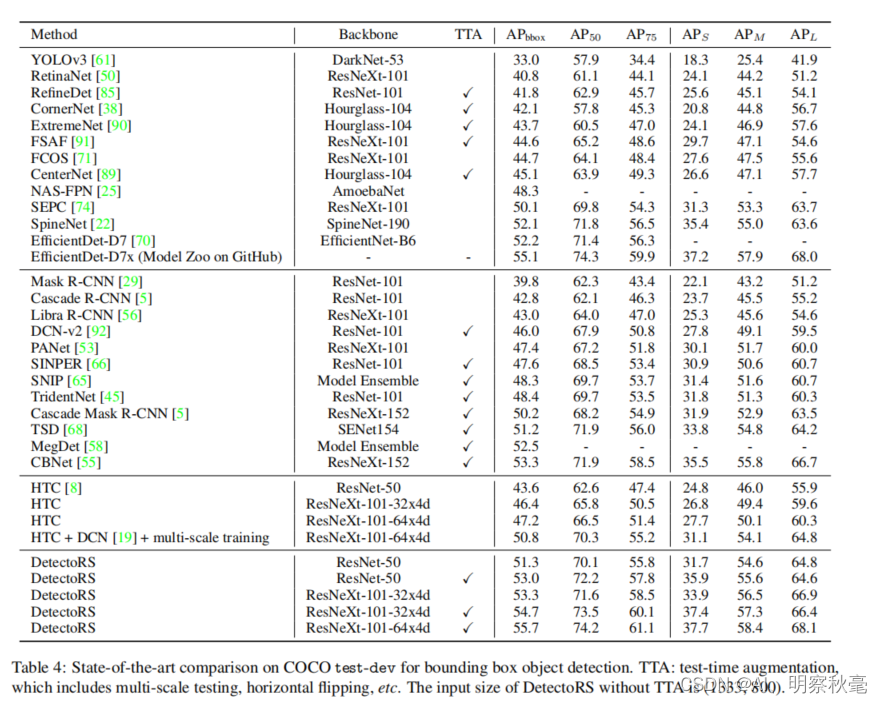
与最先进的一些检测器的性能比较
总结
级联目标检测器设计理念的成功,促使作者在目标检测的神经网络主干设计中探索它。提出的RFP实现了一个反复查看和思考的顺序设计,其中自下而上的主干和FPN多次运行。这是一个不是为了针对解决什么问题的创新,而是通过观察和启发式的创新!实验做的很充分,一些实验代码细节也在论文中能找到。


 2342
2342


 被折叠的 条评论
为什么被折叠?
被折叠的 条评论
为什么被折叠?
 到【灌水乐园】发言


