


一个连接家用wifi后,当你问“几点了”,可以语音报时的东西。esp8266与asrpro用串口连接互发数据。
一、esp8266设置
1.1 安装ESP8266FS控件
下载地址:点击此链接进入 Arduino-ESP8266官方GitHub页面下载
选ESP8266FS-0.5.0.zip下载
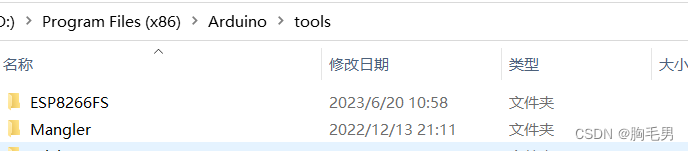
下载完,解压到根目录的tools里头,比如
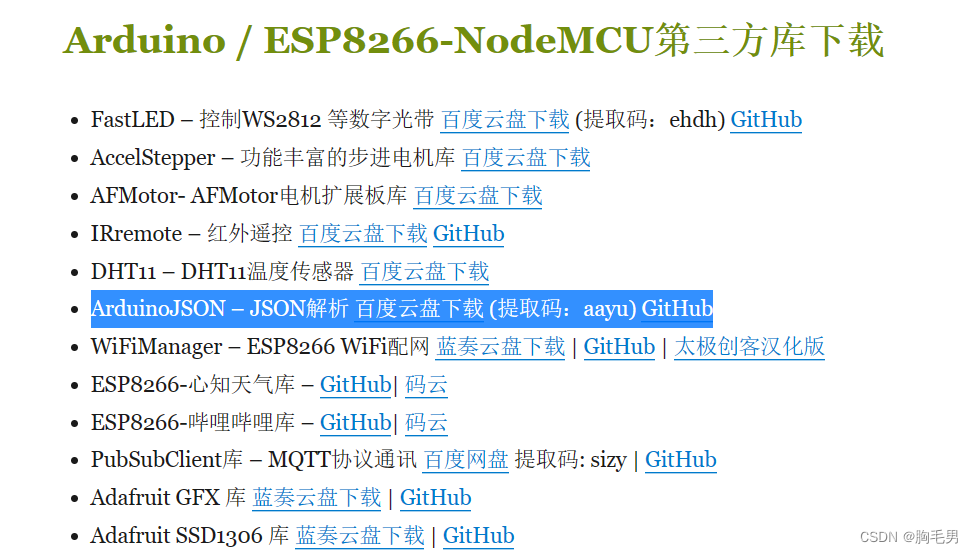
1.2 在太极创客那个网 安装 ArduinoJson-6.x.zip
ESP8266-NodeMCU第三方库下载
1.3 下载arduino程序
添加链接描述

1.4 3_4_4_SPIFFS_Pin_Control_and_A0_Read_Server 这个程序需要改写一下
主要就是,串口接收的事件,当接到"Tim"就触发,网络授时查询,网络授时用 us.pool.ntp.org
记得参数写东8区的北京时间。const int timeZone = 8;
查到了时间,就从串口发出去,给语音模块,语音模块会切分时间字符串,然后念出来。
arduino程序
/**********************************************************************
项目名称/Project          : 零基础入门学用物联网
程序名称/Program name     : 3_4_4_SPIFFS_Pin_Control_and_A0_Read_Server
团队/Team                : 太极创客团队 / Taichi-Maker (www.taichi-maker.com)
作者/Author              : CYNO朔
日期/Date(YYYYMMDD)     : 20200210
程序目的/Purpose          :
此程序用于演示如何通过网页控制LED引脚以及将A0引脚读数实时显示于网页中。
-----------------------------------------------------------------------
修订历史/Revision History
日期/Date    作者/Author      参考号/Ref    修订说明/Revision Description
20200210      CYNO朔           0.02          改正了plane -> plain
20200211      CYNO朔           0.03          一致性调整
***********************************************************************/

#include <TimeLib.h>
#include <WiFiUdp.h>
#include <ESP8266WiFi.h>
#include <ESP8266WiFiMulti.h>
#include <ESP8266WebServer.h>
#include <FS.h>
// NTP Servers:
static const char ntpServerName[] = "us.pool.ntp.org";
const int timeZone = 8;     // Central European Time
WiFiUDP Udp;
unsigned int localPort = 8888;  // local port to listen for UDP packets
time_t getNtpTime();
String digitalClockDisplay();
String printDigits(int digits);
void sendNTPpacket(IPAddress &address);
time_t prevDisplay = 0; // when the digital clock was displayed


ESP8266WiFiMulti wifiMulti;     // 建立ESP8266WiFiMulti对象,对象名称是 'wifiMulti'

ESP8266WebServer esp8266_server(80);    // 建立网络服务器对象,该对象用于响应HTTP请求。监听端口(80)

String rx_data;
//串口中断函数
void Serial_callback()
{
    while (Serial.available())
    {
        rx_data+=char(Serial.read());
        delay(5); //这里不能去掉,要给串口处理数据的时间
    }

  if(rx_data !="")
  {
      String ledState = "OFF";
     if(rx_data == "1"){
      digitalWrite(LED_BUILTIN,LOW); //LED 点亮
      ledState = "ON"; //反馈参数
      esp8266_server.send(200, "text/plain", ledState); //发送网页
     }
     else if(rx_data == "0")
     {
      digitalWrite(LED_BUILTIN,HIGH); //LED 熄灭
      ledState = "OFF"; //反馈参数
      esp8266_server.send(200, "text/plain", ledState); //发送网页
     }
     else if(rx_data =="Tim")
     {
        handlett();
     }
  }


  rx_data="";

}

void setup() {
  Serial.begin(9600);          // 启动串口通讯
  Serial.println("");

  pinMode(LED_BUILTIN, OUTPUT);   // 初始化NodeMCU控制板载LED引脚为OUTPUT
  digitalWrite(LED_BUILTIN, HIGH);// 初始化LED引脚状态

  wifiMulti.addAP("你家wifi", "你家wifi密码"); // 将需要连接的一系列WiFi ID和密码输入这里
  wifiMulti.addAP("ssid_from_AP_2", "your_password_for_AP_2"); // ESP8266-NodeMCU再启动后会扫描当前网络
  wifiMulti.addAP("ssid_from_AP_3", "your_password_for_AP_3"); // 环境查找是否有这里列出的WiFi ID。如果有
  Serial.println("Connecting ...");                            // 则尝试使用此处存储的密码进行连接。

  int i = 0;
  while (wifiMulti.run() != WL_CONNECTED) { // 尝试进行wifi连接。
    delay(1000);
    Serial.print(i++); Serial.print(' ');
  }

  Udp.begin(localPort);
  Udp.localPort();
  setSyncProvider(getNtpTime);
  setSyncInterval(300);

  // WiFi连接成功后将通过串口监视器输出连接成功信息
  Serial.println('\n');
  Serial.print("Connected to ");
  Serial.println(WiFi.SSID());              // 通过串口监视器输出连接的WiFi名称
  Serial.print("IP address:\t");
  Serial.println(WiFi.localIP());           // 通过串口监视器输出ESP8266-NodeMCU的IP

  if(SPIFFS.begin()){                       // 启动闪存文件系统
    Serial.println("SPIFFS Started.");
  } else {
    Serial.println("SPIFFS Failed to Start.");
  }

  esp8266_server.on("/setLED", handleLED);
  esp8266_server.on("/readADC", handleADC);
  esp8266_server.on("/setbtnValue", handlebv);
  esp8266_server.on("/settimValue", handlett);

  esp8266_server.onNotFound(handleUserRequest); // 处理其它网络请求

  // 启动网站服务
  esp8266_server.begin();
  Serial.println("HTTP server started");
}

void loop(void) {
  esp8266_server.handleClient();
  Serial_callback();

}


void handleLED() {
 String ledState = "OFF";
 String LED_State = esp8266_server.arg("LEDstate"); //参考xhttp.open("GET", "setLED?LEDstate="+led, true);
 //Serial.println(LED_State);

 if(LED_State == "1"){
  digitalWrite(LED_BUILTIN,LOW); //LED 点亮
  ledState = "ON"; //反馈参数
 } else {
  digitalWrite(LED_BUILTIN,HIGH); //LED 熄灭
  ledState = "OFF"; //反馈参数
 }

 esp8266_server.send(200, "text/plain", ledState); //发送网页
}
void handlebv() {
 String btn_State = esp8266_server.arg("btnValue"); //参考xhttp.open("GET", "setLED?LEDstate="+led, true);

 esp8266_server.send(200, "text/plain", btn_State); //发送模拟输入引脚到客户端ajax请求
}
void handlett() {
  String tim_State="";
  if (timeStatus() != timeNotSet) {
  if (now() != prevDisplay) { //update the display only if time has changed
    prevDisplay = now();
    tim_State = digitalClockDisplay();
    Serial.println(tim_State);
    esp8266_server.send(200, "text/plain", tim_State); //发送网页
  }
 }
}

void handleADC() {
 int a = analogRead(A0);
 String adcValue = String(a);

 esp8266_server.send(200, "text/plain", adcValue); //发送模拟输入引脚到客户端ajax请求
}

// 处理用户浏览器的HTTP访问
void handleUserRequest() {

  // 获取用户请求资源(Request Resource)
  String reqResource = esp8266_server.uri();
  Serial.print("reqResource: ");
  Serial.println(reqResource);

  // 通过handleFileRead函数处处理用户请求资源
  bool fileReadOK = handleFileRead(reqResource);

  // 如果在SPIFFS无法找到用户访问的资源,则回复404 (Not Found)
  if (!fileReadOK){
    esp8266_server.send(404, "text/plain", "404 Not Found");
  }
}

bool handleFileRead(String resource) {            //处理浏览器HTTP访问

  if (resource.endsWith("/")) {                   // 如果访问地址以"/"为结尾
    resource = "/index.html";                     // 则将访问地址修改为/index.html便于SPIFFS访问
  }

  String contentType = getContentType(resource);  // 获取文件类型

  if (SPIFFS.exists(resource)) {                     // 如果访问的文件可以在SPIFFS中找到
    File file = SPIFFS.open(resource, "r");          // 则尝试打开该文件
    esp8266_server.streamFile(file, contentType);// 并且将该文件返回给浏览器
    file.close();                                // 并且关闭文件
    return true;                                 // 返回true
  }
  return false;                                  // 如果文件未找到,则返回false
}

// 获取文件类型
String getContentType(String filename){
  if(filename.endsWith(".htm")) return "text/html";
  else if(filename.endsWith(".html")) return "text/html";
  else if(filename.endsWith(".css")) return "text/css";
  else if(filename.endsWith(".js")) return "application/javascript";
  else if(filename.endsWith(".png")) return "image/png";
  else if(filename.endsWith(".gif")) return "image/gif";
  else if(filename.endsWith(".jpg")) return "image/jpeg";
  else if(filename.endsWith(".ico")) return "image/x-icon";
  else if(filename.endsWith(".xml")) return "text/xml";
  else if(filename.endsWith(".pdf")) return "application/x-pdf";
  else if(filename.endsWith(".zip")) return "application/x-zip";
  else if(filename.endsWith(".gz")) return "application/x-gzip";
  return "text/plain";
}


/*-------- NTP code ----------*/

const int NTP_PACKET_SIZE = 48; // NTP time is in the first 48 bytes of message
byte packetBuffer[NTP_PACKET_SIZE]; //buffer to hold incoming & outgoing packets

time_t getNtpTime()
{
  IPAddress ntpServerIP; // NTP server's ip address

  while (Udp.parsePacket() > 0) ; // discard any previously received packets
  Serial.println("Transmit NTP Request");
  // get a random server from the pool
  WiFi.hostByName(ntpServerName, ntpServerIP);
  Serial.print(ntpServerName);
  Serial.print(": ");
  Serial.println(ntpServerIP);
  sendNTPpacket(ntpServerIP);
  uint32_t beginWait = millis();
  while (millis() - beginWait < 1500) {
    int size = Udp.parsePacket();
    if (size >= NTP_PACKET_SIZE) {
      Serial.println("Receive NTP Response");
      Udp.read(packetBuffer, NTP_PACKET_SIZE);  // read packet into the buffer
      unsigned long secsSince1900;
      // convert four bytes starting at location 40 to a long integer
      secsSince1900 =  (unsigned long)packetBuffer[40] << 24;
      secsSince1900 |= (unsigned long)packetBuffer[41] << 16;
      secsSince1900 |= (unsigned long)packetBuffer[42] << 8;
      secsSince1900 |= (unsigned long)packetBuffer[43];
      return secsSince1900 - 2208988800UL + timeZone * SECS_PER_HOUR;
    }
  }
  Serial.println("No NTP Response :-(");
  return 0; // return 0 if unable to get the time
}

// send an NTP request to the time server at the given address
void sendNTPpacket(IPAddress &address)
{
  // set all bytes in the buffer to 0
  memset(packetBuffer, 0, NTP_PACKET_SIZE);
  // Initialize values needed to form NTP request
  // (see URL above for details on the packets)
  packetBuffer[0] = 0b11100011;   // LI, Version, Mode
  packetBuffer[1] = 0;     // Stratum, or type of clock
  packetBuffer[2] = 6;     // Polling Interval
  packetBuffer[3] = 0xEC;  // Peer Clock Precision
  // 8 bytes of zero for Root Delay & Root Dispersion
  packetBuffer[12] = 49;
  packetBuffer[13] = 0x4E;
  packetBuffer[14] = 49;
  packetBuffer[15] = 52;
  // all NTP fields have been given values, now
  // you can send a packet requesting a timestamp:
  Udp.beginPacket(address, 123); //NTP requests are to port 123
  Udp.write(packetBuffer, NTP_PACKET_SIZE);
  Udp.endPacket();
}


String digitalClockDisplay()
{
  String result;
  result += hour();
  result += printDigits(minute());
  result += printDigits(second());
  result +=" ";
  result +=day();
  result +=".";
  result +=month();
  result +=".";
  result +=year();
  // digital clock display of the time
  //Serial.print(hour());
  //printDigits(minute());
  //printDigits(second());
  //Serial.print(" ");
  //Serial.print(day());
  //Serial.print(".");
  //Serial.print(month());
  //Serial.print(".");
  //Serial.print(year());
  //Serial.println();

  return result;
}


String printDigits(int digits)
{
  String sttemp;
  // utility for digital clock display: prints preceding colon and leading 0
  //Serial.print(":");
  sttemp=":";

  if (digits < 10)
    //Serial.print('0');
    sttemp+="0";
    sttemp+=String(digits);
  //Serial.print(digits);
  return sttemp;
}
接下来还有html文件传到esp8266的存储空间里头。
一定要下载notepad++ 打开根目录下的 data/index.html
<!DOCTYPE html>
<html lang="zh-CN">

<head>
    <meta charset="UTF-8">
	<title>太极创客-零基础入门学用物联网教程</title>
</head>
<style>

.btn1 {
    width: 200px;
    height: 100px;
	font-size: 40px;
}
</style>

<body>
<center>
<!--   <a href="http://www.taichi-maker.com" target="_blank"><img src="/img/taichi-maker.jpg" alt="太极创客"></a>   -->
<div id="demo">
<h1>以下按钮可控制ESP8266开发板引脚</h1>
 <br>
  <!-- <button type="button" οnclick="sendData(1)" style="width: 200px; height: 100px; font-size: 40px">点亮 LED</button>  -->
  <button type="button" onclick="sendData(1)" class="btn1">点亮 LED</button>
  <button type="button" onclick="sendData(0)" class="btn1">关闭 LED</button>
  <button type="button" onclick="sendData2(1)" class="btn1">1</button>
  <button type="button" onclick="sendData2(2)" class="btn1">2</button>
  <button type="button" onclick="getData2()" class="btn1">获取时间</button>
  <br>
  <br>
</div>

<div>
    LED引脚状态 : <span id="LEDState">NA</span><br>
    按钮 : <span id="btnValue">NA</span><br>
    时间 : <span id="timValue">NA</span><br>
</div>
<br><br>
<div id="demo">
<h1>以下为模拟输入引脚A0的实时读数</h1>
<div>
    A0引脚读数 : <span id="ADCValue">0</span><br>
</div>
<!--<p>此页面用于演示如何通过网页控制LED引脚以及将A0引脚读数实时显示于网页中。</p>    -->
<!--<p>本教程可在太极创客网站免费获取。太极创客网址: <a href="http://www.taichi-maker.com" target="_blank">www.taichi-maker.com</a></p>    -->

<script>
function sendData(led) {
  var xhttp = new XMLHttpRequest();
  xhttp.onreadystatechange = function() {
    if (this.readyState == 4 && this.status == 200) {
      document.getElementById("LEDState").innerHTML =
      this.responseText;
    }
  };
  xhttp.open("GET", "setLED?LEDstate="+led, true);
  xhttp.send();
}
function sendData2(btnValue1) {
  var xhttp = new XMLHttpRequest();
  xhttp.onreadystatechange = function() {
    if (this.readyState == 4 && this.status == 200) {
      document.getElementById("btnValue").innerHTML =
      this.responseText;
    }
  };
  xhttp.open("GET", "setbtnValue?btnValue="+btnValue1, true);
  xhttp.send();
}
setInterval(function() {
  // Call a function repetatively with 2 Second interval
  //getData();
  //getData2();
}, 8000); //2000mSeconds update rate

function getData() {
  var xhttp = new XMLHttpRequest();
  xhttp.onreadystatechange = function() {
    if (this.readyState == 4 && this.status == 200) {
      document.getElementById("ADCValue").innerHTML =
      this.responseText;
    }
  };
  xhttp.open("GET", "readADC", true);
  xhttp.send();
}

function getData2() {
  var xhttp = new XMLHttpRequest();
  xhttp.onreadystatechange = function() {
    if (this.readyState == 4 && this.status == 200) {
      document.getElementById("timValue").innerHTML =
      this.responseText;
    }
  };
  xhttp.open("GET", "settimValue?timValue", true);
  xhttp.send();
}

</script>
</center>
</body>
</html>
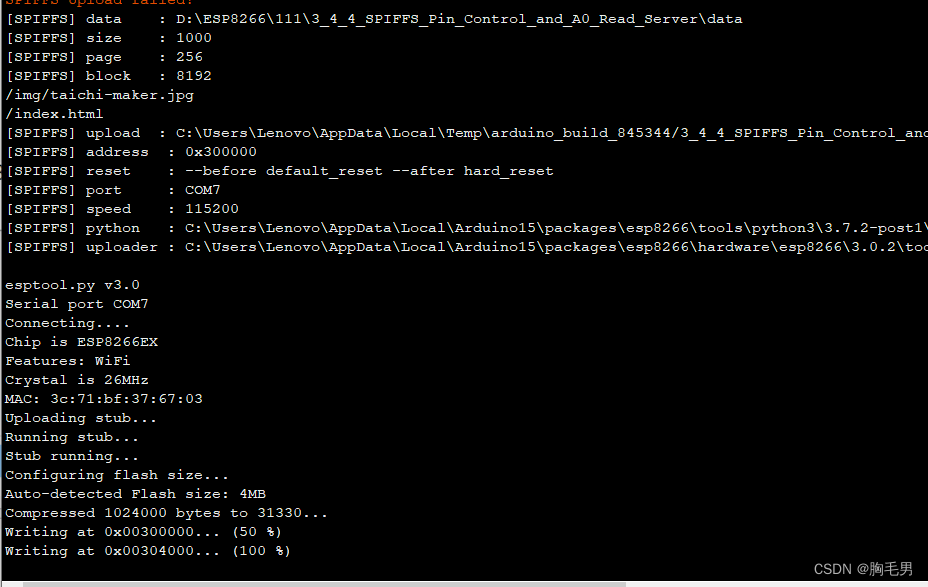
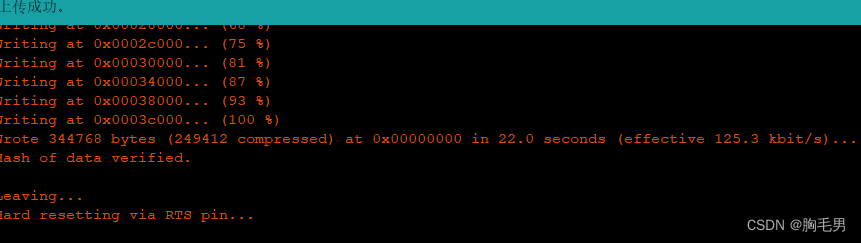
接下来先烧录资源

成功了会显示这个
再来烧程序
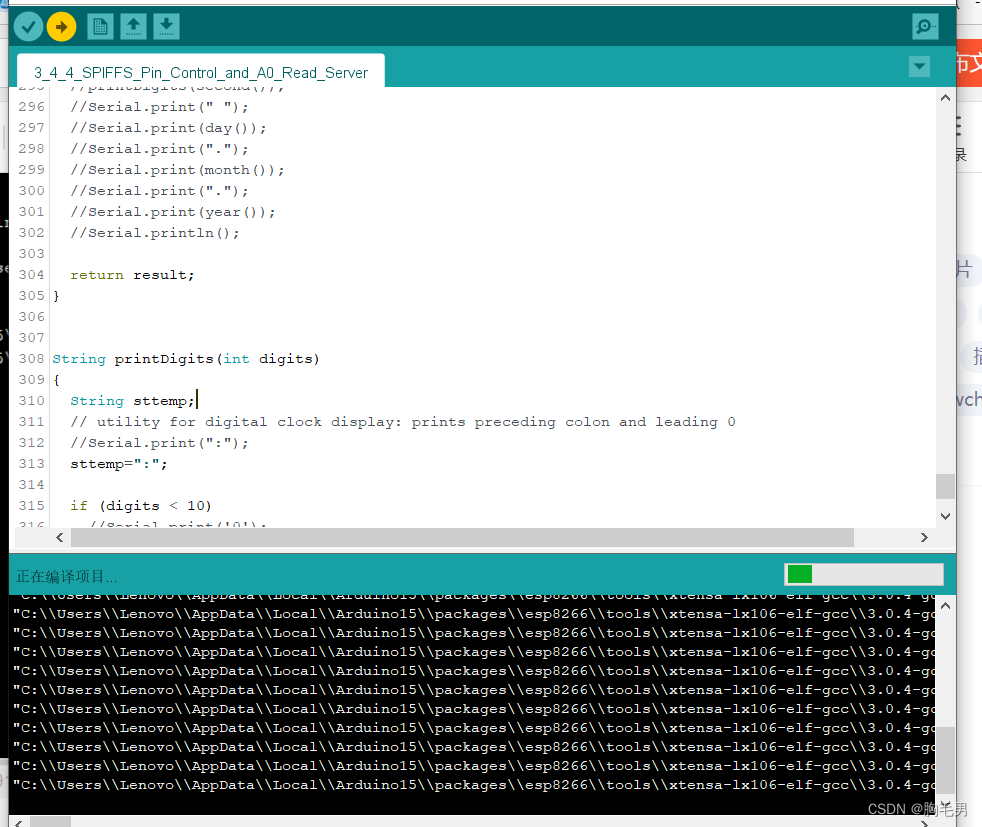
烧好了这样
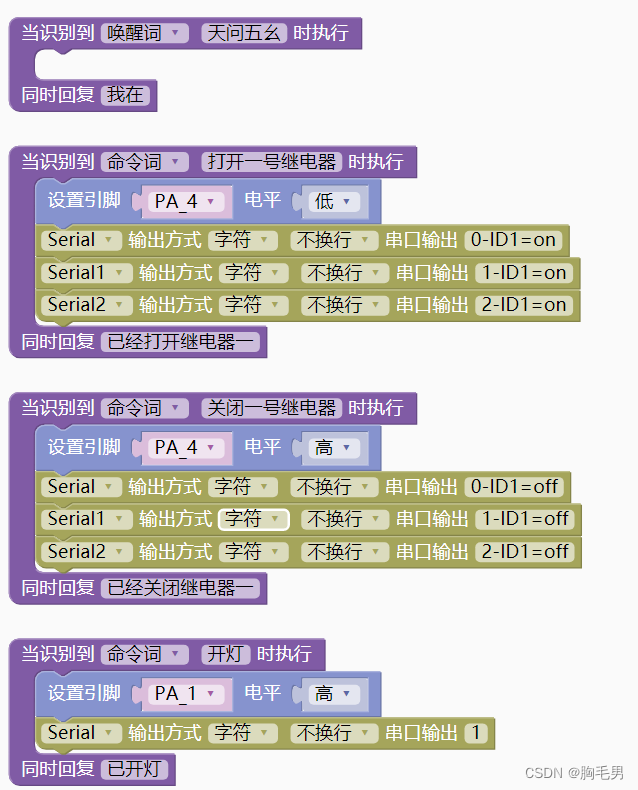
二、asrpro的整理
打开天文Block
设备选择ASRPRO

程序是这样的,太难拼了,要从已有的拼图里拼出程序,虽说很方便,但是真烧脑。

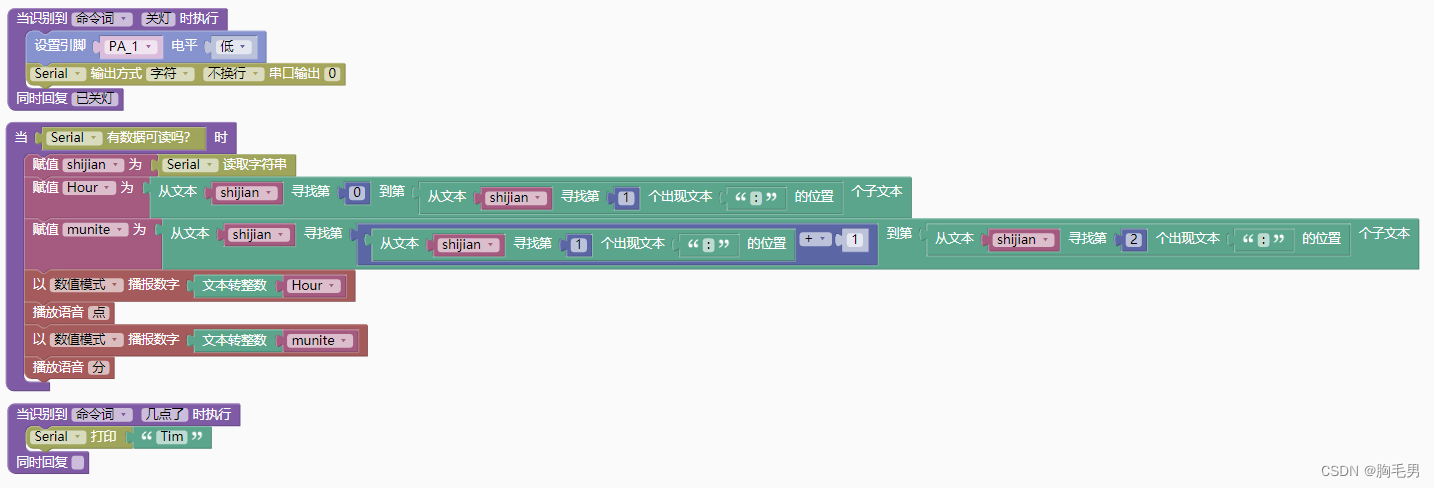
最长的那个就是截取,按照“:”分割截取时,分。烧录之后就可以了。
三、连线
音响连语音模块的音响
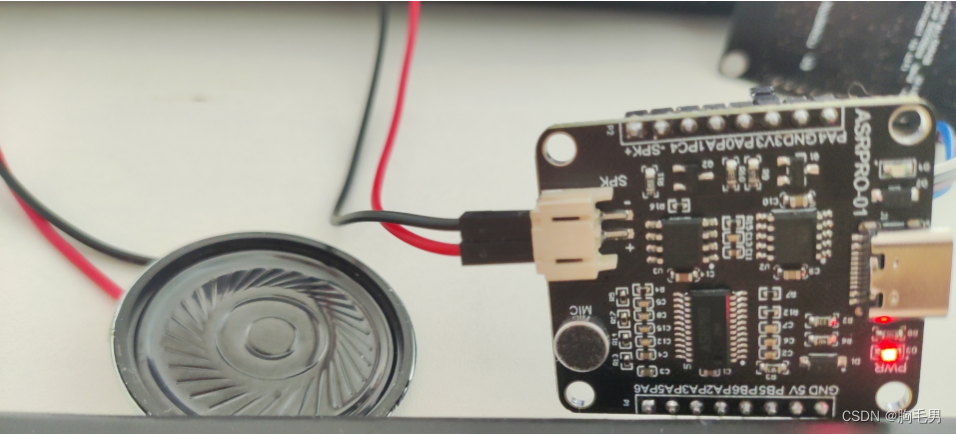
串口线连接
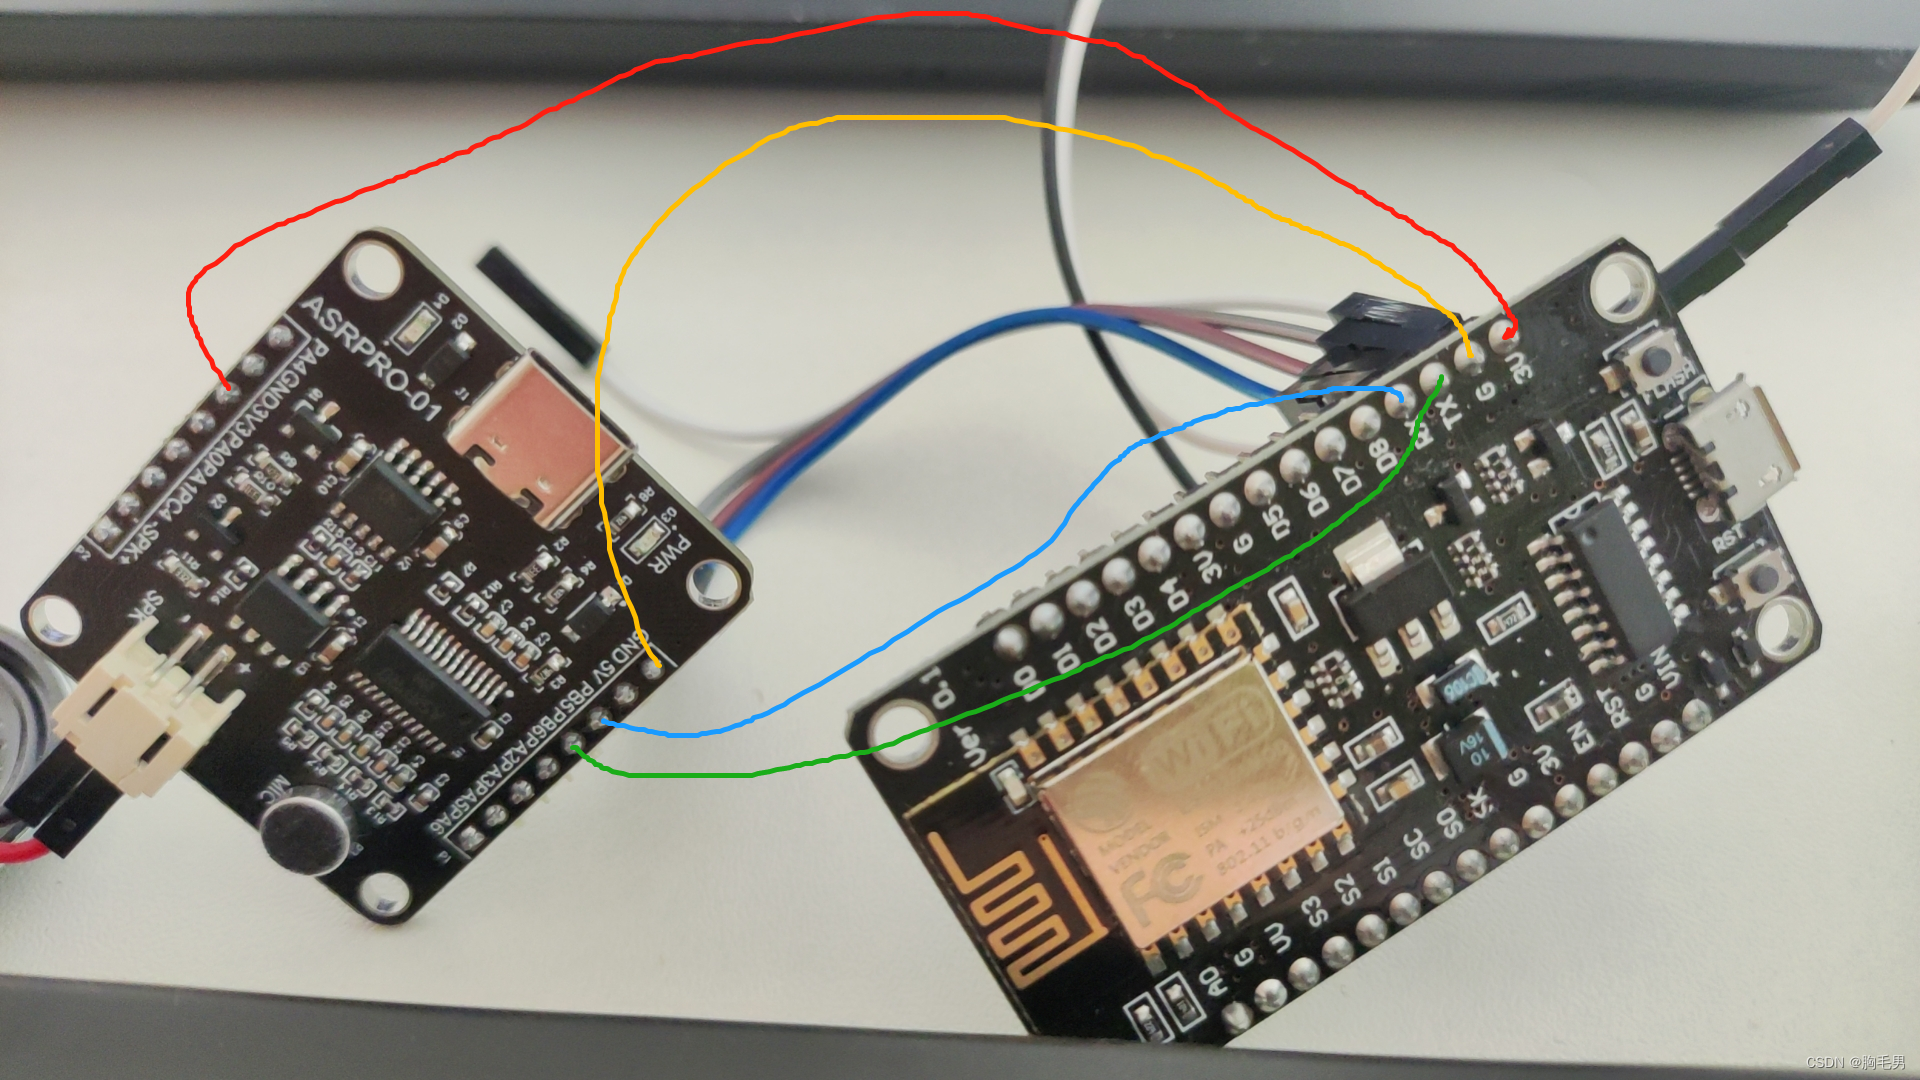
esp8266到 asrpro 分别是
3V -> 3V3
G -> GND
TX -> PB6
RX -> PB5
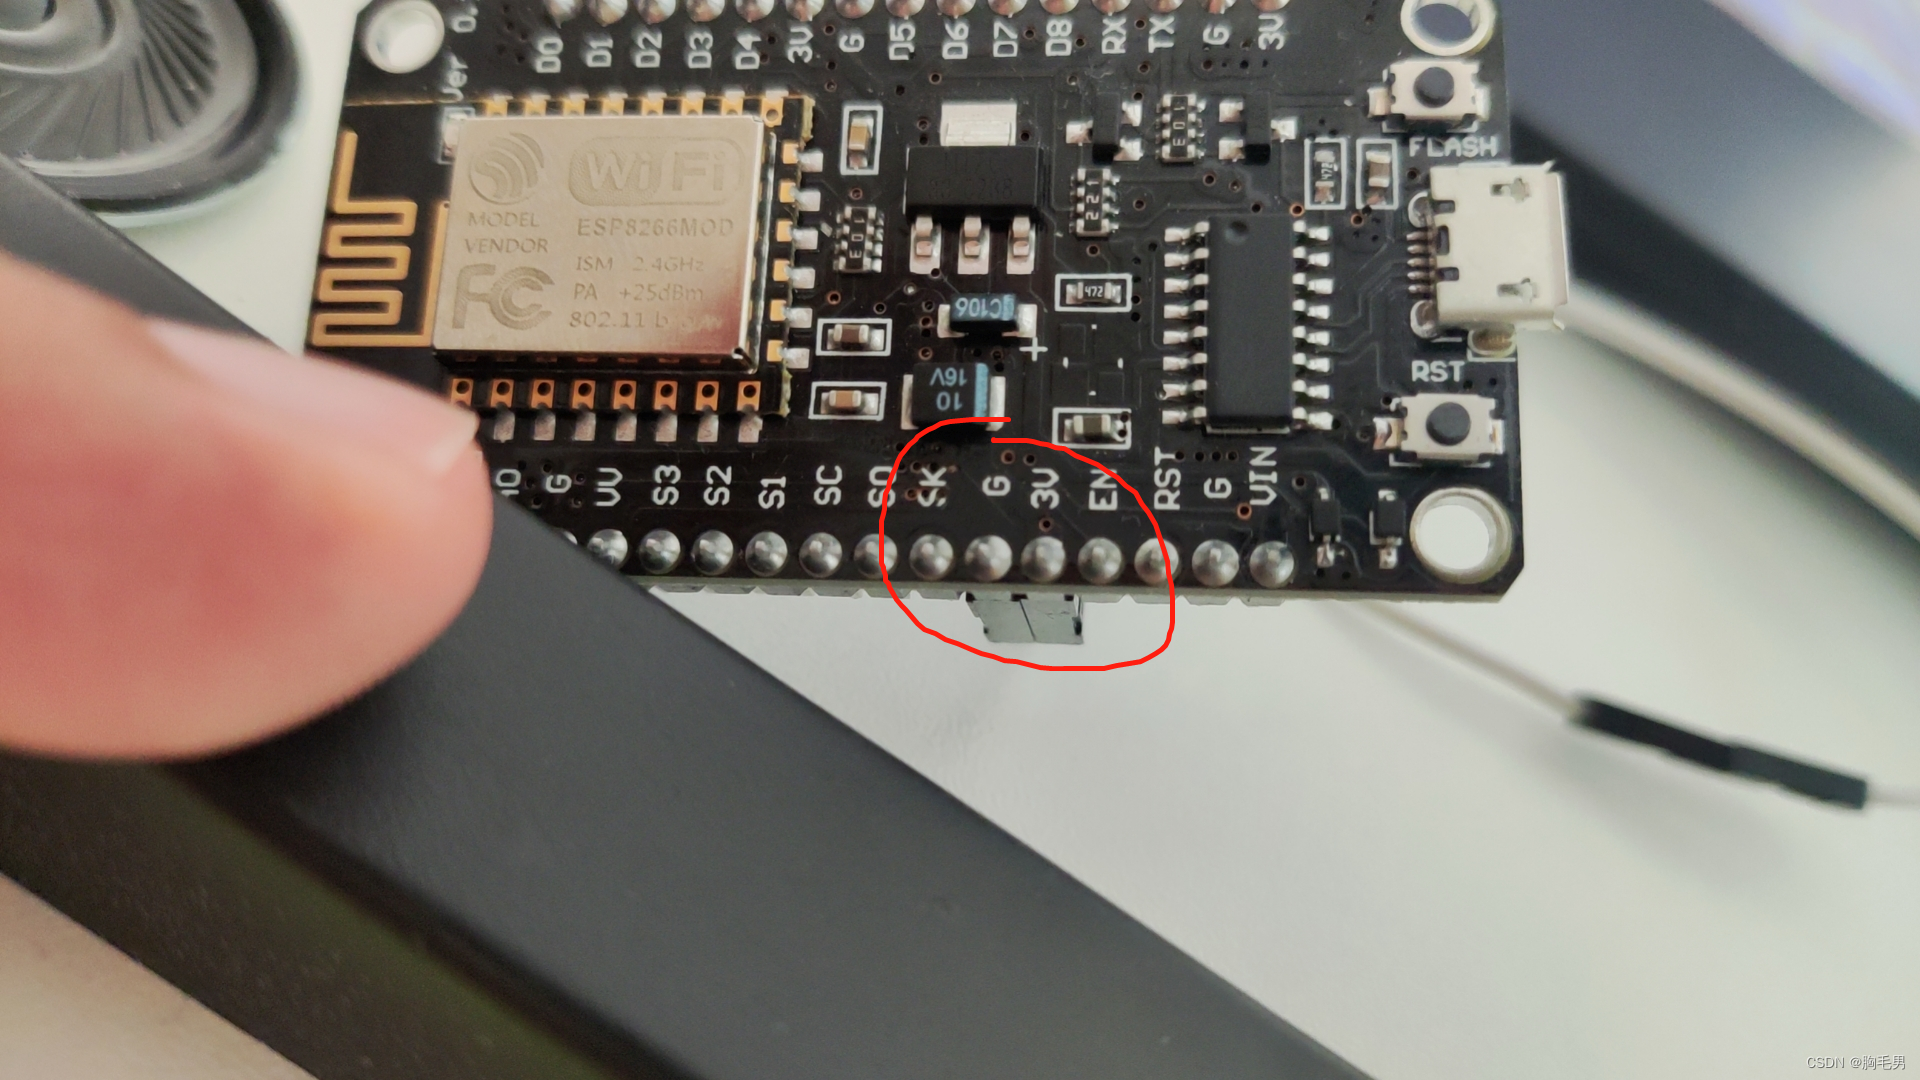
总供电在esp8266 另一侧的3V和G,分别连电源正负极
连接完成可以试试语音,说“几点了”,他就会播报时间了。这样半夜就不用再解锁手机来看了,保护眼睛。。。。。
语音授时


 1580
1580

 被折叠的 条评论
为什么被折叠?
被折叠的 条评论
为什么被折叠?
 到【灌水乐园】发言


