


ESP32S3基于espidf使能外部PSRAM配置
- 📍官方文档介绍:
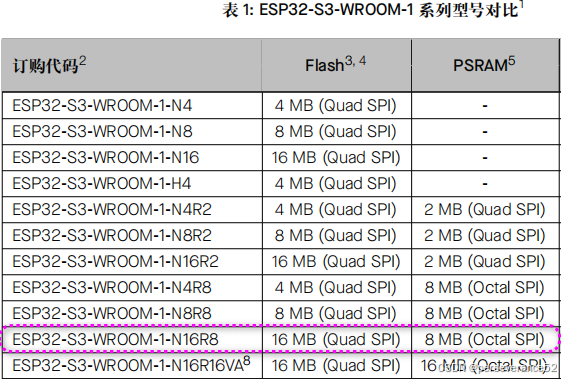
https://docs.espressif.com/projects/esp-idf/zh_CN/v5.0/esp32/migration-guides/release-5.x/system.html?highlight=psram - 所使用的型号:
ESP32-S3-WROOM-1,QSPI FLASH + PSRAM:N16R8
- 🔧在VS Code中配置
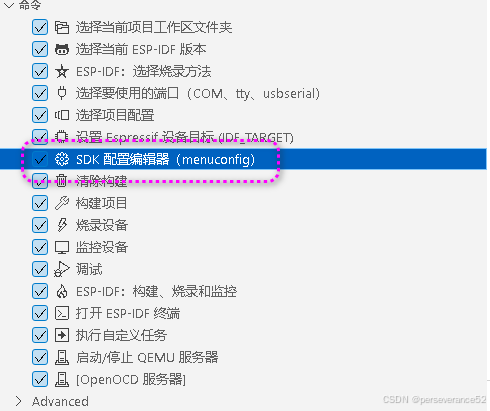
- 🌿ESP PSRAM选项
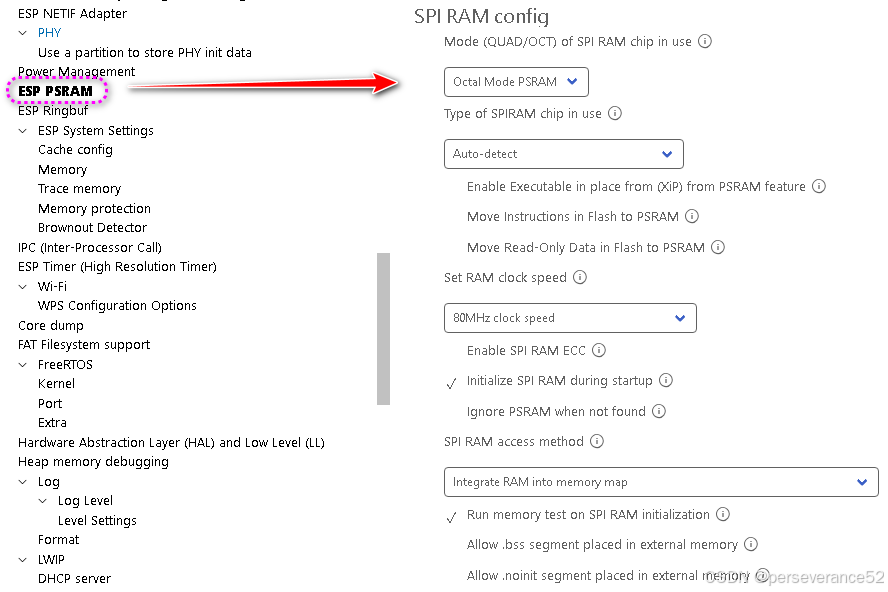
- 使能ESP PSRAM选项:

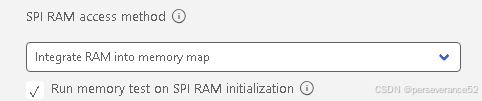
📘SPI RAM(PSRAM)存储方法,可选配置项
- Integrate RAM into memory map:适合需要直接控制内存布局和访问的场景。
将PSRAM集成到ESP32-S3的内存映射中。这意味着PSRAM将被视为系统内存的一部分,可以直接通过内存地址访问。
- Make RAM allocatable using heap_caps_malloc(…, MALLOC_CAP_SPIRAM):适合需要明确从PSRAM中分配内存的场景。
允许使用 heap_caps_malloc 等函数从PSRAM中分配内存。MALLOC_CAP_SPIRAM 是一个标志,用于指定从PSRAM中分配内存。
- Make RAM allocatable using malloc as well:适合希望简化内存分配流程的场景。
允许使用标准的 malloc 函数从PSRAM中分配内存。启用此选项后,malloc 会自动从PSRAM中分配内存(如果可用)。
📑集成片外 RAM 到 ESP32-S3 内存映射
- 在 CONFIG_SPIRAM_USE 中选择
Integrate RAM into memory map选项,以集成片外 RAM 到 ESP32-S3 内存映射。
- 这种方式的优点是访问速度快,但需要手动管理内存分配和释放。
适用场景:适用于需要直接控制内存布局和访问的场景,例如高性能计算或需要直接操作内存的应用。
- 调用方式
#include <stdio.h>
#include <stdlib.h>

#define PSRAM_START_ADDR 0x3F800000  // PSRAM 起始地址
#define PSRAM_SIZE (8 * 1024 * 1024) // PSRAM 大小(假设为 8MB)

void app_main(void)
{
    // 定义一个指向 PSRAM 起始地址的指针
    uint8_t *psram_ptr = (uint8_t *)PSRAM_START_ADDR;

    // 向 PSRAM 写入数据
    for (int i = 0; i < 1024; i++) {
        psram_ptr[i] = i % 256;  // 写入 0~255 的循环数据
    }

    // 从 PSRAM 读取数据并打印
    printf("PSRAM data:\n");
    for (int i = 0; i < 1024; i++) {
        printf("%02X ", psram_ptr[i]);
        if ((i + 1) % 16 == 0) {
            printf("\n");
        }
    }
}
添加片外 RAM 到堆内存分配器
在 CONFIG_SPIRAM_USE 中选择
Make RAM allocatable using heap_caps_malloc(..., MALLOC_CAP_SPIRAM)选项。
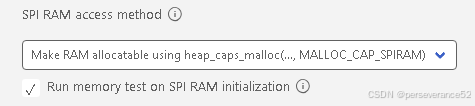
启用上述选项后,片外 RAM 被映射到数据虚拟地址空间,并将这个区域添加到携带 MALLOC_CAP_SPIRAM 标志的 堆内存分配器。
适用场景:适用于需要明确从PSRAM中分配内存的场景,例如需要大块内存但不想占用内部SRAM的应用。
- 调用方式
void *psram_mem = heap_caps_malloc(1024, MALLOC_CAP_SPIRAM);
if (psram_mem == NULL) {
    // 处理分配失败
}
调用 malloc() 分配片外 RAM
- 在 CONFIG_SPIRAM_USE 中选择
Make RAM allocatable using malloc() as well选项,该选项为默认选项。
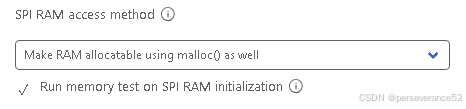
启用此选项后,片外存储器将被添加到内存分配程序(与上一选项相同),同时也将被添加到由标准 malloc() 函数返回的 RAM 中。应用程序因此可以使用片外 RAM,无需重写代码就能使用 heap_caps_malloc(..., MALLOC_CAP_SPIRAM)。
这种方式简化了内存分配的过程,适合不需要关心内存来源的场景。
适用场景:适用于希望简化内存分配流程的场景,例如一般的应用程序开发。
- 调用方法
void *mem = malloc(1024);
if (mem == NULL) {
    // 处理分配失败
}
📄使能外部PSRAM配置代码
- 使用的是smartconfig例程作为模板工程创建。
/* Esptouch example

   This example code is in the Public Domain (or CC0 licensed, at your option.)

   Unless required by applicable law or agreed to in writing, this
   software is distributed on an "AS IS" BASIS, WITHOUT WARRANTIES OR
   CONDITIONS OF ANY KIND, either express or implied.
*/

#include <string.h>
#include <stdlib.h>
#include "freertos/FreeRTOS.h"
#include "freertos/task.h"
#include "freertos/event_groups.h"
#include "esp_wifi.h"
#include "esp_eap_client.h"
#include "esp_event.h"
#include "esp_log.h"
#include "esp_system.h"
#include "nvs_flash.h"
#include "esp_netif.h"
#include "esp_smartconfig.h"
#include "esp_mac.h"

#include "driver/gpio.h"

#include "esp_sntp.h"
#include "esp_psram.h"

#define BLINK_GPIO GPIO_NUM_4

/* FreeRTOS event group to signal when we are connected & ready to make a request */
static EventGroupHandle_t s_wifi_event_group;

static uint8_t s_led_state = 0;
/* The event group allows multiple bits for each event,
   but we only care about one event - are we connected
   to the AP with an IP? */
static const int CONNECTED_BIT = BIT0;
static const int ESPTOUCH_DONE_BIT = BIT1;
static const char *TAG = "smartconfig_example";

static void smartconfig_example_task(void *parm);

static void initialize_sntp(void);

static void event_handler(void *arg, esp_event_base_t event_base,
                          int32_t event_id, void *event_data)
{
    if (event_base == WIFI_EVENT && event_id == WIFI_EVENT_STA_START)
    {
        xTaskCreate(smartconfig_example_task, "smartconfig_example_task", 4096, NULL, 3, NULL);
    }
    else if (event_base == WIFI_EVENT && event_id == WIFI_EVENT_STA_DISCONNECTED)
    {
        esp_wifi_connect();
        xEventGroupClearBits(s_wifi_event_group, CONNECTED_BIT);
    }
    else if (event_base == IP_EVENT && event_id == IP_EVENT_STA_GOT_IP)
    {
        ip_event_got_ip_t *event = (ip_event_got_ip_t *)event_data;
        ESP_LOGI("WIFI", "Got IP: " IPSTR, IP2STR(&event->ip_info.ip));
        ESP_LOGI(TAG, "Wi-Fi connected, initializing SNTP...");
        initialize_sntp(); // 初始化SNTP
        xEventGroupSetBits(s_wifi_event_group, CONNECTED_BIT);
    }
    else if (event_base == SC_EVENT && event_id == SC_EVENT_SCAN_DONE)
    {
        ESP_LOGI(TAG, "Scan done");
    }
    else if (event_base == SC_EVENT && event_id == SC_EVENT_FOUND_CHANNEL)
    {
        ESP_LOGI(TAG, "Found channel");
    }
    else if (event_base == SC_EVENT && event_id == SC_EVENT_GOT_SSID_PSWD)
    {
        ESP_LOGI(TAG, "Got SSID and password");

        smartconfig_event_got_ssid_pswd_t *evt = (smartconfig_event_got_ssid_pswd_t *)event_data;
        wifi_config_t wifi_config;
        uint8_t ssid[33] = {0};
        uint8_t password[65] = {0};
        uint8_t rvd_data[33] = {0};

        bzero(&wifi_config, sizeof(wifi_config_t));
        memcpy(wifi_config.sta.ssid, evt->ssid, sizeof(wifi_config.sta.ssid));
        memcpy(wifi_config.sta.password, evt->password, sizeof(wifi_config.sta.password));

#ifdef CONFIG_SET_MAC_ADDRESS_OF_TARGET_AP
        wifi_config.sta.bssid_set = evt->bssid_set;
        if (wifi_config.sta.bssid_set == true)
        {
            ESP_LOGI(TAG, "Set MAC address of target AP: " MACSTR " ", MAC2STR(evt->bssid));
            memcpy(wifi_config.sta.bssid, evt->bssid, sizeof(wifi_config.sta.bssid));
        }
#endif

        memcpy(ssid, evt->ssid, sizeof(evt->ssid));
        memcpy(password, evt->password, sizeof(evt->password));
        ESP_LOGI(TAG, "SSID:%s", ssid);
        ESP_LOGI(TAG, "PASSWORD:%s", password);
        if (evt->type == SC_TYPE_ESPTOUCH_V2)
        {
            ESP_ERROR_CHECK(esp_smartconfig_get_rvd_data(rvd_data, sizeof(rvd_data)));
            ESP_LOGI(TAG, "RVD_DATA:");
            for (int i = 0; i < 33; i++)
            {
                printf("%02x ", rvd_data[i]);
            }
            printf("\n");
        }

        ESP_ERROR_CHECK(esp_wifi_disconnect());
        ESP_ERROR_CHECK(esp_wifi_set_config(WIFI_IF_STA, &wifi_config));
        esp_wifi_connect();
    }
    else if (event_base == SC_EVENT && event_id == SC_EVENT_SEND_ACK_DONE)
    {
        xEventGroupSetBits(s_wifi_event_group, ESPTOUCH_DONE_BIT);
    }
}

static void initialise_wifi(void)
{
    ESP_ERROR_CHECK(esp_netif_init());
    s_wifi_event_group = xEventGroupCreate();
    ESP_ERROR_CHECK(esp_event_loop_create_default());
    esp_netif_t *sta_netif = esp_netif_create_default_wifi_sta();
    assert(sta_netif);

    wifi_init_config_t cfg = WIFI_INIT_CONFIG_DEFAULT();
    ESP_ERROR_CHECK(esp_wifi_init(&cfg));

    ESP_ERROR_CHECK(esp_event_handler_register(WIFI_EVENT, ESP_EVENT_ANY_ID, &event_handler, NULL));
    ESP_ERROR_CHECK(esp_event_handler_register(IP_EVENT, IP_EVENT_STA_GOT_IP, &event_handler, NULL));
    ESP_ERROR_CHECK(esp_event_handler_register(SC_EVENT, ESP_EVENT_ANY_ID, &event_handler, NULL));

    ESP_ERROR_CHECK(esp_wifi_set_mode(WIFI_MODE_STA));
    ESP_ERROR_CHECK(esp_wifi_start());
}

static void smartconfig_example_task(void *parm)
{
    EventBits_t uxBits;
    wifi_config_t myconfig = {0};
    ESP_LOGI(TAG, "creat smartconfig_example_task"); // 获取wifi配置信息,如果配置过,就直接连接wifi
    esp_wifi_get_config(ESP_IF_WIFI_STA, &myconfig);
    if (strlen((char *)myconfig.sta.ssid) > 0)
    {
        ESP_LOGI(TAG, "alrealy set, SSID is :%s,start connect", myconfig.sta.ssid);
        esp_wifi_connect();
    } // 如果没有配置过,就进行配网操作
    else
    {
        ESP_LOGI(TAG, "have no set, start to config");
        ESP_ERROR_CHECK(esp_smartconfig_set_type(SC_TYPE_ESPTOUCH_AIRKISS)); // 支持APP ESPTOUCH和微信AIRKISS
        smartconfig_start_config_t cfg = SMARTCONFIG_START_CONFIG_DEFAULT();
        ESP_ERROR_CHECK(esp_smartconfig_start(&cfg));
    }

    while (1)
    {
        uxBits = xEventGroupWaitBits(s_wifi_event_group, CONNECTED_BIT | ESPTOUCH_DONE_BIT, true, false, portMAX_DELAY);
        if (uxBits & CONNECTED_BIT)
        {
            ESP_LOGI(TAG, "WiFi Connected to ap"); // 成功连接路由器
        }
        if (uxBits & ESPTOUCH_DONE_BIT)
        {
            ESP_LOGI(TAG, "smartconfig over"); // 配网结束
            esp_smartconfig_stop();
            vTaskDelete(NULL);
        }
    }
}

static void blink_led(void)
{
    /* Set the GPIO level according to the state (LOW or HIGH)*/
    gpio_set_level(BLINK_GPIO, s_led_state);
}

static void configure_led(void)
{
    ESP_LOGI(TAG, "Example configured to blink GPIO LED!");
    gpio_reset_pin(BLINK_GPIO);
    /* Set the GPIO as a push/pull output */
    gpio_set_direction(BLINK_GPIO, GPIO_MODE_OUTPUT);
}

// SNTP 初始化
static void initialize_sntp(void)
{
    ESP_LOGI(TAG, "Initializing SNTP");
    esp_netif_init(); // 初始化网络接口
#if ESP_IDF_VERSION >= ESP_IDF_VERSION_VAL(5, 0, 0)
                      // 设置时间服务器(默认使用 pool.ntp.org)
    esp_sntp_setoperatingmode(SNTP_OPMODE_POLL);
    // 添加 NTP 服务器
    esp_sntp_setservername(0, "pool.ntp.org");    // 默认服务器
    esp_sntp_setservername(1, "cn.pool.ntp.org"); // 中国 NTP 服务器
    esp_sntp_setservername(2, "ntp1.aliyun.com"); // 阿里云 NTP 服务器
    // 初始化 SNTP
    esp_sntp_init();
#else
    sntp_setoperatingmode(SNTP_OPMODE_POLL);
    sntp_setservername(0, "pool.ntp.org");
    sntp_setservername(1, "cn.pool.ntp.org");
    sntp_setservername(2, "ntp1.aliyun.com");
    sntp_init(); // 初始化 SNTP
#endif
    // 设置时区(例如:北京时间 UTC+8)
    setenv("TZ", "CST-8", 1);
    tzset();
}

// 打印当前时间
void print_current_time()
{
    time_t now;
    struct tm timeinfo;
    // char buffer[64];

    // 获取当前时间戳
    time(&now);
    // 将时间戳转换为本地时间
    localtime_r(&now, &timeinfo);

    // 格式化时间
    // 使用 strftime 格式化时间
    // strftime(buffer, sizeof(buffer), "%Y-%m-%d %H:%M:%S", &timeinfo);
    // ESP_LOGI(TAG, "Formatted time: %s", buffer);

    // strftime(buffer, sizeof(buffer), "%A, %B %d, %Y %I:%M:%S %p", &timeinfo);
    // ESP_LOGI(TAG, "Formatted time: %s", buffer);

    // strftime(buffer, sizeof(buffer), "Today is %A, %B %d, %Y. The time is %I:%M %p.", &timeinfo);
    // ESP_LOGI(TAG, "Formatted time: %s", buffer);
    // 使用 asctime 打印时间
    char *time_str = asctime(&timeinfo);
    if (time_str != NULL)
    {
        // 去掉 asctime 输出的换行符
        time_str[strlen(time_str) - 1] = '\0';
        ESP_LOGI(TAG, "Current time: %s", time_str);
    }
    else
    {
        ESP_LOGE(TAG, "Failed to convert time to string");
    }
}

// 打印 Wi-Fi 信息
void print_wifi_info()
{
    wifi_config_t wifi_config;
    esp_wifi_get_config(ESP_IF_WIFI_STA, &wifi_config);

    esp_netif_ip_info_t ip_info;
    esp_netif_t *netif = esp_netif_get_handle_from_ifkey("WIFI_STA_DEF");
    if (netif && esp_netif_get_ip_info(netif, &ip_info) == ESP_OK)
    {
        ESP_LOGI(TAG, "Wi-Fi SSID: %s", (char *)wifi_config.sta.ssid);
        ESP_LOGI(TAG, "Wi-Fi Password: %s", (char *)wifi_config.sta.password);
        ESP_LOGI(TAG, "IP Address: " IPSTR, IP2STR(&ip_info.ip));
    }
    else
    {
        ESP_LOGE(TAG, "Failed to get IP information");
    }
}

void app_main(void)
{
    configure_led();
    ESP_ERROR_CHECK(nvs_flash_init());
    initialise_wifi();
    while (1)
    {
        print_current_time();
        vTaskDelay(pdMS_TO_TICKS(1000));
        print_wifi_info();
        // 检查 PSRAM 是否启用
        if (esp_psram_is_initialized())
        {
            printf("PSRAM is enabled.\n");
            // 获取 PSRAM 大小
            size_t psram_size = esp_psram_get_size();
            printf("PSRAM size: %u bytes\n", psram_size);
        }
        else
        {
            printf("PSRAM is not enabled.\n");
        }
        blink_led();
        s_led_state = !s_led_state;
    }
}
- 串口打印信息:

从打印信息来看,8388608 bytes可以确认已经使能了外部PSRAM.
📗片外PSRAM空间申请使用
✨在申请使用片外PSRAM时,需要注意,不能将全部8MB的空间全部申请了,否则会申请失败。可以根据实际任务需求,按量申请,执行完任务后,需要调用
free();,释放PSRAM内存。
#include <stdio.h>
#include "esp_heap_caps.h"
#include "esp_psram.h"//esp_psram_is_initialized函数需要包含
void app_main() {
	// 检查 PSRAM 是否启用
        if (esp_psram_is_initialized())
        {
            printf("PSRAM is enabled.\n");
            // 获取 PSRAM 大小
            size_t psram_size = esp_psram_get_size();
            printf("PSRAM size: %u bytes\n", psram_size);
             }
        else
        {
            printf("PSRAM is not enabled.\n");
        }
    // 分配PSRAM内存
    size_t psram_size = 4 * 1024 * 1024;  // 4MB
    void *psram_memory = heap_caps_malloc(psram_size, MALLOC_CAP_SPIRAM);

    if (psram_memory == NULL) {
        printf("Failed to allocate PSRAM memory\n");
    } else {
        printf("Successfully allocated PSRAM memory at %p\n", psram_memory);
        // 使用PSRAM内存
        // ...

        // 释放PSRAM内存
        free(psram_memory);
    }
}
- 🌿查询PSRAM空间
//需要psram配置 :Make RAM allocatable usingmalloc as well
//或者Make RAM allocatable usingheap_caps_malloc(..., MALLOC_CAP_SPIRAM)
// 获取PSRAM内存信息
    size_t psram_total = heap_caps_get_total_size(MALLOC_CAP_SPIRAM);//总空间
    size_t psram_free = heap_caps_get_free_size(MALLOC_CAP_SPIRAM);//可以空间

    printf("Total PSRAM: %d bytes\n", psram_total);
    printf("Free PSRAM: %d bytes\n", psram_free);


 6521
6521

 被折叠的 条评论
为什么被折叠?
被折叠的 条评论
为什么被折叠?
 到【灌水乐园】发言


