


这篇是以前写的。
参考论文为黄明明2019年发表在《河南工程学院:自然科学版》。
摘要:为提高家居生活品质和安全,设计了一种基于模糊推理的智能家居安防系统,有效实现了家居生活的防火、防盗和远程监控和报警功能。所设计的系统通过传感器对温度湿度信号,烟雾信号,震动信号及室外是否有人非法入侵等环境信息进行检测。
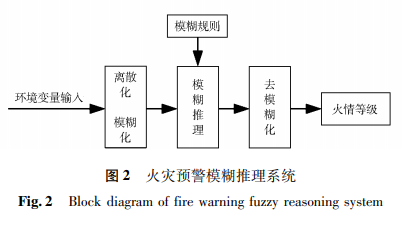


本设计的模糊推理系统有2个输入量,分别是室内环境温度和室内烟雾浓度。
将环境变量信号输入模糊推理机之前,先要将其模糊化,即将输入变量由数字转变为语言值。
将模糊变量输入推理机,根据设定的模糊规则进行模糊推理。
接下来进行反模糊化,即将语言值转变为对应的数值,该数值反映了火灾发生的概率。
以下是用python代码实现这一系统仿真。matlab对此过程操作较为简单。
安装skfuzzy,我使用的是anaconda3.8。
网站为Pre-built installation — skfuzzy v0.2 docs
conda install scitik-fuzzyimport numpy as np
import skfuzzy as fuzz
import matplotlib.pyplot as plt
from skfuzzy import control as ctrl
import math
# 温度范围为[0,50]
# 烟雾浓度范围为[0,1500]
# 火灾险情范围[0,100]
x_tem = np.arange(0, 51, 1)
x_smog= np.arange(0, 1501, 1)
x_lever= np.arange(0, 101, 1)
# 定义模糊控制变量
temperature= ctrl.Antecedent(x_tem, 'temperature')
smog = ctrl.Antecedent(x_smog, 'smog')
lever= ctrl.Consequent(x_lever, 'lever')
# 生成模糊隶属函数
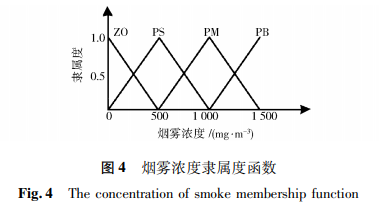
temperature['ZO'] = fuzz.trimf(x_tem, [0, 0, 15])#定义温度的三角隶属度函数横坐标
temperature['PS'] = fuzz.trimf(x_tem, [0, 15, 30])
temperature['PM'] = fuzz.trimf(x_tem, [15, 30, 50])
temperature['PB'] = fuzz.trimf(x_tem, [30, 50, 50])
#temperature.view()
smog['ZO'] = fuzz.trimf(x_smog, [0, 0, 500])#定义烟雾浓度的三角隶属度函数横坐标
smog['PS'] = fuzz.trimf(x_smog, [0, 500, 1000])
smog['PM'] = fuzz.trimf(x_smog, [500, 1000, 1500])
smog['PB'] = fuzz.trimf(x_smog, [1000, 1500, 1500])
#smog.view()
lever['ZO'] = fuzz.trimf(x_lever, [0, 0, 40]) #定义火灾等级的三角隶属度函数横坐标
lever['PS'] = fuzz.trimf(x_lever, [0, 40, 60])
lever['PM'] = fuzz.trimf(x_lever, [40, 60, 100])
lever['PB'] = fuzz.trimf(x_lever, [60, 100, 100])
lever.defuzzify_method='centroid'
#可视化这些输入输出和隶属函数
#temperature.automf(4)
# smog.automf(4)#四种程度
# temperature.view()
#smog.view()
#plt.show()
#规则
rule1=ctrl.Rule(antecedent=((temperature['ZO'] & smog['ZO'])|(temperature['PS'] & smog['ZO'])|(temperature['ZO'] & smog['PS'])),consequent=lever['ZO'],label='无')
rule2=ctrl.Rule(antecedent=((temperature['ZO'] & smog['PM'])|(temperature['PS'] & smog['PS'])|(temperature['PS'] & smog['PM'])|(temperature['PM'] & smog['ZO'])|(temperature['PM'] & smog['PS'])),consequent=lever['PS'],label='小')
rule3=ctrl.Rule(antecedent=(temperature['PM'] & smog['PM']),consequent=lever['PM'],label='中')
rule4=ctrl.Rule(antecedent=(temperature['PB']|smog['PB']),consequent=lever['PB'],label='大')
# 系统与运行环境初始化
levering_ctrl = ctrl.ControlSystem([rule1, rule2, rule3, rule4])
levering= ctrl.ControlSystemSimulation(levering_ctrl)
# 测试输出
#levering.input['temperature'] = 25
#levering.input['smog'] = 500
#levering.compute()
#print (levering.output['lever'])
#lever.view(sim=levering)
#plt.show()
# 仿真结果3D图输出,使用下列代码时请注释掉上面的测试输出
upsampled1 = np.linspace(0, 51, 51)#这里的范围不能错
upsampled2 = np.linspace(0, 1500, 1500)
x, y= np.meshgrid(upsampled1, upsampled2)#生成网格点坐标矩阵
z = np.zeros_like(x)
##tipping.input['angle'] = 0
##tipping.input['distance'] = 0
##tipping.compute()
##print (tipping.output['out'])
#out.view(sim=tipping)
pp=[]
for i in range(0,1500):
for j in range(0,51):
levering.input['temperature']=x[i,j]
levering.input['smog'] = y[i,j]
levering.compute()
z[i, j] = levering.output['lever']
# pp.append(z[i,j])
import matplotlib.pyplot as plt
from mpl_toolkits.mplot3d import Axes3D
fig = plt.figure(figsize=(10, 10)) #定义画布大小
ax = fig.add_subplot(111, projection='3d')
surf = ax.plot_surface(x, y, z, rstride=1, cstride=1, cmap='viridis',linewidth=0.4, antialiased=True)
#cset = ax.contourf(x, y, z, zdir='z', offset=-2.5, cmap='viridis', alpha=0.5)
#cset = ax.contourf(x, y, z, zdir='x', offset=3, cmap='viridis', alpha=0.5)
#cset = ax.contourf(x, y, z, zdir='y', offset=3, cmap='viridis', alpha=0.5)
ax.view_init(30, 200)#设置观察角度
plt.show()本文用的matlab版本为R2018a
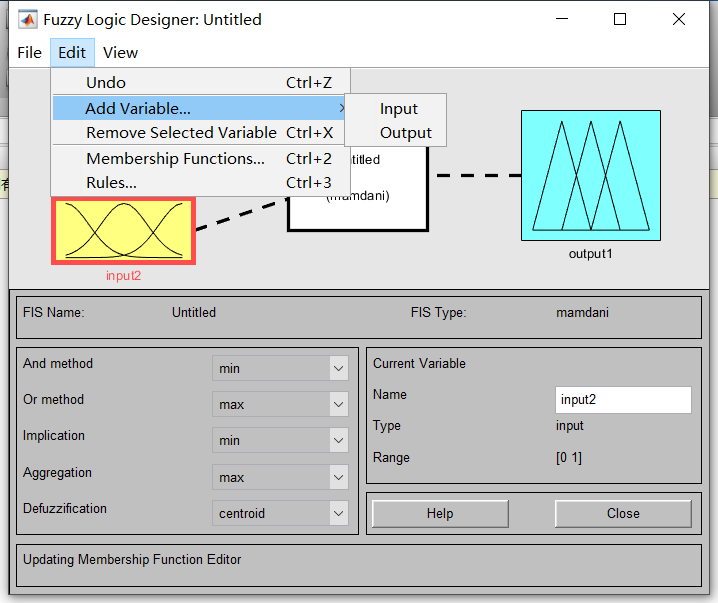
首先我们在matlab的命令窗口输入fuzzy,回车。

可在此添加输入或输出,双击图像可设置对应的隶属度函数
选择view rules,得到图5,选择view,surface,得到图6


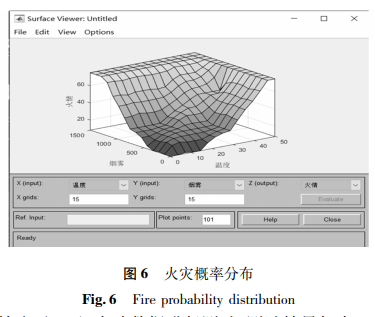
根据程序运行时间来看,matlab是优于python的。python最后呈现3D图像是执行了For循环,
1500*50=75000次,我的电脑运行需要十分钟,但是matlab瞬间就运行结束。

最近发现使用python自带的一些库运行后得到的结果并不是很精准。
我使用自己写的详细代码和调用库得到的结果有些不一样。


 1223
1223


 被折叠的 条评论
为什么被折叠?
被折叠的 条评论
为什么被折叠?
 到【灌水乐园】发言


