


目录
wandb是什么
wandb是Weight & Bias的缩写,这是一个与Tensorboard类似的参数可视化平台。不过,相比较TensorBoard而言,Wandb更加的强大,主要体现在以下的几个方面:
- 复现模型:Wandb更有利于复现模型。
这是因为Wandb不仅记录指标,还会记录超参数和代码版本。- 自动上传云端:
如果你把项目交给同事或者要去度假,Wandb可以让你便捷地查看你制作的所有模型,你就不必花费大量时间来重新运行旧实验。- 快速、灵活的集成:
只需5分钟即可把Wandb加到自己的项目。
下载Wandb免费的开源Python包,然后在代码中插入几行,以后你每次运行模型都会得到记录完备的指标和记录。- 集中式指示板:
Wandb提供同样的集中式指示板。不管在哪里训练模型,不管是在本地机器、实验室集群还是在云端实例;
这样就不必花时间从别的机器上复制TensorBoard文件。- 强大的表格:
对不同模型的结果进行搜索、筛选、分类和分组。
可以轻而易举地查看成千上万个模型版本,并找到不同任务的最佳模型。
详细内容:Wandb:模型训练最强辅助 - 知乎
wandb安装与注册登陆
1.在终端里运行如下代码用于安装wandb库。
pip install wandb2. 在安装好wandb库之后,输入如下代码进行wandb的登陆。
如果之前没有使用过wanbd的话,在运行wandb login之前最好先去wandb的官网注册一个账号,这样在输入API key时可以方便不少。点这里注册
wandb login在输入上面的代码之后终端里就会出现这两行,这时候需要做的就是点开第一行的链接,将里面的神秘代码复制粘贴到第二行里,敲一下回车,就完成了wandb的登陆。
 测试代码:
测试代码:
import wandb
config = dict (
learning_rate = 0.01,
momentum = 0.2,
architecture = "CNN",
dataset_id = "peds-0192",
infra = "AWS",
)
wandb.init(
project="detect-pedestrians",
notes="tweak baseline",
tags=["baseline", "paper1"],
config=config,
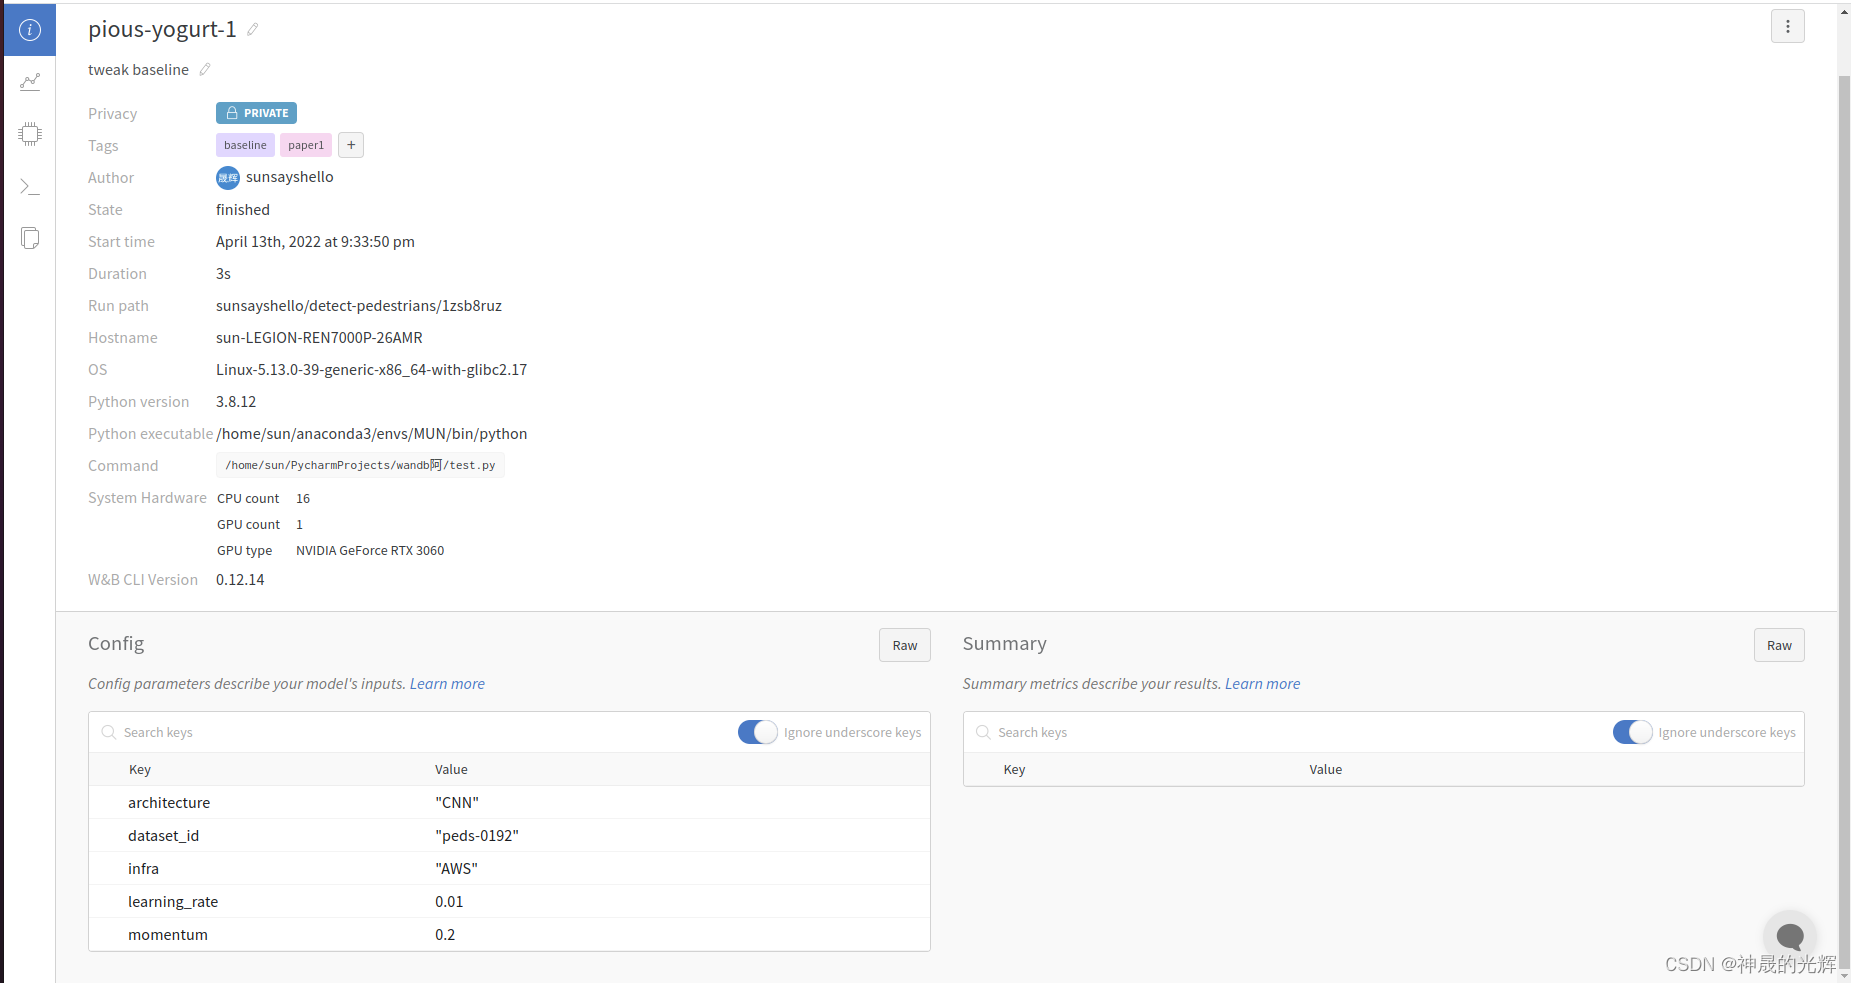
)打开运行结果里有火箭那一行的链接,浏览器中出现如下结果就说明成功了。
wandb常用函数
wandb.init()
这个函数的作用与平常定义类里面的init函数作用类似,都是起初始化的作用。在官方文档里面,init中包含20多个作用不同的参数,我从这20多个里面挑了几个自认为比较重要的参数进行具体的说明。官方文档:wandb.init - Documentation
1.project:字符串格式,这个参数用于定义你的项目名称,wandb在运行的过程中会自动帮你创建一个项目文件,将所有项目名称相同的文件都放在一起。
2.name:字符串格式,表示具体的名称,不写的话也可以,官方文档中说不定义具体名称的工程系统会自动使用两个随机单词进行命名,为了方便记忆以及防止出现例如green-wood-250之类的奇怪名字,还是定义一下比较好。
3.conifg:见wandb.config()。
4.resume:用于设置可恢复行为,通俗的理解就是当遇见意外中断时是否可继续。通常设置为默认None。
wandb.init(project='project',
           name='name',
           config=config,
           resume='None')
wandb.config()
wandb.config()用于保存训练配置,这些配置包含超参数、数据集名称或模型类型等输入设置,以及其他自变量。在使用的时候可以在wandb.init()中就进行对config的定义,这时候就能够直接对config内容进行输入。如果在init中没有设置conifg,那么就使用wandb.config.update()进行具体内容的输入。官方文档:wandb.config - Documentation
#init中定义了config
config=dic(learing rate=0.1,batch size=2,epoch=50)
#init中没有定义config
wandb.config.update(dic(learing rate=0.1,batch size=2,epoch=50))
wandb.log()和wandb.Image()
wandb.log()会将数据记录到当前的历史记录,换句话说就是每次运行到这里,系统就会将log内的参数值自动上传更新,一般数据会直接绘制成表格。wandb.Image()用于图像的显示,numpy格式的数组或者PIL实例转化为PNG,从而在网页上直接显示出来。
官方文档:wandb.log - Documentation & wandb.Imgae的我没有找到
wandb.log({'loss': loss, 'epoch': epoch, 'learning rate': cur_lr,
           'images': wandb.Image(images.float()),
           'masks': {'true': wandb.Image(targets.float()),
                     'pred': wandb.Image(pred.float())}
          })
具体使用方法
一般wandb都是写在网络的Train函数里,这里我就只放一个Train函数来举例了。大家可以照葫芦画瓢,把这个应用到自己的网络里。
首先,导入wandb库。
import os
import argparse
import time
import shutil
import wandb     #wandb库

import numpy as np
import torch
import torch.utils.data as data
import torch.backends.cudnn as cudnn

from torchvision import transforms
from data_loader import get_segmentation_dataset
from models.fast_scnn import get_fast_scnn
from utils.loss import MixSoftmaxCrossEntropyLoss, MixSoftmaxCrossEntropyOHEMLoss
from utils.lr_scheduler import LRScheduler
from utils.metric import SegmentationMetric
然后,找到合适的地方进行wandb的初始化和config内容的设置。通常写在train这个函数里面,不过也有例外,这时候就需要仔细看看代码了。比如我改的这个就是需要设置在main函数里面的。
if __name__ == '__main__':
    args = parse_args()
    test = wandb.init(project="Fast-SCNN", resume="allow")
    test.config.update(dict(epoch=args.epochs, lr=args.lr, batch_size=args.batch_size))
    trainer = Trainer(args)
    if args.eval:
        print('Evaluation model: ', args.resume)
        trainer.validation(args.start_epoch)
    else:
        print('Starting Epoch: %d, Total Epochs: %d' % (args.start_epoch, args.epochs))
        trainer.train()
数据显示部分要找到合适的位置,基本上放在train函数里面的for循环中就基本不会有太大问题了,最多就是在显示图片的时候仔细查看一下,输入的格式是否符合wandb.Image的需求,防止在使用的过程中报错。
    def train(self):
        cur_iters = 0
        start_time = time.time()
        for epoch in range(self.args.start_epoch, self.args.epochs):
            self.model.train()

            for i, (images, targets) in enumerate(self.train_loader):
                cur_lr = self.lr_scheduler(cur_iters)
                for param_group in self.optimizer.param_groups:
                    param_group['lr'] = cur_lr

                images = images.to(self.args.device)
                targets = targets.to(self.args.device)

                outputs = self.model(images)
                loss = self.criterion(outputs, targets)
                pred = torch.argmax(outputs[0], 1)


                test.log({'loss': loss, 'epoch': epoch, 'learning rate': cur_lr})
                test.log({'images': wandb.Image(images.float()),
                          'masks': {
                              'true': wandb.Image(targets.float()),
                              'pred': wandb.Image(pred.float()),
                         }}
                         )

                self.optimizer.zero_grad()
                loss.backward()
                self.optimizer.step()

                cur_iters += 1
                if cur_iters % 10 == 0:
                    print('Epoch: [%2d/%2d] Iter [%4d/%4d] || Time: %4.4f sec || lr: %.8f || Loss: %.4f' % (
                        epoch, args.epochs, i + 1, len(self.train_loader),
                        time.time() - start_time, cur_lr, loss.item()))

            if self.args.no_val:
                # save every epoch
                save_checkpoint(self.model, self.args, is_best=False)
            else:
                self.validation(epoch)

        save_checkpoint(self.model, self.args, is_best=False)
运行结果:
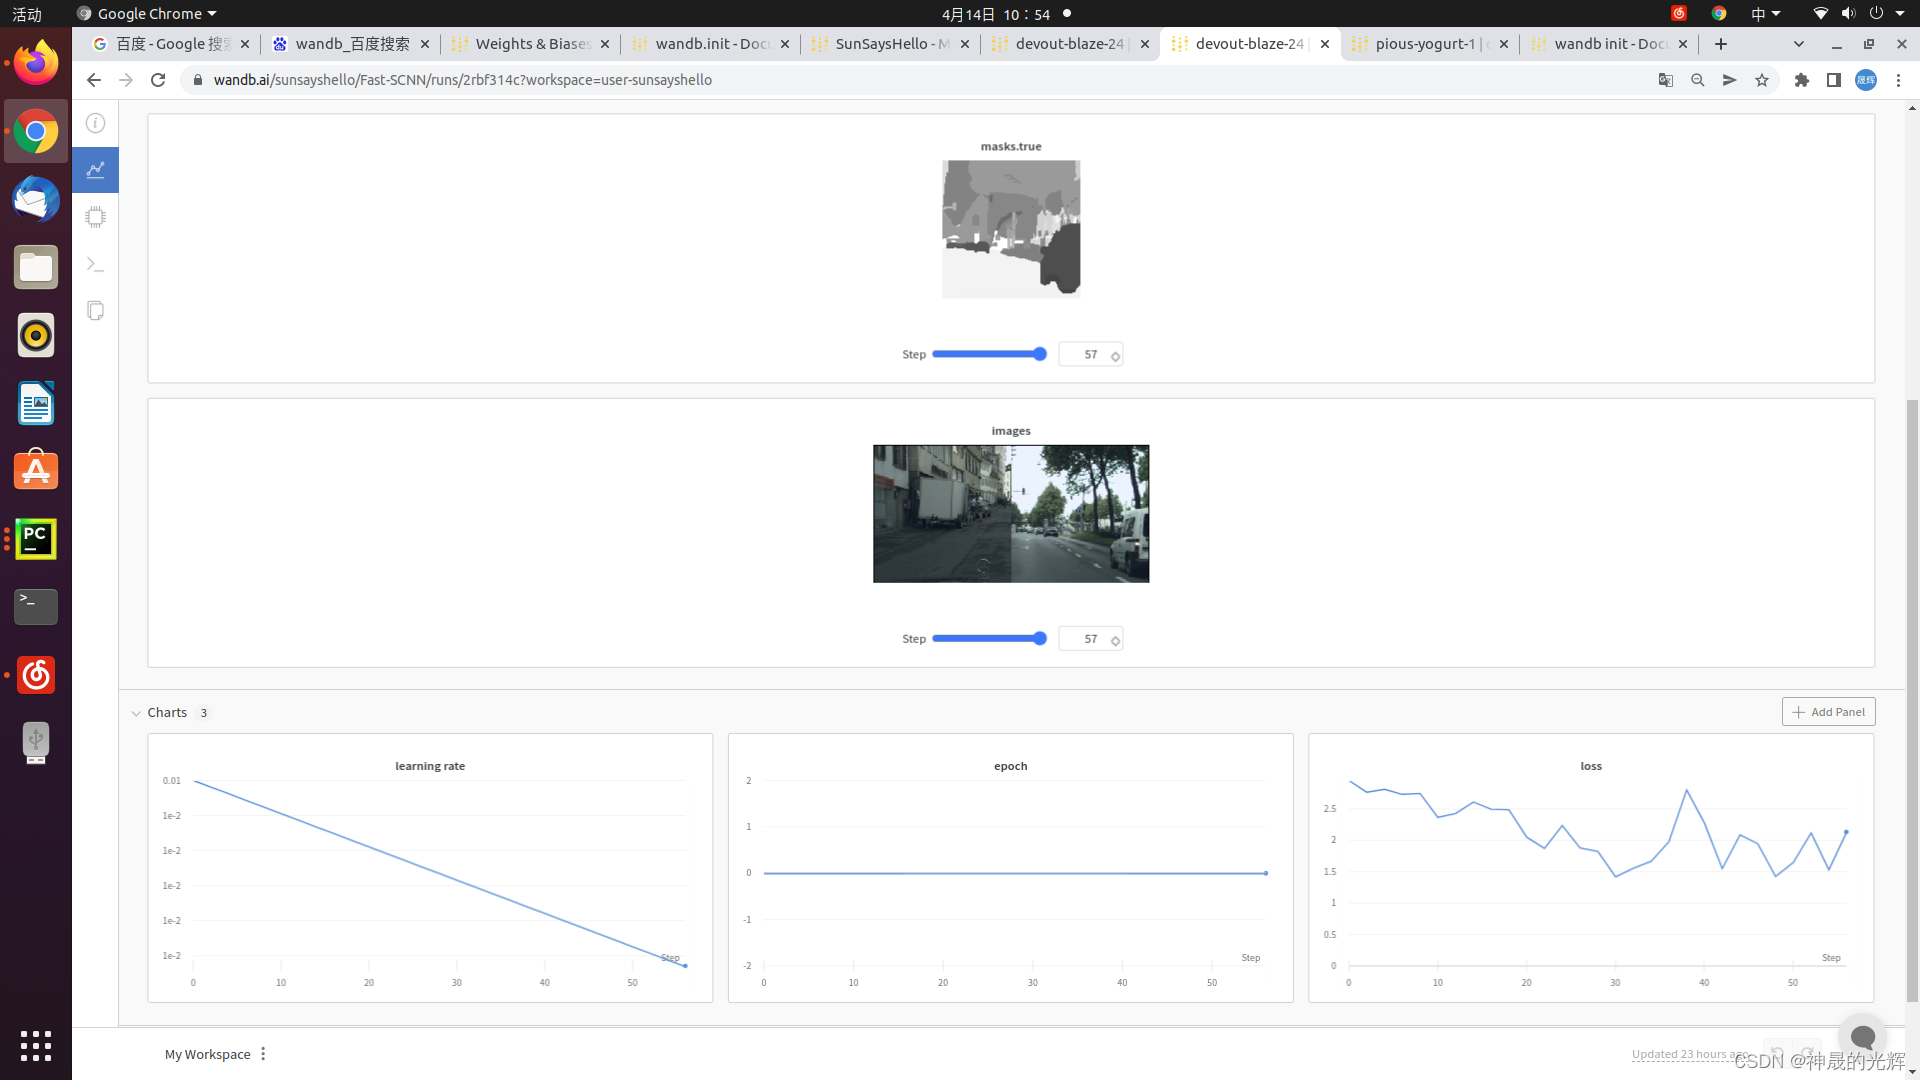
大功告成!
后传
近期本人所在的某洛可可式实验室内开始了内卷这一不良风气,但由于我们研一的除了以K神、W神、H神为首的几位神明之外基本都是彩笔,不能内卷论文,于是大家纷纷开始效仿R神开始内卷CSDN。这篇文章一方面是记录一下自己的学习成果,另一方面也希望能给大伙提供一些小小的帮助。


 1607
1607


 被折叠的 条评论
为什么被折叠?
被折叠的 条评论
为什么被折叠?
 到【灌水乐园】发言


