


Anchor box的理解
这个概念最初是在Faster R-CNN中提出,此后在SSD、YOLOv2、YOLOv3等优秀的目标识别模型中得到了广泛的应用。
背景
在Faster-RCNN中首次提出anchor box之前,存在的滑动窗口、区域建议(Regional Proposal)检测目标时都会存在一定的问题,比如一个窗口只能检测出一个目标。而anchor box很好的解决了这个问题。
滑动窗口:这是比较原始的目标检测方法,给定一个固定尺寸的窗口,根据设定的步伐,一步一步的从左至右、从上至下滑动,把每个窗口输入到卷积神经网络中进行预测和分类,这样做有两个缺点:
- 由于窗口尺寸固定,因此不适合形变较大的物体
- 窗口较多,运算量大
区域建议:这是R-CNN系列中核心的思想,以Faster R-CNN为例,模型中使用了两个神经网络,一个是CNN,一个是RPN(Regional Proposal),区域建议网络不负责图像的分类,它只负责选取出图像中可能属于数据集其中一类的候选区域。接下来就是把RPN产生的候选区域输入到分类网络中进行最终的分类。
先验知识
传统目标检测输出的表示方法: y = [ p c b x b y b h b w c 1 c 2 c 3 ] \mathrm{y}=\left[\begin{array}{l}p_{c} \\ b_{x} \\ b_{y} \\ b_{h} \\ b_{w} \\ c_{1} \\ c_{2} \\ c_{3}\end{array}\right] y=⎣⎢⎢⎢⎢⎢⎢⎢⎢⎢⎢⎡pcbxbybhbwc1c2c3⎦⎥⎥⎥⎥⎥⎥⎥⎥⎥⎥⎤,其中:
-
pc:网格中是否含有目标对象
-
bx:目标对象中心点的x坐标
-
by:目标对象中心点的y坐标
-
bh:目标对象的高度
-
bw:目标对象的宽度
-
c1,c2,c3:目标对象的类别
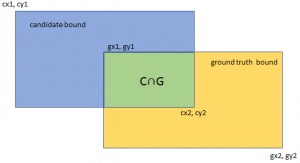
交并比(IOU):
I
o
U
=
area
(
C
)
∩
area
(
G
)
area
(
C
)
∪
area
(
G
)
I o U=\frac{\operatorname{area}(C) \cap \operatorname{area}(G)}{\operatorname{area}(C) \cup \operatorname{area}(G)}
IoU=area(C)∪area(G)area(C)∩area(G)
算法
训练阶段:
在训练阶段,是把anchor box作为训练样本,为了训练样本我们需要为每个锚框标注两类标签:一是锚框所含目标的类别,简称类别;二是真实边界框相对锚框的偏移量,简称偏移量(offset)。在目标检测时,我们首先生成多个锚框,然后为每个锚框预测类别以及偏移量,接着根据预测的偏移量调整锚框位置从而得到预测边界框,最后筛选需要输出的预测边界框。
假设图像中有 n a n_{a} na个anchor box,有 n b n_{b} nb个真实边界框,这样的话就形成了一个anchor box与真实边界框之间的对应关系矩阵 X ∈ R n a × n b X \in R^{n_{a} \times n_{b}} X∈Rna×nb,那么就根据这个对应关系找出与每个anchor box交并比最大的真实边界框,然后真实边界框的标签作为anchor box的标签,然后计算anchor box相对于真实边界框的偏移量。
这样的话就标记好了每个anchor box:标签和偏移量。
在经过一系列卷积和池化之后,在feature map层使用anchor box,到了特征层之后对每个cell映射到原图中,找到预先标注的anchor box,然后计算这个anchor box与ground truth之间的损失,训练的主要目的就是训练出用anchor box去拟合真实边框的模型参数。
损失函数:
L
(
{
p
i
}
,
{
t
i
}
)
=
1
N
c
l
s
∑
i
L
c
l
s
(
p
i
,
p
i
∗
)
+
λ
1
N
r
e
g
∑
i
p
i
∗
L
r
e
g
(
t
i
,
t
i
∗
)
L\left(\left\{p_{i}\right\},\left\{t_{i}\right\}\right)=\frac{1}{N_{c l s}} \sum_{i} L_{c l s}\left(p_{i}, p_{i}^{*}\right)+\lambda \frac{1}{N_{r e g}} \sum_{i} p_{i}^{*} L_{r e g}\left(t_{i}, t_{i}^{*}\right)
L({pi},{ti})=Ncls1i∑Lcls(pi,pi∗)+λNreg1i∑pi∗Lreg(ti,ti∗)
L
c
l
s
(
p
i
,
p
i
∗
)
L_{c l s}\left(p_{i}, p_{i}^{*}\right)
Lcls(pi,pi∗)是类别损失,
p
i
∗
p_{i}^{*}
pi∗是真实标签,如果是正样本,标注为1,如果是负样本标注为0。同理,
L
r
e
g
(
t
i
,
t
i
∗
)
L_{r e g}\left(t_{i}, t_{i}^{*}\right)
Lreg(ti,ti∗)为位置偏移损失,
t
i
∗
t_{i}^{*}
ti∗是真实边框相对于anchor box的4个参数化坐标的向量,训练的最终目标就是使得损失函数$ L\left(\left{p_{i}\right},\left{t_{i}\right}\right)$ 最小化,这样会得到使得预测类别
p
i
p_{i}
pi 、预测偏移量
t
i
t_{i}
ti 与真实标注最佳拟合模型参数。
预测阶段:
首先在图像中生成多个anchor box,然后根据训练好的模型参数去预测这些anchor box的类别和偏移量,进而得到预测的边界框。由于阈值和anchor box数量选择的问题,同一个目标可能会输出多个相似的预测边界框,这样不仅不简洁,而且会增加计算量,为了解决这个问题,常用的措施是使用非极大值抑制(non-maximum suppression,NMS)。
1 i ← n;
2 CompPartialMax(0, i − 1);
3 chkpt ← −1;
4 while i<W − 2n do
5  j ← CompPartialMax(i, i + n);
6  k ← CompPartialMax(i + n + 1, j + n);
7  if i == j OR I[j] > I[k] then
8    if (chkpt ≤ j − n OR I[j] ≥ pmax[chkpt])
     AND (j − n = i OR I[j] ≥ pmax[j − n]) then
9      MaximumAt(j);
10   if i<j then
11     chkpt ← i + n + 1;
12   i ← j + n + 1;
13 else
14   i ← k;
15   chkpt ← j + n + 1;
16   while i<W − n do
17     j ← CompPartialMax(chkpt, i + n);
18     if I[i] > I[j] then
19       MaximumAt(i);
20       i ← i + n − 1;
21       break;
22     else
23       chkpt ← i + n − 1;
24       i = j;
Algorithm 3: 1D NMS for (2n + 1)-Neighborhood
NMS就是一个抑制冗余的反复迭代-遍历的过程。
对于一个预测边界框 B B B,模型最终会输出会计算它属于每个类别的概率值,其中概率值最大对应的类别就是预测边界框的类别。在同一副图像上,把所有预测边界框(不区分类别)的预测概率从大到小进行排列,然后取出最大概率的预测边界框 B 1 B_{1} B1作为基准,然后计算剩余的预测边界框与 B 1 B_{1} B1 的交并比,如果大于给定的某个阈值,则将这个预测边界框移除。这样的话保留了概率最大的预测边界框并移除了其他与其相似的边界框。接下来要做的就是从剩余的预测边界框中选出概率值最大的预测边界框 B 2 B_{2} B2 计算过程重复上述的过程。


 1352
1352


 被折叠的 条评论
为什么被折叠?
被折叠的 条评论
为什么被折叠?
 到【灌水乐园】发言


