


Towards End-to-End Lane Detection: an Instance Segmentation Approach
论文原文
https://arxiv.org/pdf/1802.05591v1.pdf
前言
车道线检测的一篇很经典的论文,网上关于这篇论文的代码解读很多。这里记录一下自己的学习。
摘要
传统方法:手工特征提取,易受环境影响,达不到实时性要求。
之前的论文中基于深度学习方法:只能检测固定数量的车道线。
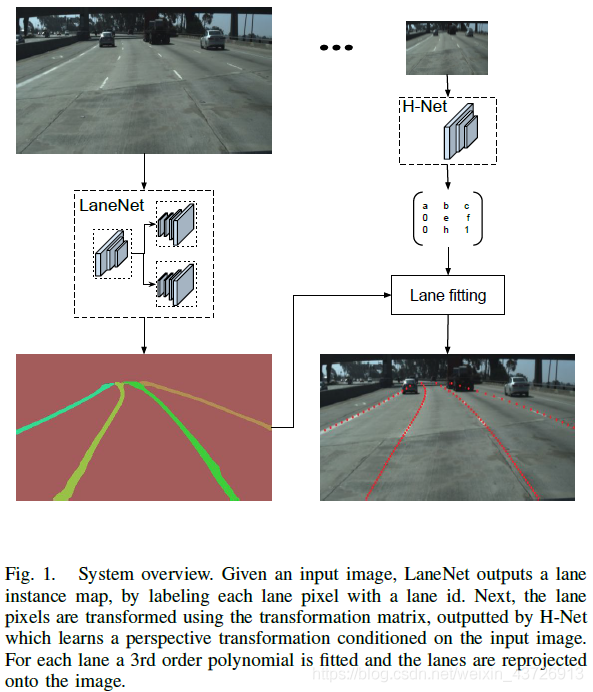
本文方法:将车道线检测作为一个实例分割问题。同时提出用神经网络去拟合逆透视变换矩阵,而不是直接固定矩阵参数,从而可以对道路变化更加鲁棒。
50fps,tuSimple数据集验证。
正文
图1是本文方法框架。
LaneNet
图2:LaneNet架构。将车道线检测作为一个实例分割问题,实现端到端。从而可实现对不同数量的车道线的检测。
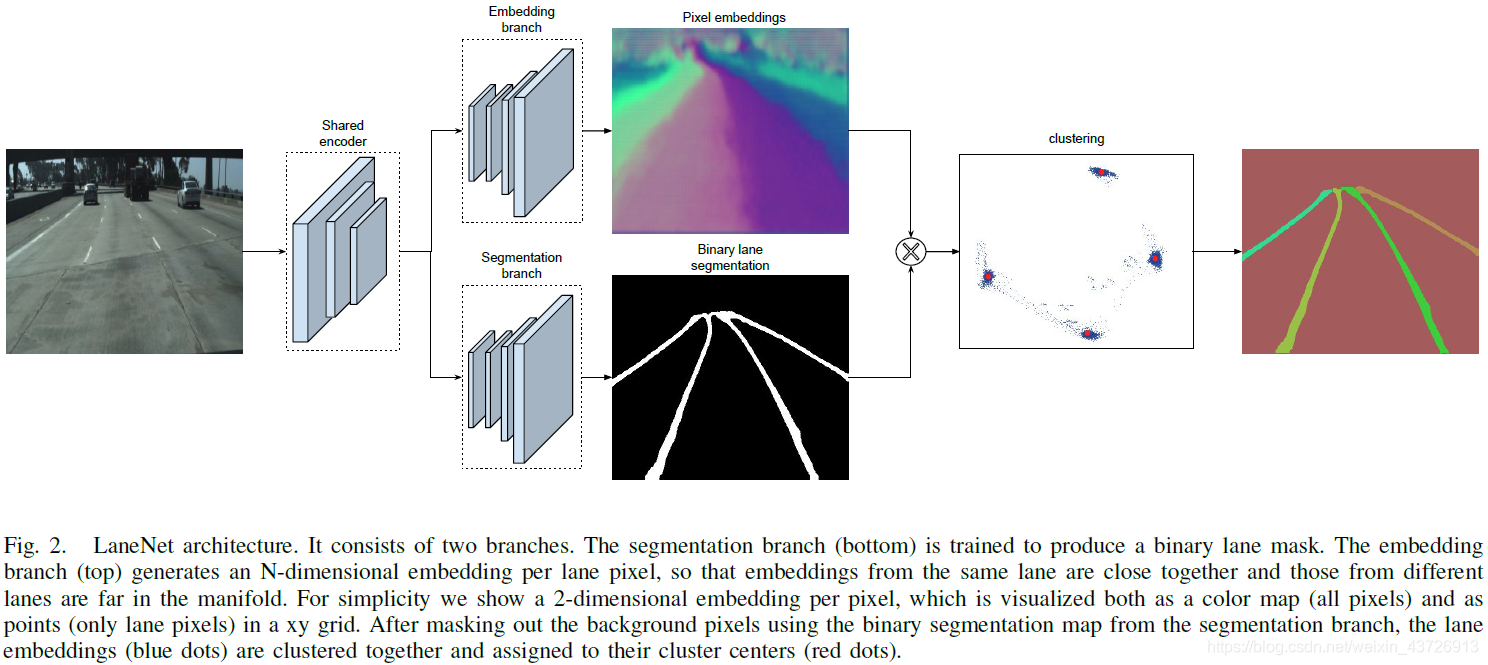
该网络结合了二值车道分割的优点和为one-shot实例分割而设计的聚类损失函数。在LaneNet的输出中,每个lane pixel都被分配对应的lane id。
多任务网络联合训练可提高速度和准确率。包含两个分支
- lane segmentation branch:(两分类问题)输出背景或者车道线。从而不必为不同的车道分配不同的类别。
为了构造ground-truth segmentation map,将所有ground-truth lane points连接在一起,形成每个lane的一条连接线。并且对隐含的车道线进行标注。(通过物体(如阻塞的汽车),或者在没有明显可见的车道片段(如虚线或褪色的车道)的情况下,绘制这些真实的车道。)这样网络也可以学习到隐藏的车道线。
损失函数:standard cross-entropy
lane/background类别不均衡:bounded inverse class weighting。

p为对应类别在总体样本中出现的概率,c是超参数。
- lane embedding branch:分割出的车道线分为不同的实例。使用聚类损失函数,为车道分割分支中的每个像素分配一个车道id,忽略背景像素。
目标检测方法(边界框)适合于紧实的物体,而车道线不是。因此将其对待为实例分割问题。采用一种基于距离度量学习的one-shot方法。通过对聚类损失函数的设计,使得同一条车道线的像素距离近,不同车道线像素距离远。具体实现如下:
L=Lvar+Ldist
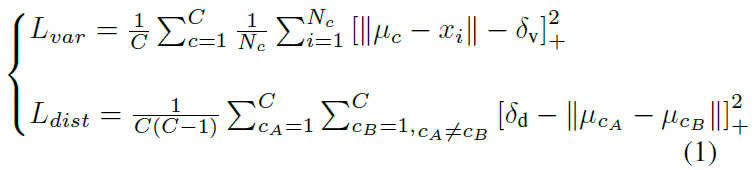
Lvar:方差项。每个像素向量点施加一个拉力,使其朝向车道的平均像素向量点。(hinged)像素向量与聚类中心距离大于δv时才被激活。
Ldist:距离项。使聚类中心彼此远离。(hinged)聚类中心之间的距离小于δd时才被激活。
C:聚类中心(车道线)的数量
Nc:聚类中心c的元素数量
xi:一个像素向量
uc:聚类中心c的平均向量
||·||:L2距离
[x]+ = max(0,x):hinge
clustering
迭代过程。 为了方便在推理时对像素进行聚类,在上述损失L中设置δd>6δv。(因为这样以一个随机的车道线嵌入为圆心,以2δv为半径,选取圆中所有的像素归为同一车道线。)
在进行聚类时,首先使用mean shift聚类,使得簇中心沿着密度上升的方向移动,防止将离群点选入相同的簇中;之后对像素向量进行划分:以簇中心为圆心,以2δv为半径,选取圆中所有的像素归为同一车道线。重复该步骤,直到将所有的车道线像素分配给对应的车道。
(作者:liyonghong
链接:https://www.jianshu.com/p/c6d38d648509
来源:简书
著作权归作者所有。商业转载请联系作者获得授权,非商业转载请注明出处。)
网络架构
基于ENet架构。具体如图2所示。两个分支的损失同等的后向传播。
关于ENet的论文:
https://arxiv.org/pdf/1606.02147.pdf
解读:
https://blog.csdn.net/u011974639/article/details/78956380
ENet各个子模块介绍(caffe实现):
https://blog.csdn.net/u013241583/article/details/90170369
https://blog.csdn.net/u013241583/article/details/90171242
https://blog.csdn.net/u013241583/article/details/90174188
https://blog.csdn.net/u013241583/article/details/90174490
ENet网络结构图
本文对ENet网络进行了略微的修改:
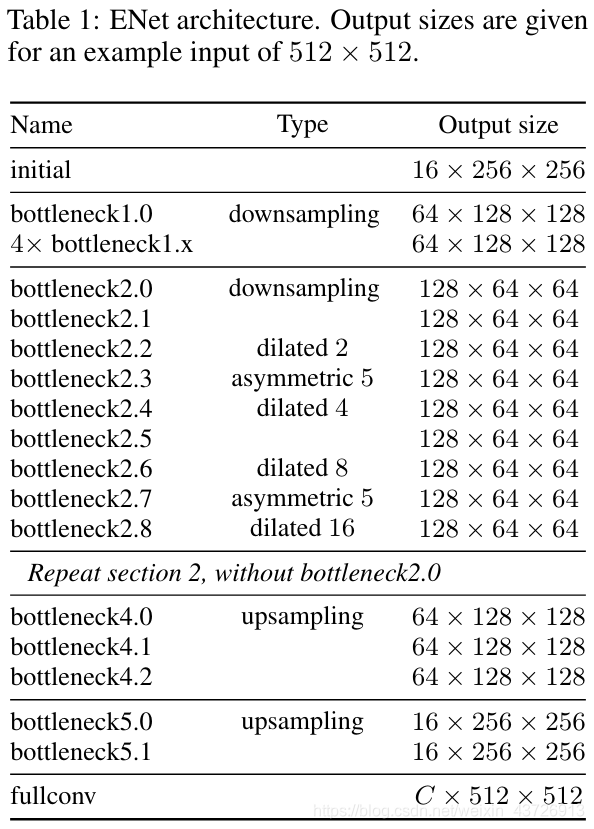
- LaneNet的体系结构是基于编码器-解码器网络ENet[29],该网络因此被修改为一个双分支网络。由于ENet的编码器比解码器包含更多的参数,完全共享两个任务之间的完整编码器将导致不满意的结果[27]。因此,虽然原始的ENet编码器包括三个阶段(阶段1、2、3),但LaneNet只在两个分支之间共享前两个阶段(阶段1和2),ENet编码器的阶段3和完整的ENet解码器作为每个独立分支的主干。分割分支的最后一层输出一个通道图像(二值分割),而嵌入分支的最后一层输出一个N通道图像,嵌入维数为N。如图2所示。每个支路的损失项是相等加权的,并通过网络反向传播。
本文设置
嵌入向量维度4
δv = 0.5
δd = 3
输入尺寸:512x256
Adam
batch size = 8
learning rate = 5e-4
HNet
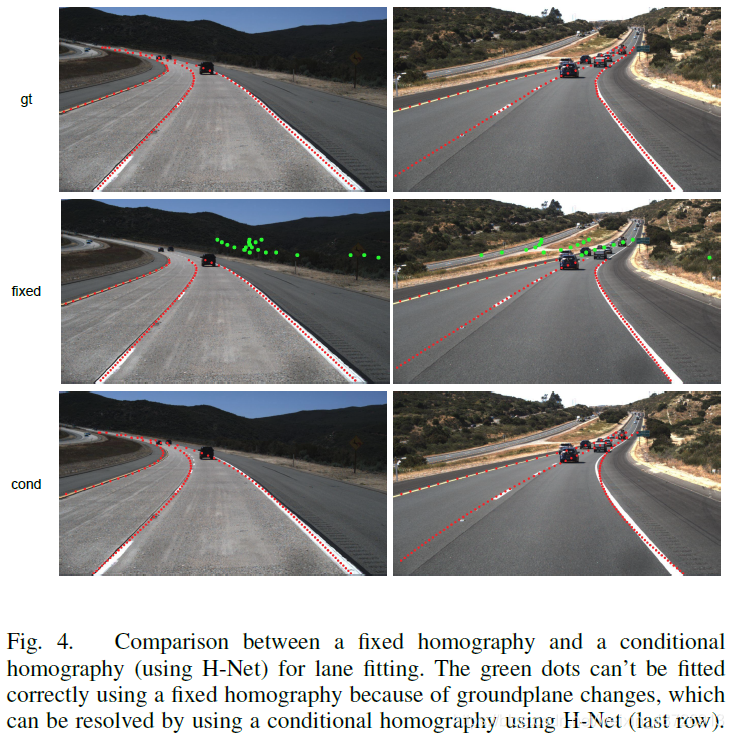
有了车道线实例之后,为了参数化描述车道线:鸟瞰图(在保持计算效率的同时提高拟合的质量)。先将实例转化到鸟瞰图上,再转换回原图。(神经网络拟合变换矩阵)具体如下。
LaneNet输出每个车道的像素集合,仍然需要通过这些像素拟合一条曲线来得到参数化的车道。在原图中直接拟合效果并不好(需要高次多项式)。因此将LaneNet的输出(像素集合)转换为鸟瞰图来拟合。如果直接用固定的变换矩阵,就会导致如图4(2):fixed所示的效果。因此本文采用H-Net输出变换矩阵,在这种变换中,车道可以用一个低阶多项式进行最佳拟合,效果如图4(2):cond所示。
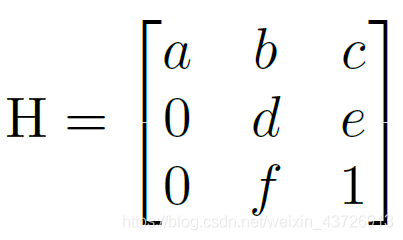
其中,变换矩阵H有6个自由度。(放置这些零是为了强制要求水平线在转换下保持水平。)
即坐标y的变换不受坐标x的影响
车道线拟合
(原文对这里讲的过于复杂,其实看下面即可)
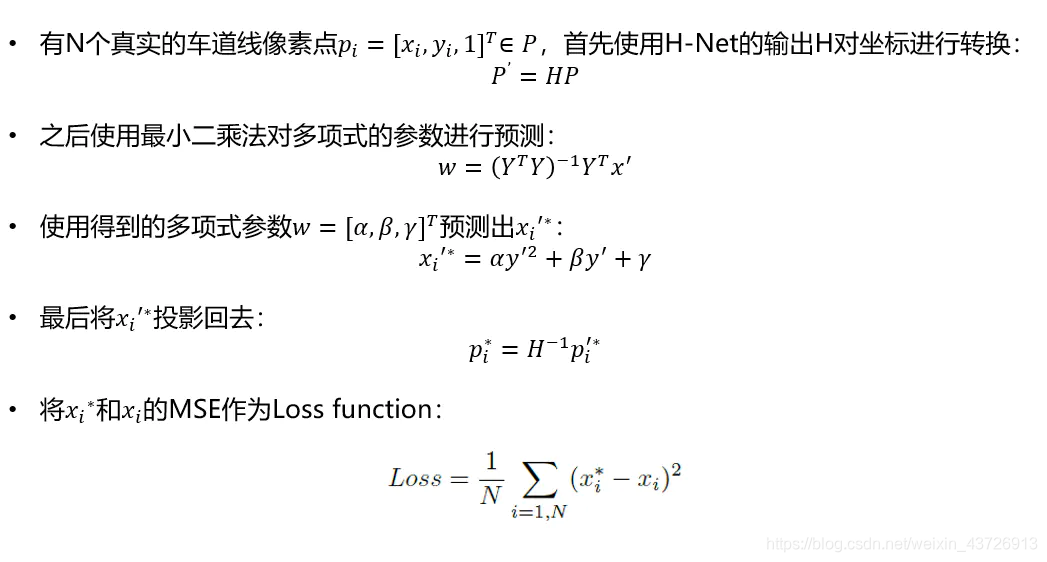
具体过程如图3所示。

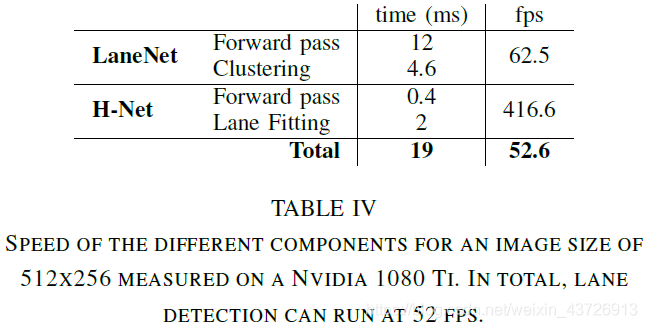
网络架构如表1所示。

本文设置
训练用于三阶多项式拟合
输入尺寸128x64
Adam
batch size = 10
learning rate = 5e-5
实验
tuSimple数据集。3626训练集,2782测试集。
accuracy:每幅图像的平均正确点数。
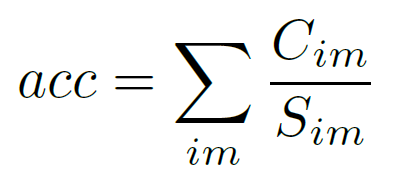
Cim:定位对的点的数量
Sim:ground truth点的数量
(小于指定阈值时被认为正确)
false positive and false negative scores
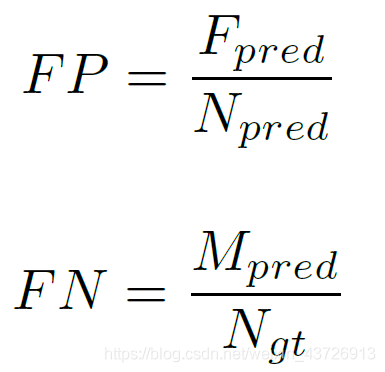
Fpred:错误预测的车道数
Npred:预测的车道数
Mpred:错过的ground-truth车道数
Ngt:所有ground-truth车道数


附一篇优秀的解读:
https://www.jianshu.com/p/c6d38d648509
代码
https://github.com/ms5898/LaneNet-PyTorch
应用pytorch框架
注:该代码并未对Hnet进行复现。而只是用sklearn的linearregress进行拟合。
包
    Python 3.7
    PyTorch 1.4.0
    torchvision
    sklearn 0.22.1
    NumPy 1.18.2
数据集
TuSimple 数据集
下载
- 解压
train_set.zip、test_set.zip到文件夹ECBM6040-Project/TUSIMPLE - 将
test_label.json放到ECBM6040-Project/TUSIMPLE/test_set(从test_set.zip解压出来的)
准备
- 将train_set加工为
ground truth image, binary ground truth and instance ground truth
python utils/process_training_dataset_2.py --src_dir (your train_set folder place)
for me this step is: python utils/process_training_dataset_2.py --src_dir /Users/smiffy/Documents/GitHub/ECBM6040-Project/TUSIMPLE/train_set
解读process_training_dataset_2.py:这个py文件就是将图森数据集中的训练集进一步划分为训练、验证、测试集。并保存起来。
import argparse # https://blog.csdn.net/yy_diego/article/details/82851661
import glob
import json
import os
import os.path as ops
import shutil

import cv2
import numpy as np


def init_args():
    parser = argparse.ArgumentParser()
    parser.add_argument('--src_dir', type=str, help='The origin path of unzipped tusimple dataset')
    return parser.parse_args() # 返回Namespace


def get_image_to_folders(json_label_path, gt_image_dir, gt_binary_dir, gt_instance_dir, src_dir):
    image_nums = len(os.listdir(gt_image_dir)) # 记录当前目录下的文件图片数(如果`process_training_dataset_2.py`运行了不止一次,则数量会不对。需要删掉training文件夹再重新运行。正常应该是3626(测试集)数。
    with open(json_label_path, 'r') as file:
        for line_index, line in enumerate(file):
            info_dict = json.loads(line)

            raw_file = info_dict['raw_file']
            h_samples = info_dict['h_samples']
            lanes = info_dict['lanes']

            image_path = ops.join(src_dir, raw_file)
            image_name_new = '{:s}.png'.format('{:d}'.format(line_index + image_nums).zfill(4)) # zfill():返回指定长度字符(右起)。https://www.runoob.com/python/att-string-zfill.html
            image_output_path = ops.join(ops.split(src_dir)[0], 'training', 'gt_image', image_name_new)
            binary_output_path = ops.join(ops.split(src_dir)[0], 'training', 'gt_binary_image', image_name_new)
            instance_output_path = ops.join(ops.split(src_dir)[0], 'training', 'gt_instance_image', image_name_new)

            src_image = cv2.imread(image_path, cv2.IMREAD_COLOR) # cv2.IMREAD_COLOR:加载一张彩色图片,忽视它的透明度。
            dst_binary_image = np.zeros([src_image.shape[0], src_image.shape[1]], np.uint8)
            dst_instance_image = np.zeros([src_image.shape[0], src_image.shape[1]], np.uint8)

            for lane_index, lane in enumerate(lanes): # 图森数据集介绍https://blog.csdn.net/qq_38096703/article/details/105513685
                assert len(h_samples) == len(lane) # 除去无效图片。
                lane_x = []
                lane_y = []
                for index in range(len(lane)): # 去除无效点。
                    if lane[index] == -2:
                        continue
                    else:
                        ptx = lane[index] # 有效x点
                        pty = h_samples[index] # 有效y点
                        lane_x.append(ptx) # lane_x:一张图中一条车道线的所有有效x点
                        lane_y.append(pty) # lane_y:一张图中一条车道线的所有有效y点
                if not lane_x:
                    continue
                lane_pts = np.vstack((lane_x, lane_y)).transpose() # np.vstack:按垂直方向(行顺序)堆叠数组构成一个新的数组。transpose:转置。https://blog.csdn.net/xiongchengluo1129/article/details/79017142
                lane_pts = np.array([lane_pts], np.int64)

                cv2.polylines(dst_binary_image, lane_pts, isClosed=False, color=255, thickness=5)
                cv2.polylines(dst_instance_image, lane_pts, isClosed=False, color=lane_index * 50 + 20, thickness=5) # 通过color控制线条颜色。

            cv2.imwrite(binary_output_path, dst_binary_image) # 写入
            cv2.imwrite(instance_output_path, dst_instance_image)
            cv2.imwrite(image_output_path, src_image)
        print('Process {:s} success'.format(json_label_path)) # 打印完成信息。


def gen_train_sample(src_dir, b_gt_image_dir, i_gt_image_dir, image_dir):
    os.makedirs('{:s}/txt_for_local'.format(ops.split(src_dir)[0]), exist_ok=True)
    with open('{:s}/txt_for_local/train.txt'.format(ops.split(src_dir)[0]), 'w') as file:
        for image_name in os.listdir(b_gt_image_dir): # os.listdir() 方法用于返回指定的文件夹包含的文件或文件夹的名字的列表。https://www.runoob.com/python/os-listdir.html
            if not image_name.endswith('.png'):
                continue
            binary_gt_image_path = ops.join(b_gt_image_dir, image_name)
            instance_gt_image_path = ops.join(i_gt_image_dir, image_name)
            image_path = ops.join(image_dir, image_name)

            b_gt_image = cv2.imread(binary_gt_image_path, cv2.IMREAD_COLOR)
            i_gt_image = cv2.imread(instance_gt_image_path, cv2.IMREAD_COLOR)
            image = cv2.imread(image_path, cv2.IMREAD_COLOR)

            if b_gt_image is None or image is None or i_gt_image is None:
                print('Image set: {:s} broken'.format(image_name))
                continue
            else:
                info = '{:s} {:s} {:s}'.format(image_path, binary_gt_image_path, instance_gt_image_path)
                file.write(info + '\n') # 三张对应的图片为一行
    return


def split_train_txt(src_dir):
    train_file_path =  '{:s}/txt_for_local/train.txt'.format(ops.split(src_dir)[0])
    test_file_path = '{:s}/txt_for_local/test.txt'.format(ops.split(src_dir)[0])
    valid_file_path = '{:s}/txt_for_local/val.txt'.format(ops.split(src_dir)[0])
    with open(train_file_path, 'r') as file: # 对图森数据集中的测试集再进一步划分
        data = file.readlines()
        train_data = data[0:int(len(data)*0.8)] # 2900
        test_data = data[int(len(data)*0.8): int(len(data)*0.9)] # 363
        valid_data = data[int(len(data) * 0.9): -1] # 362
    with open(train_file_path, 'w') as file:
        for d in train_data:
            file.write(d)
    with open(test_file_path, 'w') as file:
        for d in test_data:
            file.write(d)
    with open(valid_file_path, 'w') as file:
        for d in valid_data:
            file.write(d)


def process_tusimple_dataset(src_dir):
    traing_folder_path = ops.join(ops.split(src_dir)[0], 'training') # os.path.split():https://blog.csdn.net/xijuezhu8128/article/details/87861417 os.path.join():https://www.jb51.net/article/171478.htm
    os.makedirs(traing_folder_path, exist_ok=True) # 创建目录

    gt_image_dir = ops.join(traing_folder_path, 'gt_image')
    gt_binary_dir = ops.join(traing_folder_path, 'gt_binary_image')
    gt_instance_dir = ops.join(traing_folder_path, 'gt_instance_image')

    os.makedirs(gt_image_dir, exist_ok=True)
    os.makedirs(gt_binary_dir, exist_ok=True)
    os.makedirs(gt_instance_dir, exist_ok=True)

    for json_label_path in glob.glob('{:s}/*.json'.format(src_dir)): # glob.glob:获取指定类型文件。https://blog.csdn.net/georgeai/article/details/81035422
        get_image_to_folders(json_label_path, gt_image_dir, gt_binary_dir, gt_instance_dir, src_dir) # 将图像放到文件夹中
    gen_train_sample(src_dir, gt_binary_dir, gt_instance_dir, gt_image_dir) # 把training中三个文件夹(gt_binary_image、gt_image、gt_instance_image)的每一张图片文件名	对应写入train.txt文件中
    split_train_txt(src_dir)


if __name__ == '__main__':
    args = init_args()
    process_tusimple_dataset(args.src_dir)
为了单步调试process_training_dataset_2.py文件,将第一个函数修改如下:
def init_args():
    parser = argparse.ArgumentParser()
    parser.add_argument('--src_dir', type=str, default='/home/wqf/ECBM6040-Project/TUSIMPLE/train_set', help='The origin path of unzipped tusimple dataset')
    return parser.parse_args()
你的TUSIMPLE目录应该类似下图。

训练LaneNet(基于E-Net)
- 在
ECBM6040-Project/Notebook-experiment/Dataset Show.ipynb查看用于训练的数据集。代码如下:
import os.path as ops
import numpy as np
import torch
import cv2
import sys
sys.path.append('..') # ..代表上一级目录。如果不写,下一行导入模块是用不了的。https://www.cnblogs.com/mandy-study/p/7735801.html
from dataset.dataset_utils import TUSIMPLE, TUSIMPLE_AUG

# Build The datasets
# root = '/Users/smiffy/Documents/GitHub/TUSIMPLE/Data_Tusimple_PyTorch/training'
root = '../TUSIMPLE/txt_for_local'

train_set = TUSIMPLE(root=root, flag='train')
valid_set = TUSIMPLE(root=root, flag='valid')
test_set = TUSIMPLE(root=root, flag='test')

print('train_set length {}'.format(len(train_set))) # 调用__len__方法。返回2900
print('valid_set length {}'.format(len(valid_set))) # 362
print('test_set length {}'.format(len(test_set))) # 363

gt, bgt, igt = train_set[280] # 选取一张图片
print('image type {}'.format(type(gt))) # image type <class 'torch.Tensor'>
print('image size {} \n'.format(gt.size())) # image size torch.Size([3, 256, 512])

print('gt binary image type {}'.format(type(bgt))) # gt binary image type <class 'torch.Tensor'>
print('gt binary image size {}'.format(bgt.size())) # gt binary image size torch.Size([256, 512])
print('items in gt binary image {} \n'.format(torch.unique(bgt))) # items in gt binary image tensor([0, 1])

print('gt instance type {}'.format(type(igt))) # gt instance type <class 'torch.Tensor'>
print('gt instance size {}'.format(igt.size())) # gt instance size torch.Size([256, 512])
print('items in gt instance {} \n'.format(torch.unique(igt))) # items in gt instance tensor([  0,  20,  70, 120, 170])

# Show the images
image_show = ((gt.numpy() + 1) * 127.5).astype(int) #
image_show.shape # (3, 256, 512)

import matplotlib.pyplot as plt
# image_show = image_show[...,::-1]
plt.figure(figsize=(15,15))
image_show = image_show.transpose(1,2,0)
image_show = image_show[...,::-1]
plt.imshow(image_show)

bgt.shape # torch.Size([256, 512])

plt.figure(figsize=(20,20))
ax1 = plt.subplot(121)
plt.imshow(bgt, cmap='gray')
ax1 = plt.subplot(122)
plt.imshow(igt, cmap='gray')

# Aug Dataset
# root = '/Users/smiffy/Documents/GitHub/TUSIMPLE/Data_Tusimple_PyTorch/training'
root = '../TUSIMPLE/txt_for_local'

train_set = TUSIMPLE_AUG(root=root, flag='train')
valid_set = TUSIMPLE_AUG(root=root, flag='valid')
test_set = TUSIMPLE_AUG(root=root, flag='test')

print('train_set length {}'.format(len(train_set))) # 2900x2
print('valid_set length {}'.format(len(valid_set))) # 362x2
print('test_set length {}'.format(len(test_set)))  # 363x2

idx = 280
gt, bgt, igt = train_set[idx]
gt_aug, bgt_aug, igt_aug = train_set[idx+1]
print('image type {}'.format(type(gt)))
print('image size {} \n'.format(gt.size()))

print('gt binary image type {}'.format(type(bgt)))
print('gt binary image size {}'.format(bgt.size()))
print('items in gt binary image {} \n'.format(torch.unique(bgt)))

print('gt instance type {}'.format(type(igt)))
print('gt instance size {}'.format(igt.size()))
print('items in gt instance {} \n'.format(torch.unique(igt)))

image_show = ((gt.numpy() + 1) * 127.5).astype(int)
image_show_aug = ((gt_aug.numpy() + 1) * 127.5).astype(int)
image_show.shape

import matplotlib.pyplot as plt
# image_show = image_show[...,::-1]
plt.figure(figsize=(20,20))
ax1 = plt.subplot(121)
image_show = image_show.transpose(1,2,0)
image_show = image_show[...,::-1]
plt.imshow(image_show)

ax1 = plt.subplot(122)
image_show_aug = image_show_aug.transpose(1,2,0)
image_show_aug = image_show_aug[...,::-1]
plt.imshow(image_show_aug)

plt.show()

plt.figure(figsize=(20,20))
ax1 = plt.subplot(121)
plt.imshow(bgt, cmap='gray')
ax1 = plt.subplot(122)
plt.imshow(igt, cmap='gray')

plt.figure(figsize=(20,20))
ax1 = plt.subplot(121)
plt.imshow(bgt_aug, cmap='gray')
ax1 = plt.subplot(122)
plt.imshow(igt_aug, cmap='gray')
在上述文件导入的本地模块from dataset.dataset_utils import TUSIMPLE, TUSIMPLE_AUG代码解读如下:
import os.path as ops
import numpy as np
import torch
import cv2
import torchvision


class TUSIMPLE(torch.utils.data.Dataset): # torch.utils.data.Dataset是代表自定义数据集方法的抽象类,你可以自己定义你的数据类继承这个抽象类,非常简单,只需要定义__len__和__getitem__这两个方法就可以。。https://blog.csdn.net/qq_36653505/article/details/83351808
    def __init__(self, root, transforms=None, resize=(512, 256), flag='train'):
        self.root = root
        self.transforms = transforms
        self.resize = resize
        self.flag = flag

        self.img_pathes = []

        self.train_file = ops.join(root, 'train.txt') # 进入自己写的模块,见下面代码块解析。
        self.val_file = ops.join(root, 'val.txt')
        self.test_file = ops.join(root, 'test.txt')

        if self.flag == 'train':
            file_open = self.train_file
        elif self.flag == 'valid':
            file_open = self.val_file
        else:
            file_open = self.test_file

        with open(file_open, 'r') as file:
            data = file.readlines()
            for l in data: # l:'/home/wqf/ECBM6040-Project/TUSIMPLE/training/gt_image/0487.png /home/wqf/ECBM6040-Project/TUSIMPLE/training/gt_binary_image/0487.png /home/wqf/ECBM6040-Project/TUSIMPLE/training/gt_instance_image/0487.png
'
                line = l.split() # line:{list:3}
                self.img_pathes.append(line) # {list:{list:3}}

    def __len__(self): # __len__是魔法方法,它可以让你的自定义类使用len()方法来直接获取类的长度值,len() 是内置的方法,对于python的一些内置的类,比如列表(list),字符串(str),子节等,可以直接使用。但是,如果你的自定义类不包含__len__方法,len()函数在终端运行中是会报错的哦。https://blog.csdn.net/qq_38883271/article/details/96439208
        return len(self.img_pathes) # 返回图片数量

    def __getitem__(self, idx): # 如果在类中定义了__getitem__()方法,那么他的实例对象(假设为P)就可以这样P[key]取值。当实例对象做P[key]运算时,就会调用类中的__getitem__()方法。https://blog.csdn.net/chituozha5528/article/details/78354833
        gt_image = cv2.imread(self.img_pathes[idx][0], cv2.IMREAD_UNCHANGED) # 读取图片
        gt_binary_image = cv2.imread(self.img_pathes[idx][1], cv2.IMREAD_UNCHANGED)
        gt_instance = cv2.imread(self.img_pathes[idx][2], cv2.IMREAD_UNCHANGED)

        gt_image = cv2.resize(gt_image, dsize=self.resize, interpolation=cv2.INTER_LINEAR) # resize
        gt_binary_image = cv2.resize(gt_binary_image, dsize=self.resize, interpolation=cv2.INTER_NEAREST)
        gt_instance = cv2.resize(gt_instance, dsize=self.resize, interpolation=cv2.INTER_NEAREST)

        gt_image = gt_image / 127.5 - 1.0 # 归一化到[-1,1]
        gt_binary_image = np.array(gt_binary_image / 255.0, dtype=np.uint8) # 归一化到[0,1]
        gt_bin
最低0.47元/天 解锁文章


 1万+
1万+


 被折叠的 条评论
为什么被折叠?
被折叠的 条评论
为什么被折叠?
 到【灌水乐园】发言


