


YoloV5学习笔记(1)——复健计划
从Caffe开始到Pytorch,感觉现阶段的深度学习更应该侧重应用端,从Yolo5开始重新进行复建计划。YOLO好像还支持语义分割了。
1.环境
github的yolov5地址: https://github.com/ultralytics
yolov5的官方网站: https://docs.ultralytics.com/yolov5
目前好像需要python版本大于等于3.7,pytorch版本大于等于1.7即可,具体的pytorchh和python环境的安装不再赘述,建议使用虚拟环境。
2.训练自己的数据集
YOLO网站上的说法是 Train On Custom Data
后面这段话我很认同
Creating a custom model to detect your objects is an iterative process of collecting and organizing images,
 labeling your objects of interest, training a model, deploying it into the wild to make predictions,
  and then using that deployed model to collect examples of edge cases to repeat and improve.
大意是训练自己的模型用来检测对象是一个迭代的过程,包含图像的收集、组织(我理解的大概是对图像进行一个收纳归类裁剪的过程)、标记感兴趣的对象,训练模型,部署和应用,然后再使用部署的模型来收集边缘案例(大概就是那种模棱两可的案例),然后再进行不断的重复和改进的过程。
这个过程是只是用YOLO模型的过程,如果再加上自定义模型,还要调整模型的参数,再加上工程的应用,工作量的确需要一个强大的团队来进行。
YOLOV5的数据集必须使用已经标注好的数据集来进行(典型的全监督),目前官方文档中提供了使用Roboflow:https://roboflow.com/管理数据集和手动管理数据集两种方式。
这两天还看到了使用SAM的标注工具……只能说发展太快,工具1,工具2。
2.1 Roboflow-YOLO推荐的方式
Roboflow好像是个神奇的东西,后面再看吧,CSDN上也有人写了相关的使用体验。用YOLOv8推荐的Roboflow工具来训练自己的数据集。当时制作数据集的时候用的还不是labelme,转数据集格式的代码甚至是手写的,用这种工具的话感觉方便多了。
2.2手动标注
手动的话大概分三步
2.2.1 创建dataset.yaml文件
# Train/val/test sets as 1) dir: path/to/imgs, 2) file: path/to/imgs.txt, or 3) list: [path/to/imgs1, path/to/imgs2, ..]
path: ../datasets/coco128  # dataset root dir
train: images/train2017  # train images (relative to 'path') 128 images
val: images/train2017  # val images (relative to 'path') 128 images
test:  # test images (optional)

# Classes (80 COCO classes)
names:
  0: person
  1: bicycle
  2: car
  ...
  77: teddy bear
  78: hair drier
  79: toothbrush
2.2.2 标注
After using an annotation tool to label your images, export your labels to YOLO format, with one *.txt file per image (if no objects in image, no *.txt file is required). The *.txt file specifications are:

One row per object
Each row is class x_center y_center width height format.
Box coordinates must be in normalized xywh format (from 0 - 1). If your boxes are in pixels, divide x_center and width by image width, and y_center and height by image height.
Class numbers are zero-indexed (start from 0).
使用注释工具标记图像后,将标签导出为YOLO格式,每个图像一个*.txt文件(如果图像中没有对象,则不需要*.txt文件)。*.txt文件规范为:
每个对象一行
每一行都是x_center y_center width height类格式。
方框坐标必须是标准化的xywh格式(从0到1)。如果方框以像素为单位,请将x_center和width除以图像宽度,将y_center和height除以图像高度。
类编号为零索引(从0开始)。
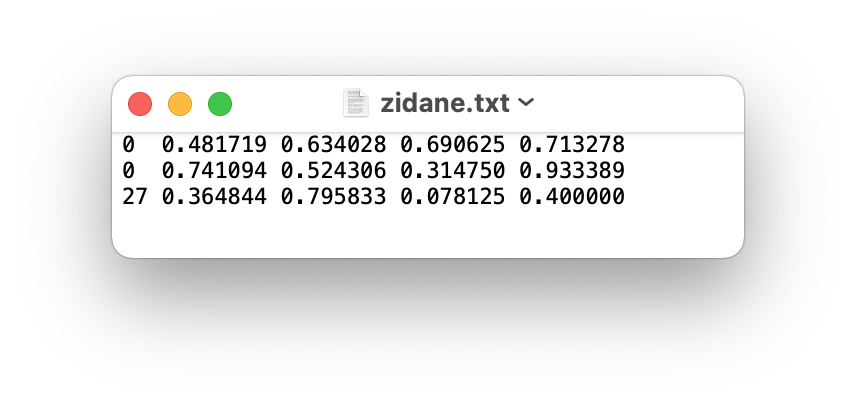
举个例子:
The label file corresponding to the above image contains 2 persons (class 0) and a tie (class 27):
这个标记文件包含了两个人(0类)和一个领带(27类)
2.2.3 创建dataset.yaml文件
Organize your train and val images and labels according to the example below.
YOLOv5 assumes /coco128 is inside a /datasets directory next to the /yolov5
directory. YOLOv5 locates labels automatically for each image by replacing
the last instance of /images/ in each image path with /labels/. For example:
../datasets/coco128/images/im0.jpg  # image
../datasets/coco128/labels/im0.txt  # label
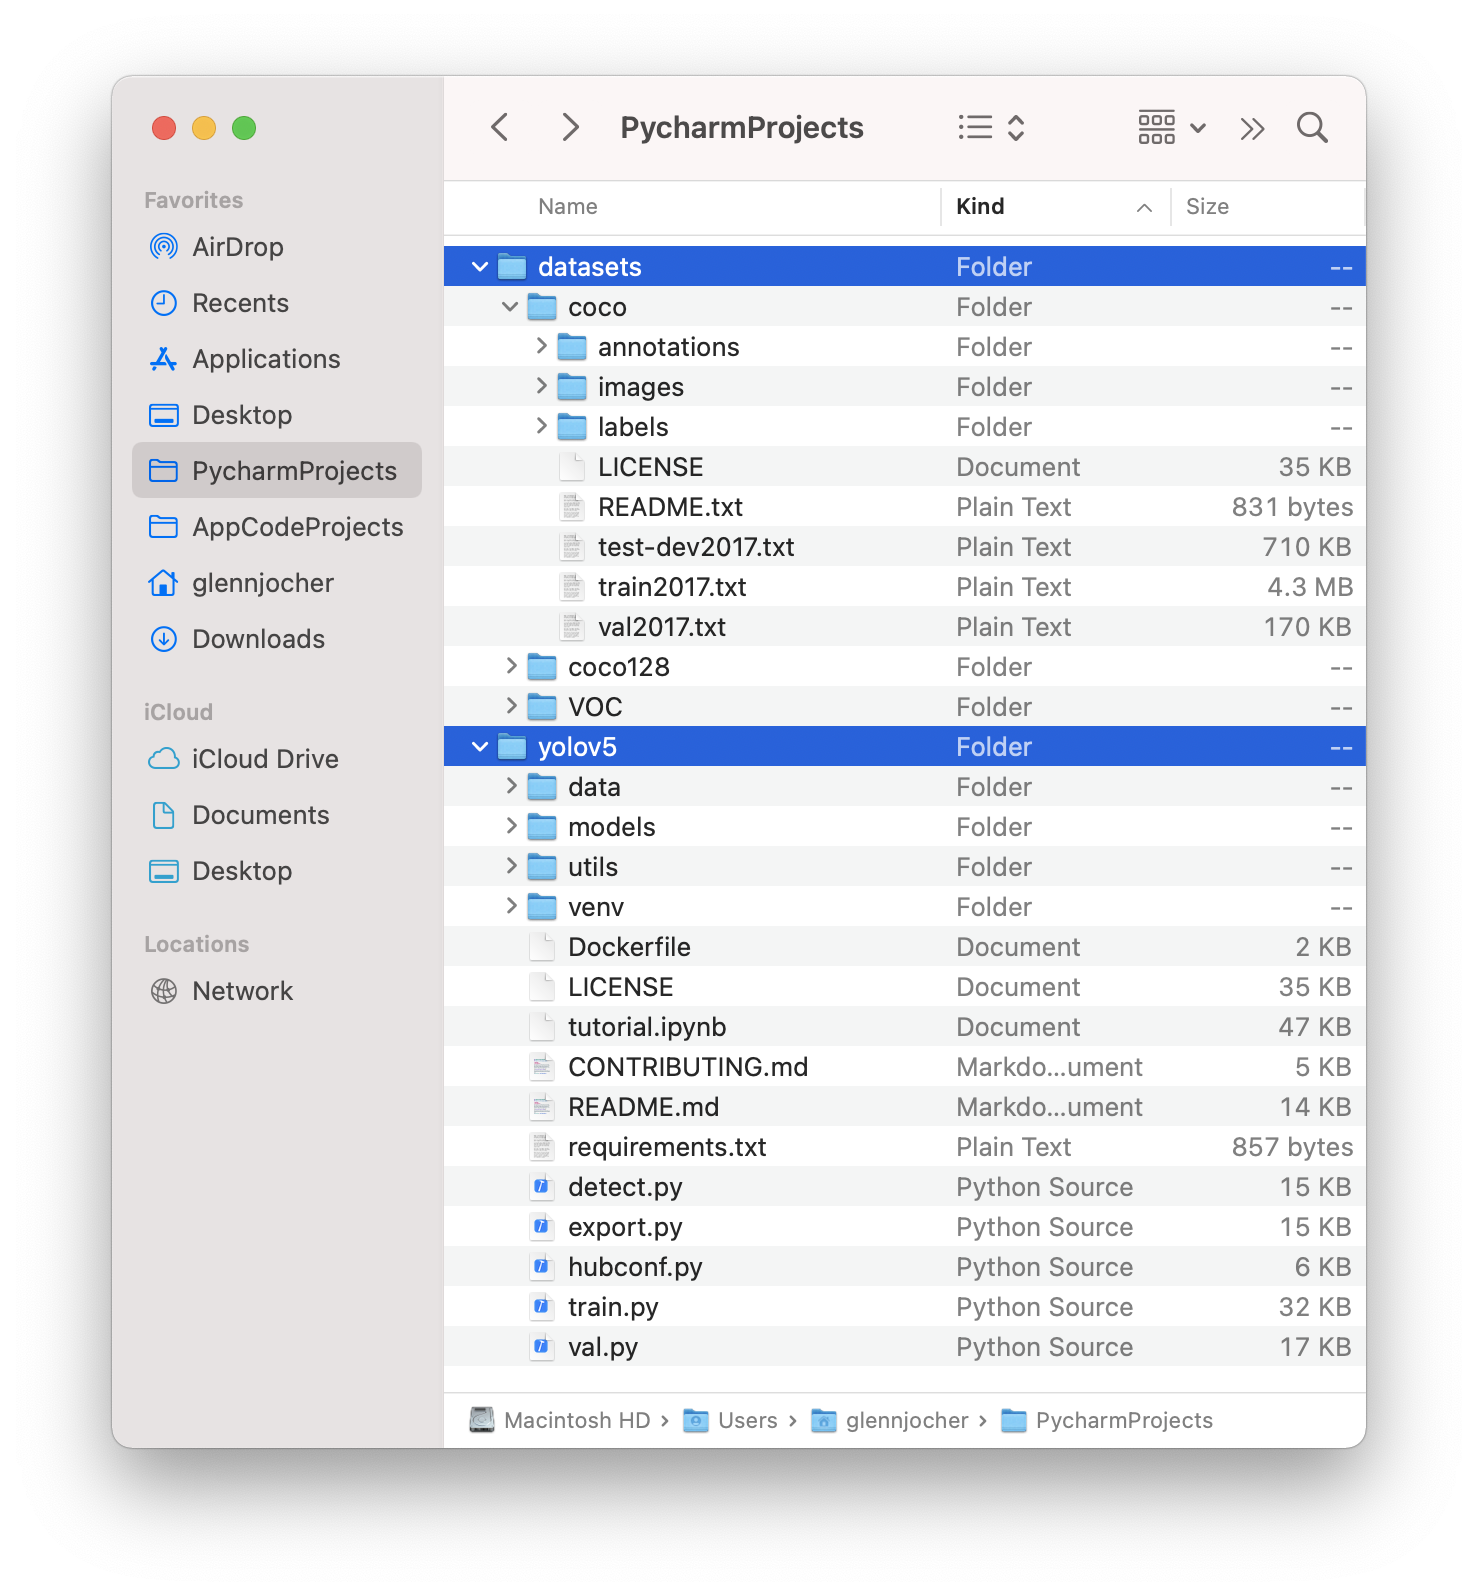
根据上的例子整理你的训练和验证图像和标签。YOLOv5通过将每个图像路径中/images/的最后一个实例替换为/labels/,自动为每个图像定位标签。
以上是YOLO介绍的方式,当然你要觉得不满意也可以自己写……建议还是用YOLO介绍的方式,能少去不少让自己脑壳痛的麻烦,几种数据集常见格式的转换也可以找到不少工具,建议一开始做数据集的时候就规划好具体的路线,免得再这种问题上卡住浪费时间(血的教训)。
3.模型的选择
模型选择和应用场景关系挺大的,要算力足够肯定直接上最大的,毕竟在完成充分调参等过程之后,同等情况下网络越深效果越好。这里放一下YOLOV5的官方表格。
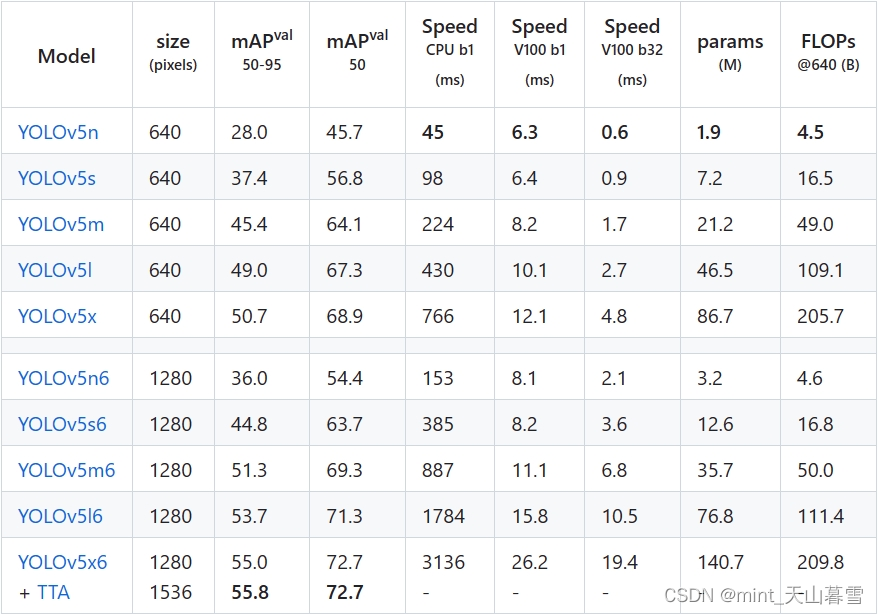
这里的mAP50和mAP50-95可以参考这篇,【深度学习】目标检测的性能评价指标,mAP_0.5,mAP_0.5,0.95,0.05。
其他几个参数就不介绍了,考虑本次项目的任务应该是部署在Jetson Nano上的,这几个模型应该都可以使用,做好数据集之后依次跑一边试试就行,反正现在训练的算力很足。
4.训练
Train a YOLOv5s model on COCO128 by specifying dataset, batch-size, image size
and either pretrained --weights yolov5s.pt (recommended), or randomly
initialized --weights '' --cfg yolov5s.yaml (not recommended).
在COCO128上训练一个YOLOv5s模型,需要指定特殊数据集(私有数据集),batch-size,图像大小和基于预训练的模型或者随机初始化的模型。
一般来说都用预训练模型,收敛、最终的精度正常情况都会更好,当然用随机初始化模型也没啥关系,但是本次是项目导向,可以直接使用已经反复验证过的结论,使用预训练模型。
训练方式就是一行代码
python train.py --img 640 --epochs 3 --data coco128.yaml --weights yolov5s.pt
这个应该是单GPU训练,因为我看到网站后面有多GPU训练的介绍。
TIPs:
Add --cache ram or --cache disk to speed up training (requires significant RAM/disk resources).
Always train from a local dataset. Mounted or network drives like Google Drive will be very slow.
所有训练结果都保存到runs/strain/,并增加运行目录,即runs/strain/exp2、runs/strain/exp3等。有关更多详细信息,请参阅我们教程笔记本的“训练”部分。
5.可视化
可视化这里提到了一个叫comet的可视化工具(以前常用的是TensorboardX),查阅comet资料的时候看到了如何做好深度学习中的代码管理顺带存一下。实验平台这里提到了你是如何管理机器学习实验的?-机器学习实验管理平台大盘点comet,可以参考。
看完专栏之后勘误一下,这个叫深度学习管理平台,大概就算是TensorboardX的plus版本。
Comet is now fully integrated with YOLOv5. Track and visualize model metrics in real time, save your hyperparameters, datasets, and model checkpoints, and visualize your model predictions with Comet Custom Panels! Comet makes sure you never lose track of your work and makes it easy to share results and collaborate across teams of all sizes!
回头看一眼comet怎么用,然后具体的安装如下:
pip install comet_ml  # 1. install
export COMET_API_KEY=<Your API Key>  # 2. paste API key
python train.py --img 640 --epochs 3 --data coco128.yaml --weights yolov5s.pt  # 3. train
YOLO还贴心的附上了Comet and YOLOv5.ipynb笔记,需要出国留学。
6.ClearML Logging and Automation
这部分好像是自动化训练,提到了一个叫ClearML的工具。
ClearML的介绍,大意是ClearML完全集成到YOLOv5中来跟踪您的实验,管理数据集版本,甚至远程执行训练运行。想到了还在向日葵进行远程的实验室,急需改进。
ClearML is completely integrated into YOLOv5 to track your experimentation, manage dataset versions and even remotely execute training runs. To enable ClearML:
安装也比较简单
pip install clearml
run clearml-init to connect to a ClearML server (deploy your own open-source server here, or use our free hosted server here)
老规矩,上一个链接介绍一下
ClearML入门:简化机器学习解决方案的开发和管理
工程内容比较多,用到的时候再学习怎么用吧,现在用也没什么用。教程就在后面,后面学的时候应该会写上笔记。
7.后续
Once your model is trained you can use your best checkpoint to: * Run CLI or Python inference on new images and videos * Validate accuracy on train, val and test splits * Export to TensorFlow, Keras, ONNX, TFlite, TF.js, CoreML and TensorRT formats * Evolve hyperparameters to improve performance * Improve your model by sampling real-world images and adding them to your datasetbest.pt
翻译一下:你可以使用你训练结果最好的模型去运行,然后再通过修改你的超参和提高数据集来继续获得更好的效果。
8.TIPs
官方的一些小TIPs,用来生成最好结果。从数据集,模型选择和训练的参数设置三方面介绍。
大多数情况下,只要你有一个足够大并且标记较为良好的数据集,你就可以在不改变模型和训练设置的情况下获得好的模型。如果你在第一时间没有获得好的模型,这里有几个你可以改进的地方,我们建议用户在第一次训练的时候全部使用默认设置,这样做可以帮助获得一个性能的基准线,并且也很容易找出需要改进的地方。
yolov5/runs/train/exp这里存放了你的训练相关数据,你需要提问的话可以把这些数据附上。
数据集
- Images per class 每类图像需要大于1500张。
- Instances per class 每种实例需要大于10000张。
- Image variety 图像的实例需要代表已经部署好的环境。大概就是要和你的应用场景相符合,数据最好来自实景拍摄。
-Label consistency 数据集中你所有设计好的标签都要被标记上,对实例有所遗漏大概率会降低你的模型性能。- Label accuracy 标签准确率, 标签需要较为完美的对每个目标进行包裹,所有的物体和边框之间不应该有任何的空隙,任何设计好的对象都不应该没有被标注。
- Label verification 使用train_batch*.jpg来观察标签是否正确。
- Background images 背景图像就是没有任何标签的图像,添加背景图像到数据集中可以减少FP,建议使用图像总数的0%-10%作为背景图像,作为参考COCO中有1000张背景图像,占COCO的1%。
这部分介绍了一个大概的数据集的数量,10000个实例+10%左右的背景图像,数据集准备的工作量还是不少的,后面做消融实验看一下数据集,背景图像的影响。
模型选择
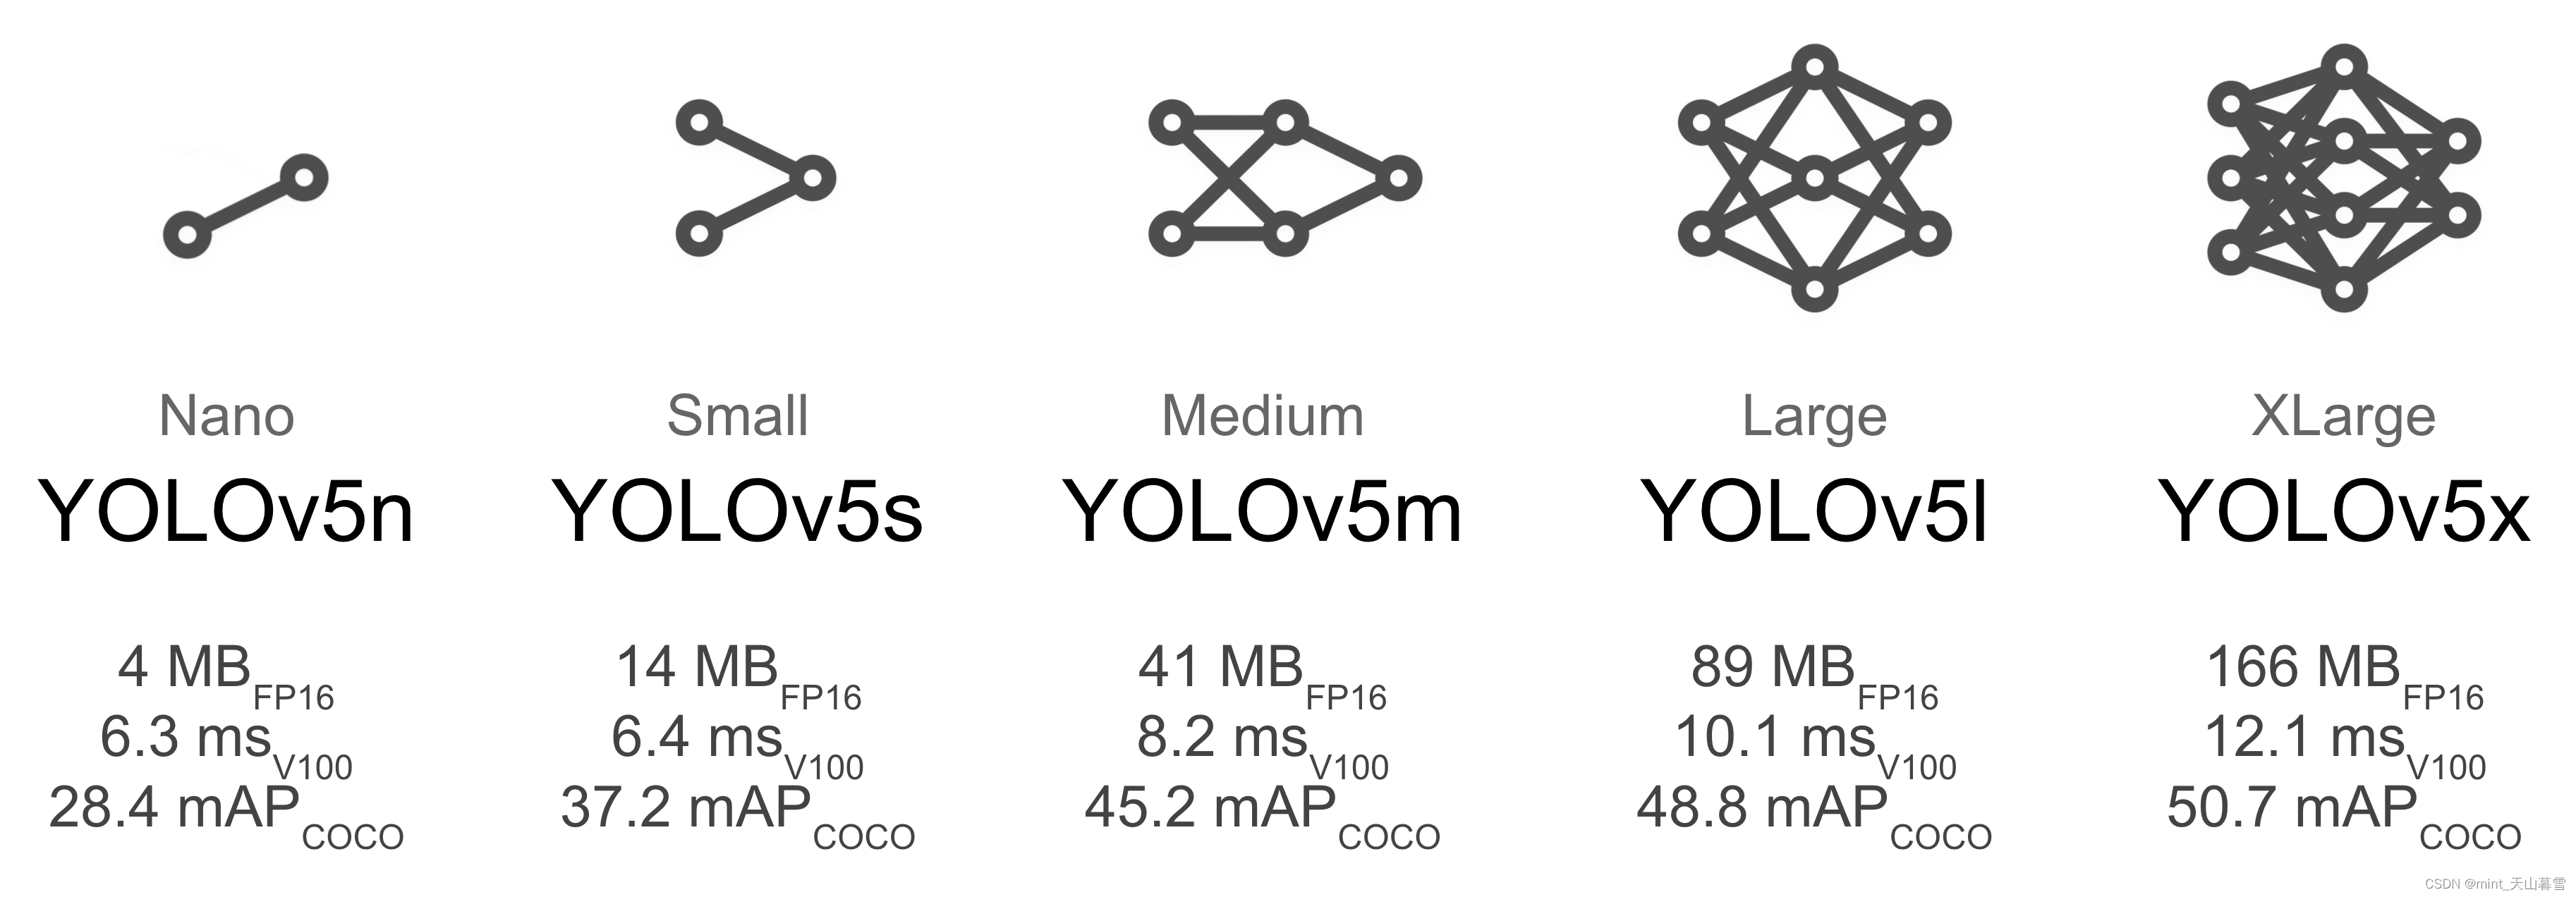
- YOLO5X和YOLO5X6可以提供更好的结果,在数据集的数量差不多的情况下,但是这两个模型有更多的参数,需要更多的CUDA内存去训练。对于移动部署来说可能YOLO5s/m更好,对于云端部署来说更推荐YOLO5l/x。可以看这里来比较各个模型。
训练之前还需要预训练的权重,可以选择用已经预训练好的权重,或者自己从0开始训练,工程方面推荐使用预训练好的权重,想做学术看看区别可以从0开始试试,正常情况下都是预训练好的效果要好。
训练设置
- 在修改之前,一定要用默认设置进行一次训练,把这次训练当作你的基准值。
- Epochs。建议300个epoch,如果过拟合了,可以适当减少epoch,如果没有出现过拟合,可以适当添加训练次数,例如600,1200个epoch。
- Image size 图像尺寸COCO的原生尺寸是 --img 640,如果你的数据集中有大量的小目标,你可以使用更高的分辨率去进行训练,这样你的效果会更好,例如使用–img1280。如果你在1280的尺寸下进行训练,你的检测和测试的网络尺寸也应在1280,这样可以获得很好的效果。
- Batch size 用你能用的最大的batch-size,小的batch-size会产生统计上的误差,这是应该尽可能避免的。
- Hyperparameters 超参数。默认的超参数都在hyp.scratch-low.yaml里面,在你进行修改之前,推荐使用默认的超参数。一般而言,增加augmentation hyperparameters 会减少和降低过拟合,但是训练时间会增加,并且最终获得的mAP也会相应的提高。减少 loss component gain hyperparameters 比如hyp可以帮助减少过拟合。有关优化这些超参数的自动化方法,请参阅超参数进化教程。


 1万+
1万+


 被折叠的 条评论
为什么被折叠?
被折叠的 条评论
为什么被折叠?
 到【灌水乐园】发言


