


1.绘图基本原理
1、获得 “图形上下文” 对象CGContextRef
2、向图形上下文对象中添加 “路径” path
3、“渲染” 图形上下文中的对象
图形上下文包含的信息
绘图路径(各式各样的图形)
绘图状态(颜色,线宽,样式,旋转,缩放,平移,图片裁剪区域等)
输出目标(绘制到什么地方去?UIView、图片、pdf、打印机等),输出可以是pdf文件,bitmap或显示器的窗口上
Quzrtz2D提供的Graphic Context:
- bitmap graphic context
- pdf graphics context
- window graphics context
- layer graphics context(UI控件)
- print Graphic context
2.绘制直线
创建一个蓝色view,并指定其对应的类为FRBlueView
FRBlueView.m
#import "FRBlueView.h"

@implementation FRBlueView

//重新默认绘图方法
- (void)drawRect:(CGRect)rect {
        // 获取当前上下文(草稿纸
    CGContextRef ctx=UIGraphicsGetCurrentContext();
    //拼接路径,同时把路径添加到上下文
    //先移动到某个点
    CGContextMoveToPoint(ctx, 50, 50);//绘图的起点
    //将直线绘制到某个点,再到某个点
    CGContextAddLineToPoint(ctx, 100, 100);//绘制一根直线到某点
    CGContextAddLineToPoint(ctx, 150, 250);
    //将画笔移动到另外一个待你
    CGContextMoveToPoint(ctx, 150, 50);//绘图的起点
    //再绘制到某一个点
    CGContextAddLineToPoint(ctx, 250, 150);
    //渲染(渲染上下文)
    CGContextStrokePath(ctx);
}
@end
结果:

2.另外两种方式绘图(路径方式CGPathRef,绘图方式CGContextRef,C与OC混合方式)
方法1和方法2可以同时相似的效果
#import "FRBlueView.h"

@implementation FRBlueView

//重新默认绘图方法
- (void)drawRect:(CGRect)rect {
    [self test2];
}
//使用上下文对象绘图
-(void)test1{
    // 获取当前上下文(草稿纸)
    CGContextRef ctx=UIGraphicsGetCurrentContext();
    //使用C的方式
    //拼接路径同时把路径添加到上下文
    CGContextMoveToPoint(ctx, 50, 50);
    CGContextAddLineToPoint(ctx, 100, 100);

    //渲染(渲染上下文)
    CGContextStrokePath(ctx);
}
//使用路径对象绘图
-(void)test2{
    // 获取当前上下文(草稿纸)
    CGContextRef ctx=UIGraphicsGetCurrentContext();
    //使用OC的方式
    //拼接路径
    CGMutablePathRef path=CGPathCreateMutable();//路径对象
    CGPathMoveToPoint(path, NULL, 100, 100);
    CGPathAddLineToPoint(path, NULL, 150, 150);
    //把路径添加到上下文中
    CGContextAddPath(ctx, path);
    //渲染(渲染上下文)
    CGContextStrokePath(ctx);
}

@end
3.再另外三种方式绘图(C与OC混合方式3,C与OC混合方式4,纯OC的方式)
#import "FRBlueView.h"

@implementation FRBlueView

//重新默认绘图方法
- (void)drawRect:(CGRect)rect {
    [self test3];
}

-(void)test3{
  //C+oc混合方式
  CGContextRef ctx=UIGraphicsGetCurrentContext();
  //拼接路径
  UIBezierPath* path=[[UIBezierPath alloc]init];//贝塞尔路径
  [path moveToPoint:CGPointMake(50, 50)];//起点
  [path addLineToPoint:CGPointMake(100, 100)];//路径终点
  //把路径添加到上下文(如何把oc的path转为c的path)
  CGContextAddPath(ctx, path.CGPath);

  //渲染
  CGContextStrokePath(ctx);
}

-(void)test4{
  //C+oc混合方式
  //获取上下文
  CGContextRef ctx=UIGraphicsGetCurrentContext();
  //拼接路径
  CGMutablePathRef path=CGPathCreateMutable();
  CGPathMoveToPoint(path, NULL, 50, 50);//C的方式
  CGPathAddLineToPoint(path, NULL, 100, 100);//绘制了路径

  //再用OC来拼接一段路径
  UIBezierPath* path1=[UIBezierPath bezierPathWithCGPath:path];//连接了上一段path
  [path1 addLineToPoint:CGPointMake(150, 50)];

  //把路径添加到上下文中
  CGContextAddPath(ctx, path1.CGPath);//path1.CGPath使用oc的path转换成了C的路径

  //渲染
  CGContextStrokePath(ctx);
}
//纯OC的方法,最简单,推荐使用
-(void)test5{
  //C+oc混合方式
  //创建路径对象
  UIBezierPath* path=[UIBezierPath bezierPath];

  //通过路径对象,拼接路径
  [path moveToPoint:CGPointMake(50, 50)];
  [path addLineToPoint:CGPointMake(150, 150)];

  //渲染
  [path stroke];

}
@end
4.关于drawRect的小专题
1、代码为什么要写在drawRect中
要在这里获取上下文,而上下文是系统创建的,在别的方法中无法获取上下文
2、rect参数的含义
- (void)drawRect:(CGRect)rect{
}
参数是一个CGRect类型,是当前View的bounds
3、drawrect什么时候调用
这个方法是系统调用的,
当view第一次显示的时候会调用
当这个view进行重绘的时候会调用
4、如何重绘
调用某个需要重绘的view对象的setNeedsDisplayde 方法
调用某个需要重绘的view对象的setNeedDisplayInRect rect是需要重绘的区域
5、为什么不能手动调用drawrect
手动调用的时候可能获取不到正确的上下文(由系统调用)
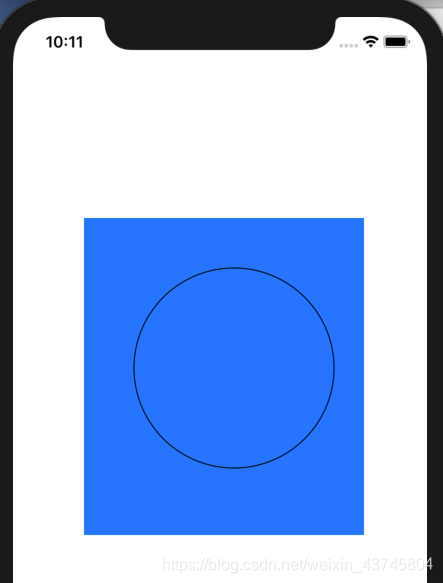
5.绘制一些基本图形(C及OC的方法)
#import "BlueView.h"

@implementation BlueView

- (void)drawRect:(CGRect)rect{
 [self test5];
}
//绘制矩形
-(void)test1{
  //绘制矩形
  //创建路径
  UIBezierPath* path=[UIBezierPath bezierPathWithRect:CGRectMake(100, 100, 100, 100)];
  //渲染路径
  [path stroke];
}
//绘制圆角矩形
-(void)test2{
  //绘制圆角矩形
  //创建路径
  UIBezierPath* path=[UIBezierPath bezierPathWithRoundedRect:CGRectMake(100, 100, 100, 100) cornerRadius:10];
  //渲染路径
  [path stroke];
}
//绘制OC的椭圆
-(void)test3{
  //绘制椭圆
  //创建路径
  UIBezierPath* path=[UIBezierPath bezierPathWithOvalInRect:CGRectMake(50, 50, 200, 100)];//200是椭圆的宽,100是椭圆的高
  //渲染路径
  [path stroke];

}
//绘制C的椭圆
-(void)test4{

  //绘制C的椭圆
  //创建对象
  CGContextRef ctx=UIGraphicsGetCurrentContext();
  //拼接路径
  CGContextAddEllipseInRect(ctx, CGRectMake(50, 50, 200, 100));

  //渲染路径
  CGContextStrokePath(ctx);

}
//绘制OC的圆
-(void)test5{
  //绘制圆(通过绘制弧线的形式)
  //创建路径
  //arcCenter:圆心,radius:半径,starAngle:起始位置,endAngle:结束位置,clockwise:是否顺时针
  UIBezierPath* path=[UIBezierPath bezierPathWithArcCenter:CGPointMake(150, 150) radius:100 startAngle:0 endAngle:2*M_PI clockwise:YES];//200是椭圆的宽,100是椭圆的高
  //渲染路径
  [path stroke];
}

//绘制C的圆
-(void)test6{

  //绘制C的椭圆
  //创建对象
  CGContextRef ctx=UIGraphicsGetCurrentContext();
  //拼接路径
  CGContextAddArc(ctx, 150, 150, 100, 0, 2*M_PI, 1);

  //渲染路径
  CGContextStrokePath(ctx);

}
@end
6.绘制一些基本图形(C及OC的方法)—图形的样式
C语言的样式
#import "BlueView.h"

@implementation BlueView

- (void)drawRect:(CGRect)rect{
  //绘制C的样式
  //创建对象
  CGContextRef ctx=UIGraphicsGetCurrentContext();
  //拼接路径
  CGContextMoveToPoint(ctx, 50, 50);
  CGContextAddLineToPoint(ctx, 100, 100);
  CGContextAddLineToPoint(ctx, 150, 50);

  //设置线宽,线宽的设置是针对上下文的CGContext的
  CGContextSetLineWidth(ctx, 20);

  //设置角的样式
  CGContextSetLineJoin(ctx, kCGLineJoinRound);//圆角样式

  //设置头尾的样式
  CGContextSetLineCap(ctx, kCGLineCapRound);//圆头尾
	//设置颜色
  CGContextSetRGBStrokeColor(ctx, 0.4, 0.5, 0.9, 1.0);
  //渲染路径
  CGContextStrokePath(ctx);
}
@end
效果:

OC的方法
#import "BlueView.h"

@implementation BlueView

- (void)drawRect:(CGRect)rect{
  //绘制OC的样式
  //创建路径对象
  UIBezierPath* path=[[UIBezierPath alloc]init];
  //创建路径
  [path moveToPoint:CGPointMake(50, 50)];
  [path addLineToPoint:CGPointMake(100, 100)];
  [path addLineToPoint:CGPointMake(150, 50)];

  //设置线宽
  [path setLineWidth:30];
  //设置连接处的样式
  [path setLineJoinStyle:kCGLineJoinRound];//圆角
  //设置头尾样式
  [path setLineCapStyle:kCGLineCapRound];//头尾圆
    //设置颜色
  [[UIColor blueColor]setStroke];
  //渲染路径
  [path stroke];

}
@end

C及OC的颜色设置是可以混用的
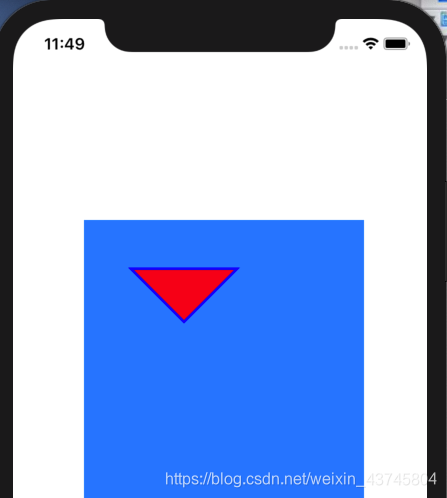
7.渲染方式
渲染就是从上下文移动到view上的过程
C语言的渲染方式
#import "BlueView.h"

@implementation BlueView

- (void)drawRect:(CGRect)rect{
  //C的渲染方式
  //1、获取上下文
  CGContextRef ctx=UIGraphicsGetCurrentContext();
  //2、拼接路径,同时添加到上下文中
  CGContextMoveToPoint(ctx, 50, 50);
  CGContextAddLineToPoint(ctx, 100, 100);
  CGContextAddLineToPoint(ctx, 150, 50);
  //CGContextAddLineToPoint(ctx, 50, 50);
  CGContextClosePath(ctx);//闭合路径

  //设置线宽
  CGContextSetLineWidth(ctx, 5);

  [[UIColor redColor]setFill];//设置填充色
  [[UIColor blueColor]setStroke];//设置描边色
  //3、渲染
  //CGContextStrokePath(ctx);//描边
  //CGContextFillPath(ctx);//填充
  //CGContextDrawPath(ctx, kCGPathFill);//也是一个填充,KCGPathStroke则是描边

  //设置即描边又填充
  CGContextDrawPath(ctx, kCGPathFillStroke);//填充且描边
}

@end
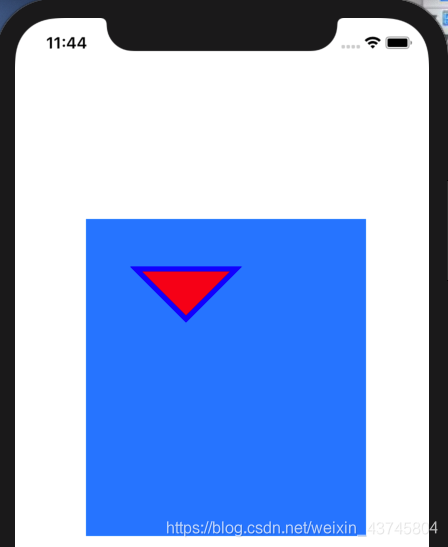
OC语言的渲染方式
#import "BlueView.h"

@implementation BlueView

- (void)drawRect:(CGRect)rect{
  //OC的渲染方式
  //创建路径对象
  UIBezierPath* path=[[UIBezierPath alloc]init];
  //拼接路径
  [path moveToPoint:CGPointMake(50, 50)];
  [path addLineToPoint:CGPointMake(100, 100)];
  [path addLineToPoint:CGPointMake(150, 50)];

  //关闭路径
  [path closePath];

  //设置线宽
  [path setLineWidth:5];
  //设置颜色
  [[UIColor redColor]setFill];//填充色
  [[UIColor blueColor]setStroke];//描边色

  //渲染
  [path stroke];//描边路径
  [path fill];//填充路径

}
@end
8.填充规则(没弄明白,也不想弄明白)
奇偶填充规则
非零环绕数规则
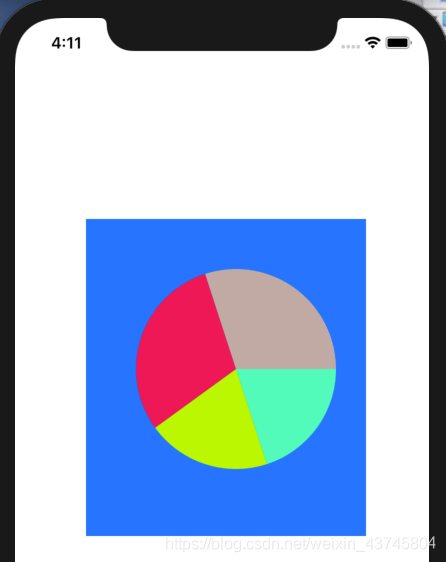
9.绘制饼图
#import "BlueView.h"

@implementation BlueView

- (void)drawRect:(CGRect)rect{
  //画饼图
  //各个饼所占弧度的比重
  NSArray* array=@[@0.1,@0.3,@0.2,@0.4];//合计要为1
  CGFloat start=0;
  CGFloat end=0;
  for (int i=0; i<array.count; i++) {
    end=2 * M_PI * [array[i] floatValue]+start;
    //绘制路径
    UIBezierPath* path=[UIBezierPath bezierPathWithArcCenter:CGPointMake(150, 150) radius:100 startAngle:start endAngle:end clockwise:YES];
    //画扇形往圆心连线
    [path addLineToPoint:CGPointMake(150, 150)];
    //填充颜色
    [[UIColor colorWithRed:((float)arc4random_uniform(256)/255) green:((float)arc4random_uniform(256)/255) blue:((float)arc4random_uniform(256)/255) alpha:1.0]set];
    //渲染路径
    [path fill];
    start=end;
  }
}

//点击view重绘图形
- (void)touchesBegan:(NSSet<UITouch *> *)touches withEvent:(UIEvent *)event{
  //重绘图形
  [self setNeedsDisplay];
  //[self setNeedsDisplayInRect:CGRectMake(0, 0, 150, 150)];//刷新指定区域
}
@end
效果
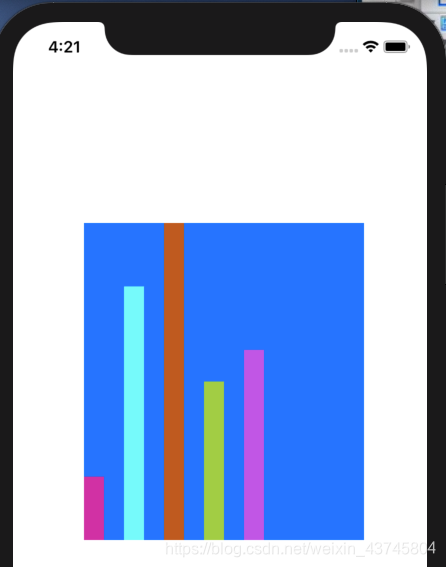
10.绘制柱状图
#import "BlueView.h"

@implementation BlueView

- (void)drawRect:(CGRect)rect{
  //画柱状图
  //各个饼所占弧度的比重
  NSArray* array=@[@0.2,@0.8,@1,@0.5,@0.6];//合计要为1


  for (int i=0; i<array.count; i++) {
    //计算rect
    CGFloat W=20;
    CGFloat H=[array[i] floatValue]*rect.size.height;
    CGFloat X=i*2*W;
    CGFloat Y=rect.size.height-H;

    //绘制路径
    UIBezierPath* path=[UIBezierPath bezierPathWithRect:CGRectMake(X, Y, W, H)];

    //填充颜色
    [[UIColor colorWithRed:((float)arc4random_uniform(256)/255) green:((float)arc4random_uniform(256)/255) blue:((float)arc4random_uniform(256)/255) alpha:1.0]set];
    //渲染
    [path fill];
  }
}
//点击view重绘图形
- (void)touchesBegan:(NSSet<UITouch *> *)touches withEvent:(UIEvent *)event{
  //重绘图形
  [self setNeedsDisplay];
  //[self setNeedsDisplayInRect:CGRectMake(0, 0, 150, 150)];//刷新指定区域
}
@end
效果:
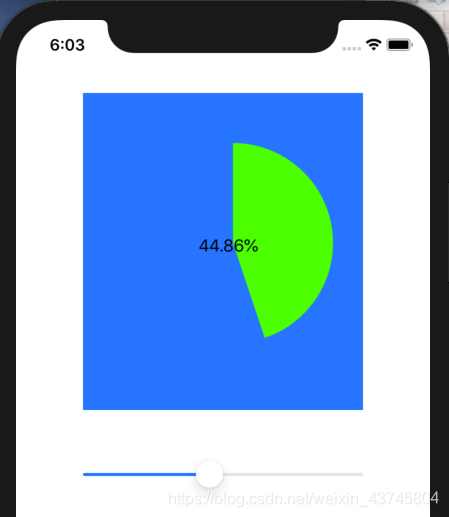
11.自定义进度条(UISlider)
Blueview.h
#import <UIKit/UIKit.h>

NS_ASSUME_NONNULL_BEGIN

@interface BlueView : UIView
@property(nonatomic,assign)CGFloat progressValue;
@end

NS_ASSUME_NONNULL_END
Blueview.m
#import "BlueView.h"
@interface BlueView()
@property (weak, nonatomic) IBOutlet UILabel *progressLabel;

@end

@implementation BlueView

//重写progressValue的set方法,同时实现刷新
-(void)setProgressValue:(CGFloat)progressValue{
  _progressValue=progressValue;

  //给标签赋值
  self.progressLabel.text=[NSString stringWithFormat:@"%.2f%%",self.progressValue*100];//这里是两个百分号

  //重绘,只要有最新的数据,就直接根据最新的数据进行画图
  [self setNeedsDisplay];
}

- (void)drawRect:(CGRect)rect{
  //画柱状图

  UIBezierPath* path=[UIBezierPath bezierPathWithArcCenter:CGPointMake(150, 150) radius:100 startAngle:0-M_PI_2 endAngle:2*M_PI*self.progressValue-M_PI_2 clockwise:YES];

  //往圆心连线
  [path addLineToPoint:CGPointMake(150, 150)];

  //填充颜色
     [[UIColor greenColor]set];

  //渲染
  [path fill];
}
//点击view重绘图形
- (void)touchesBegan:(NSSet<UITouch *> *)touches withEvent:(UIEvent *)event{
  //重绘图形
  [self setNeedsDisplay];
  //[self setNeedsDisplayInRect:CGRectMake(0, 0, 150, 150)];//刷新指定区域
}


@end
ViewController
#import "ViewController.h"
#import "BlueView.h"
@interface ViewController ()
@property (weak, nonatomic) IBOutlet BlueView *progressView;

//监听slider
- (IBAction)sliderClick:(UISlider*)sender;

@end

@implementation ViewController

- (void)viewDidLoad {
  [super viewDidLoad];

}


- (IBAction)sliderClick:(UISlider*)sender {
  //将监听到的progress Slider对象的value属性值传递给progressView的progressValue属性值
  self.progressView.progressValue=sender.value;

}
@end


 660
660


 被折叠的 条评论
为什么被折叠?
被折叠的 条评论
为什么被折叠?
 到【灌水乐园】发言


