


神经网络学习小记录(keras)-去噪自编码器(全连接、卷积)
概念
**
在深度学习中,自编码器是非常有用的一种无监督学习模型。两个核心部分是编码器(encoder)和解码器(decoder),前者将原始表示编码成隐层表示,后者将隐层表示解码成原始表示(相似),训练目标为最小化重构误差,而且一般而言,隐层的特征维度低于原始特征维度。
去噪自编码器(denoising autoencoder,DAE)是一类接受损坏数据作为输入,并训练来预测原始未被损坏数据作为输入的自编码器。-----来源百度百科
encoder和decoder可以由多种深度学习模型构成,例如全连接层、卷积层或LSTM等,以下使用Keras来实现用于图像去噪的全连接和卷积自编码器。
理论推导
作用
1.对图像去噪;
2.对数据进行压缩降维(省略);
Keras代码部分-------encoder和decoder使用dense来实现。
#- Denoising Autoencoder example
import numpy as np
np.random.seed(1337)  # for reproducibility

from keras.datasets import mnist
from keras.models import Model
from keras.utils import np_utils
from keras.layers.convolutional import Conv2D, MaxPooling2D, UpSampling2D, ZeroPadding2D
from keras.layers import Dense, Input
import matplotlib.pyplot as plt

# download the mnist to the path '~/.keras/datasets/' if it is the first time to be called
# X shape (60,000 28x28), y shape (10,000, )
(X_train,y_train), (X_test, y_test) = mnist.load_data()

# 1.dense  data pre-processing
X_train = X_train.reshape(X_train.shape[0], -1)
X_test = X_test.reshape(X_test.shape[0], -1)

X_train = X_train.astype("float32")/255.
X_test = X_test.astype("float32")/255.
print(X_train.shape)
print(X_test.shape)

##加噪
noise_factor = 0.5
X_train_noisy = X_train + noise_factor * np.random.normal(loc=0.0, scale=1.0, size=X_train.shape)
X_test_noisy = X_test + noise_factor * np.random.normal(loc=0.0, scale=1.0, size=X_test.shape)

X_train_noisy = np.clip(X_train_noisy, 0., 1.)
X_test_noisy = np.clip(X_test_noisy, 0., 1.)

##1.去噪自编码器全连接网络建模
input_img = Input(shape=(784,))

# encoder layers
encoded = Dense(128, activation='relu')(input_img)
encoded = Dense(64, activation='relu')(encoded)
encoded = Dense(10, activation='relu')(encoded)
encoder_output = Dense(2)(encoded)

# decoder layers
decoded = Dense(10, activation='relu')(encoder_output)
decoded = Dense(64, activation='relu')(decoded)
decoded = Dense(128, activation='relu')(decoded)
decoded = Dense(784, activation='tanh')(decoded)

# construct the autoencoder model
autoencoder = Model(input=input_img, output=decoded)


autoencoder.compile(optimizer='adadelta', loss='binary_crossentropy')

epochs = 10
batch_size = 128

history = autoencoder.fit(X_train_noisy, X_train,
                          batch_size=batch_size,
                          epochs=epochs, verbose=1,
                          validation_data=(X_test_noisy, X_test))
## 查看编码效果
decoded_imgs = autoencoder.predict(X_test_noisy)

n = 10
plt.figure(figsize=(20, 6))
for i in range(n):
    # 原图
    ax = plt.subplot(3, n, i + 1)
    plt.imshow(X_test_noisy[i].reshape(28, 28))
    plt.gray()
    ax.get_xaxis().set_visible(False)
    ax.get_yaxis().set_visible(False)

    # 解码效果图
    ax = plt.subplot(3, n, i + n + 1)
    plt.imshow(decoded_imgs[i].reshape(28, 28))
    plt.gray()
    ax.get_xaxis().set_visible(False)
    ax.get_yaxis().set_visible(False)

plt.show()
autoencoder.summary()
## 训练过程可视化
print(history.history.keys())

plt.plot(history.history['loss'])
plt.plot(history.history['val_loss'])
plt.title('model loss')
plt.ylabel('loss')
plt.xlabel('epoch')
plt.legend(['train', 'validation'], loc='upper right')
plt.show()
网络结构:

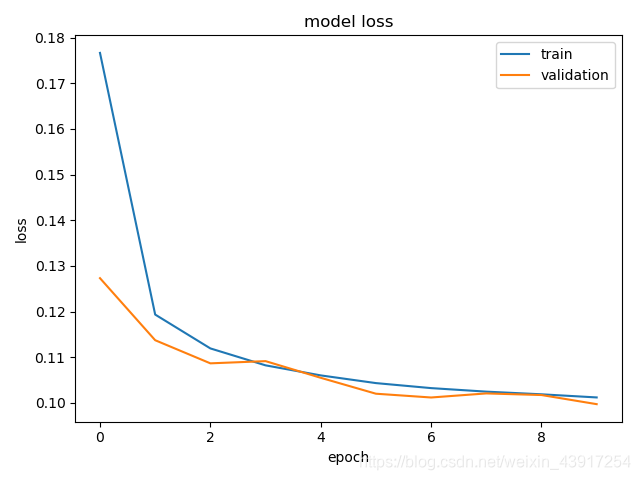
当epoch=10时:
训练输入与输出:
损失值:

Keras代码部分-------encoder和decoder使用CNN来实现。
#- Denoising Autoencoder example
import numpy as np
np.random.seed(1337)  # for reproducibility

from keras.datasets import mnist
from keras.models import Model
from keras.utils import np_utils
from keras.layers.convolutional import Conv2D, MaxPooling2D, UpSampling2D, ZeroPadding2D
from keras.layers import Dense, Input
import matplotlib.pyplot as plt

# download the mnist to the path '~/.keras/datasets/' if it is the first time to be called
# X shape (60,000 28x28), y shape (10,000, )
(X_train,y_train), (X_test, y_test) = mnist.load_data()

# 2.CNN data pre-processing
# X_train = X_train.reshape(X_train.shape[0], 28,28,1)
# X_test = X_test.reshape(X_test.shape[0], 28,28,1)

X_train = X_train.astype("float32")/255.
X_test = X_test.astype("float32")/255.
print(X_train.shape)
print(X_test.shape)

##加噪
noise_factor = 0.5
X_train_noisy = X_train + noise_factor * np.random.normal(loc=0.0, scale=1.0, size=X_train.shape)
X_test_noisy = X_test + noise_factor * np.random.normal(loc=0.0, scale=1.0, size=X_test.shape)

X_train_noisy = np.clip(X_train_noisy, 0., 1.)
X_test_noisy = np.clip(X_test_noisy, 0., 1.)

## 2.去噪自编码器卷积网络建模
# x = Input(shape=(28, 28, 1))
#
# # 编码器
# conv1_1 = Conv2D(32, (3, 3), activation='relu', padding='same')(x)
# pool1 = MaxPooling2D((2, 2), padding='same')(conv1_1)
# conv1_2 = Conv2D(32, (3, 3), activation='relu', padding='same')(pool1)
# h = MaxPooling2D((2, 2), padding='same')(conv1_2)
#
#
# # 解码器
# conv2_1 = Conv2D(32, (3, 3), activation='relu', padding='same')(h)
# up1 = UpSampling2D((2, 2))(conv2_1)
# conv2_2 = Conv2D(32, (3, 3), activation='relu', padding='same')(up1)
# up2 = UpSampling2D((2, 2))(conv2_2)
# r = Conv2D(1, (3, 3), activation='sigmoid', padding='same')(up2)
#
# autoencoder = Model(inputs=x, outputs=r)

autoencoder.compile(optimizer='adadelta', loss='binary_crossentropy')

epochs = 10
batch_size = 128

history = autoencoder.fit(X_train_noisy, X_train,
                          batch_size=batch_size,
                          epochs=epochs, verbose=1,
                          validation_data=(X_test_noisy, X_test))
## 查看编码效果
decoded_imgs = autoencoder.predict(X_test_noisy)

n = 10
plt.figure(figsize=(20, 6))
for i in range(n):
    # 原图
    ax = plt.subplot(3, n, i + 1)
    plt.imshow(X_test_noisy[i].reshape(28, 28))
    plt.gray()
    ax.get_xaxis().set_visible(False)
    ax.get_yaxis().set_visible(False)

    # 解码效果图
    ax = plt.subplot(3, n, i + n + 1)
    plt.imshow(decoded_imgs[i].reshape(28, 28))
    plt.gray()
    ax.get_xaxis().set_visible(False)
    ax.get_yaxis().set_visible(False)

plt.show()
autoencoder.summary()
## 训练过程可视化
print(history.history.keys())

plt.plot(history.history['loss'])
plt.plot(history.history['val_loss'])
plt.title('model loss')
plt.ylabel('loss')
plt.xlabel('epoch')
plt.legend(['train', 'validation'], loc='upper right')
plt.show()
网络结构:

训练输入与输出:

损失值:
----------未完待续


 4268
4268


 被折叠的 条评论
为什么被折叠?
被折叠的 条评论
为什么被折叠?
 到【灌水乐园】发言


