


1、error: command '/usr/bin/gcc' failed with exit code 1
解决方法:
给gcc加入软连接:
sudo ln -s /usr/bin/gcc-7 /usr/bin/gcc
前一个是源地址,你需要去/usr/bin/下查看你已经安装的版本,后一个是生成软连接的目标地址。
2、AttributeError: 'ConfigDict' object has no attribute 'device'
解决方法:
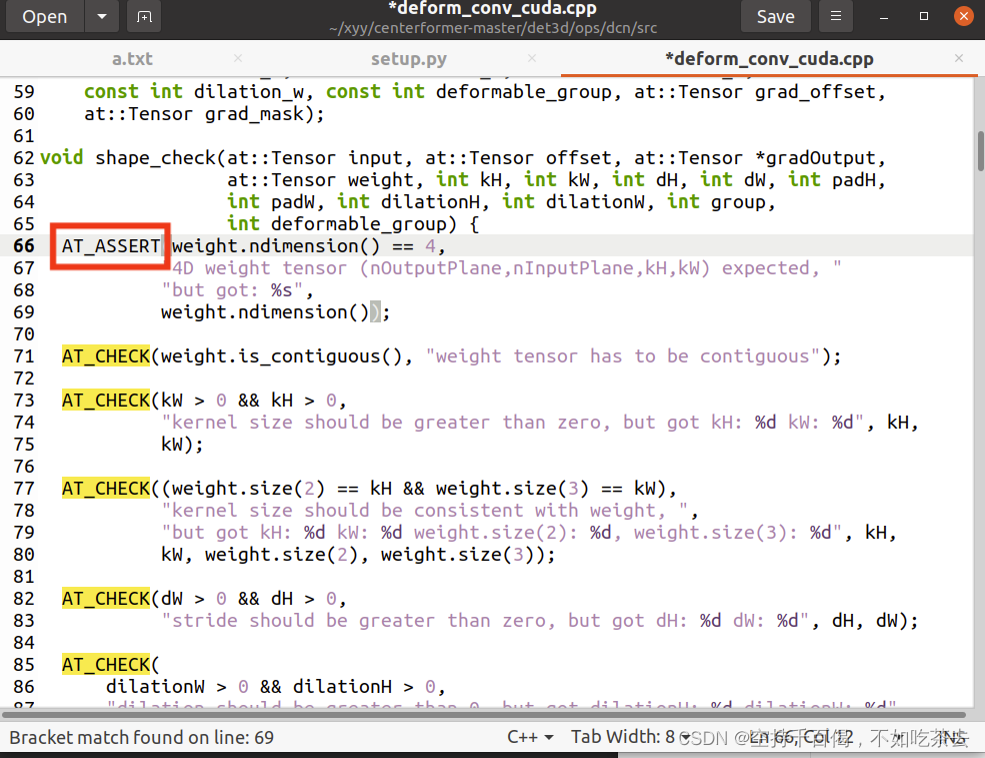
3、编译时产生的AT_CHECK问题
问题描述:
/home/xd/anaconda3/envs/centerformer/lib/python3.8/site-packages/torch/include/ATen/core/TensorBody.h:501:7: note: declared here
501 | T * data() const {
| ^~~~
det3d/ops/pointnet2/src/ball_query.cpp:33:5: error: ‘AT_CHECK’ was not declared in this scope; did you mean ‘DCHECK’?
33 | AT_CHECK(false, "CPU not supported");
| ^~~~~~~~
| DCHECK
error: command '/usr/bin/gcc' failed with exit code 1...
raise RuntimeError(message) from e
RuntimeError: Error compiling objects for extension
解决方法:如果您使用的 torch>1.5,则需要将 AT_CHECK 替换为 AT_ASSERT。
也就是说,需要进到相应的cpp文件内,将所有的AT_CHECK进行替换,然后再次编译。
所有需要改的cpp文件包括但不限于:ball_query.cpp,utils.h,group_points.cpp,interpolate.cpp,sampling.cpp,iou3d.cpp,roipool3d.cpp。
请参阅【点云3D目标检测】跑通CIA-SSD过程中的一些报错集锦_no module named 'det3d_杨立青101的博客-CSDN博客
4、ImportError: cannot import name ‘container_abcs‘ from ‘torch._six‘
参考:ImportError: cannot import name ‘container_abcs‘ from ‘torch._six‘_AESA相控阵的博客-CSDN博客
5、 ImportError: arg(): could not convert default argument 'timer: tv::CUDAKernelTimer' in method '<class 'spconv.core_cc.cumm.gemm.main.GemmParams'>.__init__' into a Python object (type not registered yet?)
解决方法:环境没有配置好,需要先将cuda_expension先安装好,以及setup.sh处理完后再来运行该指令
6、 ModuleNotFoundError: No module named 'spconv.pytorch'
问题描述:
from .scn_largekernel import SpMiddleResNetFHDLargeKernel
File "/home/xd/xyy/FocalsConv-master/FocalsConv-master/CenterPoint/det3d-master/det3d/models/backbones/scn_largekernel.py", line 2, in <module>
import spconv.pytorch as spconv
ModuleNotFoundError: No module named 'spconv.pytorch'
7、note: This error originates from a subprocess, and is likely not a problem with pip.
问题描述:
安装apex出现的问题后面还有 ERROR: No matching distribution found for setuptools
error: subprocess-exited-with-error
解决方法:
pip install setuptools==59.5.0
8、 UserWarning: To copy construct from a tensor, it is recommended to use sourceTensor.clone().detach() or sourceTensor.clone().detach().requires_grad_(True), rather than torch.tensor(sourceTensor).
解决方法:
将
theta_init_new = torch.tensor(theta, dtype=torch.float32, requires_grad=True)
改为
theta_init_new = torch.as_tensor(theta, dtype=torch.float32, requires_grad=True)9、ry.hpp: 没有那个文件或目录 21 | #include <boost/geometry.hpp>
解决方法:
更新
sudo apt-get update 安装依赖
sudo apt-get install libboost-all-dev10、无法调用import tensorflow
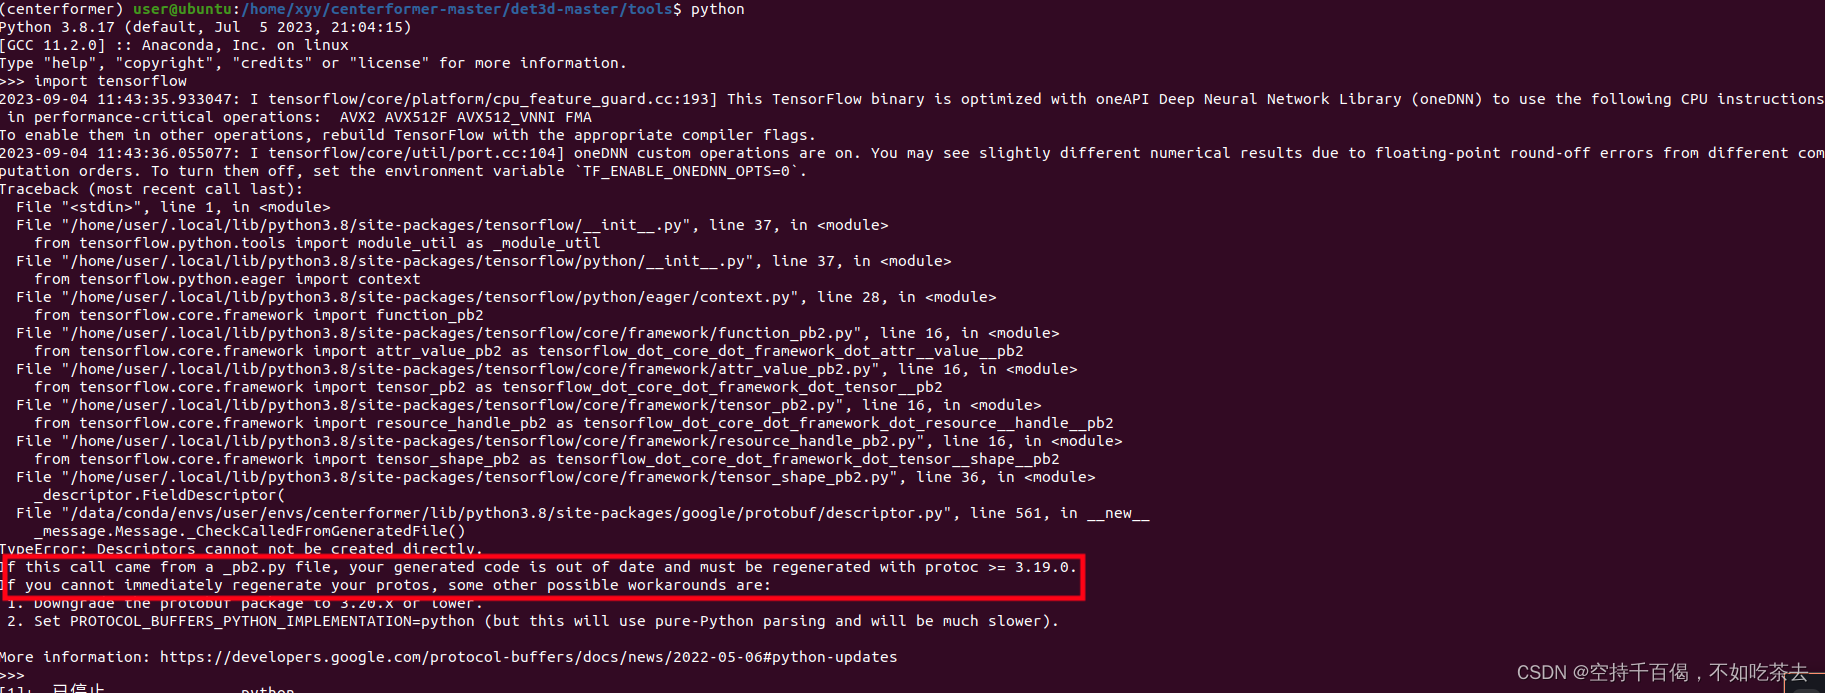
解决方法:
pip install protobuf==3.20
11、TF-TRT Warning: Cannot dlopen some TensorRT libraries. If you would like to use Nvidia GPU with TensorRT, please make sure the missing libraries mentioned above are installed properly.
解决方法:
conda install tensorflow==2.11.0
参考:https://blog.csdn.net/xr627/article/details/127581608
12、AttributeError: module 'scipy' has no attribute '__version__
解决方法:
pip install scipy ==1.8.0
13、Exception: You need either charset_nornalizer or chardet installed
解决方法:需要依赖库chardet或chardet-normalizer支持,尝试在安装requests前先pip install chardet,或使用这样命令安装:
python -m pip install requests chardet
14、ModuleNotFoundError: No module named 'Cython'
解决方法:
pip install Cython
15、ImportError: importlib_metadata backport is required for Python version < 3.9, try: $ conda/pip install importlib_metadata
解决方法:更换老版本
pip install importlib_metadata==5
16、ValueError:Unknown CUDA arch(8.6)or GPU not supported
解决方法:https://blog.csdn.net/Furtherisxgi/article/details/129758236
17、AttributeError: module ‘distutils‘ has no attribute ‘version‘
解决方法:
pip uninstall setuptools
pip install setuptools==59.5.0另一种解决方法:AttributeError: module ‘distutils‘ has no attribute ‘version‘解决跑pytorch代码报错_肖申克的陪伴的博客-CSDN博客
18、cuda版本自由切换
参考:
【CUDA】版本自由切换_bashrc 切换nvcc_摇曳的树的博客-CSDN博客
19、 nvcc fatal : Failed to preprocess host compiler properties.
FAILED: /data/xyy/envs/focalconv/CenterPoint/det3d-master/build/temp.linux-x86_64-3.8/det3d/ops/pointnet2/src/interpolate_gpu.o
/usr/local/cuda/bin/nvcc -I/data/conda/envs/user/envs/focalconv/lib/python3.8/site-packages/torch/include -I/data/conda/envs/user/envs/focalconv/lib/python3.8/site-packages/torch/include/torch/csrc/api/include -I/data/conda/envs/user/envs/focalconv/lib/python3.8/site-packages/torch/include/TH -I/data/conda/envs/user/envs/focalconv/lib/python3.8/site-packages/torch/include/THC -I/usr/local/cuda/include -I/data/conda/envs/user/envs/focalconv/include/python3.8 -c -c /data/xyy/envs/focalconv/CenterPoint/det3d-master/det3d/ops/pointnet2/src/interpolate_gpu.cu -o /data/xyy/envs/focalconv/CenterPoint/det3d-master/build/temp.linux-x86_64-3.8/det3d/ops/pointnet2/src/interpolate_gpu.o -D__CUDA_NO_HALF_OPERATORS__ -D__CUDA_NO_HALF_CONVERSIONS__ -D__CUDA_NO_BFLOAT16_CONVERSIONS__ -D__CUDA_NO_HALF2_OPERATORS__ --expt-relaxed-constexpr --compiler-options ''"'"'-fPIC'"'"'' -g -DTORCH_API_INCLUDE_EXTENSION_H '-DPYBIND11_COMPILER_TYPE="_gcc"' '-DPYBIND11_STDLIB="_libstdcpp"' '-DPYBIND11_BUILD_ABI="_cxxabi1011"' -DTORCH_EXTENSION_NAME=PN2 -D_GLIBCXX_USE_CXX11_ABI=0 -gencode=arch=compute_86,code=compute_86 -gencode=arch=compute_86,code=sm_86 -std=c++14
gcc: error trying to exec 'cc1plus': execvp: 没有那个文件或目录
nvcc fatal : Failed to preprocess host compiler properties.
解决方法:只能用gcc-9
20、 File "/data/xyy/envs/focalconv/CenterPoint/det3d-master/det3d/core/sampler/sample_ops.py", line 223, in sample_all
sample_record = data_info.get('sample', info['token'])
KeyError: 'token'
解决方法:官方给出了一个dbinfo文件需要下载,替换掉原来的文件,具体可参照官方的下载:
官方地址:https://github.com/dvlab-research/FocalsConv/tree/master
21、 from det3d.models.losses.centernet_loss import FastFocalLoss_iou, RegLoss, SegLoss
ImportError: cannot import name 'FastFocalLoss_iou' from 'det3d.models.losses.centernet_loss' (/data/xyy/envs/focalconv/CenterPoint/det3d-master/det3d/models/losses/centernet_loss.py)
解决方法:在build中将loss考入进去,或重新build 。
22、RuntimeError: Unexpected error from cudaGetDeviceCount(). Did you run some cuda functions before calling NumCudaDevices() that might have already set an error? Error 34: CUDA driver is a stub library
解决方法:torch,cuda不能用,主要是cuda系统文件的环境被破坏/当前代码需要执行的环境需要的cuda环境要求较高,且你没有该环境,具体操作是:需要将torch版本升级为torch1.10.1-cu113,torchvision==0.11.2,然后将cuda版本换成了11.3,设置好cuda完美解决问题,这个问题就是在1.9.0-cu111。
Focals Conv独有问题:
在运行非focal conv文件时诸如:nusc_centerpoint_voxelnet_01voxel.py,这个文件就是没有加focal conv的代码,如果说,你的torch版本是torch1.9.0-cu111,spconv-1.2.1,那么这个就可以完美运行。
但是你要是需要运行focal conv文件时,诸如:nusc_centerpoint_voxelnet_0075voxel_fix_bn_z_focal_multimodal.py,这个文件就是作者论文中提到的方法,要想运行此文件,则需要首先按照作者的要求下载他写好的spconv的版本扩展:spconv-plus-master,这个在作者github官网上能够找到,这个文件里面加入了他自己写的两个算子,所以自己创建了一个spocnv2.x的文件。
就当你按照要求创建好之后,执行tran.py运行指令时,就会报这个错误,主要是由于该环境对torch和cuda要求较高,需要更换才能使用。
23、 TypeError: ccimport() got multiple values for argument 'std'
File "/data/conda/envs/user/envs/focalconv-copy/lib/python3.8/site-packages/pccm/builder/pybind.py", line 120, in build_pybind
return ccimport.ccimport(
TypeError: ccimport() got multiple values for argument 'std'
解决方法1:别被表面所迷惑,其实不是pccm的问题,也不是cumm的问题,而是ccimport没配置好,整体的安装版本为pip install pccm==0.3.4 ccimport==0.3.7 cumm==0.2.8 wheel
解决方法2:安装了多个版本的cumm,建议全部重新卸载了重新装,如果cumm安装了也不行,那就安装pip install cumm-cu111。(注意这里的cu版本要与cuda版本对应,如果是cuda11.3,那就安装cumm-cu113)
24、 ImportError: cannot import name 'TensorOpParams' from 'cumm.gemm.algospec.core'
from cumm.gemm.algospec.core import TensorOpParams
ImportError: cannot import name 'TensorOpParams' from 'cumm.gemm.algospec.core'
解决方法:cumm版本太高,需要降版本。可以参考问题23。
25、AttributeError: 'BuildMeta' object has no attribute 'compiler_to_cflags'
File "/data/conda/envs/user/envs/focalconv-copy/lib/python3.8/site-packages/cumm/common.py", line 279, in __init__
self.build_meta.compiler_to_cflags["nvcc,clang++,g++"] = ["-DTV_CUDA"]
AttributeError: 'BuildMeta' object has no attribute 'compiler_to_cflags'
解决方法:pccm和cumm版本太高了。
可以参考问题23。
26、ImportError: cannot import name 'nullcontext' from 'spconv.utils' (/data/conda/envs/user/envs/focalconv-copy2/lib/python3.8/site-packages/spconv/utils/__init__.py)
解决方法:因为装了spconv-cu111但是,同时配置环境是spconv1.2.1,所以应该先把spconv-cu111删除,然后再装spconv1.2.1。
27、ImportError: /data/conda/envs/user/envs/focalconv-copy/lib/python3.8/site-packages/MultiScaleDeformableAttention-1.0-py3.8-linux-x86_64.egg/MultiScaleDeformableAttention.cpython-38-x86_64-linux-gnu.so: undefined symbol: _ZNK2at6Tensor7optionsEv
解决方法:换环境导致的,需要重新编译一下centerformer里面的sh setup.sh。
28、No module named ‘torchvision.models.utils‘
解决方法:将from torchvision.models.utils import load_state_dict_from_url改成from torch.hub import load_state_dict_from_url
29、torch._C._cuda_init()没法使用
解决方法: torch有问题,需要重新安装,这次我把cuda环境从11.1换成了11.3,torch从1.9.0换成了1.10.1。最后顺利运行。
当时和问题22一起报错的。
30、 "Using a target size ({}) that is different to the input size ({}). " "This will likely lead to incorrect results due to broadcasting. "
解决方法:在focal conv中,MSEloss要求两个输入的参数size一致,才能进行loss计算。
31、ValueError: not enough values to unpack (expected 3, got 2)
解决方法:传参的时候少参数 。
下面是安装MVP出现的问题
32、KeyError: 'all_cams_path'
原因:这种问题多半是数据集有问题,首先可以看看官方有没有提供新的增强数据集,没有的话可能是生成数据集的时候出问题了。
解决方法:这里是因为生成nuscenes数据集时就没有加入这个key,重新生成一次就好了。
这个可以在CenterPoint文件夹的nusc_common.py中找到相应的代码:
info = {
            "lidar_path": ref_lidar_path,
            "cam_front_path": ref_cam_path,
            "cam_intrinsic": ref_cam_intrinsic,
            "token": sample["token"],
            "sweeps": [],
            "ref_from_car": ref_from_car,
            "car_from_global": car_from_global,
            "timestamp": ref_time,
            "all_cams_from_lidar": all_cams_from_lidar,
            "all_cams_intrinsic": all_cams_intrinsic,
            "all_cams_path": all_cams_path
        }
如果没有找到这一段,那么可以去官网下一个最新版本的Centerpoint。
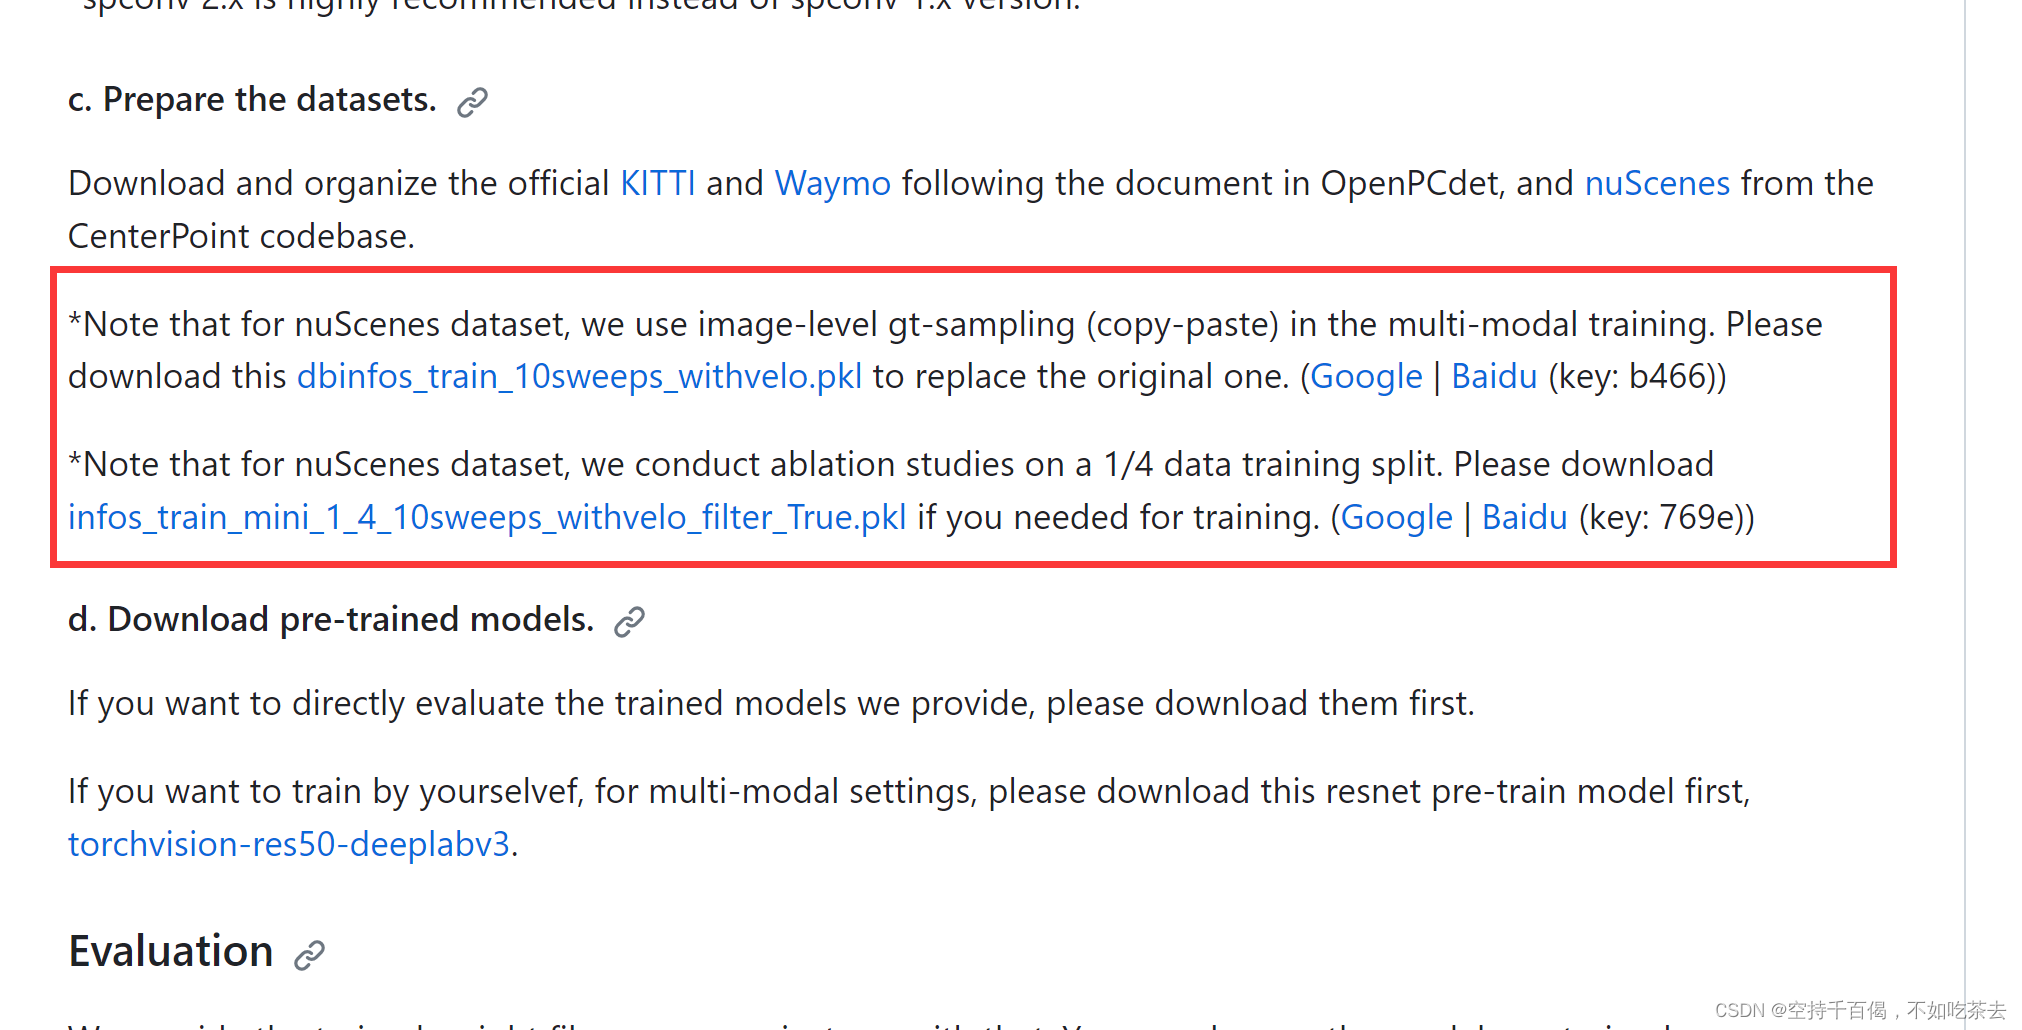
33、FileNotFoundError: [Errno 2] No such file or directory: 'data/nuScenes/dbinfos_train_10sweeps_withvelo.pkl'
解决方法:python create_data.py的时候没有执行完,中间肯定爆了什么bug没有解决,最后应该打包好一个这样的pkl,可以回去检查一下。
可能二:在MVP中,生成出来的名字不是这个,最简单的方法就是把生成好的dbinfos_train_10sweeps_withvelo_virtual.pkl改为dbinfos_train_10sweeps_withvelo.pkl
34、 from centernet.config import add_centernet_config
ModuleNotFoundError: No module named 'centernet'
这个是同级目录下不同py文件之间的调用失败问题,没有将centernet的目录路径添加到计算机的路径下。
解决方法:
①添加环境变量
采用
export PYTHONPATH=$PYTHONPATH:/home/xd/xyy/MVP-main/CenterNet2将centernet2加入到根目录中,后面时自己的CenterNet2的绝对地址。
②添加根目录
在from centernet.config import add_centernet_config之前加上:
import sys
sys.path.append(r"/home/xd/xyy/MVP-main/CenterNet2")
35、ModuleNotFoundError: No module named 'cumm.gemm'
解决方法:安装对应cuda版本的cumm:pip install cumm-cu111.
36、apex安装,解决ModuleNotFoundError: No module named ‘packaging‘ error: subprocess-exited-with-error
解决方法:
git clone https://github.com/NVIDIA/apex
cd apex
pip install -v --no-cache-dir --no-build-isolation --global-option="--cpp_ext" --global-option="--cuda_ext" --global-option="--deprecated_fused_adam" --global-option="--xentropy" --global-option="--fast_multihead_attn" ./37、type "GemmAlgoDesp": an object with that name is already defined
解决方法:将gcc-7更换成gcc-9从头编译一遍,spconv-plus,det3d。
38、RuntimeError: cusolver error: CUSOLVER_STATUS_INTERNAL_ERROR, when calling `cusolverDnCreate(handle)`
解决方法1:换个版本的torch。我刚开始用的是torch+cu111结果报了这个错误,然后换成了torch+cu113.可以通过以下的指令进行安装:
pip install torch==1.10.1+cu113 torchvision==0.11.2+cu113 -f https://download.pytorch.org/whl/cu113/解决方法2:将数据转换到cpu上运行,然后再转换回gpu。
参考:torch.inverse报错及其解决办法_runtimeerror: cusolver error: 7, when calling `cus-CSDN博客
39、importerror: /data/xyy/envs/mvp-main/centerpoint/detectron2/detectron2/_c.cpython-38-x86_64-linux-gnu.so: undefined symbol: _znk2at6tensor7reshapeen3c108arrayrefilee
问题描述:在import detectron2._C时出现以上问题。
解决方法:进入到/detectron2文件夹下,把build文件夹删掉,然后重新安装:
rm -rf build/ **/*.so # 删除
pip install -e. # 安装
参考:detectron2更新Pytorch版本后的报错记录-CSDN博客
40、cannot import 'detectron2._c', therefore 'modulateddeformconv' is not available.
解决方法:重新安装detectron2,解决方法如39问题所示。
41、RuntimeError: mmdet3d/ops/spconv/src/indice_cuda.cu 124
问题描述:安装bevfusion时,出现的cu文件报错问题。
解决方法:重新编译一下安装py文件:
python setup.py develop参考:BEVfusion环境配置笔记_mmdet3d/ops/spconv/src/indice_cuda.cu-CSDN博客
42、 keyerror: 'master_host'
问题描述:BEVFusion中使用python train.py xxx.yaml,报以下错误(图是借的):
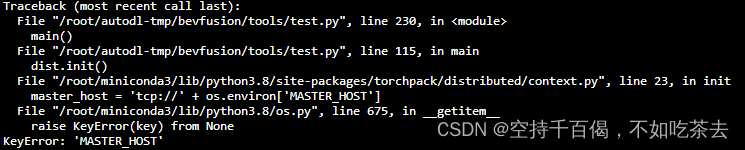
解决方法1: 使用torchpack运行代码:
torchpack dist-run -np 8 python tools/train.py configs/nuscenes/det/centerhead/lssfpn/camera/256x704/swint/default.yaml --model.encoders.camera.backbone.init_cfg.checkpoint pretrained/swint-nuimages-pretrained.pth解决方法2:为方便调试,使用以下老哥的方法将源码进行改动:
bevfusion单显卡训练/测试_bevfusion4060可以训练吗-CSDN博客
43、mmdet3d/ops/spconv/src/all.cc:16:10: fatal error: spconv/fused_spconv_ops.h: 没有那个文件或目录
问题描述:在安装RoboBEV的BEVfusion时,会报以上错误,我们需要从BEVFusion官网上下载出来/ops文件夹,根据缺少的文件进行补足:
https://github.com/mit-han-lab/bevfusion/tree/main/mmdet3d/ops/spconv
44、AttributeError: module ‘urllib‘ has no attribute ‘urlopen‘
解决方法:AttributeError: module ‘urllib‘ has no attribute ‘urlopen‘-CSDN博客
45、error: ‘thfloatblas_gemv’ was not declared in this scope; did you mean ‘thfloatblas_swap’?
解决方法:一个很玄乎的问题,这是DCNv2安装时出现的问题,是由于torch版本不匹配导致的,我们需要按照torch版本来下载DCNv2。其下载地址如下:
https://github.com/lbin/DCNv2/tree/pytorch_1.6 https://github.com/lbin/DCNv2/tree/pytorch_1.6但是我在安装的过程中,发现pytorch 1.6,pytorch 1.9版本的DCN都是相同的问题,最后将torch换成cu111+1.110,DCN版本换成DCNv2_pytorch_1.11就安装成功了。


 3062
3062

 被折叠的 条评论
为什么被折叠?
被折叠的 条评论
为什么被折叠?
 到【灌水乐园】发言


