


一、引言
本次参考的是VirConv生成虚拟点的方法:
VirConv/tools/PENet at master · hailanyi/VirConv · GitHubVirtual Sparse Convolution for Multimodal 3D Object Detection - VirConv/tools/PENet at master · hailanyi/VirConv![]() https://github.com/hailanyi/VirConv/tree/master/tools/PENet里面用到了一些小技巧,直接绕开评估,直接使用预训练的权重生成虚拟点。本文主要介绍如何使用各种各样的深度补全方法生成虚拟点,辅助3D目标检测:
https://github.com/hailanyi/VirConv/tree/master/tools/PENet里面用到了一些小技巧,直接绕开评估,直接使用预训练的权重生成虚拟点。本文主要介绍如何使用各种各样的深度补全方法生成虚拟点,辅助3D目标检测:
二、更改推理py文件
不同深度补全更改代码的方式是不同,有些甚至非常难改,可惜不能一点通。整体套路都是一样的,首先我们需要知道的一点就是,如果我们仅生成虚拟点,那么gt标签,评估函数什么的都不重要了,想去掉就去掉。因此,我们最主要的就是如何读取我们自己的数据集以及如何准确的实现深度图到3D LiDAR坐标系的投影。
下面我们以当前SOTA LRRU为例,具体操作如下:
1、重写Dataloader
我们需要自己写一个读取KITTI 3D目标检测数据集的DataLoader,从而替换掉原来读取KITTI DC的DataLoader。主要更改的是读取方式,比如calib的读取,lidar的读取,以及图像的读取。(也不是说他的不好,主要是封装的太死了,我直接改用我写好的。)
调用:
        if self.arg.dataset == 'kitti': # 我们新加的my_loader
            rgb, dep = self.my_loader[index]
            gt = None
            K = None
            paths = None
        else:  # 原来的读取方法
            dep, gt, K, rgb, paths = self.__getraw__(index)
下面是我参考VirConv的方法改好的完整代码:
class KittiDepthSemi(data.Dataset):
    """A data loader for the Kitti dataset
    """

    def __init__(self, split, args, arg):
        self.args = args
        self.split = split
        self.arg = arg
        if arg.dataset == 'kitti-dc':
            self.paths = get_kittipaths(split, args)
        elif arg.dataset == 'kitti':
            self.my_loader = MyLoader(arg.detpath)
        self.transforms = kittitransforms
        self.ipfill = fill_in_fast

    def __getraw__(self, index):
        dep = read_depth(self.paths['dep'][index]) if \
            (self.paths['dep'][index] is not None) else None
        gt = read_depth(self.paths['gt'][index]) if \
            self.paths['gt'][index] is not None else None
        rgb = read_rgb(self.paths['rgb'][index]) if \
            (self.paths['rgb'][index] is not None) else None

        if self.paths['K'][index] is not None:
            if self.split == 'train' or (self.split == 'val' and self.args.val == 'full'):
                calib = read_calib_file(self.paths['K'][index])
                K_cam = None
                if 'image_02' in self.paths['rgb'][index]:
                    K_cam = np.reshape(calib['P_rect_02'], (3, 4))
                elif 'image_03' in self.paths['rgb'][index]:
                    K_cam = np.reshape(calib['P_rect_03'], (3, 4))
                K = [K_cam[0, 0], K_cam[1, 1], K_cam[0, 2], K_cam[1, 2]]
            else:
                f_calib = open(self.paths['K'][index], 'r')
                K_cam = f_calib.readline().split(' ')
                f_calib.close()
                K = [float(K_cam[0]), float(K_cam[4]), float(K_cam[2]),
                     float(K_cam[5])]
        else:
            K = None
        return dep, gt, K, rgb, self.paths['dep'][index]

    def __getitem__(self, index):
        if self.arg.dataset == 'kitti':
            rgb, dep = self.my_loader[index]
            gt = None
            K = None
            paths = None
        else:
            dep, gt, K, rgb, paths = self.__getraw__(index)

        dep, gt, K, rgb = self.transforms(self.split, self.args, dep, gt, K, rgb)

        dep_np = dep.numpy().squeeze(0)
        dep_clear, _ = outlier_removal(dep_np)
        dep_clear = np.expand_dims(dep_clear, 0)
        dep_clear_torch = torch.from_numpy(dep_clear)

        # ip_basic fill
        dep_np = dep.numpy().squeeze(0)
        dep_np_ip = np.copy(dep_np)

        dep_ip = self.ipfill(dep_np_ip, max_depth=100.0,
                             extrapolate=True, blur_type='gaussian')

        dep_ip_torch = torch.from_numpy(dep_ip)
        dep_ip_torch = dep_ip_torch.to(dtype=torch.float32)
        # gt = dep_clear_torch if gt==None else gt
        candidates = {'dep': dep, 'dep_clear': dep_clear_torch, 'gt': gt, 'rgb': rgb, 'ip': dep_ip_torch}
        items = {
            key: val
            for key, val in candidates.items() if val is not None
        }
        if (self.args.debug_dp or self.args.test) and self.arg.dataset =='kitti-dc':
            items['d_path'] = paths

        return items

    def __len__(self):
        if self.args.toy_test:
            return self.args.toy_test_number
        else:
            try:
                return len(self.paths['gt'])
            except:
                return len(self.my_loader)
MyLoader:
class MyLoader():
    def __init__(self, root_path=''):
        self.root_path = root_path
        self.file_list = self.include_all_files()

    def include_all_files(self):
        velo_path = os.path.join(self.root_path, 'velodyne')
        all_files = os.listdir(velo_path)
        all_files.sort()

        all_files = [x[0:6] for x in all_files]

        return all_files

    def __len__(self):
        return len(self.file_list)

    def __getitem__(self, item):
        file_idx = self.file_list[item]
        # 读取kitti的基本信息
        file_image_path = os.path.join(self.root_path, 'image_2', file_idx + '.png')
        file_velo_path = os.path.join(self.root_path, 'velodyne', file_idx + '.bin')
        file_calib = os.path.join(self.root_path, 'calib', file_idx + '.txt')
        # 返回的是个Calibration的对象:初始化了P2,P3,Tr_velo2cam,R0
        calib = calibration_kitti.Calibration(file_calib)
        # 读取点云和img
        points = np.fromfile(str(file_velo_path), dtype=np.float32).reshape(-1, 4)
        # points = layer_point_discard(points, 0.9)
        image = np.array(io.imread(file_image_path), dtype=np.int32)
        image = image[:352, :1216]

        # 这里将点云
        rgb, depth = load_depth_input(calib, image, points)
2、投影并保存为虚拟点
这一块其实挺简单的,我们只需要找到预测出来深度图的位置,一般都挺明显的,例如:
outputf = net(samplef)里面保存着预测好的深度图,然后我们需要根据刚刚读取好的calib将深度图投影到3D空间中:
def save_depth_as_points(depth, idx, root_path, args):
file_idx = str(idx).zfill(6)
# 保存成png,同时也保存成bin文件
file_image_path = os.path.join(root_path, 'image_2', file_idx + '.png')
file_velo_path = os.path.join(root_path, 'velodyne', file_idx + '.bin')
file_calib = os.path.join(root_path, 'calib', file_idx + '.txt')
calib = calibration_kitti.Calibration(file_calib)
# ############################改动1:最最最重要!!!!!!calib修正####################################
# 这里calib不修正的话,会导致最后投影直接出问题。
calib.cv -= args.top_crop
# 读取lidar文件
lidar = np.fromfile(str(file_velo_path), dtype=np.float32).reshape(-1, 4)
# 读取图像信息
image = np.array(io.imread(file_image_path), dtype=np.int32)
# ###############################2、改动2:rgb这里要改成252#################################
# 这里千万千万不要改,如果把这个改成100:352,或者是:252就会出现img投影和depth投影不能完全重合的情况,具体看qq发的效果图
image = image[:352, :1216]
# #######################保存rgb####################
# paths_rgb = os.path.join(root_path, 'velodyne_depth')
# out_path_img = os.path.join(paths_rgb, file_idx + '_rgb.png')
# cv2.imwrite(out_path_img, image)
# 将lidar数据转换到相机
pts_rect = calib.lidar_to_rect(lidar[:, 0:3])
# 截取FOV视角的lidar点云
fov_flag = get_fov_flag(pts_rect, image.shape, calib)
lidar = lidar[fov_flag]
# lidar = layer_point_discard(lidar, 0.7)
# liar深度保存位置
paths = os.path.join(root_path, 'velodyne_depth_lrru')
if not os.path.exists(paths):
os.makedirs(paths)
# 文件格式
out_path = os.path.join(paths, file_idx + '.npy')
# ##############################2、改动2:这里也要改成252#################################333
depth = depth.squeeze(0).permute(1,2,0).cpu().detach().numpy()
# # ###############depth_img保存初始深度图####################
# root_path = '/media/xd/7fffee8d-7279-4e6a-80bf-7880ff37da7a/xyy/LRRU/vision/corrupted_image/'
# if not os.path.exists(root_path):
# os.makedirs(root_path)
# total_path = root_path + 'pre_init' + str(idx) + '.jpg'
# cv2.imwrite(total_path, depth)
#
# out_path_img = os.path.join(paths, file_idx + '.png')
# img = np.squeeze(depth)
# img = (img * 256).astype('uint16')
# cv2.imwrite(out_path_img, img)
# ######################保存最终合并gt信息的深度补全数据point#####################
# calib.cv -= args.top_crop
# calib.cu -= args.top_crop
# calib.fv -= args.top_crop
# 将深度图转换成voxel
final_points, new_lidar, new_p = depth2pointsrgbp(depth, image, calib, lidar)
# 保存成float16类型
final_points = final_points.astype(np.float16)
new_lidar = new_lidar.astype(np.float16)
# vision(final_points)
# vision(new_lidar)
# 保存成npy
np.save(out_path, final_points)
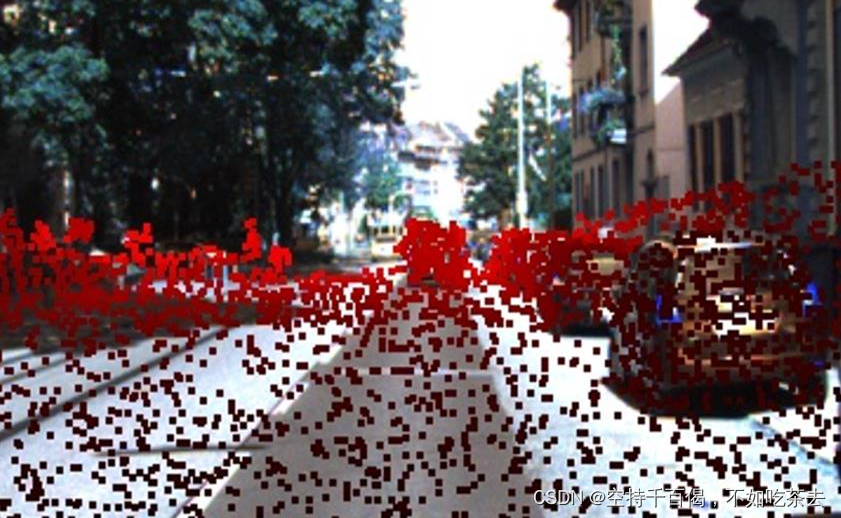
return len(final_points)最后可视化的结果如下: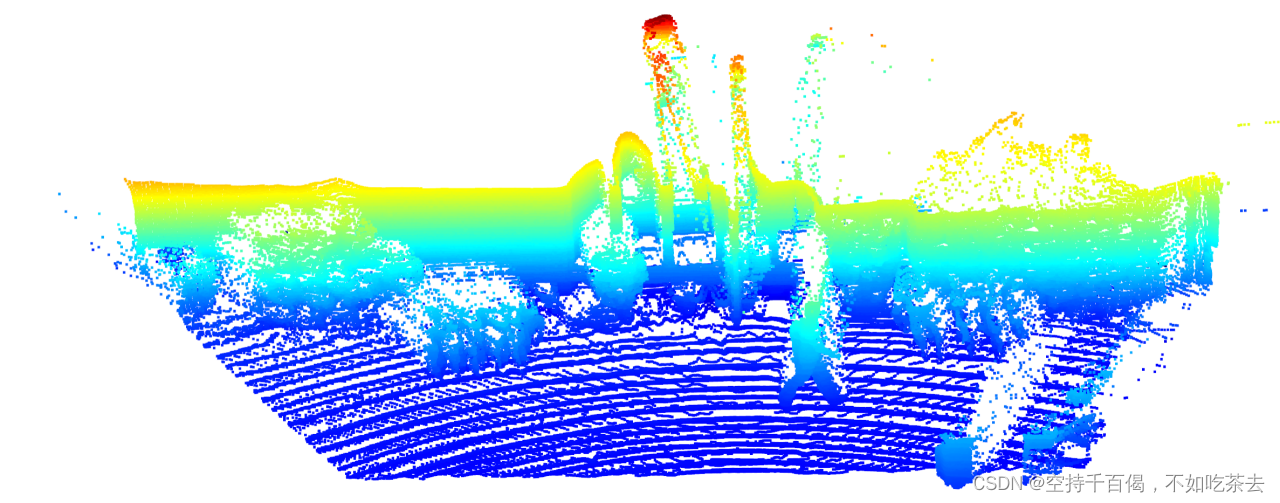
3、完整代码
完整的LRRU,TWISE,DySPN,PENet,CompletionFormer等各种补全生成虚拟点的方法会在我论文录用后开源。


 1060
1060

 被折叠的 条评论
为什么被折叠?
被折叠的 条评论
为什么被折叠?
 到【灌水乐园】发言


