


四十二、命名空间
有两个print函数它们有不同的函数签名,一个参数是string,一个参数是const char。若转变为两者都接受const char*,不使用命名空间可能会出现问题。
#include<iostream>
#include<string>

//namespace apple {

	void print(const char* text)
	{
		std::cout << text << std::endl;
	}
//}

//namespace orange {

	void print(const char* text)
	{
		std::string temp = text;
		std::reverse(temp.begin(), temp.end());
		std::cout << temp << std::endl;
	}
//}

int main()
{
	print("Hello");
	std::cin.get();
}
//按crtl+F7编译会报错,它告诉我们这个print函数参数是const char*的,已经有了函数体。我们有两个相同名字的符号,会产生编译或者链接错误。
- 命名空间的主要目的是避免命名冲突,类本身也是一种命名空间。
若apple有多个函数比如print_again,但只想单独引入print函数,可以使用using apple::print。
#include<iostream>
#include<string>

namespace apple {

	void print(const char* text)
	{
		std::cout << text << std::endl;
	}

	void print_again()
	{

	}
}

namespace orange {

	void print(const char* text)
	{
		std::string temp = text;
		std::reverse(temp.begin(), temp.end());
		std::cout << temp << std::endl;
	}
}

int main()
{
	using apple::print;

	print("Hello");

	apple::print_again();

	std::cin.get();
}
也可以给命名空间取别名;
int main()
{
	namespace a = apple; //a只存在于main函数的作用域下
	a::print("Hello");
	std::cin.get();
}
四十三、线程
使用线程类的所有东西需要thread头文件。
等待线程完成它的工作的方法是输入worker.join()。join的目的是在主线程上等待工作线程完成所有的执行后,再继续执行主线程,这意味着cin.get()代码不会运行。
#include<iostream>
#include<thread>

void DoWork()
{
}

int main()
{
	std::thread worker(DoWork); //工作线程
	worker.join();
	std::cin.get();
}
如下代码,按F5运行会一直打印Working…,再按回车会暂停打印,再按回车程序会结束。
#include<iostream>
#include<thread>

static bool s_Finished = false;

void DoWork()
{
	while (!s_Finished)
	{
		std::cout << "Working...\n";//等同于<<std::endl;
	}
}

int main()
{
	std::thread worker(DoWork);
	std::cin.get();   //暂停打印
	s_Finished = true;

	worker.join();
	std::cin.get();  //程序结束
}
若让线程每秒打印一次,需要引入命名空间std::literals::chrono_literals;
#include<iostream>
#include<thread>

static bool s_Finished = false;

void DoWork()
{
	using namespace std::literals::chrono_literals;
	//打印id
	std::cout << "Started thread id =" << std::this_thread::get_id() << std::endl;
	while (!s_Finished)
	{
		std::cout << "Working...\n";
		std::this_thread::sleep_for(1s); //暂停一秒
		//this_thread可以用来给当前线程下达命令,也可以打印这个线程的id。
	}

}

int main()
{
	std::thread worker(DoWork);
	std::cin.get();
	s_Finished = true;
	worker.join();
	//打印id
	std::count<<"Started thread id = "<<std::this_thread::get_id()<<std::endl;

	std::cin.get();
}
四十四、计时
C++11后有chrono,它是C++库的一部分,不需要去使用操作系统库。 但是在这之前如果想要一个非常精确的计时器,那么需要使用操作系统库。例如Windows中有QueryPerformanceCounter,事实上如果想要更多地控制计时,控制CPU的计时能力,那么你可能会使用平台特定的库。
#include <iostream>
#include <chrono>
#include <thread>

int main()
{
	using namespace std::literals::chrono_literals;

	auto start = std::chrono::high_resolution_clock::now(); // 当前时间
	std::this_thread::sleep_for(1s);
	auto end = std::chrono::high_resolution_clock::now();

	std::chrono::duration<float> duration = end - start;
	std::cout << duration.count() << "s " << std::endl;

	std::cin.get();
}
std::endl因为某些原因非常慢,处于优化换成\n,并且包装一个结构体:
#include <iostream>
#include <chrono>
#include <thread>

struct Timer
{
	std::chrono::time_point<std::chrono::steady_clock> start, end;
	std::chrono::duration<float> duration = end - start;

	Timer()
	{
		start = std::chrono::high_resolution_clock::now();
	}

	~Timer()
	{
		end = std::chrono::high_resolution_clock::now();
		duration = end - start;

		float ms = duration.count() * 1000.0f;
		std::cout << "Timer took " << ms << "ms" << std::endl;
	}
};

void Function()
{
	Timer timer;

	for (int i = 0; i < 100; i++)
	{
		std::cout << "Hello!\n";//优化
	}
}

int main()
{
	Function();
	std::cin.get();
}
四十五、多维数组
多维数组实际上是数组的集合,可以用指针处理数组。如下代码从堆分配简单的数组。array[0]是一个int,a2d[0]是int指针。
#include<iostream>

int main()
{
	int* array = new int[50]; //分配200个字节内存

	//指向指针集合的指针
	int** a2d = new int* [50]; // 分配50个int*,用空间来存储50个int指针。

	std::cin.get();
}
我们可以遍历并设置每个指针指向一个数组,就有了一个包含50个数组的内存位置的数组,这就是二维数组。
#include<iostream>

int main()
{
	int** a2d = new int* [50];
	for (int i = 0; i < 50;i++)
		a2d[i] = new int[50]; //数组中的每个位置都存在a2d数组中
	std::cin.get();
}
三维数组:
#include<iostream>

int main()
{
	int*** a3d = new int**[50];

	for (int i = 0;i < 50;i++)
	{
		a3d[i] = new int*[50]; //指针数组
		{
			for (int j = 0;j < 50;j++)
			{
				int** ptr = a3d[i];
				ptr[j] = new int[50]; 设置每个指针等于一个数组,int是实际类型分配
			   //或者 a3d[i][j] = new int[50];
			}
		}
	}
	std::cin.get();
}
因为是堆分配,所以需要遍历它们然后delete所有的数组,不能一次delete就搞定。若只删除一次会造成内存泄漏,50个数组的数据无法被访问,因为删除了保存这些指针的数组。
#include<iostream>

int main()
{
	int** a2d = new int* [50];
	for (int i = 0; i < 50;i++)
		a2d[i] = new int[50];

	for (int i = 0; i < 50;i++)
		delete[] a2d[i];

	delete[] a2d;  //若只删除一次

	std::cin.get();
}
四十六、排序
std::sort是C++内置的排序函数,可以为任何类型的迭代器执行排序。
我们需要给它提供一个开始迭代器和结束迭代器,迭代器内的所有东西都会被排序,基于我们提供的某个谓词排序,需要头文件algorithm。若想对vector做升序排列,传入起始的values.begin()和结束的values.end(),可以不提供任何谓词,对于整数它会默认按升序排列。
#include<iostream>
#include<vector>
#include<algorithm>//sort在此头文件中

int main()
{
	std::vector<int>  values = {3, 5, 1, 4, 2};

	std::sort(values.begin(), values.end());

	for (int value : values)
			std::cout << value << std::endl;

	std::cin.get();
}
我们可以通过传递一个函数让它按照某种方式进行排序,即可以是创建的结构体函数,也可以是lambda。或者使用内置函数,添加头文件functional,使用std::greater,会按照从大到小顺序排列。
#include<iostream>
#include<vector>
#include<algorithm>
#include<functional>

int main()
{
	std::vector<int>  values = {3, 5, 1, 4, 2};

	std::sort(values.begin(), values.end(),std::greater<int>()); //使用内置函数

	for (int value : values)
			std::cout << value << std::endl;

	std::cin.get();
}
可以设一个普通的lambda:[ ](int a,int b);给它提供一个函数,若传入的第一个参数排在前面则返回true,a < b则按升序排列。
#include<iostream>
#include<vector>
#include<algorithm>
#include<functional>

int main()
{
	std::vector<int>  values = {3, 5, 1, 4, 2};

	std::sort(values.begin(), values.end(), [](int a, int b)
	{
			return a < b;
	});

	for (int value : values)
	std::cout << value << std::endl;

	std::cin.get();
}
我们想把1排到最后,若a是第一个值,则把它移到后面去,我们返回false,不希望它在b前。如果b==1,我们希望a在前面,要返回true。
#include <iostream>
#include <vector>
#include <algorithm>

int main()
{
	std::vector<int> values = { 3, 5, 1, 4, 2 };
	std::sort(values.begin(), values.end(), [](int a, int b)
	{
		// 返回true意味着a排在前面

		// 1 排在末尾
		if (a == 1)
			return false;
		if (b == 1)
			return true;

		// 剩下的从小到大排
		return a < b;
	});

	for (int value : values)
		std::cout << value << std::endl;

	std::cin.get();
}
四十七、类型双关
类型双关(type punning)只是一个花哨的术语,用来在C++中绕过类型系统。
C++是一个强类型语言,也就是说我们有一个类型系统。而像JavaScript就没有变量类型的概念。
然而,C++的这种类型系统并不像在其他语言中那样强制,比如Java,它们的类型很难绕开,包括C#也是,你虽然也可以绕开类型系统,但要做更多的工作。在C++中虽然类型是由编译器强制执行的,但你可以直接访问内存。
把一个int型的内存,换成double去解释,当然这样做很糟糕,因为添加了四字节不属于原本自己的内存,只是作为演示。
#include <iostream>

int main()
{
	int a = 50;
	//取地址,换成对应类型的指针,再解引用
	double value = *(double*)&a;
	std::cout << value << std::endl;

	std::cin.get();
}
而如果只是想针对int的这四个字节,就可以用引用,而不是拷贝成一个新的变量:
#include <iostream>

int main()
{
	int a = 50;
	double& value = *(double*)&a;//value是引用的a
	std::cout << value << std::endl;

	std::cin.get();
}
四十八、联合体
联合体有点像类类型,或者结构体类型。只不过它一次只能占用一个成员的内存。若我们有一个结构体声明了4个浮点数,则有16个字节在这个结构体中。若用联合体声明声明4个浮点数,联合体的大小仍然是4个字节。
可以像使用结构体或者类一样使用它们,也可以给它添加静态函数或者普通函数、方法等待。然而你不能使用虚方法,还有其他一些限制。但通常人们用联合体来做的事情,是和类型双关紧密相关的。通常union是匿名使用的,但是匿名union不能含有成员函数。
#include <iostream>

int main()
{
	struct Union
	{
		union
		{
			float a;
			int b;
		};
	};

	Union u;
	u.a = 2.0f;
	std::cout << u.a << ", " << u.b << std::endl;

	std::cin.get();
}
#include<iostream>

struct Vector2
{
	float x, y;
};

struct Vector4
{
	float x, y, z, w;

	Vector2& GetA()//联合
	{
		return *(Vector2*)&x;
	}
};

void PrintVector2(const Vector2& vector)
{
	std::cout << vector.x << "," << vector.y << std::endl;
}
int main()
{
	std::cin.get();
}
Vector4实际上是2个Vector2,所以构造一个Vector2,给它一些参数,返回整个对象,但是这会创建一个全新的对象,所以可以返回一个指向Vector2的引用,引用的x是一个类型双关的版本,我们要做的就是把x的内存地址转换成Vector2,然后解引用。
另一种方法是使用union,这是一个匿名union,因为union只有一个成员,所以x,y,z,w会占用相同的空间,我们把它包装在一个匿名结构体中。现在这个结构体是union的一个成员,这是一个16字节的结构体。我们创建一个Vector4,可以正常访问vector.x并把它设为2.0f。
#include<iostream>

struct Vector2
{
	float x, y;
};

struct Vector4
{
	union//匿名union
	{
		struct//匿名结构体
		{
			float x, y, z, w;
		};
	};
};

void PrintVector2(const Vector2& vector)
{
	std::cout << vector.x << "," << vector.y << std::endl;
}

int main()
{
	Vector4 vector = { 1.0f,2.0f,3.0f,4.0f };
	vector.x = 2.0f;
	std::cin.get();
}
若继续创建一个结构体,向union添加了第二个成员,它和第一个元素占据相同的空间,它有两个Vector2组成。
struct Vector2
{
	float x, y;
};

struct Vector4
{
	union
	{
		struct
		{
			float x, y, z, w;
		};

		struct
		{
			Vector2 a, b;
		};
	};
};
现在有几种访问Vector4内数据的方法,可以用xywz或者ab,a和xy的内存是一样的,b和zw的内存一样。如下代码:
int main()
{
	Vector4 vector = { 1.0f,2.0f,3.0f,4.0f };
	PrintVector2(vector.a);
	PrintVector2(vector.b);
	vector.z = 500.0f;
	std::cout << "------------------" << std::endl;
	PrintVector2(vector.a);
	PrintVector2(vector.b);
	vector.x = 2.0f;
	std::cin.get();
}
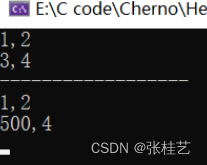
虽然没有碰过vector里b的部分,设置的是z=500,但它们占用了相同的内存。
四十九、虚析构函数
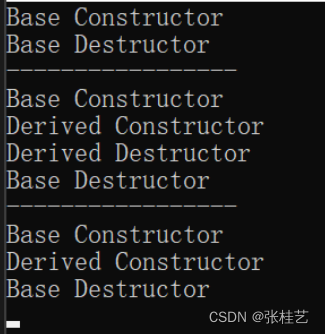
只要你允许一个类拥有子类,就一定要把析构函数写成虚函数,否则没人能安全地扩展这个类。
如果用基类指针来引用派生类对象,那么基类的析构函数必须是 virtual 的,否则 C++ 只会调用基类的析构函数,不会调用派生类的析构函数。
#include <iostream>

class Base
{
public:
	Base() { std::cout << "Base Constructor\n"; }
	virtual ~Base() { std::cout << "Base Destructor\n"; }//基类的析构函数必须是 virtual (虚)的
};

class Derived : public Base//Base的子类
{
public:
	Derived() { m_Array = new int[5]; std::cout << "Derived Constructor\n"; }
	~Derived() { delete[] m_Array; std::cout << "Derived Destructor\n"; }
private:
	int* m_Array;
};

int main()
{
	Base* base = new Base();
	delete base;
	std::cout << "------------------------\n";
	Derived* derived = new Derived();
	delete derived;
	std::cout << "------------------------\n";
	Base* poly = new Derived();
	delete poly;

	std::cin.get();
}
五十、类型转换
这里的类型转换是指在C++可用的类型系统中进行的类型转换;类型转换分为隐式和显示。
//隐式转换
int a = 5;
double value = a;

double value=5.25;
int a=value;

//显示转换
double value=5.25;
int a=(int)value;

double value=5.25;
double a=(int)value+5.3;//a=10.3,会截value掉小数的0.25
//double a=(int)(value+5.3);//a=10

//还可以用C++的方式cast,这里使用static_cast(静态类型转换)。
double s=static_cast<int>(value)+5.3;
C++风格,四种主要的cast:
static_cast、reinterpret_cast、dynamic_cast、const_cast共四种主要的cast。(它们可能会做其他的事情,但是实际的结果也只是一个成果的类型转换而已)
- 静态类型转换的情况下(static_cast),它们还会做一些其他的编译时检查,看看这种转换是否真的可能;
- reinterpret_cast则如单词reinterpret的重新解释意思一样,联系类型双关;
- const_cast,移除或者添加变量的const限定。
搞这么多cast的好处是,除了可能收到的那些编译时检查以外,还可以在代码库中搜索它们。
对于dynamic_cast,示例:
#include <iostream>

class Base
{
public:
	Base() { }
	virtual ~Base() { }
};

class Derived : public Base
{
public:
	Derived() { }
	~Derived() { }
};

class AnotherClass : public Base
{
public:
	AnotherClass() { }
	~AnotherClass() { }
};

int main()
{
	Derived* derived = new Derived();

	Base* base = derived;

	std::cin.get();
}
我们看到,有Derived和AnotherClass同时继承Base,通过Base* base = derived;我们有了base指针,那么有了这个指针后,我们怎样判定这个指针是一个Derived的实例呢还是一个AnotherClass类的实例呢?
这时候用dynamic_cast,它做的就不仅是问这个问题,而且还会尝试去做转换,如果失败还会做一些事情。
#include <iostream>

class Base
{
public:
	Base() { }
	virtual ~Base() { }
};

class Derived : public Base
{
public:
	Derived() { }
	~Derived() { }
};

class AnotherClass : public Base
{
public:
	AnotherClass() { }
	~AnotherClass() { }
};

int main()
{
	Derived* derived = new Derived();

	Base* base = derived;

	AnotherClass* ac = dynamic_cast<AnotherClass*>(base);
	if (ac)
	{
		std::cout << "This is the AnotherClass" << std::endl;
	}
	else
	{
		std::cout << "This is the Derived" << std::endl;
	}

	std::cin.get();
}
比如这里,我们知道base其实是一个Derived指针,因此这里dynamic_cast<AnotherClass*>(base)会失败,得到的ac就会是nullptr,因此会打印This is the Derived。
所以dynamic_cast是一个很好的方法,来查看转换是否成功。它与运行时类型信息RTTI(runtime type information)紧密联系。它会做运行时检查。


 489
489


 被折叠的 条评论
为什么被折叠?
被折叠的 条评论
为什么被折叠?
 到【灌水乐园】发言


