


上文我们已经依据Xilinx的官方代码讨论了Axi full master模块中我们要如何写端口信号,辅助信号的驱动逻辑,并以axi master的视角找出他们的规律
Axi_full Xilinx 学习笔记(二)-CSDN博客
本文我们聊点,可以实际应用的,让我们关注一下如何以最快的方法最少的改动,设计一个自己的axi full master 并把用户逻辑的数据写入。
由于本文是以我上学时的设计经验出发,“学术”嘛!这个东西可不考虑鲁棒性,规范性,主要能运行,管你是否优雅。只要改的最少,自己别搞得太复杂就行了。所以如果,有大佬觉得不够优雅,请勿喷。 哈哈哈哈哈哈哈哈哈哈哈!
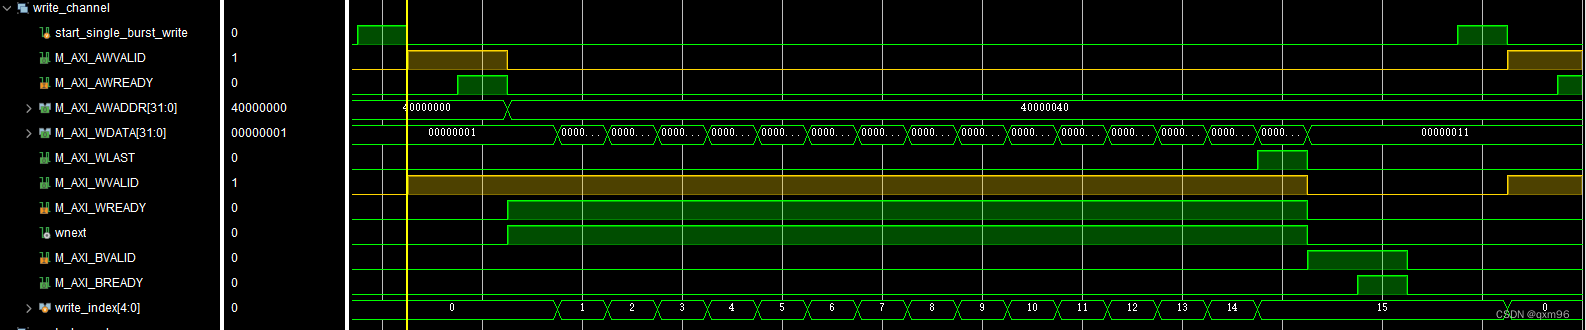
由于上篇文章讨论了,axi full master的端口驱动逻辑 那我就直接放一张 仿真的时序
写通道时序
读通道时序

-
一 总结一下这些时序图
1.写通道
- start_single_burst_write:这是一个脉冲信号,维持一个时钟拉高就置零(他直接驱动了一个写周期)
- awaddr再一次写地址通道握手并读取数据之后,直接加一个burst_len,产生新的数据为下一个写周期走准备
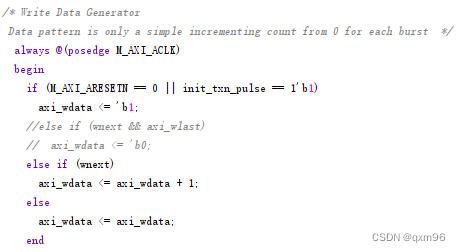
- wdata(最重要的)我们发现再xilinx的官方代码中,再awready置零之后的每个时钟更新一个数据写入从机。下方是xilinx官方代码的data gen部分只要 wnext 拉高我们就可以把新的数据写入从机。
那知道了这些我们就好办了
我通常是,在axi_full_master的模块中引出rd_en,和一个fifo
assign rd_en=awready || wnext && ~wlast;
这样我们就实现了 维持16个clk拉高,且比wnext提前一个时钟拉高(为什么提前一个时钟?因为FIFO的读出延迟)。另外,我们只需要把fifo的写入端口与自己的逻辑模块连接,这样我们就实现了把我们的数据 在最少改动官方代码的前提下,就把数据写入axi_full_master,进而写入axi_full_slave设备里面。
2.读通道
- start_single_burst_read也是一个脉冲信号 (我们就不说了)
- rnext和rdata是我们要关心的 他们时101010转换的 但这些特点我们也不用管。最简单的做法是我们 引入一个fifo,把din接到rdata,把wr_en接到rnext。
这里我们就可以轻松的把从axi_full_slave从设备中的数据存入fifo里面我们再把fifo的读出接口接到用户逻辑的模块里面就可以实现
最后一点我们可能要对官方代码修改的就是FSM
always @ ( posedge M_AXI_ACLK)
	  begin
	    if (M_AXI_ARESETN == 1'b0 )
	      begin
	        // reset condition
	        // All the signals are assigned default values under reset condition
	        mst_exec_state      <= IDLE;
	        start_single_burst_write <= 1'b0;
	        start_single_burst_read  <= 1'b0;
	        compare_done      <= 1'b0;
	        ERROR <= 1'b0;
	      end
	    else
	      begin

	        // state transition
	        case (mst_exec_state)

	          IDLE:
	            // This state is responsible to wait for user defined C_M_START_COUNT
	            // number of clock cycles.
	            if ( init_txn_pulse == 1'b1)
	              begin
	                mst_exec_state  <= INIT_WRITE;
	                ERROR <= 1'b0;
	                compare_done <= 1'b0;
	              end
	            else
	              begin
	                mst_exec_state  <= IDLE;
	              end

	          INIT_WRITE:
	            // This state is responsible to issue start_single_write pulse to
	            // initiate a write transaction. Write transactions will be
	            // issued until burst_write_active signal is asserted.
	            // write controller
	            if (writes_done)
	              begin
	                mst_exec_state <= INIT_READ;//
	              end
	            else
	              begin
	                mst_exec_state  <= INIT_WRITE;

	                if (~axi_awvalid && ~start_single_burst_write && ~burst_write_active)
	                  begin
	                    start_single_burst_write <= 1'b1;
	                  end
	                else
	                  begin
	                    start_single_burst_write <= 1'b0; //Negate to generate a pulse
	                  end
	              end

	          INIT_READ:
	            // This state is responsible to issue start_single_read pulse to
	            // initiate a read transaction. Read transactions will be
	            // issued until burst_read_active signal is asserted.
	            // read controller
	            if (reads_done)
	              begin
	                mst_exec_state <= INIT_COMPARE;
	              end
	            else
	              begin
	                mst_exec_state  <= INIT_READ;

	                if (~axi_arvalid && ~burst_read_active && ~start_single_burst_read)
	                  begin
	                    start_single_burst_read <= 1'b1;
	                  end
	               else
	                 begin
	                   start_single_burst_read <= 1'b0; //Negate to generate a pulse
	                 end
	              end

	          INIT_COMPARE:
	            // This state is responsible to issue the state of comparison
	            // of written data with the read data. If no error flags are set,
	            // compare_done signal will be asseted to indicate success.
	            //if (~error_reg)
	            begin
	              ERROR <= error_reg;
	              mst_exec_state <= IDLE;
	              compare_done <= 1'b1;
	            end
	          default :
	            begin
	              mst_exec_state  <= IDLE;
	            end
	        endcase
	      end
	  end //MASTER_EXECUTION_PROC
我们只要让 init_write之后转入init_read 在把init_read 转入init_write 一直循环就好。这就简单了。
这些小的改动就足够先让自己的axi_full跑起来了。虽然简陋我们只需要 slave,master 两个fifo做跨时钟域,这自然不能和高级的优雅的代码相比,但是我们只要稍微改改 甚至我们不考虑axi时序就可以把这个代码跑起来。对于一些简单的工程 例如应付学术,简单嘛,不磕碜~~~~~
希望大家留言,有没有什么更加简单的axi操作方法 欢迎交流。


 45
45

 被折叠的 条评论
为什么被折叠?
被折叠的 条评论
为什么被折叠?
 到【灌水乐园】发言


