


参考源码:
https://github.com/ultralytics/yolov5/tree/v5.0
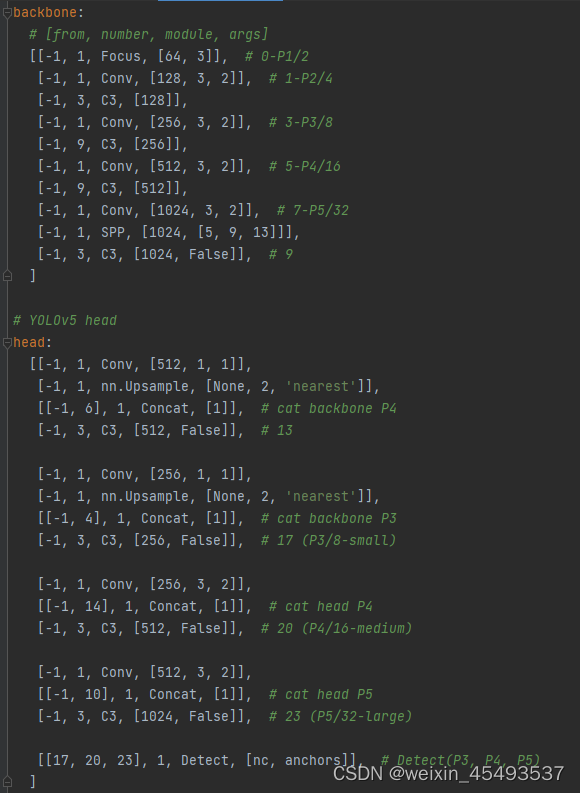
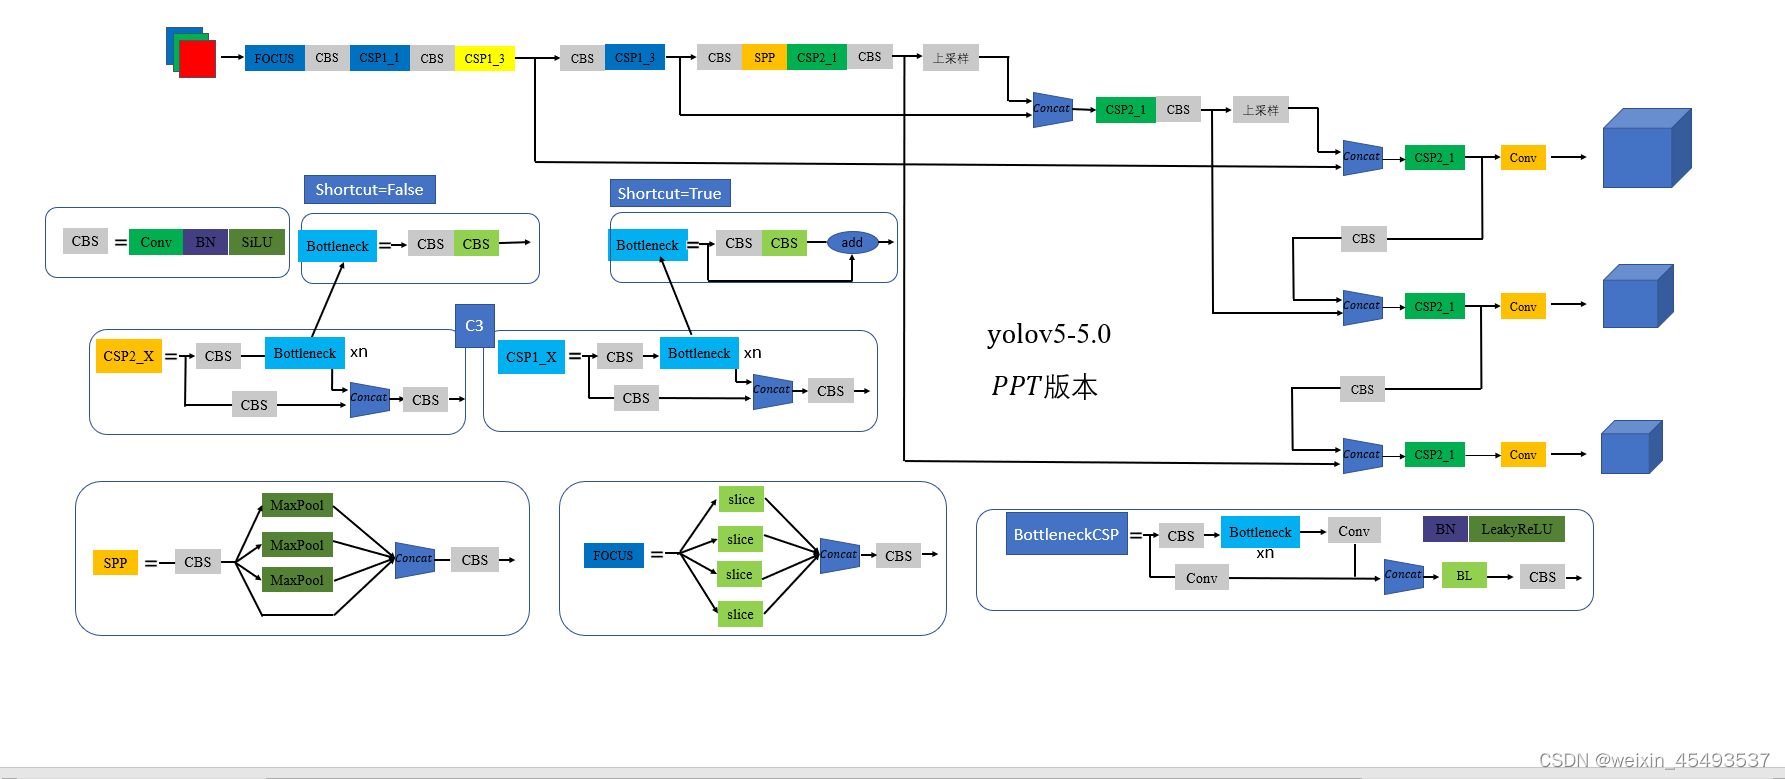
整体网络结构
网络结构通过yaml文件配置,包括yolov5s.yaml,yolov5m.yaml,yolov5l.yaml,yolov5x.yaml(depth_multiple影响网络层数, width_multiple影响channels大小)
| model scale | depth_multiple | width_multiple |
|---|---|---|
| yolov5s.yaml | 0.33 | 0.50 |
| yolov5m.yaml | 0.67 | 0.75 |
| yolov5l.yaml | 1.0 | 1.0 |
| yolov5x.yaml | 1.33 | 1.25 |
在这位大佬提供的PPT画图上修改,确实自己画图很麻烦。https://blog.csdn.net/zhangdaoliang1/article/details/122301031
构建数据集
(1)Mosaic数据增强
def load_mosaic(self, index):
    # loads images in a 4-mosaic
    labels4, segments4 = [], []
    s = self.img_size
    #在没有进行Augment之前,图像会变成img_size的两倍,yc, xc 为mosaic中心点
    #random.uniform随机生成上述范围的实数(即一半img_size到1.5倍img_size)
    yc, xc = [int(random.uniform(-x, 2 * s + x)) for x in self.mosaic_border]  # mosaic center x, y
    indices = [index] + random.choices(self.indices, k=3)  # 3 additional image indices
    #random.choices随机生成另外3张图片的索引,然后把索引合并到indices
    for i, index in enumerate(indices):
        # Load image 遍历加载图像,如果图像的长边不是img_size大小,会将长边缩放到img_size,短边等比例缩放
        img, _, (h, w) = load_image(self, index)

        # place img in img4 放置每一张图
        if i == 0:  # top left
            img4 = np.full((s * 2, s * 2, img.shape[2]), 114, dtype=np.uint8)  # base image with 4 tiles
            #获得大图上的位置
            x1a, y1a, x2a, y2a = max(xc - w, 0), max(yc - h, 0), xc, yc  # xmin, ymin, xmax, ymax (large image)
            #选取原图上的位置
            x1b, y1b, x2b, y2b = w - (x2a - x1a), h - (y2a - y1a), w, h  # xmin, ymin, xmax, ymax (small image)
        elif i == 1:  # top right
            x1a, y1a, x2a, y2a = xc, max(yc - h, 0), min(xc + w, s * 2), yc
            x1b, y1b, x2b, y2b = 0, h - (y2a - y1a), min(w, x2a - x1a), h
        elif i == 2:  # bottom left
            x1a, y1a, x2a, y2a = max(xc - w, 0), yc, xc, min(s * 2, yc + h)
            x1b, y1b, x2b, y2b = w - (x2a - x1a), 0, w, min(y2a - y1a, h)
        elif i == 3:  # bottom right
            x1a, y1a, x2a, y2a = xc, yc, min(xc + w, s * 2), min(s * 2, yc + h)
            x1b, y1b, x2b, y2b = 0, 0, min(w, x2a - x1a), min(y2a - y1a, h)

        img4[y1a:y2a, x1a:x2a] = img[y1b:y2b, x1b:x2b]  # img4[ymin:ymax, xmin:xmax]
        padw = x1a - x1b
        padh = y1a - y1b

        # Labels
        labels, segments = self.labels[index].copy(), self.segments[index].copy()
        if labels.size:
        #计算mosaic增强后的标签的位置
            labels[:, 1:] = xywhn2xyxy(labels[:, 1:], w, h, padw, padh)  # normalized xywh to pixel xyxy format
            segments = [xyn2xy(x, w, h, padw, padh) for x in segments]
        labels4.append(labels)
        segments4.extend(segments)

    # Concat/clip labels
    labels4 = np.concatenate(labels4, 0)
    for x in (labels4[:, 1:], *segments4):
        np.clip(x, 0, 2 * s, out=x)  # clip when using random_perspective()
    # img4, labels4 = replicate(img4, labels4)  # replicate

    # Augment
    #进行mosaic的时候将四张图片整合到一起之后shape为[2*img_size,2*img_size]
    #对mosaic整合的图片进行随机旋转、平移、缩放、裁剪,并resize为输入大小img_size
    img4, labels4 = random_perspective(img4, labels4, segments4,
                                       degrees=self.hyp['degrees'],
                                       translate=self.hyp['translate'],
                                       scale=self.hyp['scale'],
                                       shear=self.hyp['shear'],
                                       perspective=self.hyp['perspective'],
                                       border=self.mosaic_border)  # border to remove

    return img4, labels4
构建标签
    def build_targets(self, p, targets):
    	#targets是经过数据增强(mosaic等)后总的bbox,维度[num_box, 6]
    	#具体为(batch_img_index, class, x , y, w, h)
        # Build targets for compute_loss(), input targets(image,class,x,y,w,h)
        na, nt = self.na, targets.shape[0]  # number of anchors, targets
        tcls, tbox, indices, anch = [], [], [], []
        gain = torch.ones(7, device=targets.device)  # normalized to gridspace gain
        #每一个锚点可以匹配三个锚框,具体为对应那个锚框的下标
        ai = torch.arange(na, device=targets.device).float().view(na, 1).repeat(1, nt)  # same as .repeat_interleave(nt)
        #相当于将targets复制3份,每一份对应一个anchor下标,所以合并后的维度为
        [3,num_targets, 7]
        targets = torch.cat((targets.repeat(na, 1, 1), ai[:, :, None]), 2)  # append anchor indices
        g = 0.5  # bias
        off = torch.tensor([[0, 0],
                            [1, 0], [0, 1], [-1, 0], [0, -1],  # j,k,l,m
                            # [1, 1], [1, -1], [-1, 1], [-1, -1],  # jk,jm,lk,lm
                            ], device=targets.device).float() * g  # offsets

        for i in range(self.nl):
        	# 获得对应特征图的3个锚框,维度为[3, 2]
        	# 3个特征层,选择其中一层对应的anchor(8, 16, 32)
            anchors = self.anchors[i]
            gain[2:6] = torch.tensor(p[i].shape)[[3, 2, 3, 2]]  # xyxy gain

            # Match targets to anchors 将targets调整到特征层尺度大小(cx, cy, w, h)
            t = targets * gain
            if nt:
                # Matches
                 #j 代表每一个真实框和每一个先验框的宽高的比值的最大值是
                 #否满足小于anchor_t阈值,过滤掉不满足的
                r = t[:, :, 4:6] / anchors[:, None]  # wh ratio
                j = torch.max(r, 1. / r).max(2)[0] < self.hyp['anchor_t']  # compare
                # j = wh_iou(anchors, t[:, 4:6]) > model.hyp['iou_t']  # iou(3,n)=wh_iou(anchors(3,2), gwh(n,2))
                t = t[j]  # filter

                # Offsets
                # 以上每个gt框可以增加3个anchor预测
                # 一个是gt box中心点所在方格,另两个是中心点离的最近的两个方格
                # top_left  gt框中心点的小数部分Cx<g, Cy<g
                # bottle_left  gt框中心点的小数部分Cx<g, Cy>g
                # bottle_right  gt框中心点的小数部分Cx>g, Cy>g
                # top_right  gt框中心点的小数部分Cx>g, Cy<g
                gxy = t[:, 2:4]  # grid xy
                #图像左上角为原点的坐标变换为以图像右下角为原点的坐标。
                gxi = gain[[2, 3]] - gxy  # inverse
                j, k = ((gxy % 1. < g) & (gxy > 1.)).T
                l, m = ((gxi % 1. < g) & (gxi > 1.)).T
                j = torch.stack((torch.ones_like(j), j, k, l, m))
                # 筛选出满足条件的gt_bbox
                t = t.repeat((5, 1, 1))[j]
                #后面求正样本对应的中心点坐标
                offsets = (torch.zeros_like(gxy)[None] + off[:, None])[j]
            else:
                t = targets[0]
                offsets = 0

            # Define
            b, c = t[:, :2].long().T  # image, class
            gxy = t[:, 2:4]  # grid xy
            gwh = t[:, 4:6]  # grid wh
            gij = (gxy - offsets).long()
            # 获取正样本的中心点位置
            gi, gj = gij.T  # grid xy indices

            # Append
            a = t[:, 6].long()  # anchor indices
            indices.append((b, a, gj.clamp_(0, gain[3] - 1), gi.clamp_(0, gain[2] - 1)))  # image, anchor, grid indices
            tbox.append(torch.cat((gxy - gij, gwh), 1))  # box 此处构造的box为(dxc, dyc, w, h)
            anch.append(anchors[a])  # anchors
            tcls.append(c)  # class

        return tcls, tbox, indices, anch
NMS非极大值抑制
def non_max_suppression(prediction, conf_thres=0.25, iou_thres=0.45, classes=None, agnostic=False, multi_label=False, labels=()):
    """Runs Non-Maximum Suppression (NMS) on inference results

    Returns:
    prediction [batch, 25200, 85]
         list of detections, on (n,6) tensor per image [xyxy, conf, cls]
    """
	# 获得类别数
    nc = prediction.shape[2] - 5  # number of classes
    # 筛选满足置信度条件的
    xc = prediction[..., 4] > conf_thres  # candidates

    # Settings
    min_wh, max_wh = 2, 4096  # (pixels) minimum and maximum box width and height
    max_det = 300  # maximum number of detections per image
    max_nms = 30000  # maximum number of boxes into torchvision.ops.nms()
    time_limit = 10.0  # seconds to quit after
    redundant = True  # require redundant detections
    #每个box可以有多个label(多标签)
    multi_label &= nc > 1  # multiple labels per box (adds 0.5ms/img)
    merge = False  # use merge-NMS

    t = time.time()
    # 新建一个list 包含batchsize个空的output tensor
    output = [torch.zeros((0, 6), device=prediction.device)] * prediction.shape[0]
    # 一张图片一张图片的处理
    for xi, x in enumerate(prediction):  # image index, image inference
        # Apply constraints
        # x[((x[..., 2:4] < min_wh) | (x[..., 2:4] > max_wh)).any(1), 4] = 0  # width-height
        # 获取满足置信度条件的框
        x = x[xc[xi]]  # confidence

        # Cat apriori labels if autolabelling
        if labels and len(labels[xi]):
            l = labels[xi]
            v = torch.zeros((len(l), nc + 5), device=x.device)
            v[:, :4] = l[:, 1:5]  # box
            v[:, 4] = 1.0  # conf
            v[range(len(l)), l[:, 0].long() + 5] = 1.0  # cls
            x = torch.cat((x, v), 0)

        # If none remain process next image
        if not x.shape[0]:
            continue

        # Compute conf
        x[:, 5:] *= x[:, 4:5]  # conf = obj_conf * cls_conf

        # Box (center x, center y, width, height) to (x1, y1, x2, y2)
        box = xywh2xyxy(x[:, :4])

        # Detections matrix nx6 (xyxy, conf, cls)
        if multi_label:
        #每个预测框所属的类别置信度大于阈值的
        # 假设conf_thres=0.4
        #       class1         class2            class3
        #框1   0.5(True)   0.3(False)         0.6(True)
        #框2   0.3(False)   0.5(True)         0.7(True)
        # i=0, 0, 1, 1  j=0,2,1,2
        # (框1 0.5 class1) (框1 0.6 class3)(框2 0.5 class2) (框2 0.7 class3)

            i, j = (x[:, 5:] > conf_thres).nonzero(as_tuple=False).T
            x = torch.cat((box[i], x[i, j + 5, None], j[:, None].float()), 1)
        else:  # best class only
            conf, j = x[:, 5:].max(1, keepdim=True)
            x = torch.cat((box, conf, j.float()), 1)[conf.view(-1) > conf_thres]

        # Filter by class
        if classes is not None:
            x = x[(x[:, 5:6] == torch.tensor(classes, device=x.device)).any(1)]

        # Apply finite constraint
        # if not torch.isfinite(x).all():
        #     x = x[torch.isfinite(x).all(1)]

        # Check shape
        n = x.shape[0]  # number of boxes
        if not n:  # no boxes
            continue
        elif n > max_nms:  # excess boxes
            x = x[x[:, 4].argsort(descending=True)[:max_nms]]  # sort by confidence

        # Batched NMS
        #将两个类别所对应的目标框距离加大,使得各个类别之间做非极大值抑制相互不受影响
        # 这里就是将所有类别放在一起抑制,将每一个类别乘上一个max_wh

        c = x[:, 5:6] * (0 if agnostic else max_wh)  # classes
        boxes, scores = x[:, :4] + c, x[:, 4]  # boxes (offset by class), scores
        i = torchvision.ops.nms(boxes, scores, iou_thres)  # NMS
        if i.shape[0] > max_det:  # limit detections
            i = i[:max_det]
        if merge and (1 < n < 3E3):  # Merge NMS (boxes merged using weighted mean)
            # update boxes as boxes(i,4) = weights(i,n) * boxes(n,4)
            iou = box_iou(boxes[i], boxes) > iou_thres  # iou matrix
            weights = iou * scores[None]  # box weights
            x[i, :4] = torch.mm(weights, x[:, :4]).float() / weights.sum(1, keepdim=True)  # merged boxes
            if redundant:
                i = i[iou.sum(1) > 1]  # require redundancy

        output[xi] = x[i]
        if (time.time() - t) > time_limit:
            print(f'WARNING: NMS time limit {time_limit}s exceeded')
            break  # time limit exceeded

    return output
计算AP
def ap_per_class(tp, conf, pred_cls, target_cls, plot=False, save_dir='.', names=()):
    """ Compute the average precision, given the recall and precision curves.
    Source: https://github.com/rafaelpadilla/Object-Detection-Metrics.
    # Arguments
    	#这里的n是所有test 图像的预测框总和
        tp:  True positives (nparray, nx1 or nx10).
        conf:  Objectness value from 0-1 (nparray).
        pred_cls:  Predicted object classes (nparray).
        target_cls:  True object classes (nparray).
        plot:  Plot precision-recall curve at mAP@0.5
        save_dir:  Plot save directory
    # Returns
        The average precision as computed in py-faster-rcnn.
    """

    # Sort by objectness
    # 降序排列
    i = np.argsort(-conf)
    tp, conf, pred_cls = tp[i], conf[i], pred_cls[i]  # 将conf降序排列,同时将pred_cls和tp也按对应次序重排

    # Find unique classes
    #不同的类别数
    unique_classes = np.unique(target_cls)
    # 有多少类别
    nc = unique_classes.shape[0]  # number of classes, number of detections

    # Create Precision-Recall curve and compute AP for each class
    px, py = np.linspace(0, 1, 1000), []  # for plotting
    #ap的shape(classes, 10), p, r(classes, 1000)
    ap, p, r = np.zeros((nc, tp.shape[1])), np.zeros((nc, 1000)), np.zeros((nc, 1000))
    #求每一个类别AP
    for ci, c in enumerate(unique_classes):
        i = pred_cls == c
        n_l = (target_cls == c).sum()  # number of labels
        n_p = i.sum()  # number of predictions

        if n_p == 0 or n_l == 0:
            continue
        else:
            # Accumulate FPs and TPs
            #cumsum函数,通常用于计算一个数组各行的累加值
            fpc = (1 - tp[i]).cumsum(0)
            tpc = tp[i].cumsum(0)

            # Recall
            recall = tpc / (n_l + 1e-16)  # recall curve
            #np.interp()线性插值
            #left:当索引超出[xp,fp]时的左侧值(x<xp时在x位置的取值)
			#right:当索引超出[xp,fp]时的右侧值(y>fp时在x位置的取值)
            r[ci] = np.interp(-px, -conf[i], recall[:, 0], left=0)  # negative x, xp because xp decreases

            # Precision
            precision = tpc / (tpc + fpc)  # precision curve
            p[ci] = np.interp(-px, -conf[i], precision[:, 0], left=1)  # p at pr_score

            # AP from recall-precision curve
            for j in range(tp.shape[1]):
            	#计算0.5-0.95每一个AP值
                ap[ci, j], mpre, mrec = compute_ap(recall[:, j], precision[:, j])
                if plot and j == 0:
                    py.append(np.interp(px, mrec, mpre))  # precision at mAP@0.5

    # Compute F1 (harmonic mean of precision and recall)
    f1 = 2 * p * r / (p + r + 1e-16)
    if plot:
        plot_pr_curve(px, py, ap, Path(save_dir) / 'PR_curve.png', names)
        plot_mc_curve(px, f1, Path(save_dir) / 'F1_curve.png', names, ylabel='F1')
        plot_mc_curve(px, p, Path(save_dir) / 'P_curve.png', names, ylabel='Precision')
        plot_mc_curve(px, r, Path(save_dir) / 'R_curve.png', names, ylabel='Recall')

    i = f1.mean(0).argmax()  # max F1 index
    return p[:, i], r[:, i], ap, f1[:, i], unique_classes.astype('int32')
看yolov5源码花费不少时间,感觉理解的不够深入,如果有错误还希望大佬们指出,本文的主要目的是记录几个我觉得比较重要的函数,方便自己后续复习!


 6万+
6万+


 被折叠的 条评论
为什么被折叠?
被折叠的 条评论
为什么被折叠?
 到【灌水乐园】发言


