


Tensorflow+YOLO V4框架使用教程+YOLO V4获取识别框高度+基于相似三角形算法的物体距离测量
Tensorflow+YOLO V4框架使用教程+YOLO V4获取识别框高度+基于相似三角形算法的物体距离测量
先来讲讲我写该博客的原因吧!!
由于近期我在从事相关算法项目上的内容以及本人所在团队的中有一些学弟学妹反馈初次接触Tensorflow以及YOLO V4,再加之结合自己近期的开发项目结果,最后写了这一篇博客。
下面首先让我来介绍一下Tensorflow+YOLO V4框架的使用教程吧!!(这已经是本人接触算法下来半年以前的东西了,同样的方法对YOLO V3也适用)
首先要提一句:本人的Tensorflow的version(版本)是:
tensorflow_version=1.14.0
其中的一些主要的库的版本如下:
numpy_version=1.17.2
keras_version=2.1.5
pandas_version=1.1.4
对于安装这些库我们可以运用清华源的安装,安装代码如下:
pip install -i https://pypi.tuna.tsinghua.edu.cn/simple 相应的库的名称
因为原始的pip install 相应的库的名称速度较慢,在这里建议使用上方的清华源的安装。
接下来,开始进入我们的正题!!
Tensorflow+YOLO V4框架使用教程
在这里如何安装anaconda和tensorlow在这里就不详细介绍了,大家可以借鉴这篇博客,来完成相应的配置和安装:https://blog.csdn.net/medusa_zj/article/details/102935687?utm_source=app
大家将以上网址输入浏览器的网址栏即可。
以上是anaconda和tensorflow的相关的安装
安装完后,将该环境配置到VS Code上(本人用的IDE是VS Code),配置的相应的操作大家可以参考:
https://blog.csdn.net/shichimiyasatone/article/details/93600361?ops_request_misc=%25257B%252522request%25255Fid%252522%25253A%252522161227025116780262525522%252522%25252C%252522scm%252522%25253A%25252220140713.130102334.pc%25255Fall.%252522%25257D&request_id=161227025116780262525522&biz_id=0&utm_medium=distribute.pc_search_result.none-task-blog-2~all~first_rank_v2~rank_v29-2-93600361.first_rank_v2_pc_rank_v29_10&utm_term=vs+code+tensorflow%25E7%258E%25AF%25E5%25A2%2583%25E9%2585%258D%25E7%25BD%25AE
https://blog.csdn.net/qq_41662115/article/details/86420983?ops_request_misc=%25257B%252522request%25255Fid%252522%25253A%252522161227025116780262577286%252522%25252C%252522scm%252522%25253A%25252220140713.130102334..%252522%25257D&request_id=161227025116780262577286&biz_id=0&utm_medium=distribute.pc_search_result.none-task-blog-2~all~baidu_landing_v2~default-1-86420983.first_rank_v2_pc_rank_v29_10&utm_term=vs+code+tensorflow%25E7%258E%25AF%25E5%25A2%2583%25E9%2585%258D%25E7%25BD%25AE
以上两篇博客。
同时我们也需要下载相关YOLO V4的框架,下载地址为:
https://github.com/bubbliiiing/yolov4-keras
大家可以在这里下载,但是使用github下载的话可能会花较多的时间,大家可以使用淘宝找客服下载,这样较快。
下载完后,记得解压缩!!!
在这之后,我们使用VS Code打开刚下载文件
点击打开文件,选择刚才下载的文件并打开。
打开后,我们会看到相应的目录:
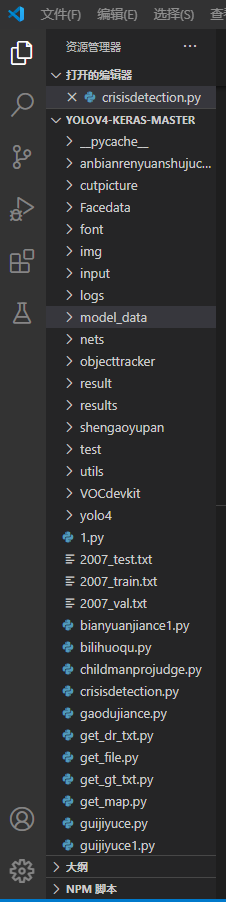
点击左下方的按钮(已经用红框标出)可以切换python版本,如图所示:

开始介绍YOLO V4框架的使用流程(在这里我们可以借鉴YOLO V3框架的使用流程)如图所示:

在此之前,我们需要用爬虫去往上爬一些用于训练的图片,爬虫代码在这里就不公示了,因为涉及到项目的封闭性。大家可以自行去网上查找一些爬取图片的代码!
爬取到相关的图片之后,需要对图片打标签,本人使用的软件是LabelImage:
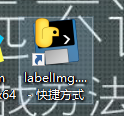
这是比较好的打标软件,本人强力推荐!
在此之后,我们将打标完后的标签文件全部转移到在yolov4-keras-master\VOCdevkit\VOC2007\Annotations目录下,按照上面的过程知道训练结束。在这里需要注意的是将我们所要分类的类名add到model_data文件夹下的coco_class.txt和voc_class.txt文件夹下。
大家就能够完成相应的训练过程,之后是测试过程,在测试过程中我们主要运用的文件是yolo.py。
yolo.py中的代码现在公式如下:
import os
import numpy as np
import copy
import colorsys
from timeit import default_timer as timer
from keras import backend as K
from keras.models import load_model
from keras.layers import Input
from PIL import Image, ImageFont, ImageDraw
from nets.yolo4 import yolo_body,yolo_eval
from utils.utils import letterbox_image


import matplotlib.pyplot as plt

#--------------------------------------------#
#   使用自己训练好的模型预测需要修改2个参数
#   model_path和classes_path都需要修改!
#--------------------------------------------#
class YOLO(object):
    _defaults = {
        "model_path": 'model_data/trained_weights_stage_1.h5',
        "anchors_path": 'model_data/yolo_anchors.txt',
        "classes_path": 'model_data/coco_classes.txt',
        "score" : 0.2,
        "iou" : 0.3,
        # 显存比较小可以使用416x416
        # 显存比较大可以使用608x608
        "model_image_size" : (416, 416)
    }

    @classmethod
    def get_defaults(cls, n):
        if n in cls._defaults:
            return cls._defaults[n]
        else:
            return "Unrecognized attribute name '" + n + "'"

    #---------------------------------------------------#
    #   初始化yolo
    #---------------------------------------------------#
    def __init__(self, **kwargs):
        self.__dict__.update(self._defaults)
        self.class_names = self._get_class()
        self.anchors = self._get_anchors()
        self.sess = K.get_session()
        self.boxes, self.scores, self.classes = self.generate()

    #---------------------------------------------------#
    #   获得所有的分类
    #---------------------------------------------------#
    def _get_class(self):
        classes_path = os.path.expanduser(self.classes_path)
        with open(classes_path) as f:
            class_names = f.readlines()
        class_names = [c.strip() for c in class_names]
        return class_names

    #---------------------------------------------------#
    #   获得所有的先验框
    #---------------------------------------------------#
    def _get_anchors(self):
        anchors_path = os.path.expanduser(self.anchors_path)
        with open(anchors_path) as f:
            anchors = f.readline()
        anchors = [float(x) for x in anchors.split(',')]
        return np.array(anchors).reshape(-1, 2)

    #---------------------------------------------------#
    #   获得所有的分类
    #---------------------------------------------------#
    def generate(self):
        model_path = os.path.expanduser(self.model_path)
        assert model_path.endswith('.h5'), 'Keras model or weights must be a .h5 file.'

        # 计算anchor数量
        num_anchors = len(self.anchors)
        num_classes = len(self.class_names)

        # 载入模型,如果原来的模型里已经包括了模型结构则直接载入。
        # 否则先构建模型再载入
        try:
            self.yolo_model = load_model(model_path, compile=False)
        except:
            self.yolo_model = yolo_body(Input(shape=(None,None,3)), num_anchors//3, num_classes)
            self.yolo_model.load_weights(self.model_path)
        else:
            assert self.yolo_model.layers[-1].output_shape[-1] == \
                num_anchors/len(self.yolo_model.output) * (num_classes + 5), \
                'Mismatch between model and given anchor and class sizes'

        print('{} model, anchors, and classes loaded.'.format(model_path))

        # 画框设置不同的颜色
        hsv_tuples = [(x / len(self.class_names), 1., 1.)
                      for x in range(len(self.class_names))]
        self.colors = list(map(lambda x: colorsys.hsv_to_rgb(*x), hsv_tuples))
        self.colors = list(
            map(lambda x: (int(x[0] * 255), int(x[1] * 255), int(x[2] * 255)),
                self.colors))

        # 打乱颜色
        np.random.seed(10101)
        np.random.shuffle(self.colors)
        np.random.seed(None)

        self.input_image_shape = K.placeholder(shape=(2, ))

        boxes, scores, classes = yolo_eval(self.yolo_model.output, self.anchors,
                num_classes, self.input_image_shape,
                score_threshold=self.score, iou_threshold=self.iou)
        return boxes, scores, classes

    #---------------------------------------------------#
    #   检测图片
    #---------------------------------------------------#
    def detect_image(self, image):
        start = timer()

        # 调整图片使其符合输入要求
        new_image_size = self.model_image_size
        boxed_image = letterbox_image(image, new_image_size)
        image_data = np.array(boxed_image, dtype='float32')
        image_data /= 255.
        image_data = np.expand_dims(image_data, 0)  # Add batch dimension.

        # 预测结果
        out_boxes, out_scores, out_classes = self.sess.run(
            [self.boxes, self.scores, self.classes],
            feed_dict={
                self.yolo_model.input: image_data,
                self.input_image_shape: [image.size[1], image.size[0]],
                K.learning_phase(): 0
            })

        print('Found {} boxes for {}'.format(len(out_boxes), 'img'))
        # 设置字体
        font = ImageFont.truetype(font='font/simhei.ttf',
                    size=np.floor(3e-2 * image.size[1] + 0.5).astype('int32'))
        thickness = (image.size[0] + image.size[1]) // 300

        small_pic=[]

        for i, c in list(enumerate(out_classes)):
            predicted_class = self.class_names[c]
            box = out_boxes[i]
            score = out_scores[i]

            top, left, bottom, right = box
            top = top - 5
            left = left - 5
            bottom = bottom + 5
            right = right + 5


            top = max(0, np.floor(top + 0.5).astype('int32'))
            left = max(0, np.floor(left + 0.5).astype('int32'))
            bottom = min(image.size[1], np.floor(bottom + 0.5).astype('int32'))
            right = min(image.size[0], np.floor(right + 0.5).astype('int32'))

            # 画框框
            label = '{} {:.2f}'.format(predicted_class, score)
            draw = ImageDraw.Draw(image)
            label_size = draw.textsize(label, font)
            label = label.encode('utf-8')
            print(label)

            middle_x=(left+right)/2
            middle_y=(bottom+top)/2
            #取识别框中人像的中心点位置
            print(middle_x)
            print(middle_y)
            print("-----------------------------")


            if top - label_size[1] >= 0:
                text_origin = np.array([left, top - label_size[1]])
            else:
                text_origin = np.array([left, top + 1])

            for i in range(thickness):
                draw.rectangle(
                    [left + i, top + i, right - i, bottom - i],
                    outline=self.colors[c])
            draw.rectangle(
                [tuple(text_origin), tuple(text_origin + label_size)],
                fill=self.colors[c])
            draw.text(text_origin, str(label,'UTF-8'), fill=(0, 0, 0), font=font)
            del draw

        end = timer()
        print("程序运行时间为:")
        print(end - start)
        return image

    def close_session(self):
        self.sess.close()

def detect_video(yolo, video_path, output_path=""):
    import cv2
    vid = cv2.VideoCapture(video_path)
    if not vid.isOpened():
        raise IOError("Couldn't open webcam or video")
    video_FourCC    = int(vid.get(cv2.CAP_PROP_FOURCC))
    video_fps       = vid.get(cv2.CAP_PROP_FPS)
    video_size      = (int(vid.get(cv2.CAP_PROP_FRAME_WIDTH)),
                        int(vid.get(cv2.CAP_PROP_FRAME_HEIGHT)))
    isOutput = True if output_path != "" else False
    if isOutput:
        print("!!! TYPE:", type(output_path), type(video_FourCC), type(video_fps), type(video_size))
        out = cv2.VideoWriter(output_path, video_FourCC, video_fps, video_size)
    accum_time = 0
    curr_fps = 0
    fps = "FPS: ??"
    prev_time = timer()
    while True:
        return_value, frame = vid.read()
        image = Image.fromarray(frame)
        image = yolo.detect_image(image)
        result = np.asarray(image)
        curr_time = timer()
        exec_time = curr_time - prev_time
        prev_time = curr_time
        accum_time = accum_time + exec_time
        curr_fps = curr_fps + 1
        if accum_time > 1:
            accum_time = accum_time - 1
            fps = "FPS: " + str(curr_fps)
            curr_fps = 0
        cv2.putText(result, text=fps, org=(3, 15), fontFace=cv2.FONT_HERSHEY_SIMPLEX,
                    fontScale=0.50, color=(255, 0, 0), thickness=2)
        cv2.namedWindow("result", cv2.WINDOW_NORMAL)
        cv2.imshow("result", result)
        if isOutput:
            out.write(result)
        if cv2.waitKey(1) & 0xFF == ord('q'):
            break
    yolo.close_session()

if __name__ == '__main__':
    #for l in range(600,607):
     image = Image.open("D:/yolov4-keras-master/yolov4-keras-master/VOCdevkit/VOC2007/JPEGImages/4.jpg") #读取图片
     #"+str(l)+"
     #image = detect_video(YOLO(),r'D:/yolov4-keras-master/yolov4-keras-master/VOCdevkit/VOC2007/video/1.mp4')
     image = image.convert('RGB') # 将灰度图转化为三通道图像 以便显示彩色的边框
     image=YOLO.detect_image(YOLO(),image) #进行检测
     image.show()
     #image.save('D:/yolov4-keras-master/yolov4-keras-master/VOCdevkit/VOC2007/ends/'+str(l)+'.jpg')
里面具体的一些代码就不详细介绍了,我们来将一种情况,就是拿到训练的模型后,我们将调用模型来完成初步的物体识别工作,但由于基本参数的一些配置,容易是的识别框显示较多或者直接不显示识别框,大家其实都会认为是模型训练的不够好,其实这个答案并不一定准确,下识别框的显示其实和下面的两个参数有很大关系,大家可以直接通过修改一下两个参数就能够解决上述问题:(参数如下)
"model_path": 'model_data/trained_weights_stage_1.h5',
        "anchors_path": 'model_data/yolo_anchors.txt',
        "classes_path": 'model_data/coco_classes.txt',
        "score" : 0.2,
        "iou" : 0.3,
在这里是要修改score和iou即可,如果遇到没有识别框的情况,我们可以适当减小他们的值;如果遇到识别框较多的情况我们可以增大相应的值。
到这里,我们就完成了对Tensorflow+YOLO V4框架使用。
YOLO V4获取识别框高度
在这里获取识别框的高度较为简单。
因为在YOLO V4完成相应识别框的绘制时,就已经提供了相应的参数top、bottom、letf和right,我们只需将bottom减去top再将其显示在识别框上或者直接print()输出即可完成任务,显示在识别框上的代码如下,在这里提供一下类似代码,大家可以进行修改:
draw.text((int(middle_x),int(top)),"离岸距离为"+str(abs(int(x_dist)))+"cm", (255, 0, 0), font=font)
那么获取识别框的高度的任务就完成了!!
接下来就是我们利用相似三角形来获取距离。
(由于保证项目的封闭性,本人在这里不提供相应完整的代码)
基于相似三角形算法的物体距离测量
好!开始进入正题!!!!!!由于牵扯到相机(摄像头),首先需要设定相应的相机内参:
#图像分辨率
        frame_width = 1280
        frame_height = 720

        #相机内参
        camera_cx = 628.060
        camera_cy = 345.411
        camera_fx = 716.168
        camera_fy = 715.988

        #标定点像素、相机高度、标定点实际距离
        cab_pixel_y = 650
        camera_h = 0.735*100
        cab_dist = 1.61*100

        #求主点对应的实际距离,与相机的角度
        a1 = math.atan(camera_h / cab_dist)
        a2 = math.atan((cab_pixel_y - camera_cy) / camera_fy)
        a3 = a1 - a2
        op_dist = camera_h * math.atan(a3)
    #以上为相机(摄像头)的初始设置,据具体情况而定可修改
然后,开始计算相应的距离:
#运用相似三角形

            #由于y上的数值在后续的x上计算上有用到所以先将求y上的距离放在前面

            #求任意像素点的y方向实际距离
            b1 = math.atan((middle_y - camera_cy) / camera_fy)  #调用人像y轴方向上的中点
            b2 = a3 + b1
            y_dist = camera_h / math.tan(b2)
            print(y_dist)

            #求该像素点的x方向实际距离
            pixel_y_dist = math.sqrt(pow((middle_y - camera_cy), 2) + pow(camera_fy, 2))
            dist_y_slope = camera_h / math.sin(b2)
            x_dist = dist_y_slope * (middle_x - camera_cx) / pixel_y_dist
            print(x_dist)
具体介绍大家可以看相应的注释,这是较为简单的相似三角形测距的实战。
争对相似三角形测距的原理大家可以参考:https://blog.csdn.net/weixin_43159148/article/details/83507950?ops_request_misc=%25257B%252522request%25255Fid%252522%25253A%252522161227451516780271525620%252522%25252C%252522scm%252522%25253A%25252220140713.130102334.pc%25255Fall.%252522%25257D&request_id=161227451516780271525620&biz_id=0&utm_medium=distribute.pc_search_result.none-task-blog-2~all~first_rank_v2~rank_v29-2-83507950.first_rank_v2_pc_rank_v29_10&utm_term=%25E5%258D%2595%25E7%259B%25AE%25E7%259B%25B8%25E4%25BC%25BC%25E4%25B8%2589%25E8%25A7%2592%25E5%25BD%25A2%25E6%25B5%258B%25E8%25B7%259D%25E5%258E%259F%25E7%2590%2586
今天就给我大家讲解到这里,因为本人学弟学妹的需要所以较为注重讲述前面第一大部分的知识,也希望大家能够学习,多多支持,我会一直在进步的路上。

THANK YOU!!!


 4036
4036


 被折叠的 条评论
为什么被折叠?
被折叠的 条评论
为什么被折叠?
 到【灌水乐园】发言


