


一、准备阶段
-
准备需要用到的模型pipeline
-
准备图像及其掩膜
import torch
import requests
from PIL import Image
from io import BytesIO
from matplotlib import pyplot as plt
# StableDiffusionInpaintPipeline 是一个用于图像修复(Inpainting)的管道。稳定扩散算法是一种基于偏微分方程的图像修复方法,它通过在图像中填充缺失的区域来恢复图像的完整性。该管道实现了稳定扩散算法的各个步骤,包括数据预处理、扩散过程和结果后处理等
# StableDiffusionDepth2ImgPipeline 是一个用于从深度图生成图像的管道。深度图是一种表示场景中物体距离相机的图像,而图像则是一种表示场景中物体外观的图像。该管道利用稳定扩散算法将深度图转换为图像,从而实现从深度图到图像的转换。
# We'll be exploring a number of pipelines today!
from diffusers import (
StableDiffusionPipeline,
StableDiffusionImg2ImgPipeline,
StableDiffusionInpaintPipeline,
StableDiffusionDepth2ImgPipeline
)
# We'll use a couple of demo images later in the notebook
def download_image(url):
response = requests.get(url)
return Image.open(BytesIO(response.content)).convert("RGB")
# Download images for inpainting example
img_url = "https://raw.githubusercontent.com/CompVis/latent-diffusion/main/data/inpainting_examples/overture-creations-5sI6fQgYIuo.png"
mask_url = "https://raw.githubusercontent.com/CompVis/latent-diffusion/main/data/inpainting_examples/overture-creations-5sI6fQgYIuo_mask.png"
init_image = download_image(img_url).resize((512, 512))
mask_image = download_image(mask_url).resize((512, 512))
二、文本生成图像
1. 用到的pipeline——StableDiffusionPipeline
-
创建生成器
-
pipe中的参数:
-
图像提示:要生成什么内容
-
不希望生成的图像中包含的内容
-
指定生成图像时要遵循提示的程度
-
指定推理步数
-
指定生成器,确保结果可以重现
-
# Set up a generator for reproducibility # 创建一个生成器用以确保结果的可重现性 generator = torch.Generator(device=device).manual_seed(40) # 调用 pipe 函数来运行管道,展示一些可用的参数 # Run the pipeline, showing some of the available arguments pipe_output = pipe( # 生成图像的提示(prompt),即要生成的内容 prompt="A Bernese Mountain Dog chasing a ball on the lawn with its tongue sticking out", # What to generate # 不希望生成的内容的提示(negative_prompt) negative_prompt="Oversaturated, blurry, low quality", # What NOT to generate height=480, width=640, # Specify the image size # 指定生成图像时要遵循提示的程度 guidance_scale=8, # How strongly to follow the prompt # 指定生成图像时要进行的推理步骤的数量。 num_inference_steps=50, # How many steps to take # generator:指定生成器,以确保结果的可重现性 generator=generator # Fixed random seed ) # View the resulting image: pipe_output.images[0]
作者认为guidance_scale的最佳取值区间在8 到 12
2. pipeline组成
(1) VAE可分自编码器
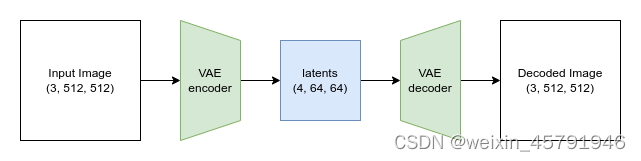
VAE将输入编码成一种被压缩过的表示形式,再把这个“隐式的”表示形式解码成某种接近输入的输出。当我们使用 Stable Diffusion 生成图片时,我们先在VAE的“隐空间”应用扩散过程生成隐编码,然后在结尾对它们解码来查看结果图片。
# Create some fake data (a random image, range (-1, 1))
# * 2 将随机张量中的每个元素乘以 2,而 - 1 则将结果减去 1。这个操作的目的是将随机张量的值范围从 [0, 1] 缩放到 [-1, 1]
images = torch.rand(1, 3, 512, 512).to(device) * 2 - 1
print("Input images shape:", images.shape)
# Encode to latent space
# .latent_dist.mean 是对潜在表示对象中的概率分布取其均值
# pipe.vae.encode(images) 是一个模型 pipe 中的 vae 对象对输入图像 images 进行编码的操作。它返回一个包含潜在表示的对象
# 整个代码的含义是将输入图像 images 通过 pipe.vae 模型进行编码,然后取得到的潜在表示的均值,并乘以 0.18215,最后将结果赋值给变量 latents
with torch.no_grad():
latents = 0.18215 * pipe.vae.encode(images).latent_dist.mean
print("Encoded latents shape:", latents.shape)
# Decode again
# .sample 是对解码后的图像对象中的概率分布进行采样的操作,这个操作会从概率分布中随机采样一个样本,得到最终的解码图像
# torch.no_grad(),表示在解码和采样过程中不进行梯度计算
# 整个代码的含义是对潜在表示 latents 进行解码,然后从解码后的图像对象中随机采样一个图像,并将结果赋值给变量 decoded_images
with torch.no_grad():
decoded_images = pipe.vae.decode(latents / 0.18215).sample
print("Decoded images shape:", decoded_images.shape)
原本 512x512 尺寸的图片被压缩到 64x64的隐式表示形式(有四个通道)中
【疑问:】为什么会被压缩成4*64*64?是普适规律吗?后面也涉及到这个问题。这里的VAE是作用于随机噪声的吗?(后面是作用于随机噪声的)
(2)分词器Tokenizer和文本编码器Text Encoder
-
Text Encoder结构
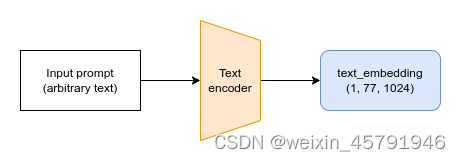
文本首先要被管线中的分词器(tokenizer)转换成一系列的分词(token),再被送入文本编码器模型,从而用数值表示字符
-
集成表示代码
 # Get the final text embeddings using the pipeline's _encode_prompt function:
 # 这段代码的目的是使用 pipeline 的 _encode_prompt 函数获取最终的文本嵌入。
 text_embeddings = pipe._encode_prompt("A painting of a flooble", device, 1, False, '')
 text_embeddings.shape
(3) U-Net
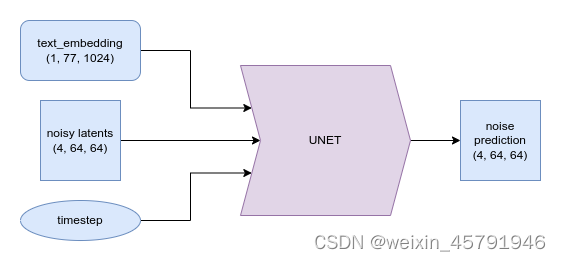
UNet 模型接收一个带噪的输入,并预测噪声
3. DIY采样循环
guidance_scale = 8 #@param num_inference_steps=30 #@param prompt = "Bernese Mountain Dogs happily run on the sunlit lawn" #@param negative_prompt = "zoomed in, blurry, oversaturated, warped" #@param # Encode the prompt # 文本嵌入 text_embeddings = pipe._encode_prompt(prompt, device, 1, True, negative_prompt) # Create our random starting point # 创建一个形状为 (1, 4, 64, 64) 的随机张量 latents。 # 对应这噪声的隐式分布 # 这个随机张量包含了服从标准正态分布的随机值。 latents = torch.randn((1, 4, 64, 64), device=device, generator=generator) # 随机张量 latents 中的每个元素与 pipe.scheduler.init_noise_sigma 相乘, # 并将结果重新赋值给 latents。这个操作的目的是将随机张量的值按照初始噪声的标准差进行缩放 latents *= pipe.scheduler.init_noise_sigma # Prepare the scheduler # 调度器 pipe.scheduler.set_timesteps(num_inference_steps, device=device) # Loop through the sampling timesteps for i, t in enumerate(pipe.scheduler.timesteps): # expand the latents if we are doing classifier free guidance # 将 latents 进行复制,然后使用 torch.cat 函数将复制后的 latents 连接起来,形成一个新的张量 latent_model_input。 # 这个操作的目的是为了在进行分类器无关引导时扩展 latents latent_model_input = torch.cat([latents] * 2) # Apply any scaling required by the scheduler # 根据时间步 t 对 latent_model_input 进行缩放操作【随机生成的噪声隐式分布】 latent_model_input = pipe.scheduler.scale_model_input(latent_model_input, t) # predict the noise residual with the unet with torch.no_grad(): noise_pred = pipe.unet(latent_model_input, t, encoder_hidden_states=text_embeddings).sample # perform guidance # 使用 chunk 函数将 noise_pred 分割成两部分,分别存储在 noise_pred_uncond 和 noise_pred_text 中。 # 这个操作的目的是将噪声残差分为无条件部分和文本引导部分 noise_pred_uncond, noise_pred_text = noise_pred.chunk(2) noise_pred = noise_pred_uncond + guidance_scale * (noise_pred_text - noise_pred_uncond) # compute the previous noisy sample x_t -> x_t-1 # 从步进操作的结果中获取先前的样本 prev_sample,并将其赋值给 latents # 也就是计算先前的带噪声样本 x_t -> x_t-1 latents = pipe.scheduler.step(noise_pred, t, latents).prev_sample # Decode the resulting latents into an image with torch.no_grad(): image = pipe.decode_latents(latents.detach()) # View pipe.numpy_to_pil(image)[0]


 3656
3656


 被折叠的 条评论
为什么被折叠?
被折叠的 条评论
为什么被折叠?
 到【灌水乐园】发言


