


目录
hikvision SDK使用(转)-腾讯云开发者社区-腾讯云
1.海康相机开发流程
使用工业相机采集图像,首先需要对相机的相关参数进行设置。现在项目需要使用SDK进行二次开发。依照以下步骤进行:
1.枚举设备 -> 2.创建句柄 -> 3.打开设备 -> 4.开始抓图 -> 5.获取一帧并保存图像 -> 6.停止抓图 -> 7.关闭设备 -> 8.销毁句柄
1.1 设备连接接口流程(海康相机V3.5.0)
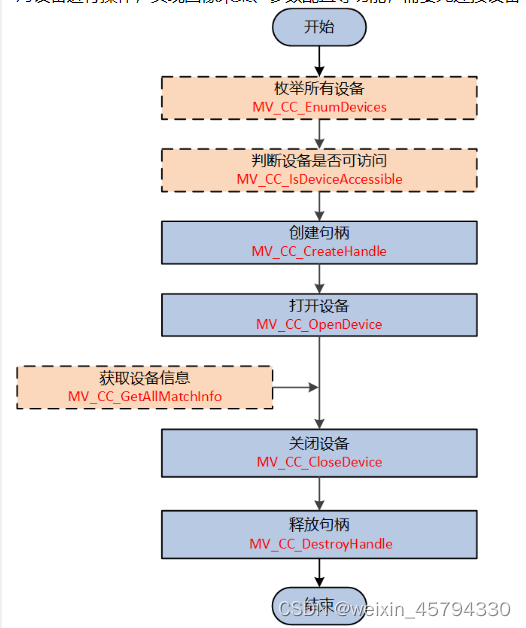
详细步骤
- (可选)调用 MV_CC_EnumDevices() 枚举子网内指定传输协议对应的所有设备。 可通过nTLayerType在结构 MV_CC_DEVICE_INFO() 中获取设备信息。
- (可选)在打开指定设备前,调用 MV_CC_IsDeviceAccessible() 检查指定设备是否可访问。
- 调用 MV_CC_CreateHandle() 创建设备句柄。
- 调用 MV_CC_OpenDevice() 打开设备。
- (可选)调用 MV_CC_GetAllMatchInfo()以获取设备信息。
- 调用 MV_CC_CloseDevice() 关闭设备。
-
调用 MV_CC_DestroyHandle() 销毁句柄并释放资源。
1.2 主动取流流程(海康相机V3.5.0)
SDK提供主动获取图像的接口,用户可以在开启取流后直接调用此接口获取图像,也可以使用异步方式(线程、定时器等)获取图像。
• 主动获取图像有两种方式(两种方式不能同时使用):
方式一:调用 MV_CC_StartGrabbing() 开始采集,需要自己开启一个buffer,然后在应用层循环调用 MV_CC_GetOneFrameTimeout() 获取指定像素格式的帧数据,获取帧数据时上层应用程序需要根据帧率控制好调用该接口的频率。
方式二:调用 MV_CC_StartGrabbing() 开始采集,然后在应用层调用 MV_CC_GetImageBuffer() 获取指定像素格式的帧数据,然后调用 MV_CC_FreeImageBuffer() 释放buffer,获取帧数据时上层应用程序需要根据帧率控制好调用该接口的频率。
• 主动取图方式使用的场景:
主动取图方式需要先调用 MV_CC_StartGrabbing() 启动图像采集。上层应用程序需要根据帧率,控制好调用主动取图接口的频率。两种主动取图方式都支持设置超时时间,SDK内部等待直到有数据时返回,可以增加取流平稳性,适合用于对平稳性要求较高的场合。
• 两种主动取图方式的区别:
a、 MV_CC_GetImageBuffer() 需要与 MV_CC_FreeImageBuffer() 配套使用,当处理完取到的数据后,需要用 MV_CC_FreeImageBuffer() 接口将pstFrame内的数据指针权限进行释放。
b、 MV_CC_GetImageBuffer() 与 MV_CC_GetOneFrameTimeout() 相比,有着更高的效率。且其取流缓存的分配是由sdk内部自动分配的,而 MV_CC_GetOneFrameTimeout() 接口是需要客户自行分配。
• 注意事项:
a、两种主动取图方式不能同时使用,且不能与后面的回调取图方式同时使用,三种取图方式只能使用其中一种。
b、pData返回的是一个地址指针,建议将pData里面的数据copy出来另建线程使用。
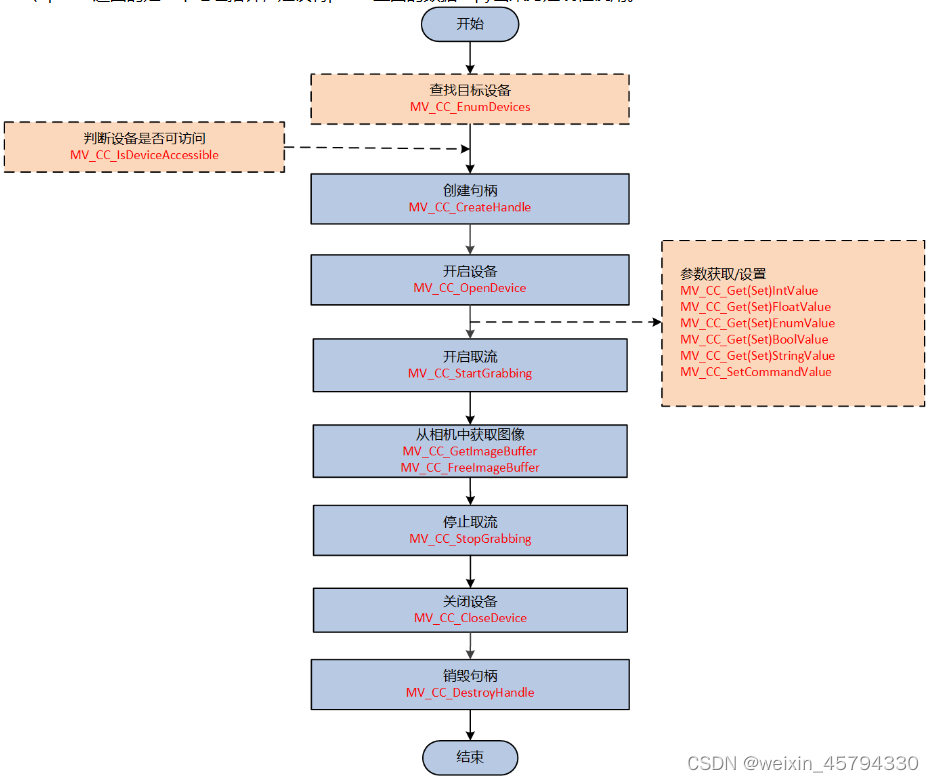
详细步骤
- (可选)调用 MV_CC_EnumDevices() 枚举子网内指定传输协议对应的所有设备。 可通过nTLayerType在结构 MV_CC_DEVICE_INFO() 中获取设备信息。
- (可选)打开指定设备前,调用 MV_CC_IsDeviceAccessible() 检查指定设备是否可访问。
- 调用 MV_CC_CreateHandle() 创建设备句柄。
- 调用 MV_CC_OpenDevice() 打开设备。
-
(可选)执行以下一个或多个操作以获取/设置相机不同类型的参数。
• 获取/设置Int类型节点值 调用 MV_CC_GetIntValue() / MV_CC_SetIntValue()
• 获取/设置Float类型节点值 调用 MV_CC_GetFloatValue() / MV_CC_SetFloatValue()
• 获取/设置Enum类型节点值 调用 MV_CC_GetEnumValue() / MV_CC_SetEnumValue()
• 获取/设置Bool类型节点值 调用 MV_CC_GetBoolValue() / MV_CC_SetBoolValue()
• 获取/设置String类型节点值 调用 MV_CC_GetStringValue() / MV_CC_SetStringValue()
• 设置Command类型节点值 调用 MV_CC_SetCommandValue()
-
图像采集:
• (可选)调用 MV_CC_SetImageNodeNum() 设置图像缓存节点个数。当获取的图像数超过这个设定值,最早的图像数据会被自动丢弃。
• 调用 MV_CC_StartGrabbing() 开始取流。
• 对于原始图像数据,可调用 MV_CC_ConvertPixelType() 转换图像的像素格式,也可调用 MV_CC_SaveImage() 转换成JPEG或BMP格式的图片,并保存成图片文件。
• 在应用程序层中重复调用 MV_CC_GetOneFrameTimeout() 来获取图片数据。
- 调用 MV_CC_StopGrabbing() 停止采集。
- 调用 MV_CC_CloseDevice() 关闭设备。
- 调用 MV_CC_DestroyHandle() 销毁句柄并释放资源。
1.3 回调取流流程(海康相机V3.5.0)
SDK提供注册回调函数的接口,用户可以将自己定义的回调函数注册在SDK内部,SDK获取到相机图像会主动回调到应用程序供用户处理,此方式可以简化用户程序逻辑。
• 回调取图方式使用场景:
可以使用 MV_CC_RegisterImageCallBackEx() 接口注册回调函数。回调函数可以自定义,用于自动回调获取的图像。此方法可以简化应用程序逻辑。如果你想设置获取RGB24或BGR24格式的图像数据,也可以使用 MV_CC_RegisterImageCallBackForRGB() 或 MV_CC_RegisterImageCallBackForBGR() 来注册回调函数。
• 注意事项:
a、回调函数中不建议有耗时操作、线程锁等,容易造成回调阻塞。
b、pData返回的是一个地址指针,建议将pData里面的数据copy出来另建线程使用。
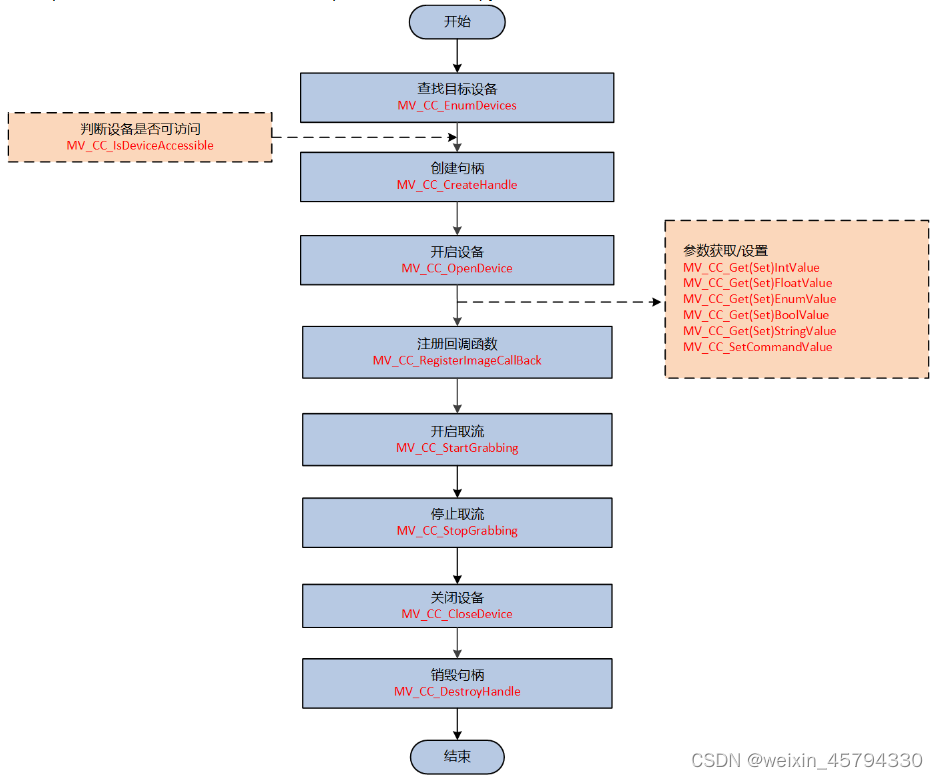
详细步骤
- (可选)调用 MV_CC_EnumDevices() 枚举子网内指定传输协议对应的所有设备。 可通过nTLayerType在结构 MV_CC_DEVICE_INFO() 中获取设备的信息。
- (可选)打开指定设备前,调用 MV_CC_IsDeviceAccessible() 检查指定设备是否可访问。
- 调用 MV_CC_CreateHandle() 创建设备句柄。
- 调用 MV_CC_OpenDevice() 打开设备。
-
(可选)执行以下一个或多个操作以获取/设置相机不同类型的参数。
• 获取/设置Int类型节点值 调用 MV_CC_GetIntValue() / MV_CC_SetIntValue()
• 获取/设置Float类型节点值 调用 MV_CC_GetFloatValue() / MV_CC_SetFloatValue()
• 获取/设置Enum类型节点值 调用 MV_CC_GetEnumValue() / MV_CC_SetEnumValue()
• 获取/设置Bool类型节点值 调用 MV_CC_GetBoolValue() / MV_CC_SetBoolValue()
• 获取/设置String类型节点值 调用 MV_CC_GetStringValue() / MV_CC_SetStringValue()
• 设置Command类型节点值 调用 MV_CC_SetCommandValue()
-
图像采集:
• (可选)调用 MV_CC_SetImageNodeNum() 设置图像缓存节点个数。当获取的图像数超过这个设定值,最早的图像数据会被自动丢弃。
• 调用 MV_CC_RegisterImageCallBack() 来设置数据回调函数。
• 调用 MV_CC_StartGrabbing() 开始采集。
• 对于原始图像数据,可调用 MV_CC_ConvertPixelType() 转换图像的像素格式,也可以调用 MV_CC_SaveImage() 转换为JPEG或BMP格式图片,并保存成图片文件。
- 调用 MV_CC_StopGrabbing() 停止采集。
- 调用 MV_CC_CloseDevice() 关闭设备。
- 调用 MV_CC_DestroyHandle() 销毁句柄并释放资源。
2.步骤示例
1.枚举设备 -> 2.创建设备句柄 -> 3.打开相机设备 -> 4.开始抓图 -> 5.获取一帧并保存图像 -> 6.停止抓图 -> 7.关闭相机设备 -> 8.销毁句柄
2.1 枚举设备
调用 MV_CC_EnumDevices() 枚举子网内指定传输协议对应的所有设备。
int MV_CC_EnumDevices ( IN unsigned int nTLayerType,
IN OUT MV_CC_DEVICE_INFO_LIST * pstDevList )
枚举设备
参数
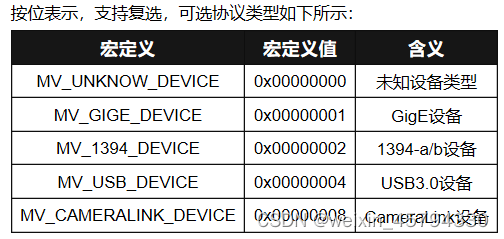
nTLayerType [IN] 枚举传输层
按位表示,支持复选,可选协议类型如下所示:
例如:nTLayerType = MV_GIGE_DEVICE | MV_USB_DEVICE,表示查找GigE和USB3.0设备
pstDevList [OUT] 设备列表
返回
成功,返回MV_OK;失败,返回错误码。
#include<iostream>
#include<MvCameraControl.h>
#include "windows.h"


using namespace std;

int main()
{
	//https://blog.csdn.net/weixin_44840658/article/details/89174782
	//枚举相机
	//先定义一个设备列表,用来存放枚举到的设备
	MV_CC_DEVICE_INFO_LIST cam_List;//列表 用于存放枚举到的相机列表
	//枚举
	int nRet = MV_OK;
	nRet = MV_CC_EnumDevices(MV_GIGE_DEVICE, &cam_List);
	if (MV_OK != nRet)
	{
		cout<<"Enum Devices fail! nRet [0x%x]\n"<< nRet<<endl;
		return 0;
	}
	else//找到相机
	{
		//枚举到相机后,就可以获取到相机的一些设备信息
		//打印设备的SN码、设备名称、制造商
		//获取枚举到的相机数量
		int cam_num = cam_List.nDeviceNum;
		cout << "相机数量:" << cam_num << endl;
		//留给后边研究,没有运行成功
		MV_CC_DEVICE_INFO* p_cam_Info = cam_List.pDeviceInfo[0];//相机数量可能有多个,此处只对第一个进行参数访问等
       if(p_cam_Info->nTLayerType == MV_USB_DEVICE)
		{cout<< "相机序列号: " << p_cam_Info->SpecialInfo.stGigEInfo.chSerialNumber << endl;//此处默认为网口相机
        }
		int MV_A = MV_CC_IsDeviceAccessible(p_cam_Info, MV_ACCESS_Control);
		if (!MV_A)
		{
			cout << "设备不允许被访问!" << endl;
		}
		cout << "设备运行被访问" << endl;
	}
}
2.2 创建设备句柄
调用 MV_CC_CreateHandle() 创建设备句柄。
int  MV_CC_CreateHandle  ( OUT void **  handle,IN const MV_CC_DEVICE_INFO *  pstDevInfo)

创建设备句柄

参数
handle [OUT] 设备句柄
pstDevInfo [IN] 设备信息结构体

返回
成功,返回MV_OK;
失败,返回错误码 。
#include<iostream>
#include<MvCameraControl.h>
#include "windows.h"
using namespace std;
int main()
{
//https://blog.csdn.net/weixin_44840658/article/details/89174782
//枚举相机
//先定义一个设备列表,用来存放枚举到的设备
MV_CC_DEVICE_INFO_LIST cam_List;//列表 用于存放枚举到的相机列表
//枚举
int nRet = MV_OK;
nRet = MV_CC_EnumDevices(MV_GIGE_DEVICE, &cam_List);
if (MV_OK != nRet)
{
cout<<"Enum Devices fail! nRet [0x%x]\n"<< nRet<<endl;
return 0;
}
else//找到相机
{
//枚举到相机后,就可以获取到相机的一些设备信息
//打印设备的SN码、设备名称、制造商
//获取枚举到的相机数量
int cam_num = cam_List.nDeviceNum;
cout << "相机数量:" << cam_num << endl;
//留给后边研究,没有运行成功
MV_CC_DEVICE_INFO* p_cam_Info = cam_List.pDeviceInfo[0];
//相机相关参数输出
//检查指定设备是否可访问
int MV_A = MV_CC_IsDeviceAccessible(p_cam_Info, MV_ACCESS_Control);
if (!MV_A)
{
cout << "设备不允许被访问!" << endl;
}
cout << "设备运行被访问" << endl;
}
//创建相机句柄
int nRet2 = MV_OK;
void* handle = NULL;
nRet2 = MV_CC_CreateHandle(&handle, cam_List.pDeviceInfo[0]);//枚举相机列表中的第一个相机
if (MV_OK != nRet2)
{
cout << "创建句柄失败!nRet2 :" << nRet2 << endl;
system("pause");
return 0;
}
//打开相机
//开始取流
//使用内部缓存获取一帧图片
//其余操作
//停止采集
//关闭相机
//销毁句柄
if (handle != NULL)
{
MV_CC_DestroyHandle(handle);
handle = NULL;
}
system("pause");
return 0;
}2.3 打开设备
调用 MV_CC_OpenDevice() 打开设备。
int MV_CC_OpenDevice ( IN void * handle,
IN unsigned int nAccessMode,
IN unsigned short nSwitchoverKey)
打开设备
参数
handle [IN] 设备句柄
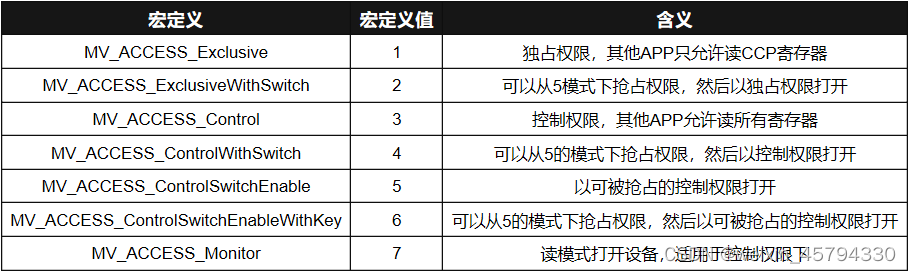
nAccessMode [IN] 访问权限,具体可见下列表格
nSwitchoverKey [IN] 切换访问权限时的密钥
返回
成功,返回MV_OK;
失败,返回错误码 。
//打开相机
	int nRet3 = MV_OK;
	nRet3 = MV_CC_OpenDevice(handle);//此处handle参数为MV_CC_CreateHandle创建的相机句柄
	if (MV_OK != nRet3)
	{
		cout << "打开相机失败!nRet3 :" << nRet3 << endl;
		system("pause");
		return 0;
	}
2.4 开始抓图(开始取流)
调用 MV_CC_StartGrabbing() 开始取流。
int MV_CC_StartGrabbing  ( IN void *  handle )

开始取流

参数
handle [IN] 设备句柄

返回
成功,返回MV_OK;
失败,返回错误码

备注
该接口不支持CameraLink设备。
//开始取流
// Start grab image
nRet = MV_CC_StartGrabbing(handle);
if (MV_OK != nRet)
{
cout << "取流失败!nRet :" << nRet << endl;
system("pause");
return 0;
}2.5 获取一帧并保存图像(此项有点混乱 有待修正)
2.5.1 方式一:
调用 MV_CC_StartGrabbing() 开始采集,需要自己开启一个buffer,然后在应用层循环调用 MV_CC_GetOneFrameTimeout() 获取指定像素格式的帧数据,获取帧数据时上层应用程序需要根据帧率控制好调用该接口的频率。
int MV_CC_GetOneFrameTimeout ( IN void * handle,
IN OUT unsigned char * pData,
IN unsigned int nDataSize,
IN OUT MV_FRAME_OUT_INFO_EX * pstFrameInfo,
unsigned int nMsec)
采用超时机制获取一帧图片,SDK内部等待直到有数据时返回
参数
handle [IN] 设备句柄
pData [OUT] 图像数据接收指针
nDataSize [IN] 接收缓存大小
pstFrameInfo [OUT] 图像信息结构体
nMsec [IN] 等待超时时间
返回
成功,返回MV_OK;
失败,返回错误码
备注
• 调用该接口获取图像数据帧之前需要先调用 MV_CC_StartGrabbing() 启动图像采集。该接口为主动式获取帧数据,上层应用程序需要根据帧率,控制好调用该接口的频率。该接口支持设置超时时间,SDK内部等待直到有数据时返回,可以增加取流平稳性,适合用于对平稳性要求较高的场合。
• 该接口对于U3V、GIGE设备均可支持。
• 该接口不支持CameraLink设备。
2.5.2方式二:
调用 MV_CC_StartGrabbing() 开始采集,然后在应用层调用 MV_CC_GetImageBuffer() 获取指定像素格式的帧数据,然后调用 MV_CC_FreeImageBuffer() 释放buffer,获取帧数据时上层应用程序需要根据帧率控制好调用该接口的频率。
应用层调用 MV_CC_GetImageBuffer() 获取指定像素格式的帧数据
int MV_CC_GetImageBuffer ( IN void * handle,
OUT MV_FRAME_OUT * pstFrame,
IN unsigned int nMsec)
使用内部缓存获取一帧图片(与 MV_CC_Display() 不能同时使用)
参数
handle [IN] 设备句柄
pstFrame [OUT] 图像数据和图像信息
nMsec [IN] 等待超时时间,输入INFINITE时表示无限等待,直到收到一帧数据或者停止取流
返回
成功,返回MV_OK;
失败,返回错误码 用 MV_CC_FreeImageBuffer() 接口将pstFrame内的数据指针权限进行释放
int MV_CC_FreeImageBuffer ( IN void * handle,
IN MV_FRAME_OUT * pstFrame)
释放图像缓存(此接口用于释放不再使用的图像缓存,与 MV_CC_GetImageBuffer() 配套使用)
参数
handle [IN] 设备句柄
pstFrame [IN] 图像数据和图像数据
返回
成功,返回MV_OK;
失败,返回错误码
备注
• 该接口与 MV_CC_GetImageBuffer() 配套使用,使用 MV_CC_GetImageBuffer() 接口取到的图像数据pstFrame,需要用 MV_CC_FreeImageBuffer() 接口进行权限释放。
• 该接口对于取流效率高于GetOneFrameTimeout接口,且GetImageBuffer在不进行Free的情况下,最大支持输出的节点数与SetImageNode接口所设置的节点数相等,默认节点数是1。
• 该接口对于U3V、GIGE设备均可支持。
• 该接口不支持CameraLink设备。
对于原始图像数据,可调用 MV_CC_ConvertPixelType() 转换图像的像素格式
int MV_CC_ConvertPixelType ( IN void * handle,
IN OUT MV_CC_PIXEL_CONVERT_PARAM * pstCvtParam)
像素格式转换
参数
handle [IN] 设备句柄
pstCvtParam [IN][OUT] 像素格式转换参数结构体
返回
成功,返回MV_OK ;
失败,返回错误码
备注
通过将接口可以将从设备采集到的原始图像数据转换成用户所需的像素格式并存放在指定内存中。该接口调用无接口顺序要求,有图像源数据就可以进行转换,可以先调用 MV_CC_GetOneFrameTimeout() 或者 MV_CC_RegisterImageCallBackEx() 设置回调函数,获取一帧图像数据,然后再通过该接口转换格式。如果设备当前采集图像是JPEG压缩的格式,则不支持调用该接口进行转换。
#include<iostream>
#include<MvCameraControl.h>
#include "windows.h"
using namespace std;
void PrintDeviceInfo(MV_CC_DEVICE_INFO* pstMVDevInfo)
{
if (NULL == pstMVDevInfo)
{
printf("The Pointer of pstMVDevInfo is NULL!\n");
return;
}
if (pstMVDevInfo->nTLayerType == MV_GIGE_DEVICE)
{
int nIp1 = ((pstMVDevInfo->SpecialInfo.stGigEInfo.nCurrentIp & 0xff000000) >> 24);
int nIp2 = ((pstMVDevInfo->SpecialInfo.stGigEInfo.nCurrentIp & 0x00ff0000) >> 16);
int nIp3 = ((pstMVDevInfo->SpecialInfo.stGigEInfo.nCurrentIp & 0x0000ff00) >> 8);
int nIp4 = (pstMVDevInfo->SpecialInfo.stGigEInfo.nCurrentIp & 0x000000ff);
// en:print current ip and user defined name
printf("CurrentIp: %d.%d.%d.%d\n", nIp1, nIp2, nIp3, nIp4);
cout << "用户自定义名称: " << pstMVDevInfo->SpecialInfo.stGigEInfo.chUserDefinedName << endl;
cout << "相机序列号: " << pstMVDevInfo->SpecialInfo.stGigEInfo.chSerialNumber << endl;
}
else if (pstMVDevInfo->nTLayerType == MV_USB_DEVICE)
{
printf("UserDefinedName: %s\n", pstMVDevInfo->SpecialInfo.stUsb3VInfo.chUserDefinedName);
printf("Serial Number: %s\n", pstMVDevInfo->SpecialInfo.stUsb3VInfo.chSerialNumber);
printf("Device Number: %d\n\n", pstMVDevInfo->SpecialInfo.stUsb3VInfo.nDeviceNumber);
}
else
{
printf("Not support.\n");
}
}
bool IsColor(MvGvspPixelType enType)
{
switch (enType)
{
case PixelType_Gvsp_BGR8_Packed:
case PixelType_Gvsp_YUV422_Packed:
case PixelType_Gvsp_YUV422_YUYV_Packed:
case PixelType_Gvsp_BayerGR8:
case PixelType_Gvsp_BayerRG8:
case PixelType_Gvsp_BayerGB8:
case PixelType_Gvsp_BayerBG8:
case PixelType_Gvsp_BayerGB10:
case PixelType_Gvsp_BayerGB10_Packed:
case PixelType_Gvsp_BayerBG10:
case PixelType_Gvsp_BayerBG10_Packed:
case PixelType_Gvsp_BayerRG10:
case PixelType_Gvsp_BayerRG10_Packed:
case PixelType_Gvsp_BayerGR10:
case PixelType_Gvsp_BayerGR10_Packed:
case PixelType_Gvsp_BayerGB12:
case PixelType_Gvsp_BayerGB12_Packed:
case PixelType_Gvsp_BayerBG12:
case PixelType_Gvsp_BayerBG12_Packed:
case PixelType_Gvsp_BayerRG12:
case PixelType_Gvsp_BayerRG12_Packed:
case PixelType_Gvsp_BayerGR12:
case PixelType_Gvsp_BayerGR12_Packed:
return true;
default:
return false;
}
}
bool IsMono(MvGvspPixelType enType)
{
switch (enType)
{
case PixelType_Gvsp_Mono10:
case PixelType_Gvsp_Mono10_Packed:
case PixelType_Gvsp_Mono12:
case PixelType_Gvsp_Mono12_Packed:
return true;
default:
return false;
}
}
int main()
{
//https://blog.csdn.net/weixin_44840658/article/details/89174782
//枚举相机
//先定义一个设备列表,用来存放枚举到的设备
MV_CC_DEVICE_INFO_LIST cam_List;//列表 用于存放枚举到的相机列表
//枚举
int nRet = MV_OK;
nRet = MV_CC_EnumDevices(MV_GIGE_DEVICE, &cam_List);
if (MV_OK != nRet)
{
cout<<"Enum Devices fail! nRet [0x%x]\n"<< nRet<<endl;
return 0;
}
else//找到相机
{
//枚举到相机后,就可以获取到相机的一些设备信息
//打印设备的SN码、设备名称、制造商
//获取枚举到的相机数量
int cam_num = cam_List.nDeviceNum;
cout << "相机数量:" << cam_num << endl;
//留给后边研究,没有运行成功
MV_CC_DEVICE_INFO* p_cam_Info = cam_List.pDeviceInfo[0];
//相机相关参数输出
PrintDeviceInfo(p_cam_Info);
//检查指定设备是否可访问
int MV_A = MV_CC_IsDeviceAccessible(p_cam_Info, MV_ACCESS_Control);
if (!MV_A)
{
cout << "设备不允许被访问!" << endl;
}
cout << "设备运行被访问" << endl;
}
//创建相机句柄
int nRet2 = MV_OK;
void* handle = NULL;
nRet2 = MV_CC_CreateHandle(&handle, cam_List.pDeviceInfo[0]);//枚举相机列表中的第一个相机
if (MV_OK != nRet2)
{
cout << "创建句柄失败!nRet2 :" << nRet2 << endl;
system("pause");
return 0;
}
//打开相机
int nRet3 = MV_OK;
nRet3 = MV_CC_OpenDevice(handle);
if (MV_OK != nRet3)
{
cout << "打开相机失败!nRet3 :" << nRet3 << endl;
system("pause");
return 0;
}
//开始取流
	// Start grab image
	nRet = MV_CC_StartGrabbing(handle);
	if (MV_OK != nRet)
	{
		cout << "取流失败!nRet :" << nRet << endl;
		system("pause");
		return 0;
	}
创建结构体
//MV_CC_PIXEL_CONVERT_PARAM stConvertParam = { 0 };
//nRet = MV_CC_ConvertPixelType(handle, &stConvertParam);
//if (MV_OK != nRet)
//{
// cout << "图像创建失败!nRet :" << nRet << endl;
// system("pause");
// return 0;
//}
///**************************************/
使用内部缓存获取一帧图片
ConvertPixelType.cpp
例子来自 ConnectSpecCamera.cpp
//MV_FRAME_OUT stImageInfo = { 0 };
//nRet = MV_CC_GetImageBuffer(handle, &stImageInfo, 1000);
//if (nRet == MV_OK)
//{
// cout << "相机采集图像的宽度:" << stImageInfo.stFrameInfo.nWidth << endl;
// cout << "相机采集图像的高度:" << stImageInfo.stFrameInfo.nHeight << endl;
// cout << "相机采集图像的帧号:" << stImageInfo.stFrameInfo.nFrameNum << endl;
//
// //ConvertPixelType.cpp
// MV_DISPLAY_FRAME_INFO stDisplayInfo = { 0 };
// //HWND g_hWnd = AfxGetMainWnd()->m_hWnd;
// //if (g_hwnd)
// {
// cout << "正在输出" << endl;
// //stDisplayInfo.hWnd = GetDesktopWindow();
// //GetDesktopWindow该函数返回桌面窗口的句柄;
// stDisplayInfo.hWnd = GetForegroundWindow();
// //是获取当前系统中被激活的窗口
// stDisplayInfo.pData = stImageInfo.pBufAddr;
// stDisplayInfo.nDataLen = stImageInfo.stFrameInfo.nFrameLen;
// stDisplayInfo.nWidth = stImageInfo.stFrameInfo.nWidth;
// stDisplayInfo.nHeight = stImageInfo.stFrameInfo.nHeight;
// stDisplayInfo.enPixelType = stImageInfo.stFrameInfo.enPixelType;
// MV_CC_DisplayOneFrame(handle, &stDisplayInfo);
// //system("pause");
// }
// //释放指针 MV_CC_GetImageBuffer---&stImageInfo
// nRet = MV_CC_FreeImageBuffer(handle, &stImageInfo);
// if (nRet != MV_OK)
// {
// cout << "Free Image Buffer fail! nRet=" << nRet << endl;
// }
//}
//else
//{
// cout << "No data! nRet=" << nRet << endl;
//}
///**************************************/
unsigned char *pConvertData = NULL;
unsigned int nConvertDataSize = 0;
//ConvertPixelType.cpp
//图像格式转换
//该示例程序通过图像转换接口将相机取图的图像格式转换为用户需要的格式。
MV_FRAME_OUT stImageInfo = { 0 };
nRet = MV_CC_GetImageBuffer(handle, &stImageInfo, 1000);
if (nRet == MV_OK)
{
printf("Get One Frame: Width[%d], Height[%d], nFrameNum[%d]\n",
stImageInfo.stFrameInfo.nWidth, stImageInfo.stFrameInfo.nHeight, stImageInfo.stFrameInfo.nFrameNum);
MvGvspPixelType enDstPixelType = PixelType_Gvsp_Undefined;
unsigned int nChannelNum = 0;
char chFileName[MAX_PATH] = { 0 };
//If it is color, converted to RGB8
if (IsColor(stImageInfo.stFrameInfo.enPixelType))
{
nChannelNum = 3;
enDstPixelType = PixelType_Gvsp_RGB8_Packed;
sprintf(chFileName, "AfterConvert.rgb");
}
//If it's Mono, converted to Mono8
else if (IsMono(stImageInfo.stFrameInfo.enPixelType))
{
nChannelNum = 1;
enDstPixelType = PixelType_Gvsp_Mono8;
sprintf(chFileName, "AfterConvert.gray");
}
else
{
printf("Don't need to convert!\n");
}
if (enDstPixelType != PixelType_Gvsp_Undefined)
{
pConvertData = (unsigned char*)malloc(stImageInfo.stFrameInfo.nWidth * stImageInfo.stFrameInfo.nHeight * nChannelNum);
if (NULL == pConvertData)
{
printf("malloc pConvertData fail!\n");
nRet = MV_E_RESOURCE;
return;
}
nConvertDataSize = stImageInfo.stFrameInfo.nWidth * stImageInfo.stFrameInfo.nHeight * nChannelNum;
// Convert pixel format
MV_CC_PIXEL_CONVERT_PARAM stConvertParam = { 0 };
stConvertParam.nWidth = stImageInfo.stFrameInfo.nWidth; // image width
stConvertParam.nHeight = stImageInfo.stFrameInfo.nHeight; // image height
stConvertParam.pSrcData = stImageInfo.pBufAddr; // input data buffer
stConvertParam.nSrcDataLen = stImageInfo.stFrameInfo.nFrameLen; // input data size
stConvertParam.enSrcPixelType = stImageInfo.stFrameInfo.enPixelType; // input pixel format
stConvertParam.enDstPixelType = enDstPixelType; // output pixel format
stConvertParam.pDstBuffer = pConvertData; // output data buffer
stConvertParam.nDstBufferSize = nConvertDataSize; // output buffer size
nRet = MV_CC_ConvertPixelType(handle, &stConvertParam);
if (MV_OK != nRet)
{
printf("Convert Pixel Type fail! nRet [0x%x]\n", nRet);
return;
}
FILE* fp = NULL;
errno_t err = fopen_s(&fp, chFileName, "wb");
if (0 != err || NULL == fp)
{
printf("Open file failed\n");
nRet = MV_E_RESOURCE;
return;
}
fwrite(stConvertParam.pDstBuffer, 1, stConvertParam.nDstLen, fp);
fclose(fp);
printf("Convert pixeltype succeed\n");
}
MV_CC_FreeImageBuffer(handle, &stImageInfo);
}
else
{
printf("No data[0x%x]\n", nRet);
}
//
//停止采集
// Stop grab image
nRet = MV_CC_StopGrabbing(handle);
if (MV_OK != nRet)
{
cout << "停止采集失败!nRet :" << nRet << endl;
system("pause");
return 0;
}
//关闭相机
int nRet4 = MV_OK;
nRet4=MV_CC_CloseDevice(handle);
if (MV_OK != nRet4)
{
cout << "关闭相机失败!nRet4 :" << nRet4 << endl;
return 0;
}
//销毁句柄
if (handle != NULL)
{
MV_CC_DestroyHandle(handle);
handle = NULL;
}
cout << "Hello!" << endl;
system("pause");
return 0;
}2.6 停止抓图(停止取流)
调用 MV_CC_StopGrabbing() 停止采集。
int  MV_CC_StopGrabbing  ( IN void *  handle )

停止取流

参数
handle [IN] 设备句柄

返回
成功,返回MV_OK;
失败,返回错误码

备注
该接口不支持CameraLink设备。
2.7 关闭相机设备
调用 MV_CC_CloseDevice() 关闭设备。
int  MV_CC_CloseDevice  ( IN void *  handle )
关闭设备

参数
handle [IN] 设备句柄

返回
成功,返回MV_OK;
失败,返回错误码

备注
通过 MV_CC_OpenDevice() 连接设备后,可以通过该接口断开设备连接,释放资源
//关闭相机
int nRet4 = MV_OK;
nRet4=MV_CC_CloseDevice(handle);//此处handle参数为MV_CC_CreateHandle创建的相机句柄
if (MV_OK != nRet4)
{
cout << "关闭相机失败!nRet4 :" << nRet4 << endl;
return 0;
}2.8 销毁句柄
调用 MV_CC_DestroyHandle() 销毁句柄并释放资源。
int  MV_CC_DestroyHandle  ( IN void *  handle )

销毁设备句柄

参数
handle [IN] 设备句柄

返回
成功,返回MV_OK;
失败,返回错误码 。
//销毁句柄
if (handle != NULL)
{
MV_CC_DestroyHandle(handle);//此处handle参数为MV_CC_CreateHandle创建的相机句柄
handle = NULL;
}3.实验源码
#include<iostream>
#include<MvCameraControl.h>
#include "windows.h"
using namespace std;
void PrintDeviceInfo(MV_CC_DEVICE_INFO* pstMVDevInfo)
{
if (NULL == pstMVDevInfo)
{
printf("The Pointer of pstMVDevInfo is NULL!\n");
return;
}
if (pstMVDevInfo->nTLayerType == MV_GIGE_DEVICE)
{
int nIp1 = ((pstMVDevInfo->SpecialInfo.stGigEInfo.nCurrentIp & 0xff000000) >> 24);
int nIp2 = ((pstMVDevInfo->SpecialInfo.stGigEInfo.nCurrentIp & 0x00ff0000) >> 16);
int nIp3 = ((pstMVDevInfo->SpecialInfo.stGigEInfo.nCurrentIp & 0x0000ff00) >> 8);
int nIp4 = (pstMVDevInfo->SpecialInfo.stGigEInfo.nCurrentIp & 0x000000ff);
// en:print current ip and user defined name
printf("CurrentIp: %d.%d.%d.%d\n", nIp1, nIp2, nIp3, nIp4);
cout << "用户自定义名称: " << pstMVDevInfo->SpecialInfo.stGigEInfo.chUserDefinedName << endl;
cout << "相机序列号: " << pstMVDevInfo->SpecialInfo.stGigEInfo.chSerialNumber << endl;
}
else if (pstMVDevInfo->nTLayerType == MV_USB_DEVICE)
{
printf("UserDefinedName: %s\n", pstMVDevInfo->SpecialInfo.stUsb3VInfo.chUserDefinedName);
printf("Serial Number: %s\n", pstMVDevInfo->SpecialInfo.stUsb3VInfo.chSerialNumber);
printf("Device Number: %d\n\n", pstMVDevInfo->SpecialInfo.stUsb3VInfo.nDeviceNumber);
}
else
{
printf("Not support.\n");
}
}
int main()
{
//https://blog.csdn.net/weixin_44840658/article/details/89174782
//枚举相机
//先定义一个设备列表,用来存放枚举到的设备
MV_CC_DEVICE_INFO_LIST cam_List;//列表 用于存放枚举到的相机列表
//枚举
int nRet = MV_OK;
nRet = MV_CC_EnumDevices(MV_GIGE_DEVICE, &cam_List);
if (MV_OK != nRet)
{
cout<<"Enum Devices fail! nRet [0x%x]\n"<< nRet<<endl;
return 0;
}
else//找到相机
{
//枚举到相机后,就可以获取到相机的一些设备信息
//打印设备的SN码、设备名称、制造商
//获取枚举到的相机数量
int cam_num = cam_List.nDeviceNum;
cout << "相机数量:" << cam_num << endl;
//留给后边研究,没有运行成功
MV_CC_DEVICE_INFO* p_cam_Info = cam_List.pDeviceInfo[0];
//相机相关参数输出
PrintDeviceInfo(p_cam_Info);
//检查指定设备是否可访问
int MV_A = MV_CC_IsDeviceAccessible(p_cam_Info, MV_ACCESS_Control);
if (!MV_A)
{
cout << "设备不允许被访问!" << endl;
}
cout << "设备运行被访问" << endl;
}
//创建相机句柄
int nRet2 = MV_OK;
void* handle = NULL;
nRet2 = MV_CC_CreateHandle(&handle, cam_List.pDeviceInfo[0]);//枚举相机列表中的第一个相机
if (MV_OK != nRet2)
{
cout << "创建句柄失败!nRet2 :" << nRet2 << endl;
system("pause");
return 0;
}
//打开相机
int nRet3 = MV_OK;
nRet3 = MV_CC_OpenDevice(handle);
if (MV_OK != nRet3)
{
cout << "打开相机失败!nRet3 :" << nRet3 << endl;
system("pause");
return 0;
}
//开始取流
// Start grab image
nRet = MV_CC_StartGrabbing(handle);
if (MV_OK != nRet)
{
cout << "取流失败!nRet :" << nRet << endl;
system("pause");
return 0;
}
创建结构体
//MV_CC_PIXEL_CONVERT_PARAM stConvertParam = { 0 };
//nRet = MV_CC_ConvertPixelType(handle, &stConvertParam);
//if (MV_OK != nRet)
//{
// cout << "图像创建失败!nRet :" << nRet << endl;
// system("pause");
// return 0;
//}
//使用内部缓存获取一帧图片
//例子来自 ConnectSpecCamera.cpp
MV_FRAME_OUT stImageInfo = { 0 };
nRet = MV_CC_GetImageBuffer(handle, &stImageInfo, 1000);
if (nRet == MV_OK)
{
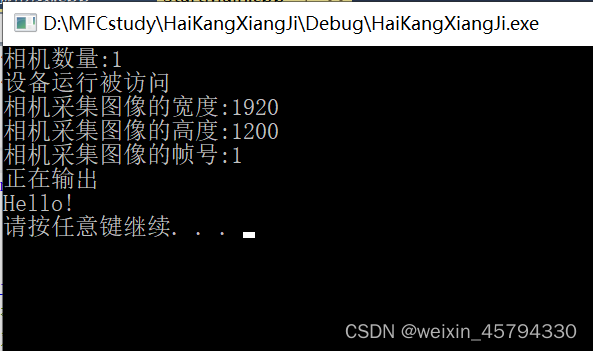
cout << "相机采集图像的宽度:" << stImageInfo.stFrameInfo.nWidth << endl;
cout << "相机采集图像的高度:" << stImageInfo.stFrameInfo.nHeight << endl;
cout << "相机采集图像的帧号:" << stImageInfo.stFrameInfo.nFrameNum << endl;
//ConvertPixelType.cpp
MV_DISPLAY_FRAME_INFO stDisplayInfo = { 0 };
//HWND g_hWnd = AfxGetMainWnd()->m_hWnd;
//if (g_hwnd)
{
cout << "正在输出" << endl;
//stDisplayInfo.hWnd = GetDesktopWindow();
//GetDesktopWindow该函数返回桌面窗口的句柄;
stDisplayInfo.hWnd = GetForegroundWindow();
//是获取当前系统中被激活的窗口
stDisplayInfo.pData = stImageInfo.pBufAddr;
stDisplayInfo.nDataLen = stImageInfo.stFrameInfo.nFrameLen;
stDisplayInfo.nWidth = stImageInfo.stFrameInfo.nWidth;
stDisplayInfo.nHeight = stImageInfo.stFrameInfo.nHeight;
stDisplayInfo.enPixelType = stImageInfo.stFrameInfo.enPixelType;
MV_CC_DisplayOneFrame(handle, &stDisplayInfo);
//system("pause");
}
//释放指针 MV_CC_GetImageBuffer---&stImageInfo
nRet = MV_CC_FreeImageBuffer(handle, &stImageInfo);
if (nRet != MV_OK)
{
cout << "Free Image Buffer fail! nRet=" << nRet << endl;
}
}
else
{
cout << "No data! nRet=" << nRet << endl;
}
//
//停止采集
// Stop grab image
nRet = MV_CC_StopGrabbing(handle);
if (MV_OK != nRet)
{
cout << "停止采集失败!nRet :" << nRet << endl;
system("pause");
return 0;
}
//关闭相机
int nRet4 = MV_OK;
nRet4=MV_CC_CloseDevice(handle);
if (MV_OK != nRet4)
{
cout << "关闭相机失败!nRet4 :" << nRet4 << endl;
return 0;
}
//销毁句柄
if (handle != NULL)
{
MV_CC_DestroyHandle(handle);
handle = NULL;
}
cout << "Hello!" << endl;
system("pause");
return 0;
}hikvision SDK使用(转)-腾讯云开发者社区-腾讯云
4.运行结果
在海康工业相机的SDK中,MV_CC_GetImageBuffer()和MV_CC_FreeImageBuffer()是两个重要的函数,用于处理图像数据的获取和释放,是图像采集过程中必不可少的部分。下面是这两个函数的作用和使用说明:
MV_CC_GetImageBuffer()作用: MV_CC_GetImageBuffer()函数用于从相机获取一帧图像数据。当相机开始采集后,该函数会被调用以获得相机捕获的图像缓冲区。该函数会返回图像数据的指针,以及相关的图像信息,如宽度、高度、像素格式等。
函数原型:MV_STATUS MV_CC_GetImageBuffer(MV_FRAME_OUT_INFO_EX *pFrameInfo, void **ppData, int nWaitTime);
参数说明:•pFrameInfo:指向MV_FRAME_OUT_INFO_EX结构体的指针,用于接收图像信息,包括图像的宽度、高度、像素格式、图像数据大小等。•ppData:指向一个void*类型的指针变量,该函数会将图像数据的指针赋值给这个变量。•nWaitTime:等待获取图像数据的时间,单位为毫秒。如果在指定时间内未能获取到图像数据,函数将返回超时错误。
MV_CC_FreeImageBuffer()作用: MV_CC_FreeImageBuffer()函数用于释放通过MV_CC_GetImageBuffer()获取的图像缓冲区。在处理完图像数据后,必须调用此函数来释放内存,防止内存泄漏。函数原型:MV_STATUS MV_CC_FreeImageBuffer(void *pData);
参数说明:•pData:通过MV_CC_GetImageBuffer()函数获取的图像数据指针。调用MV_CC_FreeImageBuffer()时,需要将这个指针作为参数传入,以释放相应的图像缓冲区。
使用示例以下是一个简化的使用示例,展示了如何在C++中使用这两个函数:MV_STATUS ret;
MV_FRAME_OUT_INFO_EX frameInfo;
void* pData = nullptr;

// ... (相机初始化和开始采集)

// 获取一帧图像
ret = MV_CC_GetImageBuffer(&frameInfo, &pData, 1000);
if (ret == MV_OK)
{
    // 处理图像数据
    // ...

    // 释放图像缓冲区
    MV_CC_FreeImageBuffer(pData);
}

// ... (相机停止采集和清理资源)
在实际应用中,MV_CC_GetImageBuffer()通常会在一个循环中多次调用,以连续获取多帧图像,而MV_CC_FreeImageBuffer()则在处理完每一帧图像后立即调用,以及时释放资源。


 1万+
1万+

 被折叠的 条评论
为什么被折叠?
被折叠的 条评论
为什么被折叠?
 到【灌水乐园】发言


