


👨🎓个人主页:研学社的博客
💥💥💞💞欢迎来到本博客❤️❤️💥💥
🏆博主优势:🌞🌞🌞博客内容尽量做到思维缜密,逻辑清晰,为了方便读者。
⛳️座右铭:行百里者,半于九十。
📋📋📋本文目录如下:🎁🎁🎁
目录

💥1 概述
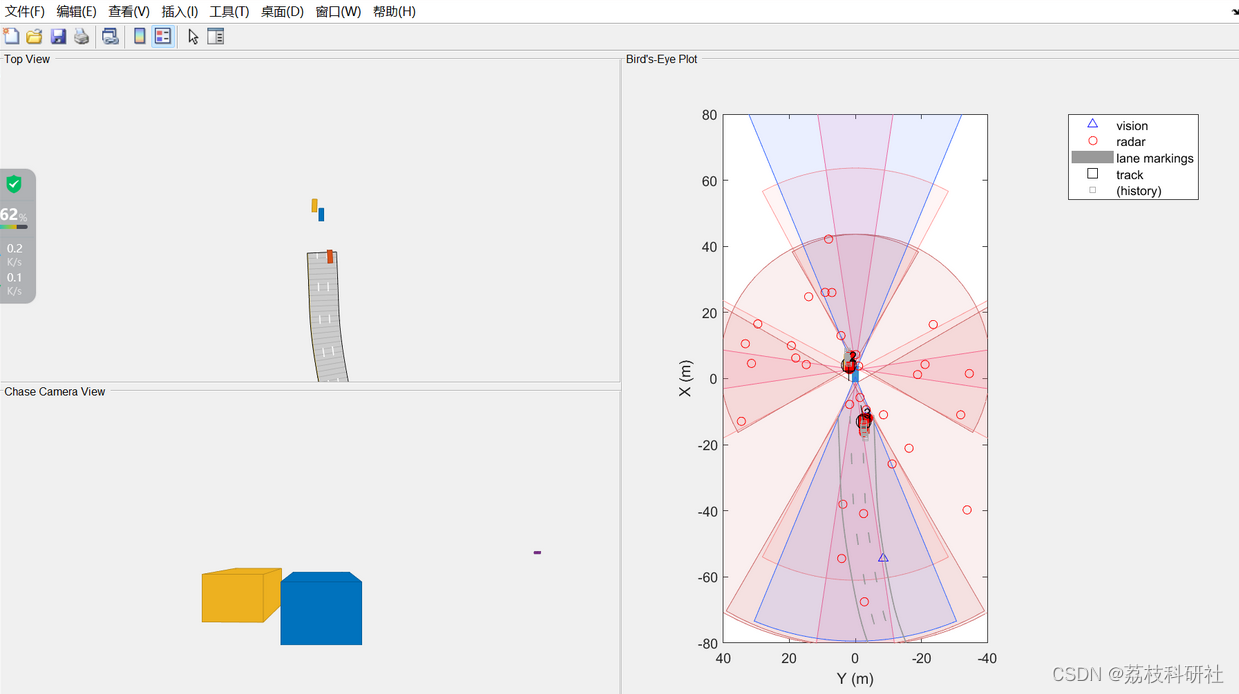
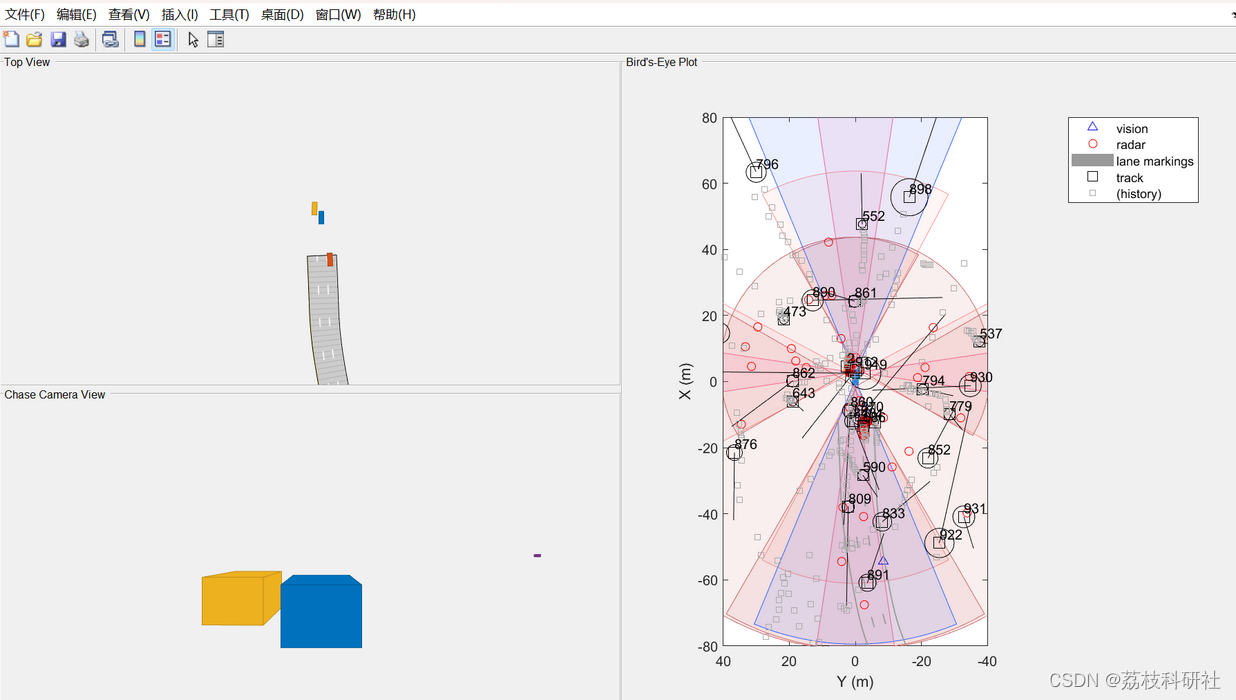
本文使用MATLAB的场景生成器工具箱,通过合成雷达和视觉观察创建一个简单的高速公路驾驶场景。扩展卡尔曼滤波器已被实现以将车辆的状态传播到未来。将投影状态值与当前测量值进行比较以执行跟踪。
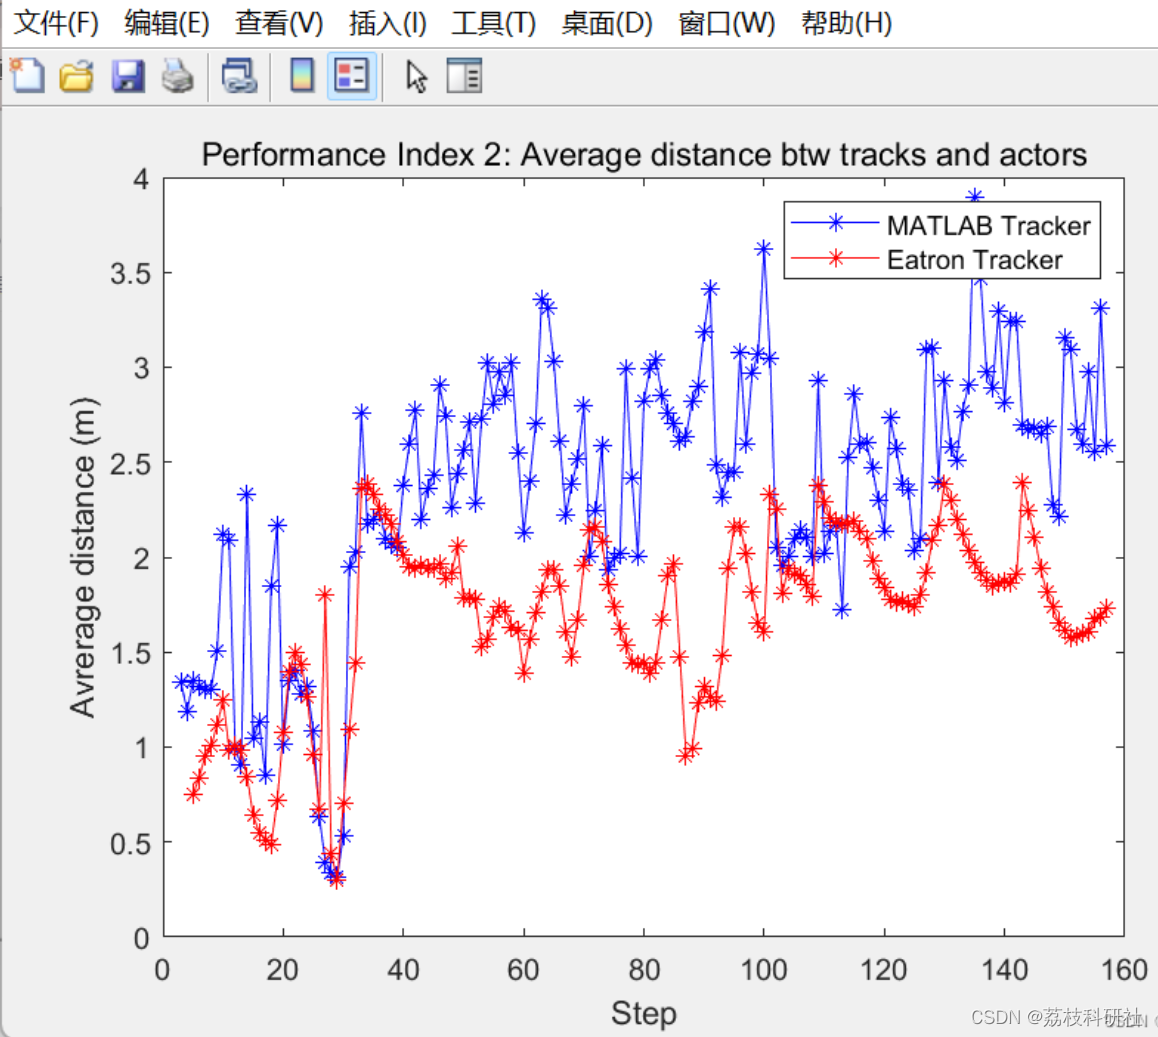
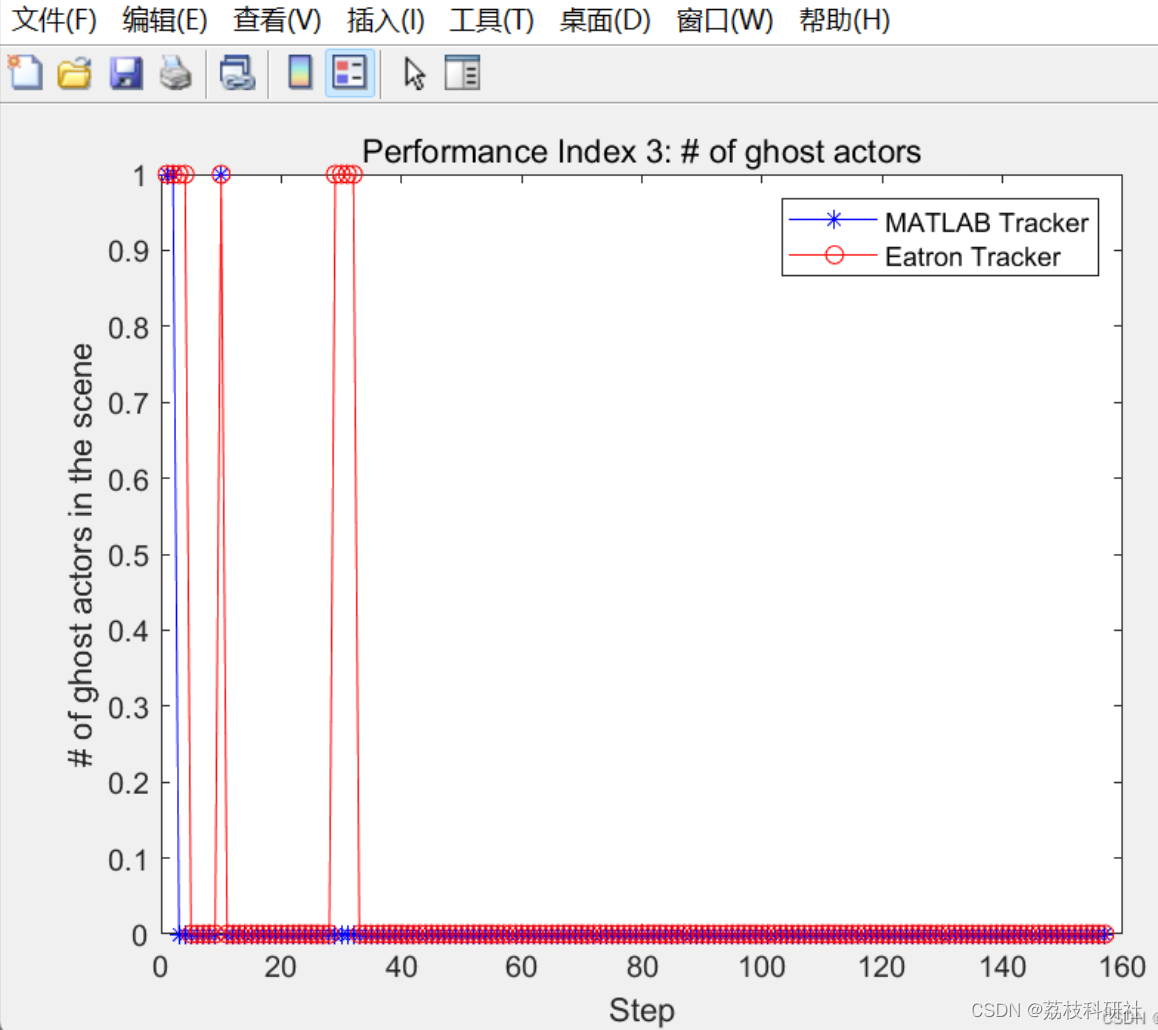
📚2 运行结果

部分代码:
clear all
close all
clc
%% Parameters
% Assignment gate value
AssignmentThreshold = 30; % The higher the Gate value, the higher the likelihood that every track...
% will be assigned a detection.
% M/N initiation parameters
% The track is "confirmed" if after N consecutive updates at
% least M measurements are assigned to the track after the track initiation.
N = 5;
M = 4;
% Elimination threshold: The track will be deleted after EliminationTH # of updates without
% any measurement update
EliminationTH = 10; % updates
% Measurement Noise
R = [22.1 0 0 0
0 2209 0 0
0 0 22.1 0
0 0 0 2209];
% Process noise
Q= 7e-1.*eye(4);
% Performance anlysis parameters:
XScene = 80;
YScene = 40;
% PerfRadius is defined after scenario generation
%% Generate the Scenario
% Define an empty scenario.
scenario = drivingScenario;
scenario.SampleTime = 0.01; % seconds
SensorsSampleRate = 0.1; % seconds
EgoSpeed = 25; % m/s
%% Simple Scenario (Choice #1)
% Load scenario road and extract waypoints for each lane
Scenario = load('SimpleScenario.mat');
WPs{1} = Scenario.data.ActorSpecifications(2).Waypoints;
WPs{2} = Scenario.data.ActorSpecifications(1).Waypoints;
WPs{3} = Scenario.data.ActorSpecifications(3).Waypoints;
road(scenario, WPs{2}, 'lanes',lanespec(3));
% Ego vehicle (lane 2)
egoCar = vehicle(scenario, 'ClassID', 1);
egoWPs = circshift(WPs{2},-8);
path(egoCar, egoWPs, EgoSpeed);
% Car1 (passing car in lane 3)
Car1 = vehicle(scenario, 'ClassID', 1);
Car1WPs = circshift(WPs{1},0);
path(Car1, Car1WPs, EgoSpeed + 5);
% Car2 (car in lane 1)
Car2 = vehicle(scenario, 'ClassID', 1);
Car2WPs = circshift(WPs{3},-15);
path(Car2, Car2WPs, EgoSpeed -5);
% Ego follower (lane 2)
Car3 = vehicle(scenario, 'ClassID', 1);
Car3WPs = circshift(WPs{2},+5);
path(Car3, Car3WPs, EgoSpeed);
% Car4 (stopped car in lane 1)
Car4 = vehicle(scenario, 'ClassID', 1);
Car4WPs = circshift(WPs{3},-13);
path(Car4, Car4WPs, 1);
ActorRadius = norm([Car1.Length,Car1.Width]);
%---------------------------------------------------------------------------------------------
%% Waypoint generation (Choice #2)
% % Load scenario road and extract waypoints for each lane
% WPs = GetLanesWPs('Scenario3.mat');
% % Define road wtr the middle lane waypoints
% road(scenario, WPs{2}, 'lanes',lanespec(3));
% %%%%%%%%%%%% BE CAREFUL OF LANESPACE(3) %%%%%%%%%%%%%%%%%%%%%%%%%%%%%%%%%%%%%
% % Ego vehicle (lane 2)
% egoCar = vehicle(scenario, 'ClassID', 1);
% path(egoCar, WPs{2}, EgoSpeed); % On right lane
%
% % Car1 (passing car in lane 3)
% Car1 = vehicle(scenario, 'ClassID', 1);
% WPs{1} = circshift(WPs{1},20);
% path(Car1, WPs{1}, EgoSpeed + 2);
%
% % Car2 (slower car in lane 1)
% Car2 = vehicle(scenario, 'ClassID', 1);
% WPs{3} = circshift(WPs{3},-50);
% path(Car2, WPs{3}, EgoSpeed -5);
%---------------------------------------------------------------------------------------------
%% Create a Tracker
% Create a |<matlab:doc('multiObjectTracker') multiObjectTracker>| to track
% the vehicles that are close to the ego vehicle. The tracker uses the
% |initSimDemoFilter| supporting function to initialize a constant velocity
% linear Kalman filter that works with position and velocity.
%
% Tracking is done in 2-D. Although the sensors return measurements in 3-D,
% the motion itself is confined to the horizontal plane, so there is no
% need to track the height.
tracker = multiObjectTracker('FilterInitializationFcn', @initSimDemoFilter, ...
'AssignmentThreshold', 30, 'ConfirmationParameters', [4 5]);
positionSelector = [1 0 0 0; 0 0 1 0]; % Position selector
velocitySelector = [0 1 0 0; 0 0 0 1]; % Velocity selector
%% Define Sensors and Bird's Eye Plot
sensors = SensorsConfig(egoCar,SensorsSampleRate);
BEP = createDemoDisplay(egoCar, sensors);
BEP1 = createDemoDisplay(egoCar, sensors);
%% Fusion Loop for the scenario
Tracks = [];
count = 0;
toSnap = true;
TrackerStep = 0;
time0 = 0;
currentStep = 0;
Performance.Actors.Ground = [];
Performance.Actors.EATracks = [];
Performance.Actors.MATracks = [];
Performance.MeanDistance.EA = [];
Performance.MeanDistance.MA = [];
Performance.GhostActors.EA = [];
Performance.GhostActors.MA = [];
while advance(scenario) %&& ishghandle(BEP.Parent)
currentStep = currentStep + 1;
% Get the scenario time
time = scenario.SimulationTime;
% Get the position of the other vehicle in ego vehicle coordinates
ta = targetPoses(egoCar);
% Simulate the sensors
detections = {};
isValidTime = false(1,length(sensors));
for i = 1:length(sensors)
[sensorDets,numValidDets,isValidTime(i)] = sensors{i}(ta, time);
if numValidDets
for j = 1:numValidDets
% Vision detections do not report SNR. The tracker requires
% that they have the same object attributes as the radar
% detections. This adds the SNR object attribute to vision
% detections and sets it to a NaN.
if ~isfield(sensorDets{j}.ObjectAttributes{1}, 'SNR')
sensorDets{j}.ObjectAttributes{1}.SNR = NaN;
end
end
detections = [detections; sensorDets]; %#ok<AGROW>
end
end
% Update the tracker if there are new detections
if any(isValidTime)
TrackerStep = TrackerStep + 1;
🎉3 参考文献
部分理论来源于网络,如有侵权请联系删除。
[1]尹晓东,刘后铭.改进的多目标多传感器数据融合相关算法[J].地质科技管理,1994(03):225-231.


 4716
4716


 被折叠的 条评论
为什么被折叠?
被折叠的 条评论
为什么被折叠?
 到【灌水乐园】发言


