


成功训练配置darknet_yolov4流程及细节
1、环境编译
2、VOC数据集下载
3、修改训练.cfg及.data文件
4、cfg配置参数详解
5、训练脚本,开始训练
6、How to save weight on Linux training?
7、控制台输出信息解释
8、数据集train.txt中的.jpg必须是绝对路径
9、关于burn_in & learning rate
1.1、下载darknet
git clone https://github.com/AlexeyAB/darknet.git
1.2、修改makefile并make编译
cd darknet
根据自己服务器或电脑情况,修改makefile

OPENCV为1的话,安装OpenCV可以在终端中输入以下命令:
sudo apt-get install libopencv-dev
之后,make进行编译
2.1、官网https://github.com/AlexeyAB/darknet中有很多数据集,以VOC为例
wget https://pjreddie.com/media/files/VOCtrainval_11-May-2012.tar
wget https://pjreddie.com/media/files/VOCtrainval_06-Nov-2007.tar
wget https://pjreddie.com/media/files/VOCtest_06-Nov-2007.tar
tar xf VOCtrainval_11-May-2012.tar
tar xf VOCtrainval_06-Nov-2007.tar
tar xf VOCtest_06-Nov-2007.tar
在script/下新建 VOCdevkit文件夹,把下载的VOC压缩文件放在此文件夹中,tar解压,之后,将scripts/voc_label.py文件复制到新建的VOCdevkit中,运行,之后,VOCdevkit文件夹显示如下:

此时,训练数据VOC准备完毕
3.1 根据数据集的存放位置及classes数据修改cfg,以cfg/voc.data为例:
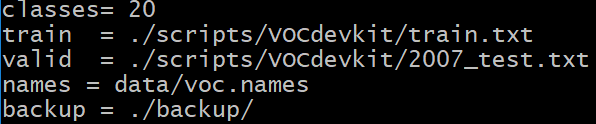
截图倒数第二行的voc.names也要做相应修改
3.2 修改训练需要的配置文件,比如,将将cfg/yolov4-custom.cfg复制重命名为 yolov4-voc.cfg,并对我们要使用的yolov4-voc.cfg做相应修改,最好不要在原始的yolov4-custom.cfg上直接修改:
[net]层要改batch,[yolo]层要改classes,[convolutional]要改filters(yolo层最前面)(配置文件搜yolo,tiny改两处,V4改三处)
修改依据:
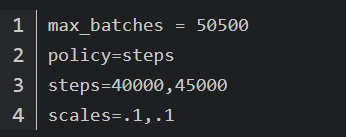
max_batches:change line max_batches to (classes*2000 but not less than number of training images, but not less than number of training images and not less than 6000), f.e. max_batches=6000 if you train for 3 classes
steps:change line steps to 80% and 90% of max_batches, f.e. steps=4800,5400
width&height:set network size width=416 height=416 or any value multiple of 32
filters:(classes + 5)×3
配置文件修改完毕,之后就可以开始训练了
4、在训练之前,我们先看一下cfg中的关键参数都有哪些
[net] section
batch=1 - number of samples (images, letters, ...) which will be precossed in one batch

subdivisions=1 - number of mini_batches in one batch, size mini_batch = batch/subdivisions, so GPU processes mini_batch samples at once, and the weights will be updated for batch samples (1 iteration processes batch images)

width=416 - network size (width), so every image will be resized to the network size during Training and Detection

height=416 - network size (height), so every image will be resized to the network size during Training and Detection

channels=3 - network size (channels), so every image will be converted to this number of channels during Training and Detection

inputs=256 - network size (inputs) is used for non-image data: letters, prices, any custom data

max_chart_loss=20 - max value of Loss in the image chart.png

For training only

Contrastive loss:

contrastive=1 - use Supervised contrastive loss for training Classifier (should be used with [contrastive] layer)

unsupervised=1 - use Unsupervised contrastive loss for training Classifier on images without labels (should be used with contrastive=1 parameter and with [contrastive] layer)

Data augmentation:

angle=0 - randomly rotates images during training (classification only)

saturation = 1.5 - randomly changes saturation of images during training

exposure = 1.5 - randomly changes exposure (brightness) during training

hue=.1 - randomly changes hue (color) during training https://en.wikipedia.org/wiki/HSL_and_HSV

blur=1 - blur will be applied randomly in 50% of the time: if 1 - will be blured background except objects with blur_kernel=31, if >1 - will be blured whole image with blur_kernel=blur (only for detection and if OpenCV is used)

min_crop=224 - minimum size of randomly cropped image (classification only)

max_crop=448 - maximum size of randomly cropped image (classification only)

aspect=.75 - aspect ration can be changed during croping from 0.75 - to 1/0.75 (classification only)

letter_box=1 - keeps aspect ratio of loaded images during training (detection training only, but to use it during detection-inference - use flag -letter_box at the end of detection command)

cutmix=1 - use CutMix data augmentation (for Classifier only, not for Detector)

mosaic=1 - use Mosaic data augmentation (4 images in one)

mosaic_bound=1 - limits the size of objects when mosaic=1 is used (does not allow bounding boxes to leave the borders of their images when Mosaic-data-augmentation is used)

data augmentation in the last [yolo]-layer

jitter=0.3 - randomly changes size of image and its aspect ratio from x(1 - 2*jitter) to x(1 + 2*jitter)
random=1 - randomly resizes network size after each 10 batches (iterations) from /1.4 to x1.4 with keeping initial aspect ratio of network size
adversarial_lr=1.0 - Changes all detected objects to make it unlike themselves from neural network point of view. The neural network do an adversarial attack on itself

attention=1 - shows points of attention during training

gaussian_noise=1 - add gaussian noise

Optimizator:

momentum=0.9 - accumulation of movement, how much the history affects the further change of weights (optimizer)

decay=0.0005 - a weaker updating of the weights for typical features, it eliminates dysbalance in dataset (optimizer) http://cs231n.github.io/neural-networks-3/

learning_rate=0.001 - initial learning rate for training

burn_in=1000 - initial burn_in will be processed for the first 1000 iterations, current_learning rate = learning_rate * pow(iterations / burn_in, power) = 0.001 * pow(iterations/1000, 4) where is power=4 by default

max_batches = 500200 - the training will be processed for this number of iterations (batches)

policy=steps - policy for changing learning rate: constant (by default), sgdr, steps, step, sig, exp, poly, random (f.e., if policy=random - then current learning rate will be changed in this way = learning_rate * pow(rand_uniform(0,1), power))

power=4 - if policy=poly - the learning rate will be = learning_rate * pow(1 - current_iteration / max_batches, power)

sgdr_cycle=1000 - if policy=sgdr - the initial number of iterations in cosine-cycle

sgdr_mult=2 - if policy=sgdr - multiplier for cosine-cycle https://towardsdatascience.com/https-medium-com-reina-wang-tw-stochastic-gradient-descent-with-restarts-5f511975163

steps=8000,9000,12000 - if policy=steps - at these numbers of iterations the learning rate will be multiplied by scales factor

scales=.1,.1,.1 - if policy=steps - f.e. if steps=8000,9000,12000, scales=.1,.1,.1 and the current iteration number is 10000 then current_learning_rate = learning_rate * scales[0] * scales[1] = 0.001 * 0.1 * 0.1 = 0.00001

label_smooth_eps=0.1 - use label smoothing for training Classifier
5、准备训练脚本
touch train_voc.sh
vim train_voc.sh
./darknet detector train cfg/voc.data cfg/yolov4-voc.cfg yolov4.conv.137 -dont show
# or use nohup way
'''nohup ./darknet detector train cfg/voc.data cfg/yolov4-voc.cfg yolov4.conv.137 -dont_show -mjpeg_port8090 -map
 -clear > backup/train_voc_log.log 2>&1'''
训练结束后,在darknet/下会出现chart_yolov4-voc.png的loss和MAP图像曲线,下图是我训练中途实时产生的png图像:

下面是我在运行中遇到的问题集解决办法
6、可根据save weights的需求,更改darknet/src下的detector.c的385行
 if ((iteration >= (iter_save + 10000) || iteration % 10000 == 0) ||
            (iteration >= (iter_save + 1000) || iteration % 1000 == 0) && net.max_batches < 10000)
        {
            iter_save = iteration;
7、控制台中会输出下面一行信息:

依次为:
current_batch,loss,avg_loss,rate,now()-time,imgs
9、burn_in
官方解释:
burin_in - is used to try to find minimum the nearest to the pre-trained weights.
用来解释接近预训练权重的最小值

例如:
burn_in = 1000
max_batches = 10000
policy = steps
steps = 8000,9000
scales = .1,.1
意思是,总的迭代次数10000次
在8000次迭代时learning_rate *0.1
在9000次迭代时再乘以0.1
如果初始learning_rate=0.001, 那么在1000-8000时lr为 0.001
在8000-9000时为0.0001,在9000-10000时为0.00001
在0-1000时按照上图95行进行更新
https://blog.csdn.net/u010881576/article/details/107053328
https://github.com/AlexeyAB/darknet
gpu&cudnn配置:https://blog.51cto.com/14912988/2551970
opencv:https://stackoverflow.com/questions/49512394/compiling-darknet-with-opencv-python


 3104
3104


 被折叠的 条评论
为什么被折叠?
被折叠的 条评论
为什么被折叠?
 到【灌水乐园】发言


