


 本文详细介绍了OpenMV中各种图像预处理技术,包括自适应直方图均衡、模糊滤波、核滤波、二值分割、边缘检测、腐蚀膨胀等,通过实例展示了这些操作如何改变图像的特征和对比度,旨在提升图像处理效果。
本博客讲述的是获取一张图片首先对图像进行处理,比如畸形矫正,图像滤波等操作。
1.histeq()自适应直方图均衡
# 自适应直方图均衡例子
#
# 此示例展示了如何使用自适应直方图均衡来改善图像中的对比度。
#自适应直方图均衡将图像分割成区域,然后均衡这些区域中的直方图,
#以改善图像对比度与全局直方图均衡化。
#此外,您可以指定剪辑限制以防止对比度变得狂野。
histeq(adaptive=True, clip_limit=50)
# clip_limit <0为您提供正常的自适应直方图均衡,这可能会导致大量的对比噪音...
# clip_limit=1 什么都不做。为获得最佳效果,请略高于1,如下所示。
# 越高,越接近标准自适应直方图均衡,并产生巨大的对比度波动。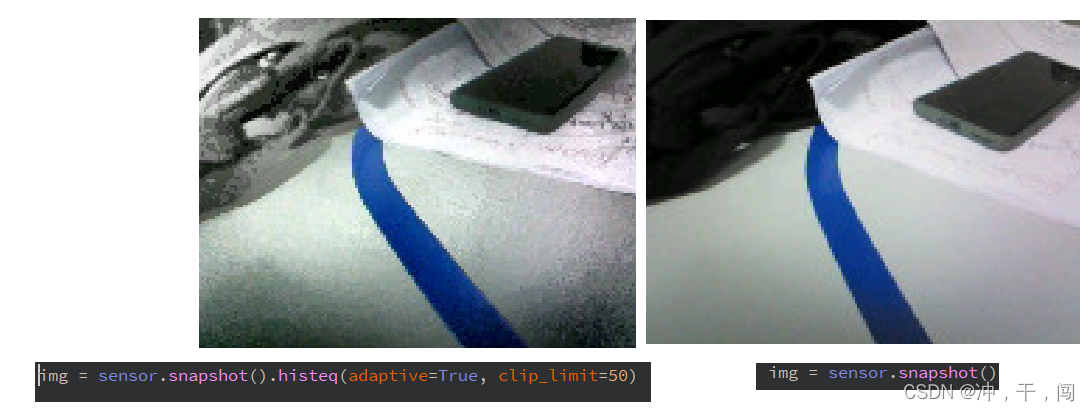 如果没有参数输入那么久默认直方图均衡,目增大对比度。
亮的地方更亮,暗的地方更暗
2.模糊滤波
sensor.set_framesize(sensor.QQVGA)
img = sensor.snapshot() # 拍一张照片,返回图像
# 在图像的每个像素上运行核。
img.gaussian(1)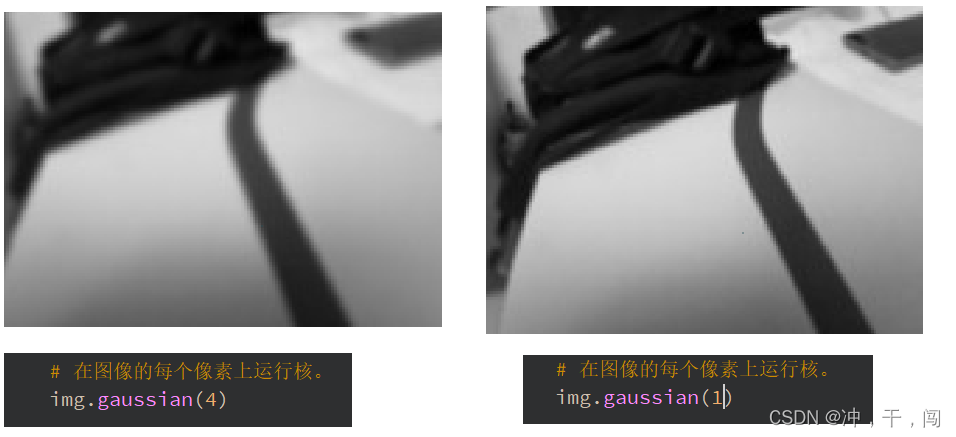 结论:通过对比不同的核数发现核数越大图像越模糊,随着核数的增大帧率也降低
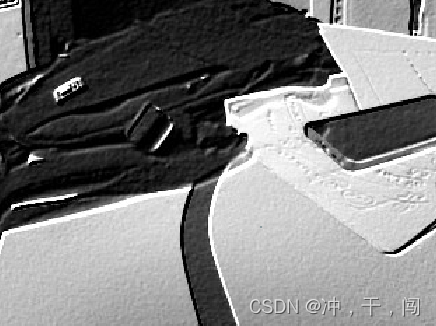
3.核滤波
这个参数还没搞懂,以后需要在研究,先速成在说
import sensor, image, time

sensor.reset() # 初始化sensor

sensor.set_pixformat(sensor.GRAYSCALE) # or sensor.RGB565
#设置图像色彩格式,有RGB565色彩图和GRAYSCALE灰度图两种

sensor.set_framesize(sensor.QVGA) # or sensor.QQVGA (or others)
#设置图像像素大小

sensor.skip_frames(time = 2000) # 让新的设置生效
clock = time.clock() # 跟踪FPS帧率

kernel_size = 1 # 3x3==1, 5x5==2, 7x7==3, etc.

kernel = [-2, -1,  0, \
          -1,  1,  1, \
           0,  1,  2]

while(True):
    clock.tick() # 追踪两个snapshots()之间经过的毫秒数.
    img = sensor.snapshot() # 拍一张照片,返回图像

    # Run the kernel on every pixel of the image.
    # 在图像的每个像素上运行核
    img.morph(kernel_size, kernel)

    print(clock.fps()) # 注意: 当连接电脑后,OpenMV会变成一半的速度。当不连接电脑,帧率会增加。
上述代码核滤波的效果
4.卡通化滤波-在我这个上无法使用
# seed_threshold控制着色区域的最大区域增长。 将其放大会合并更多像素。

    # floating_threshold控制增长区域时的最大像素到像素的差异。设置高的值将快速组合图像中的所有像素。你应该使其小一些。

    # cartoon() 将增长同时两个限制都满足的区域...

    img = sensor.snapshot().cartoon(seed_threshold=0.05, floating_thresholds=0.05)
5.彩图双边滤波
import sensor, image, time

sensor.reset()                      # 初始化sensor

sensor.set_pixformat(sensor.RGB565) # or sensor.RGB565
#设置图像色彩格式,有RGB565色彩图和GRAYSCALE灰度图两种

sensor.set_framesize(sensor.QQVGA)  # or sensor.QVGA (or others)
#设置图像像素大小

sensor.skip_frames(time = 2000)     # 让新的设置生效
clock = time.clock() # 跟踪FPS帧率

while(True):
    clock.tick() # 追踪两个snapshots()之间经过的毫秒数.
    img = sensor.snapshot() # 拍一张照片,返回图像

    # color_sigma controls how close color wise pixels have to be to each other to be
    # color_sigma控制彩色明智像素之间必须有多近的距离才能模糊。
    # blured togheter. A smaller value means they have to be closer.
    # 更小的值意味着它们必须更接近。
    # A larger value is less strict.
    # 较大的值不那么严格。

    # space_sigma controls how close space wise pixels have to be to each other to be
    # space_sigma控制空间智慧像素彼此之间必须有多近才能模糊
    # blured togheter. A smaller value means they have to be closer.
    # 更小的值意味着它们必须更接近。
    # A larger value is less strict.
    # 较大的值不那么严格。

    # Run the kernel on every pixel of the image.
    # 在图像的每个像素上运行核
    img.bilateral(3, color_sigma=0.1, space_sigma=1)

    # Note that the bilateral filter can introduce image defects if you set
    # color_sigma/space_sigma to aggresively. Increase the sigma values until
    # the defects go away if you see them.
    # 请注意,如果将color_sigma/space_sigma设置为聚合,双边过滤器可能会引入图像缺陷。
    # 如果你看到缺陷,增加sigma值直到缺陷
最低0.47元/天 解锁文章


 2803
2803

 被折叠的 条评论
为什么被折叠?
被折叠的 条评论
为什么被折叠?
 到【灌水乐园】发言


