


一.Recovery基本概念
Android支持Recovery模式。在某些操作之后,系统会自动重启并进入到Recovery模式,用户按组合键开机(HOME+POWER),也可进入Recovery模式。该模式提供如下功能:
1、擦除用户数据
恢复系统到出厂模式,即擦除用户数据和缓存数据。
2、系统升级
系统升级的概念比较广,包括系统文件的升级、恢复损害的系统数据、firmware的升级,以及应用软件的维护,甚至影音文件的下载。系统升级需要使用特定的升级包,Android使用OTA[1]升级包,其初衷在于可以发挥广域无线通信链路的优势,如3G。
升级方式有两种:
1、在线升级
利用无线通信网络,系统自动连接更新源,查看有无升级包、下载OTA升级包,然后给出提示,发起升级过程,如下左图。感觉有点类似Windows XP的系统更新,只不过升级的时候,Android系统会重启系统进入Recovery模式。另外Android的升级内容很广泛,比如可以通过这种方式安装应用程序。T-Mobile已经提供了这种服务,如升级服务器以OTA无线方式向G1终端发送Android平台RC33升级包,传输媒介可以是3G网络、Wi-Fi或GPRS。
2、离线升级
可以将下载到的OTA包放在SD卡里,通过离线方式升级,如下右图所示。这种升级方式比较灵活,不用花费无线流量。这样一来,使用自己制作的OTA进行升级也成为可能。事实上,G1就是用这种方式进行刷机的,比如更新radio firmware以支持某个频段。
二.正常模式下的升级流程
涉及的源码路径:
framework/base/core/java/android/os/RecoverySystem.java
framework/base/service/core/java/com/android/server/RecoverySystemService.java
bootable/recovery/uncrypt/uncrypt.rc
bootable/recovery/uncrypt/uncrypt.cpp
bootable/recovery/bootloader_message/Bootloader_message.cpp
代码跟踪
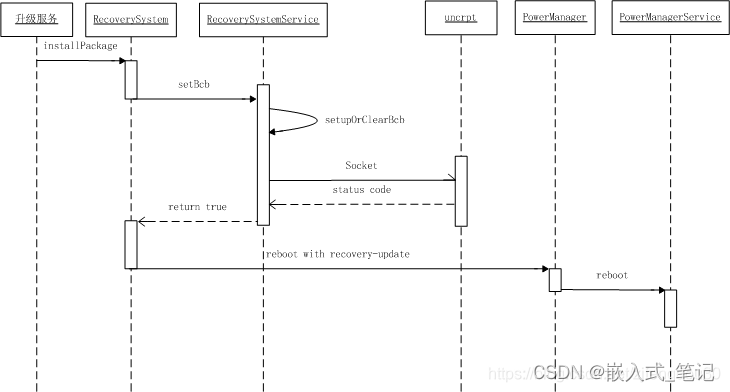
当我们需要进行系统升级或者执行恢复出厂设置等动作时,系统framework通过RecoverySystem封装了一套完整的API来实现此功能,上层只需要调用接口即可。
该类提供了如下接口:
验证包的签名
public static void verifyPackage(File packageFile,
                                     ProgressListener listener,
                                     File deviceCertsZipFile)
        throws IOException, GeneralSecurityException {
}
这个函数主要是对读取X509公钥,并进行验证。 Recovery模式下,也会对包的签名进行校验,这里针对不同的需求,可选择是否调用。
安装升级包
public static void installPackage(Context context, File packageFile)
这里将会调用系统隐藏的installPackage方法,生成升级命令,并将命令写入misc分区中。
public static void installPackage(Context context, File packageFile, boolean processed)
            throws IOException {
        synchronized (sRequestLock) {
            LOG_FILE.delete();
            // Must delete the file in case it was created by system server.
            UNCRYPT_PACKAGE_FILE.delete();

            String filename = packageFile.getCanonicalPath();
            Log.w(TAG, "!!! REBOOTING TO INSTALL " + filename + " !!!");

            // If the package name ends with "_s.zip", it's a security update.
			//文件名称以_s结尾的,表示此次升级为安全升级模式。
            boolean securityUpdate = filename.endsWith("_s.zip");

            // If the package is on the /data partition, the package needs to
            // be processed (i.e. uncrypt'd). The caller specifies if that has
            // been done in 'processed' parameter.
			// android7.0对/data分区有加密,所以如果包的路径在/data分区的话,我们需要从分区中去找包
            if (filename.startsWith("/data/")) {
                if (processed) {
                    if (!BLOCK_MAP_FILE.exists()) {
                        Log.e(TAG, "Package claimed to have been processed but failed to find "
                                + "the block map file.");
                        throw new IOException("Failed to find block map file");
                    }
                } else {
                    FileWriter uncryptFile = new FileWriter(UNCRYPT_PACKAGE_FILE);
                    try {
                        uncryptFile.write(filename + "\n");
                    } finally {
                        uncryptFile.close();
                    }
                    // UNCRYPT_PACKAGE_FILE needs to be readable and writable
                    // by system server.
                    if (!UNCRYPT_PACKAGE_FILE.setReadable(true, false)
                            || !UNCRYPT_PACKAGE_FILE.setWritable(true, false)) {
                        Log.e(TAG, "Error setting permission for " + UNCRYPT_PACKAGE_FILE);
                    }

                    BLOCK_MAP_FILE.delete();
                }

                // If the package is on the /data partition, use the block map
                // file as the package name instead.
                filename = "@/cache/recovery/block.map";
            }

		    //拼接对应的升级命令,这些命令将会在Recovery模式下中使用。
            final String filenameArg = "--update_package=" + filename + "\n";
            final String localeArg = "--locale=" + Locale.getDefault().toString() + "\n";
            final String securityArg = "--security\n";

            String command = filenameArg + localeArg;
            if (securityUpdate) {
                command += securityArg;
            }

            RecoverySystem rs = (RecoverySystem) context.getSystemService(Context.RECOVERY_SERVICE);
			//调用RecoverySystemService远程服务的方法将命令写入到BCB中
            if (!rs.setupBcb(command)) {
                throw new IOException("Setup BCB failed");
            }

            // Having set up the BCB (bootloader control block), go ahead and reboot
            PowerManager pm = (PowerManager) context.getSystemService(Context.POWER_SERVICE);
            pm.reboot(PowerManager.REBOOT_RECOVERY_UPDATE);

            throw new IOException("Reboot failed (no permissions?)");
        }
}
上述函数的功能,主要总结为制作升级命令,并将其写入BCB, 然后重启系统至Recovery, 升级命令的生成,再该函数中已经完成,继续跟踪如何将命令写入BCB中。
写入BCB的实现在RecoverySystemService.java中,RecoverySystemService是一个远程服务类,其内部定义了,BinderService实现了IRecoverySystem接口,所以RecoverySystem调用setupBcb实际最终走到RecoverySystemService的内部类BinderService的setupBcb函数。
@Override // Binder call
public boolean setupBcb(String command) {
            if (DEBUG) Slog.d(TAG, "setupBcb: [" + command + "]");
            synchronized (sRequestLock) {
                return setupOrClearBcb(true, command);
            }
}
此函数未实现相关功能,直接调用服务的方法setupOrClearBcb方法,
 private boolean setupOrClearBcb(boolean isSetup, String command) {
            mContext.enforceCallingOrSelfPermission(android.Manifest.permission.RECOVERY, null);
            //检查uncrypt服务是否已经运行, uncrypt是一个本地进程
            final boolean available = checkAndWaitForUncryptService();
            if (!available) {
                Slog.e(TAG, "uncrypt service is unavailable.");
                return false;
            }

            if (isSetup) {
			    //向init进程发送setup-bcb命令
                SystemProperties.set("ctl.start", "setup-bcb");
            } else {
                SystemProperties.set("ctl.start", "clear-bcb");
            }

            ...
			...
SystemProperties.set(“ctl.start”, “setup-bcb”);设置属性后,由init进程响应该动作,启动一个名称为setup-bcb的服务。实际就是执行uncrypt可执行程序。该服务定义在uncrypt.rc中
service setup-bcb /system/bin/uncrypt --setup-bcb
    class main
	socket uncrypt stream 600 system system
	disabled
	oneshot
uncrypt被执行,走到此时代码走到其入口函数处
int main(int argc, char** argv) {
    //定义三种动作类型
    enum { UNCRYPT, SETUP_BCB, CLEAR_BCB } action;
    const char* input_path = nullptr;
    const char* map_file = CACHE_BLOCK_MAP.c_str();

    if (argc == 2 && strcmp(argv[1], "--clear-bcb") == 0) {
        action = CLEAR_BCB;
    } else if (argc == 2 && strcmp(argv[1], "--setup-bcb") == 0) {
	    //我们从属性设置启动的参数为 --setup-bcb, 所以走此处逻辑
        action = SETUP_BCB;
    } else if (argc == 1) {
        action = UNCRYPT;
    } else if (argc == 3) {
        input_path = argv[1];
        map_file = argv[2];
        action = UNCRYPT;
    } else {
        usage(argv[0]);
        return 2;
    }
    //根据平台读取分区表
    if ((fstab = read_fstab()) == nullptr) {
        log_uncrypt_error_code(kUncryptFstabReadError);
        return 1;
    }

    ...
	...

    bool success = false;
    switch (action) {
        case UNCRYPT:
            success = uncrypt_wrapper(input_path, map_file, socket_fd.get());
            break;
        case SETUP_BCB:
		    //action 为SETUP_BCB, 执行setup_back函数。
            success = setup_bcb(socket_fd.get());
            break;
        case CLEAR_BCB:
            success = clear_bcb(socket_fd.get());
            break;
        default:  // Should never happen.
            ALOGE("Invalid uncrypt action code: %d", action);
            return 1;
    }

    // c13. Read a 4-byte code from the client before uncrypt exits. This is to
    // ensure the client to receive the last status code before the socket gets
    // destroyed.
    int code;
    if (android::base::ReadFully(socket_fd.get(), &code, 4)) {
        ALOGI("  received %d, exiting now", code);
    } else {
        ALOGE("failed to read the code: %s", strerror(errno));
    }
    return success ? 0 : 1;
}
我们此处传入的参数是 --setup-bcb,所以最终会执行setup_bcb函数,并阻塞在此,等待socket的消息。
static bool setup_bcb(const int socket) {
    // c5. receive message length
	//读取接受到的数据长度
	//数据长度由RecoverySystemService的setupOrClearBcb函数发送
    int length;
    if (!android::base::ReadFully(socket, &length, 4)) {
        ALOGE("failed to read the length: %s", strerror(errno));
        return false;
    }
    length = ntohl(length);

    // c7. receive message
	//读取接受到的数据内容
	//这个数据内容由RecoverySystemService的setupOrClearBcb函数发送
    std::string content;
    content.resize(length);
    if (!android::base::ReadFully(socket, &content[0], length)) {
        ALOGE("failed to read the length: %s", strerror(errno));
        return false;
    }
    ALOGI("  received command: [%s] (%zu)", content.c_str(), content.size());
	...
	...
至此,SystemProperties.set(“ctl.start”, “setup-bcb”); 的动作都执行完成。
接着看RecoverySystemService中的setupOrClearBcb
private boolean setupOrClearBcb(boolean isSetup, String command) {
    ...
	...
	    DataInputStream dis = null;
        DataOutputStream dos = null;
            try {
               //创建输入流与输出流与uncrypt进程通信
                dis = new DataInputStream(socket.getInputStream());
                dos = new DataOutputStream(socket.getOutputStream());

                // Send the BCB commands if it's to setup BCB.
                if (isSetup) {
				    //发送命令长度,将会在uncrypt进程中的setup_bcb函数中获取
                    dos.writeInt(command.length());
					//发送命令内容,将会在uncrypt进程中的setup_bcb函数中获取
                    dos.writeBytes(command);
                    dos.flush();
                }
                ...
                ...
}
在属性设置的时候,就已知uncrypt阻塞的其setup_bcb中等待数据的接受,而其接受的数据就是上述函数的DataOutputSteram发送过去的,首先发送数据长度,然后再发送数据内容。uncrypt的setup_bcb在接受到数据后,继续运行,代码如下:
static bool setup_bcb(const int socket) {
    ...
    ...
     // c8. setup the bcb command
    std::string err;
	//将命令写入bcb
    if (!write_bootloader_message(options, &err)) {
        ALOGE("failed to set bootloader message: %s", err.c_str());
	    //发送失败,socket回复 -1
        write_status_to_socket(-1, socket);
        return false;
    }
    if (!wipe_package.empty() && !write_wipe_package(wipe_package, &err)) {
        ALOGE("failed to set wipe package: %s", err.c_str());
        write_status_to_socket(-1, socket);
        return false;
    }
    // c10. send "100" status
	//发送成功, socket回复100
    write_status_to_socket(100, socket);
    return true;
}
setup_bcb在收到数据之后,会调用write_bootloader_message写入bcb, 该函数定义在bootloader_message.cpp中
bool write_bootloader_message(const bootloader_message& boot, std::string* err) {
  return write_misc_partition(&boot, sizeof(boot), BOOTLOADER_MESSAGE_OFFSET_IN_MISC, err);
}

static bool write_misc_partition(const void* p, size_t size, size_t offset, std::string* err) {
  std::string misc_blk_device = get_misc_blk_device(err); //得到misc设备描述符
  if (misc_blk_device.empty()) {
    return false;
  }
  //打开misc设备
  android::base::unique_fd fd(open(misc_blk_device.c_str(), O_WRONLY | O_SYNC));
  if (fd.get() == -1) {
    *err = android::base::StringPrintf("failed to open %s: %s", misc_blk_device.c_str(),
                                       strerror(errno));
    return false;
  }
  //定位到offset的位置
  if (lseek(fd.get(), static_cast<off_t>(offset), SEEK_SET) != static_cast<off_t>(offset)) {
    *err = android::base::StringPrintf("failed to lseek %s: %s", misc_blk_device.c_str(),
                                       strerror(errno));
    return false;
  }
  //写入升级信息
  if (!android::base::WriteFully(fd.get(), p, size)) {
    *err = android::base::StringPrintf("failed to write %s: %s", misc_blk_device.c_str(),
                                       strerror(errno));
    return false;
  }

  // TODO: O_SYNC and fsync duplicates each other?
  if (fsync(fd.get()) == -1) {
    *err = android::base::StringPrintf("failed to fsync %s: %s", misc_blk_device.c_str(),
                                       strerror(errno));
    return false;
  }
  return true;
}
uncrypt在执行成功之后,会通过socket返回状态吗 100 给RecoverySystemService类中函数setupOrClearBcb的DataInputStream,然后setupOrClearBcb返回true到RecoverySystem的installPackage中,最后由RecoverySystem执行重启到Recovery模式的动作。
public static void installPackage(Context context, File packageFile, boolean processed){
    ...
	...
	RecoverySystem rs = (RecoverySystem) context.getSystemService(Context.RECOVERY_SERVICE);
    if (!rs.setupBcb(command)) {
        throw new IOException("Setup BCB failed");
    }

    // Having set up the BCB (bootloader control block), go ahead and reboot
	//进入关机流程,系统将重启至Recovery模式。
    PowerManager pm = (PowerManager) context.getSystemService(Context.POWER_SERVICE);
    pm.reboot(PowerManager.REBOOT_RECOVERY_UPDATE);
 }
三.Recovery模式下,升级流程处理
正常模式下,经过一系列的参数设置,通过PowerManagerService执行reboot方法后,系统将会重启,此时bootloader会检测到misc分区中,存在系统进入recovery的命令,从而加载recovery.img镜像进入到Recovery模式下运行。recovery的入口函数定义在recovery.cpp文件中,流程涉及的源码文件如下:
bootable/recovery/recovery.cpp
bootable/recovery/install.cpp
bootable/recovery/bootloader_message/bootloader_message.cpp
bootable/recovery/roots.cpp
recovery中的逻辑是面向过程的,跟着代码流程往下走就行,此处不分析日志重定向以及 --sideload模式的升级,提取出recovery.cpp main函数中比较重要的逻辑如下:
int main(int argc, char **argv) {
    ......
    ......
    printf("Starting recovery (pid %d) on %s", getpid(), ctime(&start));

    load_volume_table(); // 加载分区表
    has_cache = volume_for_path(CACHE_ROOT) != nullptr;  //确认cache分区是否已挂载
     // 获取recovery命令, 此次进入recovery模式需要执行什么动作,均由此处获取的参数决定
    std::vector<std::string> args = get_args(argc, argv);

    //这块代码用于初始化Recovery的UI,就是我们在升级模式看到的进度条,log提示,动画等
    Device* device = make_device();
    if (android::base::GetBoolProperty("ro.boot.quiescent", false)) {
        printf("Quiescent recovery mode.\n");
        ui = new StubRecoveryUI();
    } else {
        ui = device->GetUI();

        if (!ui->Init(locale)) {
            printf("Failed to initialize UI, use stub UI instead.\n");
            ui = new StubRecoveryUI();
        }
    }

    //这里加载recovery对应的sepolicy权限,该权限定义在/system/sepolicy/recovery.te文件中,可以在此文件中进行内容的增   减
    sehandle = selinux_android_file_context_handle();
    selinux_android_set_sehandle(sehandle);
    if (!sehandle) {
        ui->Print("Warning: No file_contexts\n");
    }
    //开始启动UI显示
    device->StartRecovery();

    //以上的准备工作完成后,开始进入升级逻辑的处理
    int status = INSTALL_SUCCESS;
    //recovery命令中存在升级包的路径
    if (update_package != NULL) {
          //两种情况直接跳过升级流程,重启系统
          //电量不足的情况下, 通过is_battery_ok() 函数检测
          //因kernel crash或者类似场景进入recovery模式的, 通过bootreason_in_blacklist()函数检测
          //最后所有条件都满足的情况下,开始调用安装升级包的函数
          status = install_package(update_package, &should_wipe_cache,
                                     TEMPORARY_INSTALL_FILE, true, retry_count);
    }
}
下面逐个分析具体的函数
- load_volume_table() 这个函数的作用是加载分区表, 定义在roots.cpp中,源码如下
void load_volume_table()
{
    int i;
    int ret;
   //读取默认的分区表,分区表保存在 /etc/recovery.fstab 中
    fstab = fs_mgr_read_fstab_default();
    if (!fstab) {
        LOG(ERROR) << "failed to read default fstab";
        return;
    }

    ret = fs_mgr_add_entry(fstab, "/tmp", "ramdisk", "ramdisk");
    if (ret < 0 ) {
        LOG(ERROR) << "failed to add /tmp entry to fstab";
        fs_mgr_free_fstab(fstab);
        fstab = NULL;
        return;
    }

    printf("recovery filesystem table\n");
    printf("=========================\n");
    for (i = 0; i < fstab->num_entries; ++i) {
        Volume* v = &fstab->recs[i];
        printf("  %d %s %s %s %lld\n", i, v->mount_point, v->fs_type,
               v->blk_device, v->length);
    }
    printf("\n");
}
2.make_device()函数,该函数定义在device.h中,实现方式在android O版本中主要有三种,默认的实现,也就是手机或者平板设备,该函数在default_device.cpp中实现,手表类的的,则在wear_device.cpp中,VR设备的,定义在vr_device.cpp中,实现方式比较简单,就是针对不同的设备,创建用于显示的对象了,这里我只关注default_device.cpp,中的实现
Device* make_device() {
//这个ScreenRecoveryUI就是实现了Recovery界面绘制的逻辑。
  return new Device(new ScreenRecoveryUI);
}
3.install_package函数的实现,该函数就是Recovery开始执行升级动作的开始,定义在install.cpp。
总结: Recovery的启动时由bootloader检测到misc分区中的升级信息,从而引导recovery镜像进入升级模式的过程,Recovery升级流程是面向过程的,入口函数首先会加载recovery模式下的分区信息,然后从启动的命令参数,或者misc分区,或者command文件中获取执行参数,然后初始化对应的变量,用来表示我们在Recovery中做何种动作,如执行升级,擦除分区数据等。变量初始完成后,再加载selinux权限,随后初始化显示模块的对象,随即开始执行具体的逻辑。

进入到install_package函数时,这里并没有开始执行升级擦写的逻辑,先看该函数的前面部分逻辑
......
......
//setup_install_mounts中,对/tmp /cache两个挂载点是否已挂载以及其他分区是否已卸载进行了判断,必须
//保证当前只有且仅有/tmp 与/cache两个分区挂载才能正确执行安装的逻辑
 if (setup_install_mounts() != 0) {
    LOG(ERROR) << "failed to set up expected mounts for install; aborting";
    result = INSTALL_ERROR;
  } else {
    //确保分区正确挂载的情况下,继续进行安装逻辑的判断
    result = really_install_package(path, wipe_cache, needs_mount, &log_buffer, retry_count,
                                    &max_temperature);
  }
really_install_package函数听起来像是真正执行开始擦写分区的具体实现,然后进入后,发现并没有,这里主要是做一些挂载确认,升级包校验的功能
static int really_install_package(const std::string& path, bool* wipe_cache, bool needs_mount,
                                  std::vector<std::string>* log_buffer, int retry_count,
                                  int* max_temperature) {
 //前方部分代码已忽略
  if (needs_mount) {
    //这里的逻辑主要是确认一下升级包存放路径的分区是否已经正常挂载,path[0]这个值之所有有区别,是
    //因为有的设备/data分区是加密的,那么就不能直接通过写入指定设备挂载点的路径来确认升级包路径
    //而是通过dev设备去查找升级包
    if (path[0] == '@') {
      ensure_path_mounted(path.substr(1).c_str());
    } else {
      ensure_path_mounted(path.c_str());
    }
  }

 //这里是内存映射,获取升级包的内存首地址以及升级包的大小
  MemMapping map;
  if (!map.MapFile(path)) {
    LOG(ERROR) << "failed to map file";
    return INSTALL_CORRUPT;
  }

  //这里是做升级校验,确认升级包的签名,以及头信息等符合升级要求
  // Verify package.
  if (!verify_package(map.addr, map.length)) {
    log_buffer->push_back(android::base::StringPrintf("error: %d", kZipVerificationFailure));
    return INSTALL_CORRUPT;
  }

  // Try to open the package.
  ZipArchiveHandle zip;
  int err = OpenArchiveFromMemory(map.addr, map.length, path.c_str(), &zip);
  if (err != 0) {
    LOG(ERROR) << "Can't open " << path << " : " << ErrorCodeString(err);
    log_buffer->push_back(android::base::StringPrintf("error: %d", kZipOpenFailure));

    CloseArchive(zip);
    return INSTALL_CORRUPT;
  }

  //扩展的兼容性检查,从Android 8.0开始支持,但是默认关闭
  // Additionally verify the compatibility of the package.
  if (!verify_package_compatibility(zip)) {
    log_buffer->push_back(android::base::StringPrintf("error: %d", kPackageCompatibilityFailure));
    CloseArchive(zip);
    return INSTALL_CORRUPT;
  }

   //跑到这里才开始执行升级内容的逻辑。
  int result = try_update_binary(path, zip, wipe_cache, log_buffer, retry_count, max_temperature);
从上面代码分析看到,运行到try_update_binary的时候,我们已经把一切都准备了,这个时候,该执行分区擦写动作了吧,继续看try_update_binary函数
  //忽略部分代码
  //pipe是linux中的管道通信,接下来的进度条,动画更新需要依赖管道通信来进行
  int pipefd[2];
  pipe(pipefd);

  std::vector<std::string> args;
  //AB 升级的模式下,调用/sbin/update_engine_sideload可执行程序进行升级擦写
#ifdef AB_OTA_UPDATER
  int ret = update_binary_command(package, zip, "/sbin/update_engine_sideload", retry_count,
                                  pipefd[1], &args);
#else
  //普通模式下,使用update-binary可执行程序进行升级擦写逻辑,这个update-binary就是打包在升级包中的linux可
  //执行程序,我们在做包的时候,系统就已经通过python脚本自动将程序打入升级包中了,它的原名叫做libupdater,
  //源代码在 bootable/recovery/updater下
  int ret = update_binary_command(package, zip, "/tmp/update-binary", retry_count, pipefd[1],
                                  &args);
#endif
  if (ret) {
    close(pipefd[0]);
    close(pipefd[1]);
    return ret;
  }

//下面的逻辑就是系通过管道跟update-binary可执行程序通信,更新升级进度,界面UI显示,LOG提示等。
  char buffer[1024];
  FILE* from_child = fdopen(pipefd[0], "r");
  while (fgets(buffer, sizeof(buffer), from_child) != nullptr) {
    std::string line(buffer);
    size_t space = line.find_first_of(" \n");
    std::string command(line.substr(0, space));
    if (command.empty()) continue;

    // Get rid of the leading and trailing space and/or newline.
    std::string args = space == std::string::npos ? "" : android::base::Trim(line.substr(space));

    if (command == "progress") {
      std::vector<std::string> tokens = android::base::Split(args, " ");
      double fraction;
      int seconds;
      if (tokens.size() == 2 && android::base::ParseDouble(tokens[0].c_str(), &fraction) &&
          android::base::ParseInt(tokens[1], &seconds)) {
        ui->ShowProgress(fraction * (1 - VERIFICATION_PROGRESS_FRACTION), seconds);
      } else {
        LOG(ERROR) << "invalid \"progress\" parameters: " << line;
      }
    } else if (command == "set_progress") {
      std::vector<std::string> tokens = android::base::Split(args, " ");
      double fraction;
      if (tokens.size() == 1 && android::base::ParseDouble(tokens[0].c_str(), &fraction)) {
        ui->SetProgress(fraction);
      } else {
        LOG(ERROR) << "invalid \"set_progress\" parameters: " << line;
      }
    } else if (command == "ui_print") {
      ui->PrintOnScreenOnly("%s\n", args.c_str());
      fflush(stdout);
    } else if (command == "wipe_cache") {
      *wipe_cache = true;
    } else if (command == "clear_display") {
      ui->SetBackground(RecoveryUI::NONE);
    } else if (command == "enable_reboot") {
      // packages can explicitly request that they want the user
      // to be able to reboot during installation (useful for
      // debugging packages that don't exit).
      ui->SetEnableReboot(true);
    } else if (command == "retry_update") {
      retry_update = true;
    } else if (command == "log") {
      if (!args.empty()) {
        // Save the logging request from updater and write to last_install later.
        log_buffer->push_back(args);
      } else {
        LOG(ERROR) << "invalid \"log\" parameters: " << line;
      }
    } else {
      LOG(ERROR) << "unknown command [" << command << "]";
    }
  }
  fclose(from_child);

  int status;
  waitpid(pid, &status, 0);
总结:进入到install.cpp文件的时候,才真正开始进行一些升级包逻辑的处理,如升级包加载,校验等,最后通过执行从升级包中解压出来的update-binary可执行文件,执行真正的磁盘内容擦写动作。
update-binary的功能
在介绍这个可执行程序之前,先看一下android自定义的升级脚本描述,update-script文件
getprop("ro.product.device") == "msm8917" || abort("E3004: This package is for \"msm8917\" devices; this is a \"" + getprop("ro.product.device") + "\".");
ui_print("....");
show_progress(0.750000, 0);
ui_print("Patching system image unconditionally...");
block_image_update("/dev/block/bootdevice/by-name/system", package_extract_file("system.transfer.list"), "system.new.dat", "system.patch.dat") ||
  abort("E1001: Failed to update system image.");
show_progress(0.050000, 5);
package_extract_file("boot.img", "/dev/block/bootdevice/by-name/boot");
show_progress(0.200000, 10);
# ---- FullOTA_InstallEnd ----
# ---- FullOTA_InstallEnd_MMC ----
# ---- radio update tasks ----
ui_print("Patching firmware images...");
ifelse(msm.boot_update("main"), (
package_extract_file("firmware-update/cmnlib64.mbn", "/dev/block/bootdevice/by-name/cmnlib64");
package_extract_file("firmware-update/cmnlib.mbn", "/dev/block/bootdevice/by-name/cmnlib");
package_extract_file("firmware-update/rpm.mbn", "/dev/block/bootdevice/by-name/rpm");
package_extract_file("firmware-update/tz.mbn", "/dev/block/bootdevice/by-name/tz");
package_extract_file("firmware-update/emmc_appsboot.mbn", "/dev/block/bootdevice/by-name/aboot");
package_extract_file("firmware-update/sbl1.mbn", "/dev/block/bootdevice/by-name/sbl1");
package_extract_file("firmware-update/devcfg.mbn", "/dev/block/bootdevice/by-name/devcfg");
), "");
ifelse(msm.boot_update("backup"), (
package_extract_file("firmware-update/cmnlib64.mbn", "/dev/block/bootdevice/by-name/cmnlib64bak");
package_extract_file("firmware-update/cmnlib.mbn", "/dev/block/bootdevice/by-name/cmnlibbak");
package_extract_file("firmware-update/rpm.mbn", "/dev/block/bootdevice/by-name/rpmbak");
package_extract_file("firmware-update/tz.mbn", "/dev/block/bootdevice/by-name/tzbak");
package_extract_file("firmware-update/emmc_appsboot.mbn", "/dev/block/bootdevice/by-name/abootbak");
package_extract_file("firmware-update/sbl1.mbn", "/dev/block/bootdevice/by-name/sbl1bak");
package_extract_file("firmware-update/devcfg.mbn", "/dev/block/bootdevice/by-name/devcfgbak");
), "");
msm.boot_update("finalize");
package_extract_file("firmware-update/splash.img", "/dev/block/bootdevice/by-name/splash");
package_extract_file("firmware-update/NON-HLOS.bin", "/dev/block/bootdevice/by-name/modem");
ui_print("OTA_InstallEnd");
set_progress(1.000000);
像ui_print,package_extract_file,show_progress,getprop等关键字recovery中有专门的语言描述,针对对应的关键字做对应的解释以及对应的执行函数,接下来看下update-binary的入口代码,这部分定义在bootable/recovery/updater中
//上面忽略了部分代码
// Set up the pipe for sending commands back to the parent process.
  //这里第二个参数就是我们在install.cpp的try_update_binary中创建的管道文件句柄,接下来binary执行过程中,
  //会通过这个句柄跟install.cpp通信,用来刷新UI跟设置参数。
  int fd = atoi(argv[2]);
  FILE* cmd_pipe = fdopen(fd, "wb");
  setlinebuf(cmd_pipe);

  // Extract the script from the package.
  //从升级包中解压update-script文件, argv的参数,都是从try_update_binary函数中传过来的
  const char* package_filename = argv[3];
  MemMapping map;
  if (!map.MapFile(package_filename)) {
    LOG(ERROR) << "failed to map package " << argv[3];
    return 3;
  }
  ZipArchiveHandle za;
  int open_err = OpenArchiveFromMemory(map.addr, map.length, argv[3], &za);
  if (open_err != 0) {
    LOG(ERROR) << "failed to open package " << argv[3] << ": " << ErrorCodeString(open_err);
    CloseArchive(za);
    return 3;
  }

  ZipString script_name(SCRIPT_NAME);
  ZipEntry script_entry;
  int find_err = FindEntry(za, script_name, &script_entry);
  if (find_err != 0) {
    LOG(ERROR) << "failed to find " << SCRIPT_NAME << " in " << package_filename << ": "
               << ErrorCodeString(find_err);
    CloseArchive(za);
    return 4;
  }

  std::string script;
  script.resize(script_entry.uncompressed_length);
  int extract_err = ExtractToMemory(za, &script_entry, reinterpret_cast<uint8_t*>(&script[0]),
                                    script_entry.uncompressed_length);
  if (extract_err != 0) {
    LOG(ERROR) << "failed to read script from package: " << ErrorCodeString(extract_err);
    CloseArchive(za);
    return 5;
  }

  // Configure edify's functions.
  //这里就是开始构建关键字解析函数,就是把script中定义的关键字,跟具体执行的函数挂钩。
  RegisterBuiltins();
  RegisterInstallFunctions();
  RegisterBlockImageFunctions();
  RegisterDeviceExtensions();

  // Parse the script.
  //解析update-script文件
  std::unique_ptr<Expr> root;
  int error_count = 0;
  int error = parse_string(script.c_str(), &root, &error_count);
  if (error != 0 || error_count > 0) {
    LOG(ERROR) << error_count << " parse errors";
    CloseArchive(za);
    return 6;
  }
 //加载selinux权限
  sehandle = selinux_android_file_context_handle();
  selinux_android_set_sehandle(sehandle);

  if (!sehandle) {
    fprintf(cmd_pipe, "ui_print Warning: No file_contexts\n");
  }

  // Evaluate the parsed script.
  UpdaterInfo updater_info;
  updater_info.cmd_pipe = cmd_pipe;
  updater_info.package_zip = za;
  updater_info.version = atoi(version);
  updater_info.package_zip_addr = map.addr;
  updater_info.package_zip_len = map.length;

  State state(script, &updater_info);

  if (argc == 5) {
    if (strcmp(argv[4], "retry") == 0) {
      state.is_retry = true;
    } else {
      printf("unexpected argument: %s", argv[4]);
    }
  }
  ota_io_init(za, state.is_retry);

  std::string result;
  //开始执行script中定义的函数。
  bool status = Evaluate(&state, root, &result);
从入口函数知道了script中描述的关键字都有对应的方法,那下面就针对上述贴出来的update-script文件流程作分析。
首先,需要判断当前平台是否匹配,不能让其他平台的包互相升级。
getprop(“ro.product.device”) == “msm8917” || abort(“E3004: This package is for “msm8917” devices; this is a “” + getprop(“ro.product.device”) + “”.”);
这个getprop对应 bootable/recovery/updater/install.cpp中的GetpropFn,实际上就是通过系统的GetProperty获取系统的ro属性值,属性值的key = ro.product.device, 这个属性值,我们也可以通过adb命令,输入 getprop ro.product.device拿到
Value* GetPropFn(const char* name, State* state, const std::vector<std::unique_ptr<Expr>>& argv) {
  if (argv.size() != 1) {
    return ErrorAbort(state, kArgsParsingFailure, "%s() expects 1 arg, got %zu", name, argv.size());
  }
  std::string key;
  if (!Evaluate(state, argv[0], &key)) {
    return nullptr;
  }
  std::string value = android::base::GetProperty(key, "");
  return StringValue(value);
}
在判断平台设备匹配时,接下来打印一行日志
ui_print("…"); ui_print对应的函数也定义在bootable/recovery/updater/install.cpp中,最终通过pipe管道把要打印的信息发送到bootable/recovery/install.cpp中接收
//bootable/recovery/updater/install.cpp
static void uiPrint(State* state, const std::string& buffer) {
  UpdaterInfo* ui = static_cast<UpdaterInfo*>(state->cookie);

  // "line1\nline2\n" will be split into 3 tokens: "line1", "line2" and "".
  // So skip sending empty strings to UI.
  std::vector<std::string> lines = android::base::Split(buffer, "\n");
  for (auto& line : lines) {
    if (!line.empty()) {
      fprintf(ui->cmd_pipe, "ui_print %s\n", line.c_str());
    }
  }
  // On the updater side, we need to dump the contents to stderr (which has
  // been redirected to the log file). Because the recovery will only print
  // the contents to screen when processing pipe command ui_print.
  LOG(INFO) << buffer;
}

//bootable/recovery/install.cpp
else if (command == "ui_print") {
      //把接收到的消息绘制在屏幕上
      ui->PrintOnScreenOnly("%s\n", args.c_str());
      fflush(stdout);
}
show_progress的流程也类似ui_print,这里就不再描述了,接下来看block_image_update,这个方法用于全量升级时,升级system分区
block_image_update("/dev/block/bootdevice/by-name/system", package_extract_file("system.transfer.list"), "system.new.dat", "system.patch.dat") || abort("E1001: Failed to update system image.");
函数定义在bootable/recovery/updater/blockimg.cpp文件中
Value* BlockImageUpdateFn(const char* name, State* state,
                          const std::vector<std::unique_ptr<Expr>>& argv) {
    const Command commands[] = {
        { "bsdiff",     PerformCommandDiff  },
        { "erase",      PerformCommandErase },
        { "free",       PerformCommandFree  },
        { "imgdiff",    PerformCommandDiff  },
        { "move",       PerformCommandMove  },
        { "new",        PerformCommandNew   },
        { "stash",      PerformCommandStash },
        { "zero",       PerformCommandZero  }
    };

    return PerformBlockImageUpdate(name, state, argv, commands,
                sizeof(commands) / sizeof(commands[0]), false);
}
block_image_update函数中对应有许多的子命令,这些子命令分别在不同的函数中去实现功能,对于全量升级来说,在升级包中的system.transfer.list文件找那个有使用这些命令,这些命令都在升级包制作的时候,系统写入的
erase 24,74806,97792,133684,163328,198446,228864,263623,294400,518633,523776,524802,556544,557570,589312,590338,622080,623106,654848,655874,687616,688642,720384,721410,753152
new 2,0,1024
new 2,1024,2048
new 4,2048,2478,2479,3073
new 4,3073,4054,4055,4098
new 2,4098,5122
new 4,5122,6090,6091,6147
new 2,6147,7171
new 4,7171,7284,7285,8196
new 2,8196,9220
new 6,9220,9397,9398,10143,10144,10246
new 10,10246,11029,11030,11075,11076,11213,11214,11236,11237,11274
new 2,16922,17946
.....
这里我截取了一部分分析,erase对应的是PerformCommandErase函数,这个就是用ioctl命令来让驱动去擦除指定设备块的内容
 if (ioctl(params.fd, BLKDISCARD, &blocks) == -1) {
        PLOG(ERROR) << "BLKDISCARD ioctl failed";
        return -1;
 }
new对应PerformCommandNew函数,将指定内容写入磁盘
 ssize_t status = write(fd, buf, nbyte);
 if (status == -1 && errno == EIO) {
     have_eio_error = true;
 }
其他命令等都在blockimg.cpp中实现,这里不再深入。
update-binary执行完成后,继续回到recovery进程中,如果安装成功的情况下,最后保存recovery日志,最后让系统重启
 finish_recovery();
    switch (after) {
        case Device::SHUTDOWN:
            ui->Print("Shutting down...\n");
            //通知关机
            android::base::SetProperty(ANDROID_RB_PROPERTY, "shutdown,");
            break;

        case Device::REBOOT_BOOTLOADER:
            ui->Print("Rebooting to bootloader...\n");
            //通知重启
            android::base::SetProperty(ANDROID_RB_PROPERTY, "reboot,bootloader");
            break;

        default:
            ui->Print("Rebooting...\n");
            reboot("reboot,");
            break;
    }
    //一直等待,直到关机或者重启
    while (true) {
        pause();
    }


 6419
6419


 被折叠的 条评论
为什么被折叠?
被折叠的 条评论
为什么被折叠?
 到【灌水乐园】发言


