图像分割实战-系列教程10:U2NET显著性检测实战2

在这里插入图片描述

🍁🍁🍁图像分割实战-系列教程 总目录

有任何问题欢迎在下面留言
本篇文章的代码运行界面均在Pycharm中进行
本篇文章配套的代码资源已经上传

U2NET显著性检测实战1
U2NET显著性检测实战2
U2NET显著性检测实战3

5、残差Unet模块

在这里插入图片描述

class RSU7(nn.Module):#UNet07DRES(nn.Module):

    def __init__(self, in_ch=3, mid_ch=12, out_ch=3):
        super(RSU7,self).__init__()

        self.rebnconvin = REBNCONV(in_ch,out_ch,dirate=1)

        self.rebnconv1 = REBNCONV(out_ch,mid_ch,dirate=1)
        self.pool1 = nn.MaxPool2d(2,stride=2,ceil_mode=True)

        self.rebnconv2 = REBNCONV(mid_ch,mid_ch,dirate=1)
        self.pool2 = nn.MaxPool2d(2,stride=2,ceil_mode=True)

        self.rebnconv3 = REBNCONV(mid_ch,mid_ch,dirate=1)
        self.pool3 = nn.MaxPool2d(2,stride=2,ceil_mode=True)

        self.rebnconv4 = REBNCONV(mid_ch,mid_ch,dirate=1)
        self.pool4 = nn.MaxPool2d(2,stride=2,ceil_mode=True)

        self.rebnconv5 = REBNCONV(mid_ch,mid_ch,dirate=1)
        self.pool5 = nn.MaxPool2d(2,stride=2,ceil_mode=True)

        self.rebnconv6 = REBNCONV(mid_ch,mid_ch,dirate=1)

        self.rebnconv7 = REBNCONV(mid_ch,mid_ch,dirate=2)

        self.rebnconv6d = REBNCONV(mid_ch*2,mid_ch,dirate=1)
        self.rebnconv5d = REBNCONV(mid_ch*2,mid_ch,dirate=1)
        self.rebnconv4d = REBNCONV(mid_ch*2,mid_ch,dirate=1)
        self.rebnconv3d = REBNCONV(mid_ch*2,mid_ch,dirate=1)
        self.rebnconv2d = REBNCONV(mid_ch*2,mid_ch,dirate=1)
        self.rebnconv1d = REBNCONV(mid_ch*2,out_ch,dirate=1)

    def forward(self,x):
        hx = x
        hxin = self.rebnconvin(hx)
        hx1 = self.rebnconv1(hxin)
        hx = self.pool1(hx1)

        hx2 = self.rebnconv2(hx)
        hx = self.pool2(hx2)

        hx3 = self.rebnconv3(hx)
        hx = self.pool3(hx3)

        hx4 = self.rebnconv4(hx)
        hx = self.pool4(hx4)

        hx5 = self.rebnconv5(hx)
        hx = self.pool5(hx5)

        hx6 = self.rebnconv6(hx)

        hx7 = self.rebnconv7(hx6)

        hx6d =  self.rebnconv6d(torch.cat((hx7,hx6),1))
        hx6dup = _upsample_like(hx6d,hx5)

        hx5d =  self.rebnconv5d(torch.cat((hx6dup,hx5),1))
        hx5dup = _upsample_like(hx5d,hx4)

        hx4d = self.rebnconv4d(torch.cat((hx5dup,hx4),1))
        hx4dup = _upsample_like(hx4d,hx3)
        hx3d = self.rebnconv3d(torch.cat((hx4dup,hx3),1))
        hx3dup = _upsample_like(hx3d,hx2)
        hx2d = self.rebnconv2d(torch.cat((hx3dup,hx2),1))
        hx2dup = _upsample_like(hx2d,hx1)

        hx1d = self.rebnconv1d(torch.cat((hx2dup,hx1),1))
        return hx1d + hxin

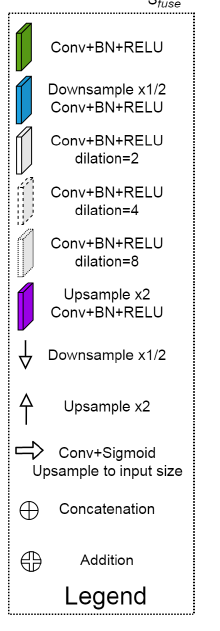
这里以RSU7举例,U2Net就是每一个backbone都是一个带残差连接的Unet,这些backbone再以Unet的形式进行连接,在连接的过程中有特征凭借和上采样下采样操作

  1. 首先这里的RSU7也是一个一个相同的小组件组成,每一个小组件都是一个REBNCONV
  2. 一个REBNCONV就是,一个卷积Conv、批归一化BatchNormalization、Relu激活函数的三连
  3. 在构造函数中,就是定义了1个REBNCONV+5个(REBNCONV+Maxpooling)+8个REBNCONV
  4. 其中第一个REBNCONV是为了进行残差连接,将输入的长、宽、通道数转化为和输出一直的维度,代表原始输入的x
  5. 在最后的输出会再加上这个x,表示残差连接操作
  6. 编码器就是5个(REBNCONV+Maxpooling)和最后一个没有Maxpooling的REBNCONV,即hx1到hx6
  7. hx7是中间结果
  8. 解码器就是5(对应位置进行拼接的REBNCONV+上采样)和最后一个没有上采样的REBNCONV,即hx6d到hx1d
  9. hx1d再加上前面提到的x就是最后的输出

U2NET显著性检测实战1
U2NET显著性检测实战2
U2NET显著性检测实战3

  • 7
    点赞
  • 8
    收藏
    觉得还不错? 一键收藏
  • 打赏
    打赏
  • 0
    评论
下面是一个简单的PyQt5界面实现U2Net图像分割的例子,使用PyTorch实现。 ``` import sys import os import numpy as np from PIL import Image from PyQt5.QtWidgets import QApplication, QMainWindow, QLabel, QPushButton, QFileDialog from PyQt5.QtGui import QPixmap import torch import torchvision.transforms as transforms from model.u2net import U2NET class MainWindow(QMainWindow): def __init__(self): super().__init__() # 创建UI界面 self.initUI() # 加载模型 self.model = U2NET() self.model.load_state_dict(torch.load("u2net.pth", map_location=torch.device('cpu'))) self.model.eval() def initUI(self): # 设置窗口标题和大小 self.setWindowTitle("U2Net Image Segmentation") self.setGeometry(100, 100, 800, 600) # 创建标签和按钮 self.label = QLabel(self) self.label.setGeometry(25, 50, 750, 450) self.label.setStyleSheet("border: 1px solid black;") self.button = QPushButton("Select Image", self) self.button.setGeometry(25, 525, 150, 50) self.button.clicked.connect(self.selectImage) self.button2 = QPushButton("Segment Image", self) self.button2.setGeometry(200, 525, 150, 50) self.button2.clicked.connect(self.segmentImage) def selectImage(self): # 打开文件对话框,选择要处理的图像 options = QFileDialog.Options() options |= QFileDialog.DontUseNativeDialog fileName, _ = QFileDialog.getOpenFileName(self,"QFileDialog.getOpenFileName()", "","All Files (*);;Images (*.png *.jpg *.jpeg)", options=options) if fileName: # 加载图像并显示在标签上 pixmap = QPixmap(fileName) pixmap = pixmap.scaled(750, 450) self.label.setPixmap(pixmap) # 将图像转换为PyTorch tensor格式 self.input_image = Image.open(fileName).convert("RGB") self.transform = transforms.Compose([transforms.Resize((320, 320)), transforms.ToTensor(), transforms.Normalize((0.485, 0.456, 0.406), (0.229, 0.224, 0.225))]) self.input_tensor = self.transform(self.input_image).unsqueeze(0) def segmentImage(self): # 对选择的图像进行分割 with torch.no_grad(): output_tensor = self.model(self.input_tensor) # 将输出转换为PIL Image格式 output_tensor = output_tensor.squeeze().numpy() output_tensor = np.where(output_tensor > 0.5, 1.0, 0.0) output_image = Image.fromarray((output_tensor * 255).astype(np.uint8)).convert("L") # 显示分割结果 output_pixmap = QPixmap.fromImage(ImageQt(output_image)) output_pixmap = output_pixmap.scaled(750, 450) self.label.setPixmap(output_pixmap) if __name__ == "__main__": # 创建应用程序和主窗口 app = QApplication(sys.argv) mainWindow = MainWindow() mainWindow.show() sys.exit(app.exec_()) ``` 在上面的代码中,我们首先创建了一个`MainWindow`类,它继承自`QMainWindow`类,并重写了`initUI`方法来创建UI界面。在`initUI`方法中,我们创建了一个标签和两个按钮,其中一个用于选择图像,另一个用于对图像进行分割。 在选择图像按钮的回调函数`selectImage`中,我们使用`QFileDialog`打开一个文件对话框,让用户选择要处理的图像。然后,我们使用`PIL`库来加载图像,并将其转换为PyTorch tensor格式。在转换过程中,我们使用了`transforms`模块来对图像进行缩放、标准化等预处理操作。 在对图像进行分割的按钮回调函数`segmentImage`中,我们将输入张量传递给已加载的U2Net模型,并得到输出张量。然后,我们将输出张量转换为PIL Image格式,并将其显示在标签上。在转换过程中,我们使用了NumPy来将输出张量转换为二值图像,使用`PIL`库将其转换为灰度图像,并使用`QPixmap`将其转换为Qt图像格式。 最后,我们在`__main__`函数中创建了应用程序和主窗口,并调用`show`方法来显示窗口。

“相关推荐”对你有帮助么?

  • 非常没帮助
  • 没帮助
  • 一般
  • 有帮助
  • 非常有帮助
提交
评论
添加红包

请填写红包祝福语或标题

红包个数最小为10个

红包金额最低5元

当前余额3.43前往充值 >
需支付:10.00
成就一亿技术人!
领取后你会自动成为博主和红包主的粉丝 规则
hope_wisdom
发出的红包

打赏作者

机器学习杨卓越

你的鼓励将是我创作的最大动力

¥1 ¥2 ¥4 ¥6 ¥10 ¥20
扫码支付:¥1
获取中
扫码支付

您的余额不足,请更换扫码支付或充值

打赏作者

实付
使用余额支付
点击重新获取
扫码支付
钱包余额 0

抵扣说明:

1.余额是钱包充值的虚拟货币,按照1:1的比例进行支付金额的抵扣。
2.余额无法直接购买下载,可以购买VIP、付费专栏及课程。

余额充值