


通过在源码上debug,并一步步写注释来理解源码。
Faster R-CNN流程图:

预测过程整体可分七步:
1、输入图片
2、利用主干特征提取网络或得共享特征层(获得feature map(执行Resnet50的layer0、1、2、3))
3、利用共享特征层获得建议框(经过三次卷积对先验框进行调整获得建议框)
4、对建议框解码获得需要截取的位置
5、对共享特征层进行截取(ROIPooling:Resnet50的layer4以及后面的操作)
6、对截取后的特征层呢进行resize和下一步的卷积
7、获得最终的预测结果并解码
一、获得主干特征提取网络(feature map)
resnet50.py文件
ResNet50结构参考下图50-layer

resnet50.py源码文件:
经过layer3(第四次压缩)之后得到feature map(公用特征层),其有两个应用,一个是和ROIPooling结合使用、另一个是进行一次3x3的卷积后,进行一个18通道的1x1卷积,还有一个36通道的1x1卷积。
9 x 4的卷积 用于预测 公用特征层上 每一个网格点上 每一个先验框的变化情况。(结果会对这些先验框进行调整,获得一个新的框。)-->得到建议框
9 x 2的卷积 用于预测 公用特征层上 每一个网格点上 每一个预测框内部是否包含了物体,序号为1的内容为包含物体的概率。(判断上述获得的新框是否包含物体。)
import math

import torch.nn as nn
from torch.hub import load_state_dict_from_url


class Bottleneck(nn.Module):
    expansion = 4
    def __init__(self, inplanes, planes, stride=1, downsample=None):
        super(Bottleneck, self).__init__()
        self.conv1 = nn.Conv2d(inplanes, planes, kernel_size=1, stride=stride, bias=False)
        self.bn1 = nn.BatchNorm2d(planes)

        self.conv2 = nn.Conv2d(planes, planes, kernel_size=3, stride=1, padding=1, bias=False)
        self.bn2 = nn.BatchNorm2d(planes)

        self.conv3 = nn.Conv2d(planes, planes * 4, kernel_size=1, bias=False)
        self.bn3 = nn.BatchNorm2d(planes * 4)

        self.relu = nn.ReLU(inplace=True)
        self.downsample = downsample
        self.stride = stride

    def forward(self, x):
        residual = x

        out = self.conv1(x)
        out = self.bn1(out)
        out = self.relu(out)

        out = self.conv2(out)
        out = self.bn2(out)
        out = self.relu(out)

        out = self.conv3(out)
        out = self.bn3(out)
        if self.downsample is not None:
            residual = self.downsample(x)

        out += residual
        out = self.relu(out)

        return out

class ResNet(nn.Module):
    def __init__(self, block, layers, num_classes=1000):
        #-----------------------------------#
        #   假设输入进来的图片是600,600,3
        #-----------------------------------#
        self.inplanes = 64
        super(ResNet, self).__init__()

        # 600,600,3 -> 300,300,64
        self.conv1 = nn.Conv2d(3, 64, kernel_size=7, stride=2, padding=3, bias=False)
        self.bn1 = nn.BatchNorm2d(64)
        self.relu = nn.ReLU(inplace=True)

        # 300,300,64 -> 150,150,64
        self.maxpool = nn.MaxPool2d(kernel_size=3, stride=2, padding=0, ceil_mode=True)

        # 150,150,64 -> 150,150,256
        self.layer1 = self._make_layer(block, 64, layers[0])   #执行三次残差
        # 150,150,256 -> 75,75,512
        self.layer2 = self._make_layer(block, 128, layers[1], stride=2)
        # 75,75,512 -> 38,38,1024 到这里可以获得一个38,38,1024的共享特征层
        self.layer3 = self._make_layer(block, 256, layers[2], stride=2)
        # self.layer4被用在classifier模型中
        self.layer4 = self._make_layer(block, 512, layers[3], stride=2)

        self.avgpool = nn.AvgPool2d(7)
        self.fc = nn.Linear(512 * block.expansion, num_classes)

        for m in self.modules():
            if isinstance(m, nn.Conv2d):
                n = m.kernel_size[0] * m.kernel_size[1] * m.out_channels
                m.weight.data.normal_(0, math.sqrt(2. / n))
            elif isinstance(m, nn.BatchNorm2d):
                m.weight.data.fill_(1)
                m.bias.data.zero_()

    def _make_layer(self, block, planes, blocks, stride=1):
        downsample = None
        #-------------------------------------------------------------------#
        #   当模型需要进行高和宽的压缩的时候,就需要用到残差边的downsample
        #-------------------------------------------------------------------#
        if stride != 1 or self.inplanes != planes * block.expansion:
            downsample = nn.Sequential(
                nn.Conv2d(self.inplanes, planes * block.expansion,kernel_size=1, stride=stride, bias=False),
                nn.BatchNorm2d(planes * block.expansion),
            )
        layers = []
        layers.append(block(self.inplanes, planes, stride, downsample))
        self.inplanes = planes * block.expansion
        for i in range(1, blocks):
            layers.append(block(self.inplanes, planes))
        return nn.Sequential(*layers)

    def forward(self, x):
        x = self.conv1(x)
        x = self.bn1(x)
        x = self.relu(x)
        x = self.maxpool(x)

        x = self.layer1(x)
        x = self.layer2(x)
        x = self.layer3(x)
        x = self.layer4(x)

        x = self.avgpool(x)
        x = x.view(x.size(0), -1)
        x = self.fc(x)
        return x

def resnet50(pretrained = False):
    model = ResNet(Bottleneck, [3, 4, 6, 3])
    if pretrained:
        state_dict = load_state_dict_from_url("https://download.pytorch.org/models/resnet50-19c8e357.pth", model_dir="./model_data")
        model.load_state_dict(state_dict)
    #----------------------------------------------------------------------------#
    #   获取特征提取部分,从conv1到model.layer3,最终获得一个38,38,1024的特征层
    #----------------------------------------------------------------------------#
    features    = list([model.conv1, model.bn1, model.relu, model.maxpool, model.layer1, model.layer2, model.layer3])
    #----------------------------------------------------------------------------#
    #   获取分类部分,从model.layer4到model.avgpool
    #----------------------------------------------------------------------------#
    classifier  = list([model.layer4, model.avgpool])

    features    = nn.Sequential(*features)
    classifier  = nn.Sequential(*classifier)
    return features, classifier

# if __name__ == "__main__":
#     resnet50()
二、先验框的实现
anchors.py文件
目的是将每个像素(特征点)的九个先验框绘制在特征图上。
在代码中对执行的每一步添加了注释。
import numpy as np

#--------------------------------------------#
#   生成基础的先验框
#--------------------------------------------#
def generate_anchor_base(base_size=16, ratios=[0.5, 1, 2], anchor_scales=[8, 16, 32]):
    anchor_base = np.zeros((len(ratios) * len(anchor_scales), 4), dtype=np.float32)  #九行四列(9,4)
    for i in range(len(ratios)):   #循环三次(三种不同比例大小的框)
        for j in range(len(anchor_scales)):    #循环三次(一种比例有三个框)
            h = base_size * anchor_scales[j] * np.sqrt(ratios[i])  #np.sqrt计算平方根
            w = base_size * anchor_scales[j] * np.sqrt(1. / ratios[i])

            index = i * len(anchor_scales) + j
            anchor_base[index, 0] = - h / 2.
            anchor_base[index, 1] = - w / 2.
            anchor_base[index, 2] = h / 2.
            anchor_base[index, 3] = w / 2.
    return anchor_base   #九行四列的九个建议框位置,四列为X1,Y1,X2,Y2左上角和右下角坐标

#--------------------------------------------#
#   对基础先验框进行拓展对应到所有特征点上
#--------------------------------------------#
def _enumerate_shifted_anchor(anchor_base, feat_stride, height, width):  #(anchor_base,16,38,38)
    #---------------------------------#
    #   计算网格中心点
    #---------------------------------#
    shift_x             = np.arange(0, width * feat_stride, feat_stride)  #生成一个序列(0,16,32,。。。,37*16=592)一共38个点
    shift_y             = np.arange(0, height * feat_stride, feat_stride)  #38个点
    shift_x, shift_y    = np.meshgrid(shift_x, shift_y)   #组合起来,建立网格
    shift               = np.stack((shift_x.ravel(), shift_y.ravel(), shift_x.ravel(), shift_y.ravel(),), axis=1)  #堆叠 (1444,4),38*38=1444个特征点

    #---------------------------------#
    #   每个网格点上的9个先验框
    #---------------------------------#
    A       = anchor_base.shape[0]   #9  9个框
    K       = shift.shape[0]   #38*38=1444   1444个象数点
    anchor  = anchor_base.reshape((1, A, 4)) + shift.reshape((K, 1, 4))   #(1,9,4)+(1444,1,4)=(1444,9,4)利用了python的广播机制
    #---------------------------------#
    #   所有的先验框
    #---------------------------------#
    anchor  = anchor.reshape((K * A, 4)).astype(np.float32)   #(12996,4) 1444(象数点)*9(每个象数点的先验框数)=12996个先验框 astype(np.float32)用于将数组的数据类型转换为 float32 类型。
    return anchor

if __name__ == "__main__":
    import matplotlib.pyplot as plt
    nine_anchors = generate_anchor_base()   #每个像素点有九个先验框
    print(nine_anchors)     #终端输出九个先验框的位置

    height, width, feat_stride  = 38,38,16
    anchors_all                 = _enumerate_shifted_anchor(nine_anchors, feat_stride, height, width)   #返回12996个先验框的数据
    print(np.shape(anchors_all))   #(12996,4)

    fig     = plt.figure()
    #add_subplot(3,4,11)
    #参数一:3,子图总行数;参数二:4,子图总列数;参数三:11,子图位置(将画布分割成3行4列,图像画在从左到右从上到下的第11块。)
    #add_subplot(111)参数111的意思是:将画布分割成1行1列,图像画在从左到右从上到下的第1块。当只想画一张图时就使用111。
    ax      = fig.add_subplot(111)
    #设置 x,y 轴的数值显示范围
    plt.ylim(-300,900)
    plt.xlim(-300,900)
    shift_x = np.arange(0, width * feat_stride, feat_stride)  #生成一个序列,三个参数(起始值,终止值,步长)
    shift_y = np.arange(0, height * feat_stride, feat_stride)
    shift_x, shift_y = np.meshgrid(shift_x, shift_y)  #生成笛卡尔坐标系(将x和y结合起来生成一个二维坐标系,目的是建立网格以及网格的坐标)
    plt.scatter(shift_x,shift_y)   #绘制网格图
    box_widths  = anchors_all[:,2]-anchors_all[:,0]   #计算宽度W=X2-X1
    box_heights = anchors_all[:,3]-anchors_all[:,1]   #计算高度H=Y2-Y1

    for i in [108, 109, 110, 111, 112, 113, 114, 115, 116]:   #108^9+1=13 第十三个象数点上的九个先验框
    #python matplotlib.Rectangle在一幅图片里作出一个或多个矩形框
    #rectangle函数的参数解释如下: Rectangle(xy,width,heigth,angle=0,**kwargs)
    #xy:2元组,矩形左下角坐标
    #width:矩形的宽度
    #height:矩形的高度
    #angle:float,可选,矩形相对于x轴逆时针旋转角度,默认0
    #fill:bool,可选,是否填充矩形
        rect = plt.Rectangle([anchors_all[i, 0],anchors_all[i, 1]],box_widths[i],box_heights[i],color="r",fill=False)
        ax.add_patch(rect)   #与plt.Rectangle一起使用,用来向Matplotlib绘图中的Axes对象中添加图形对象(例如矩形、圆等)的函数。
    plt.show()
三、通过RPN获得建议框
RPN代码:
RPN分为四步:
1.获得建议框网络的预测结果(三次卷积得到9*2(检测2中的先验框是否包含物体),9*4(检测2中的先验框的调整参数))
2.生成先验框anchor
3.用1对2的先验框进行调整
4.进行筛选(非极大值抑制等操作),最终得到建议框
到此位置还只是粗略的一个框的获取,也就是一个建议框。然后我们会在建议框里面继续找东西。
import numpy as np
import torch
from torch import nn
from torch.nn import functional as F
from torchvision.ops import nms
from utils.anchors import _enumerate_shifted_anchor, generate_anchor_base
from utils.utils_bbox import loc2bbox


class ProposalCreator():
    def __init__(
        self,
        mode,
        nms_iou             = 0.7,
        n_train_pre_nms     = 12000,
        n_train_post_nms    = 600,
        n_test_pre_nms      = 3000,
        n_test_post_nms     = 300,
        min_size            = 16

    ):
        #-----------------------------------#
        #   设置预测还是训练
        #-----------------------------------#
        self.mode               = mode   #training
        #-----------------------------------#
        #   建议框非极大抑制的iou大小
        #-----------------------------------#
        self.nms_iou            = nms_iou   #0.7
        #-----------------------------------#
        #   训练用到的建议框数量
        #-----------------------------------#
        self.n_train_pre_nms    = n_train_pre_nms   #12000
        self.n_train_post_nms   = n_train_post_nms  #600
        #-----------------------------------#
        #   预测用到的建议框数量
        #-----------------------------------#
        self.n_test_pre_nms     = n_test_pre_nms   #3000
        self.n_test_post_nms    = n_test_post_nms  #300
        self.min_size           = min_size     #16

    def __call__(self, loc, score, anchor, img_size, scale=1.):
        if self.mode == "training":
            n_pre_nms   = self.n_train_pre_nms
            n_post_nms  = self.n_train_post_nms
        else:
            n_pre_nms   = self.n_test_pre_nms
            n_post_nms  = self.n_test_post_nms

        #-----------------------------------#
        #   将先验框转换成tensor
        #-----------------------------------#
        anchor = torch.from_numpy(anchor).type_as(loc)
        #-----------------------------------#
        #   将RPN网络预测结果转化成建议框
        #-----------------------------------#
        roi = loc2bbox(anchor, loc)
        #-----------------------------------#
        #   防止建议框超出图像边缘
        #-----------------------------------#
        roi[:, [0, 2]] = torch.clamp(roi[:, [0, 2]], min = 0, max = img_size[1])
        roi[:, [1, 3]] = torch.clamp(roi[:, [1, 3]], min = 0, max = img_size[0])

        #-----------------------------------#
        #   建议框的宽高的最小值不可以小于16
        #-----------------------------------#
        min_size    = self.min_size * scale
        keep        = torch.where(((roi[:, 2] - roi[:, 0]) >= min_size) & ((roi[:, 3] - roi[:, 1]) >= min_size))[0]
        #-----------------------------------#
        #   将对应的建议框保留下来
        #-----------------------------------#
        roi         = roi[keep, :]
        score       = score[keep]

        #-----------------------------------#
        #   根据得分进行排序,取出建议框
        #-----------------------------------#
        order       = torch.argsort(score, descending=True)
        if n_pre_nms > 0:
            order   = order[:n_pre_nms]
        roi     = roi[order, :]
        score   = score[order]

        #-----------------------------------#
        #   对建议框进行非极大抑制
        #   使用官方的非极大抑制会快非常多
        #-----------------------------------#
        keep    = nms(roi, score, self.nms_iou)
        if len(keep) < n_post_nms:
            index_extra = np.random.choice(range(len(keep)), size=(n_post_nms - len(keep)), replace=True)
            keep        = torch.cat([keep, keep[index_extra]])
        keep    = keep[:n_post_nms]
        roi     = roi[keep]
        return roi


# #--------------------------------------------#
# #   生成基础的先验框
# #--------------------------------------------#
# def generate_anchor_base(base_size=16, ratios=[0.5, 1, 2], anchor_scales=[8, 16, 32]):
#     anchor_base = np.zeros((len(ratios) * len(anchor_scales), 4), dtype=np.float32)  #九行四列(9,4)
#     for i in range(len(ratios)):   #循环三次(三种不同比例大小的框)
#         for j in range(len(anchor_scales)):    #循环三次(一种比例有三个框)
#             h = base_size * anchor_scales[j] * np.sqrt(ratios[i])  #np.sqrt计算平方根
#             w = base_size * anchor_scales[j] * np.sqrt(1. / ratios[i])

#             index = i * len(anchor_scales) + j
#             anchor_base[index, 0] = - h / 2.
#             anchor_base[index, 1] = - w / 2.
#             anchor_base[index, 2] = h / 2.
#             anchor_base[index, 3] = w / 2.
#     return anchor_base   #九行四列的九个建议框位置,四列为X1,Y1,X2,Y2左上角和右下角坐标

# def _enumerate_shifted_anchor(anchor_base, feat_stride, height, width):  #(anchor_base,16,38,38)
#     #---------------------------------#
#     #   计算网格中心点
#     #---------------------------------#
#     shift_x             = np.arange(0, width * feat_stride, feat_stride)  #生成一个序列(0,16,32,。。。,37*16=592)一共38个点
#     shift_y             = np.arange(0, height * feat_stride, feat_stride)  #38个点
#     shift_x, shift_y    = np.meshgrid(shift_x, shift_y)   #组合起来,建立网格
#     shift               = np.stack((shift_x.ravel(), shift_y.ravel(), shift_x.ravel(), shift_y.ravel(),), axis=1)  #堆叠 (1444,4),38*38=1444个特征点

#     #---------------------------------#
#     #   每个网格点上的9个先验框
#     #---------------------------------#
#     A       = anchor_base.shape[0]   #9  9个框
#     K       = shift.shape[0]   #38*38=1444   1444个象数点
#     anchor  = anchor_base.reshape((1, A, 4)) + shift.reshape((K, 1, 4))   #(1,9,4)+(1444,1,4)=(1444,9,4)利用了python的广播机制
#     #---------------------------------#
#     #   所有的先验框
#     #---------------------------------#
#     anchor  = anchor.reshape((K * A, 4)).astype(np.float32)   #(12996,4) 1444(象数点)*9(每个象数点的建议框数)=12996个建议框 astype(np.float32)用于将数组的数据类型转换为 float32 类型。
#     return anchor


class RegionProposalNetwork(nn.Module):
    def __init__(
        self,
        in_channels     = 512,
        mid_channels    = 512,     #优先以外部传入参数为准,传入1024,512  对应in_channels = 1024 ,mid_channels = 512
        ratios          = [0.5, 1, 2],
        anchor_scales   = [8, 16, 32],
        feat_stride     = 16,
        mode            = "training",
    ):
        super(RegionProposalNetwork, self).__init__()
        #-----------------------------------------#
        #   生成基础先验框,shape为[9, 4]
        #-----------------------------------------#
        self.anchor_base    = generate_anchor_base(anchor_scales = anchor_scales, ratios = ratios)   #(9,4)  一个特征点上九个框左上角和右下角的坐标
        n_anchor            = self.anchor_base.shape[0]  #9个建议框

        #-----------------------------------------#
        #   先进行一个3x3的卷积,可理解为特征整合
        #-----------------------------------------#
        self.conv1  = nn.Conv2d(in_channels, mid_channels, 3, 1, 1)   #一次3*3的卷积
        #-----------------------------------------#
        #   分类预测先验框内部是否包含物体
        #-----------------------------------------#
        self.score  = nn.Conv2d(mid_channels, n_anchor * 2, 1, 1, 0)  #一次1*1的卷积
        #-----------------------------------------#
        #   回归预测对先验框进行调整
        #-----------------------------------------#
        self.loc    = nn.Conv2d(mid_channels, n_anchor * 4, 1, 1, 0)   #一次1*1的卷积    这三次卷积对应流程图左边的操作

        #-----------------------------------------#
        #   特征点间距步长
        #-----------------------------------------#
        self.feat_stride    = feat_stride   #16
        #-----------------------------------------#
        #   用于对建议框解码并进行非极大抑制
        #-----------------------------------------#
        self.proposal_layer = ProposalCreator(mode)   #记录一些参数
        #--------------------------------------#
        #   对FPN的网络部分进行权值初始化
        #--------------------------------------#
        normal_init(self.conv1, 0, 0.01)
        normal_init(self.score, 0, 0.01)
        normal_init(self.loc, 0, 0.01)

    def forward(self, x, img_size, scale=1.):
        n, _, h, w = x.shape
        #-----------------------------------------#
        #   先进行一个3x3的卷积,可理解为特征整合
        #-----------------------------------------#
        x = F.relu(self.conv1(x))    #输入的x是feature map共享特征层(38,38,1024)
        #-----------------------------------------#
        #   回归预测对先验框进行调整
        #-----------------------------------------#
        rpn_locs = self.loc(x)
        rpn_locs = rpn_locs.permute(0, 2, 3, 1).contiguous().view(n, -1, 4)   #将通道数调整至最后一个维度,再进行reshape,成了(batch_size,每一个先验框,rpn_locs:对先验框进行调整获得建议框/rpn_scores:用来判断是否包含物体)
        #-----------------------------------------#
        #   分类预测先验框内部是否包含物体
        #-----------------------------------------#
        rpn_scores = self.score(x)
        rpn_scores = rpn_scores.permute(0, 2, 3, 1).contiguous().view(n, -1, 2)

        #--------------------------------------------------------------------------------------#
        #   进行softmax概率计算,每个先验框只有两个判别结果
        #   内部包含物体或者内部不包含物体,rpn_softmax_scores[:, :, 1]的内容为包含物体的概率
        #--------------------------------------------------------------------------------------#
        rpn_softmax_scores  = F.softmax(rpn_scores, dim=-1)
        rpn_fg_scores       = rpn_softmax_scores[:, :, 1].contiguous()
        rpn_fg_scores       = rpn_fg_scores.view(n, -1)

        #------------------------------------------------------------------------------------------------#
        #   生成先验框,此时获得的anchor是布满网格点的,当输入图片为600,600,3的时候,shape为(12996, 4)
        #------------------------------------------------------------------------------------------------#
        anchor = _enumerate_shifted_anchor(np.array(self.anchor_base), self.feat_stride, h, w)
        rois        = list()
        roi_indices = list()
        for i in range(n):
            roi         = self.proposal_layer(rpn_locs[i], rpn_fg_scores[i], anchor, img_size, scale = scale)
            batch_index = i * torch.ones((len(roi),))
            rois.append(roi.unsqueeze(0))
            roi_indices.append(batch_index.unsqueeze(0))

        rois        = torch.cat(rois, dim=0).type_as(x)
        roi_indices = torch.cat(roi_indices, dim=0).type_as(x)
        anchor      = torch.from_numpy(anchor).unsqueeze(0).float().to(x.device)

        return rpn_locs, rpn_scores, rois, roi_indices, anchor

def normal_init(m, mean, stddev, truncated=False):
    if truncated:
        m.weight.data.normal_().fmod_(2).mul_(stddev).add_(mean)  # not a perfect approximation
    else:
        m.weight.data.normal_(mean, stddev)  #服从高斯分布
        m.bias.data.zero_()   #设置无偏差


# if __name__ == "__main__":
#     #---------------------------------#
#     #   构建classifier网络(构建建议框网络)
#     #---------------------------------#
#     rpn = RegionProposalNetwork(
#         1024, 512,
#         # ratios          = [0.5, 1, 2],
#         # anchor_scales   = [8, 16, 32],
#         # feat_stride     = 16,
#     )
图中三次卷积(获得对先验框的调整参数和预测是否有物体)对应在RPN中的代码

# 先进行一个3x3的卷积,可理解为特征整合
self.conv1 = nn.Conv2d(in_channels, mid_channels, 3, 1, 1) #一次3*3的卷积
# 分类预测先验框内部是否包含物体
self.score = nn.Conv2d(mid_channels, n_anchor * 2, 1, 1, 0) #一次1*1的卷积
# 回归预测对先验框进行调整
self.loc = nn.Conv2d(mid_channels, n_anchor * 4, 1, 1, 0) #一次1*1的卷积 这三次卷积对应流程图左边的操作
def forward(self, x, img_size, scale=1.):
n, _, h, w = x.shape
# 先进行一个3x3的卷积,可理解为特征整合
x = F.relu(self.conv1(x)) #输入的x是feature map共享特征层(38,38,1024)
# 回归预测对先验框进行调整
rpn_locs = self.loc(x)
rpn_locs = rpn_locs.permute(0, 2, 3, 1).contiguous().view(n, -1, 4)
# 分类预测先验框内部是否包含物体
rpn_scores = self.score(x)
rpn_scores = rpn_scores.permute(0, 2, 3, 1).contiguous().view(n, -1, 2)
9 x 4的卷积 用于预测 公用特征层上 每一个网格点上 每一个先验框的变化情况。(结果会对这些先验框进行调整,获得一个新的框。)-->得到建议框
9 x 2的卷积 用于预测 公用特征层上 每一个网格点上 每一个预测框内部是否包含了物体,序号为1的内容为包含物体的概率。(判断上述获得的新框是否包含物体。)
对Proposal建议框的解码:
class ProposalCreator():
    def __init__(
        self,
        mode,
        nms_iou             = 0.7,
        n_train_pre_nms     = 12000,
        n_train_post_nms    = 600,
        n_test_pre_nms      = 3000,
        n_test_post_nms     = 300,
        min_size            = 16

    ):
        #-----------------------------------#
        #   设置预测还是训练
        #-----------------------------------#
        self.mode               = mode
        #-----------------------------------#
        #   建议框非极大抑制的iou大小
        #-----------------------------------#
        self.nms_iou            = nms_iou
        #-----------------------------------#
        #   训练用到的建议框数量
        #-----------------------------------#
        self.n_train_pre_nms    = n_train_pre_nms
        self.n_train_post_nms   = n_train_post_nms
        #-----------------------------------#
        #   预测用到的建议框数量
        #-----------------------------------#
        self.n_test_pre_nms     = n_test_pre_nms
        self.n_test_post_nms    = n_test_post_nms
        self.min_size           = min_size

    def __call__(self, loc, score, anchor, img_size, scale=1.):
        if self.mode == "training":
            n_pre_nms   = self.n_train_pre_nms
            n_post_nms  = self.n_train_post_nms
        else:
            n_pre_nms   = self.n_test_pre_nms
            n_post_nms  = self.n_test_post_nms

        #-----------------------------------#
        #   将先验框转换成tensor
        #-----------------------------------#
        anchor = torch.from_numpy(anchor)
        if loc.is_cuda:
            anchor = anchor.cuda()
        #-----------------------------------#
        #   将RPN网络预测结果转化成建议框
        #-----------------------------------#
        roi = loc2bbox(anchor, loc)
        #-----------------------------------#
        #   防止建议框超出图像边缘
        #-----------------------------------#
        roi[:, [0, 2]] = torch.clamp(roi[:, [0, 2]], min = 0, max = img_size[1])
        roi[:, [1, 3]] = torch.clamp(roi[:, [1, 3]], min = 0, max = img_size[0])

        #-----------------------------------#
        #   建议框的宽高的最小值不可以小于16
        #-----------------------------------#
        min_size    = self.min_size * scale
        keep        = torch.where(((roi[:, 2] - roi[:, 0]) >= min_size) & ((roi[:, 3] - roi[:, 1]) >= min_size))[0]
        #-----------------------------------#
        #   将对应的建议框保留下来
        #-----------------------------------#
        roi         = roi[keep, :]
        score       = score[keep]

        #-----------------------------------#
        #   根据得分进行排序,取出建议框
        #-----------------------------------#
        order       = torch.argsort(score, descending=True)
        if n_pre_nms > 0:
            order   = order[:n_pre_nms]
        roi     = roi[order, :]
        score   = score[order]

        #-----------------------------------#
        #   对建议框进行非极大抑制
        #   使用官方的非极大抑制会快非常多
        #-----------------------------------#
        keep    = nms(roi, score, self.nms_iou)
        keep    = keep[:n_post_nms]
        roi     = roi[keep]
        return roi
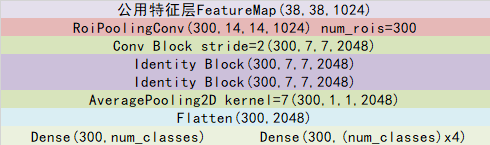
四、ROIPooling(对Proposal建议框加以利用)
建议框会对公用特征层feature map(维度为38*38*1024) 的38x38个区域进行截取,也就是认为这些区域里存在目标,然后将截取的结果进行resize,resize到14x14x1024的大小。
然后再对每个建议框再进行Resnet原有的第五次压缩(layer4)。压缩完后进行一个平均池化,再进行一个Flatten,最后分别进行一个num_classes的全连接和(num_classes)x4全连接。
(num_classes的全连接用于对最后获得的框进行分类,(num_classes)x4全连接用于对相应的建议框进行调整。)
对Proposal建议框加以利用的过程与shape变化如图所示:
class Resnet50RoIHead(nn.Module):
    def __init__(self, n_class, roi_size, spatial_scale, classifier):
        super(Resnet50RoIHead, self).__init__()
        self.classifier = classifier
        #--------------------------------------#
        #   对ROIPooling后的的结果进行回归预测
        #--------------------------------------#
        self.cls_loc = nn.Linear(2048, n_class * 4)
        #-----------------------------------#
        #   对ROIPooling后的的结果进行分类
        #-----------------------------------#
        self.score = nn.Linear(2048, n_class)
        #-----------------------------------#
        #   权值初始化
        #-----------------------------------#
        normal_init(self.cls_loc, 0, 0.001)
        normal_init(self.score, 0, 0.01)

        self.roi = RoIPool((roi_size, roi_size), spatial_scale)

    def forward(self, x, rois, roi_indices, img_size):
        n, _, _, _ = x.shape
        if x.is_cuda:
            roi_indices = roi_indices.cuda()
            rois = rois.cuda()
        rois        = torch.flatten(rois, 0, 1)   #(300,4)
        roi_indices = torch.flatten(roi_indices, 0, 1)   #(300,)

        rois_feature_map = torch.zeros_like(rois)   #(300,4)
        rois_feature_map[:, [0,2]] = rois[:, [0,2]] / img_size[1] * x.size()[3]
        rois_feature_map[:, [1,3]] = rois[:, [1,3]] / img_size[0] * x.size()[2]

        indices_and_rois = torch.cat([roi_indices[:, None], rois_feature_map], dim=1)
        #-----------------------------------#
        #   利用建议框对公用特征层进行截取
        #-----------------------------------#
        pool = self.roi(x, indices_and_rois)
        #-----------------------------------#
        #   利用classifier网络进行特征提取
        #-----------------------------------#
        fc7 = self.classifier(pool)
        #--------------------------------------------------------------#
        #   当输入为一张图片的时候,这里获得的f7的shape为[300, 2048]
        #--------------------------------------------------------------#
        fc7 = fc7.view(fc7.size(0), -1)

        roi_cls_locs    = self.cls_loc(fc7)  #(300,84)
        roi_scores      = self.score(fc7)
        roi_cls_locs    = roi_cls_locs.view(n, -1, roi_cls_locs.size(1))
        roi_scores      = roi_scores.view(n, -1, roi_scores.size(1))
        return roi_cls_locs, roi_scores
最后即可进行预测框绘制


 219
219


 被折叠的 条评论
为什么被折叠?
被折叠的 条评论
为什么被折叠?
 到【灌水乐园】发言


