


代码地址:
https://github.com/cvg/nice-slamGitHub - cvg/nice-slam: [CVPR'22] NICE-SLAM: Neural Implicit Scalable Encoding for SLAM
参考链接:
1.环境配置:
之前用windows系统总是出问题,后来转战linux,本文使用Ubuntu22.04,anaconda自己安装哈。
1.下载压缩包,打开environment.yaml文件,在channels里面添加两行代码:
  - https://mirrors.tuna.tsinghua.edu.cn/anaconda/pkgs/free/
  - https://mirrors.ustc.edu.cn/anaconda/pkgs/free/

2.按照github教程
sudo apt-get install libopenexr-dev
conda env create -f environment.yaml
激活创建的虚拟环境
conda activate nice-slam2.anaconda环境下升级gcc g++
升级gcc和g++到7.3.0版本
conda install -c moussi gcc_impl_linux-64
conda install -c moussi gxx_impl_linux-64
修改gcc和g++软链接
ln -s ~/anaconda3/envs/(envs_name)/bin/x86_64-conda_cos6-linux-gnu-gcc  ~/anaconda3/envs/(envs_name)/bin/gcc
ln -s ~/anaconda3/envs/(envs_name)/bin/x86_64-conda_cos6-linux-gnu-g++  ~/anaconda3/envs/(envs_name)/bin/g++
下载数据集,测试Apartment的可视化效果
python visualizer.py configs/Apartment/apartment.yaml --output output/vis/Apartment
然后会报错,锁定到gcc和g++版本低,进行解决。
查看gcc和g++版本
gcc -vReading specs from ~/anaconda3/envs/(envs_name)/bin/../lib/gcc/x86_64-conda_cos6-linux-gnu/7.3.0/specs
COLLECT_GCC=gcc
COLLECT_LTO_WRAPPER=~/anaconda3/envs/(envs_name)/bin/../libexec/gcc/x86_64-conda_cos6-linux-gnu/7.3.0/lto-wrapper
Target: x86_64-conda_cos6-linux-gnu
Configured with: /home/conda/feedstock_root/build_artifacts/ctng-compilers_1580517382604/work/.build/x86_64-conda_cos6-linux-gnu/src/gcc/configure --build=x86_64-build_pc-linux-gnu --host=x86_64-build_pc-linux-gnu --target=x86_64-conda_cos6-linux-gnu --prefix=/home/conda/feedstock_root/build_artifacts/ctng-compilers_1580517382604/work/gcc_built --with-sysroot=/home/conda/feedstock_root/build_artifacts/ctng-compilers_1580517382604/work/gcc_built/x86_64-conda_cos6-linux-gnu/sysroot --enable-languages=c,c++,fortran,objc,obj-c++ --with-pkgversion='crosstool-NG 1.23.0.450-d54ae' --enable-__cxa_atexit --disable-libmudflap --enable-libgomp --disable-libssp --enable-libquadmath --enable-libquadmath-support --enable-libsanitizer --enable-libmpx --with-gmp=/home/conda/feedstock_root/build_artifacts/ctng-compilers_1580517382604/work/.build/x86_64-conda_cos6-linux-gnu/buildtools --with-mpfr=/home/conda/feedstock_root/build_artifacts/ctng-compilers_1580517382604/work/.build/x86_64-conda_cos6-linux-gnu/buildtools --with-mpc=/home/conda/feedstock_root/build_artifacts/ctng-compilers_1580517382604/work/.build/x86_64-conda_cos6-linux-gnu/buildtools --with-isl=/home/conda/feedstock_root/build_artifacts/ctng-compilers_1580517382604/work/.build/x86_64-conda_cos6-linux-gnu/buildtools --enable-lto --with-host-libstdcxx='-static-libgcc -Wl,-Bstatic,-lstdc++,-Bdynamic -lm' --enable-threads=posix --enable-target-optspace --enable-plugin --enable-gold --disable-nls --disable-multilib --with-local-prefix=/home/conda/feedstock_root/build_artifacts/ctng-compilers_1580517382604/work/gcc_built/x86_64-conda_cos6-linux-gnu/sysroot --enable-long-long --enable-default-pie
Thread model: posix
gcc version 7.3.0 (crosstool-NG 1.23.0.450-d54ae)
COLLECT_LTO_WRAPPER里面的路径是虚拟环境里的,g++同理。
运行时发现还是有问题
libGL error: MESA-LOADER: failed to open swrast: /usr/lib/dri/swrast_dri.so: cannot open shared object file: No such file or directory (search paths /u sr/lib/x86_64-linux-gnu/dri:\$${ORIGIN}/dri:/usr/lib/dri, suffix _dri)
libGL error: failed to load driver: swrast
GLFW Error: GLX: Failed to create context: GLXBadFBConfig
Failed to create window
[DrawGeometries] Failed creating OpenGL window.
解决方法
cd  /usr/lib/
sudo mkdir dri
sudo ls -s  /lib/x86_64-linux-gnu/dri/swrast_dri.so    swrast_dri.so
出现新问题
libGL error: MESA-LOADER: failed to open swrast: /home/wyc/anaconda3/envs/randlanet/bin/../lib/libstdc++.so.6: version `GLIBCXX_3.4.30' not found (req uired by /lib/x86_64-linux-gnu/libLLVM-13.so.1) (search paths /usr/lib/x86_64-linux-gnu/dri:\$${ORIGIN}/dri:/usr/lib/dri, suffix _dri)
libGL error: failed to load driver: swrast
GLFW Error: GLX: Failed to create context: GLXBadFBConfig
Failed to create window
[DrawGeometries] Failed creating OpenGL window.
进入虚拟环境
conda install -c conda-forge gcc最终解决了!
3.可视化运行
python visualizer.py configs/Apartment/apartment.yaml --output output/vis/Apartment

4.Demo运行

可以看出Demo的输入文件有RGB图像,深度图,相机内参,位姿。
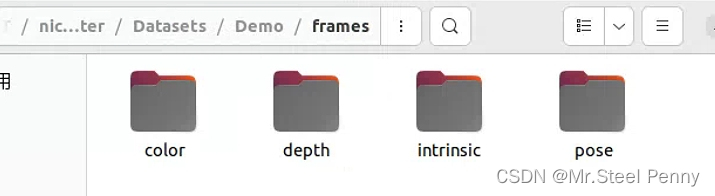
python -W ignore run.py configs/Demo/demo.yaml生成的文件如下: 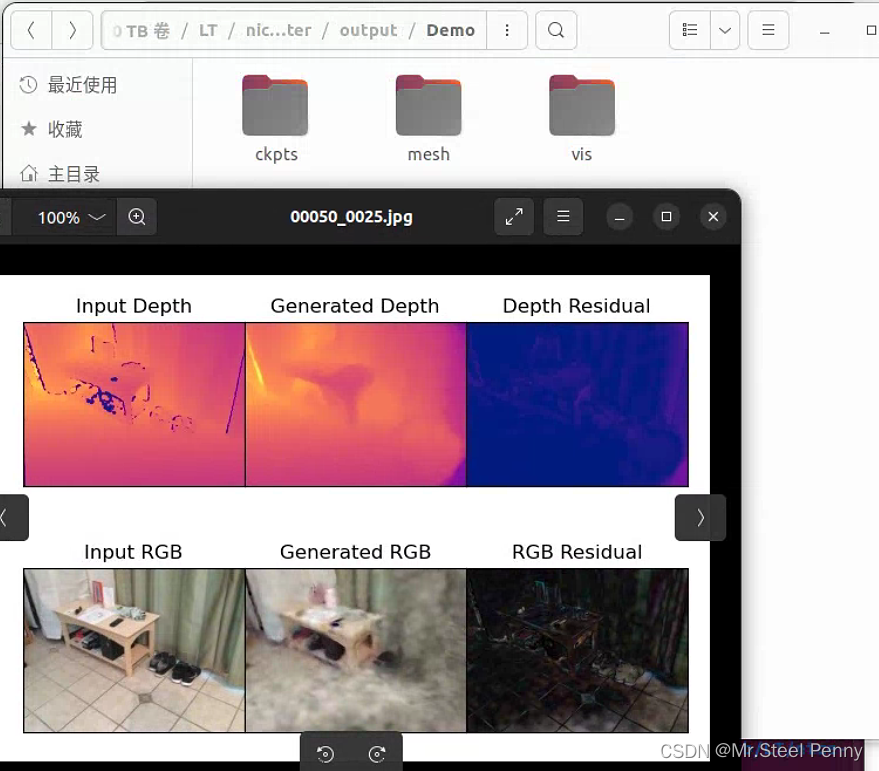
进行可视化
python visualizer.py configs/Demo/demo.yaml 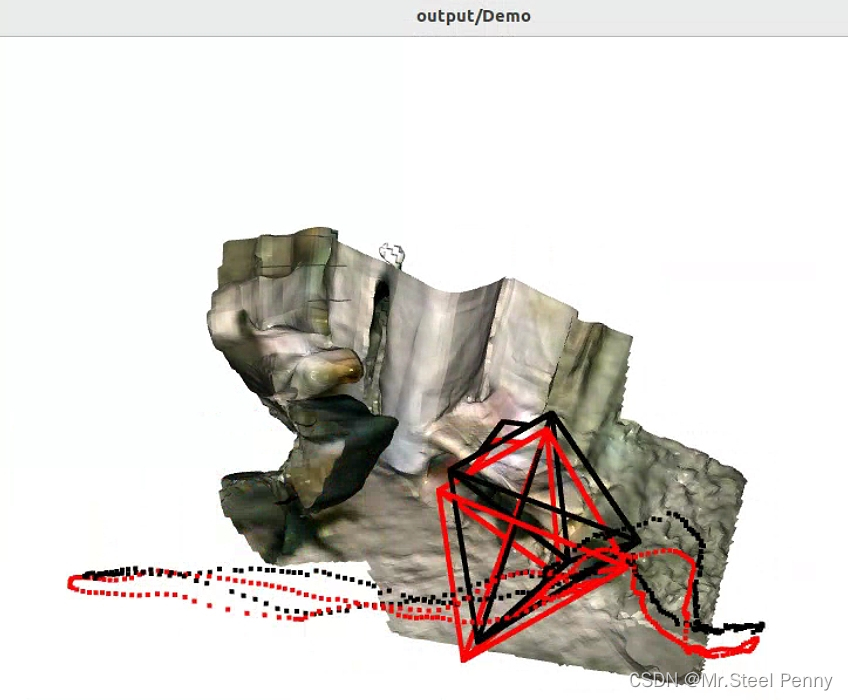


 1768
1768

 被折叠的 条评论
为什么被折叠?
被折叠的 条评论
为什么被折叠?
 到【灌水乐园】发言


