


一、CPU SIMD
//PC
1. #include "stdio.h"
2. #include <xmmintrin.h> // Need this for SSE compiler intrinsics
3. #include <math.h> // Needed for sqrt in CPU-only version
4. #include <time.h>
5.
6. int main(int argc, char* argv[])
7. {
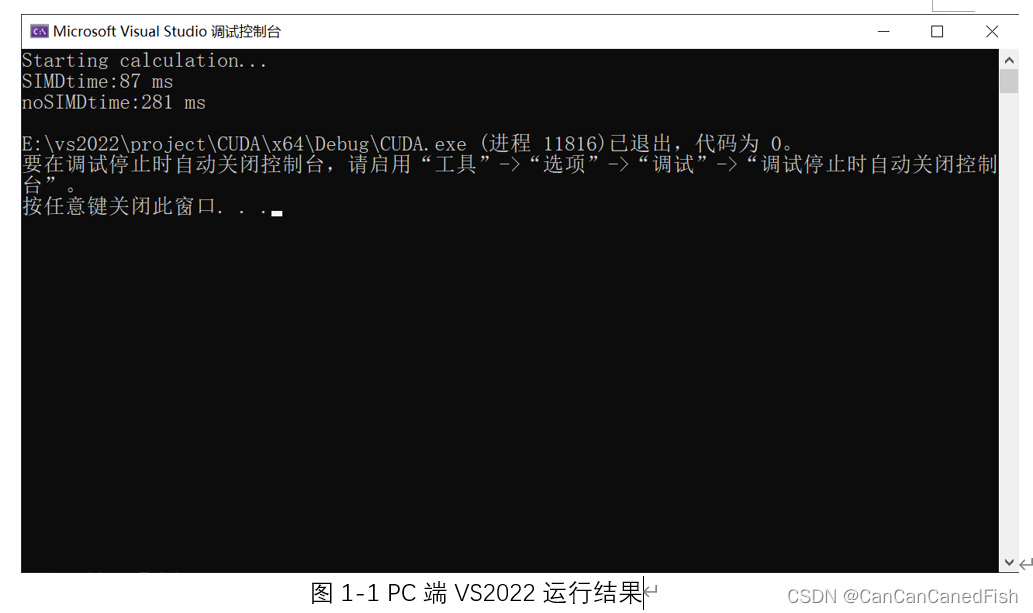
8. printf("Starting calculation...\n");
9. const int length = 64000;
10.
11. // We will be calculating Y = SQRT(x) / x, for x = 1->64000
12. // If you do not properly align your data for SSE instructions, you may take a huge performance hit.
13. float *pResult = (float*) _aligned_malloc(length * sizeof(float), 16); // align to 16-byte for SSE
14. __m128 x;
15. __m128 xDelta = _mm_set1_ps(4.0f); // Set the xDelta to (4,4,4,4)
16. __m128 *pResultSSE = (__m128*) pResult;
17.
18. const int SSELength = length / 4;
19. clock_t clock1=clock();
20. #define TIME_SSE // Define this if you want to run with SSE
21. #ifdef TIME_SSE
22. // lots of stress loops so we can easily use a stopwatch
23. for (int stress = 0; stress < 1000; stress++)
24. {
25. // Set the initial values of x to (4,3,2,1)
26. x = _mm_set_ps(4.0f, 3.0f, 2.0f, 1.0f);
27. for (int i=0; i < SSELength; i++)
28. {
29. __m128 xSqrt = _mm_sqrt_ps(x);
30. // Note! Division is slow. It's actually faster to take the reciprocal of a number and multiply
31. // Also note that Division is more accurate than taking the reciprocal and multiplying
32.
33. #define USE_DIVISION_METHOD
34. #ifdef USE_FAST_METHOD
35. __m128 xRecip = _mm_rcp_ps(x);
36. pResultSSE[i] = _mm_mul_ps(xRecip, xSqrt);
37. #endif //USE_FAST_METHOD
38. #ifdef USE_DIVISION_METHOD
39. pResultSSE[i] = _mm_div_ps(xSqrt, x);
40. #endif // USE_DIVISION_METHOD
41. // Advance x to the next set of numbers
42. x = _mm_add_ps(x, xDelta);
43. }
44. }
45. clock_t clock2=clock();
46. printf("SIMDtime:%d ms\n",1000*(clock2-clock1)/CLOCKS_PER_SEC);
47. #endif // TIME_SSE
48.
49. #define TIME_NoSSE
50. #ifdef TIME_NoSSE
51. clock_t clock3=clock();
52. // lots of stress loops so we can easily use a stopwatch
53. for (int stress = 0; stress < 1000; stress++)
54. {
55. clock_t clock3=clock();
56. float xFloat = 1.0f;
57. for (int i=0 ; i < length; i++)
58. {
59. // Even though division is slow, there are no intrinsic functions like there are in SSE
60. pResult[i] = sqrt(xFloat) / xFloat;
61. xFloat += 1.0f;
62. }
63. }
64. clock_t clock4=clock();
65. printf("noSIMDtime:%d ms\n",1000*(clock4-clock3)/CLOCKS_PER_SEC);
66.
67. #endif // TIME_noSSE
68. return 0;
69. }
//server
1. #include<stdio.h>
2. #include"arm_neon.h"
3. void add3(uint8x16_t* data){
4. uint8x16_t three = vmovq_n_u8(3);
5. *data = vaddq_u8(*data, three);
6. }
7. void printf_uint8(uint8x16_t data, char* name) {
8. int i;
9. static uint8_t p[16];
10. vst1q_u8(p, data);
11. printf("%s = ", name);
12. for (int i = 0; i < 16; i++) {
13. printf("%02d ", p[i]);
14. }
15. printf("\n");
16. }
17. int main() {
18. const uint8_t uint8_data[] = { 1,2,3,4,5,6,7,8,9,10,11,12,13,14,15,16 };
19. uint8x16_t data;
20. data = vld1q_u8(uint8_data);
21.
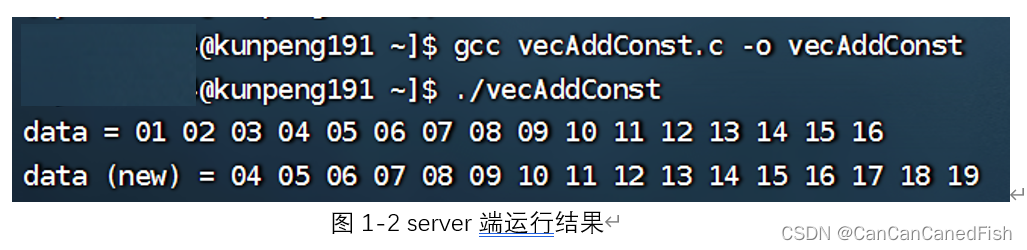
22. printf_uint8(data, "data");
23. add3(&data);
24. printf_uint8(data, "data (new)");
25. return 0;
26. }
CPU 指令处理数据的能力是衡量 CPU 性能的重要指标,为了提高 CPU 指令处理数据的能力,半导体厂商在 CPU 中推出了一些可以同时并行处理多个数据的指令 —— SIMD 指令,使得单一的计算可以处理多种不同的数据
SIMD的全称是 Single Instruction Multiple Data,中文译为:“单指令多数据”,即一条指令处理多条数据。
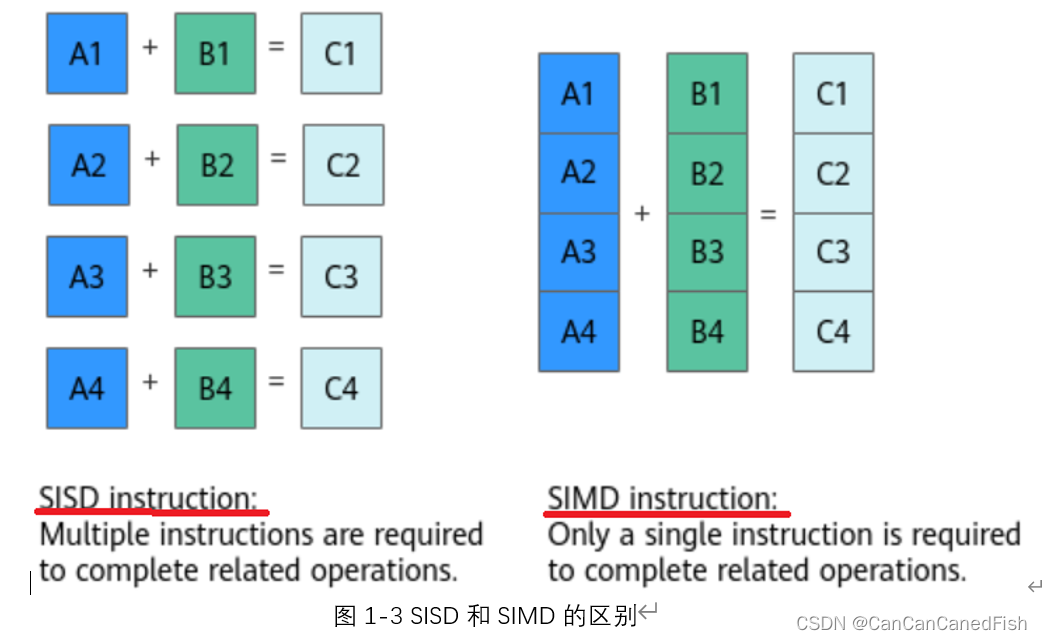
例如:一个普通加法指令,一次只能对两个数执行一个加法操作。而一个 SIMD 加法指令,一次可以对两个数组(向量)执行加法操作。如下图1-3所示。
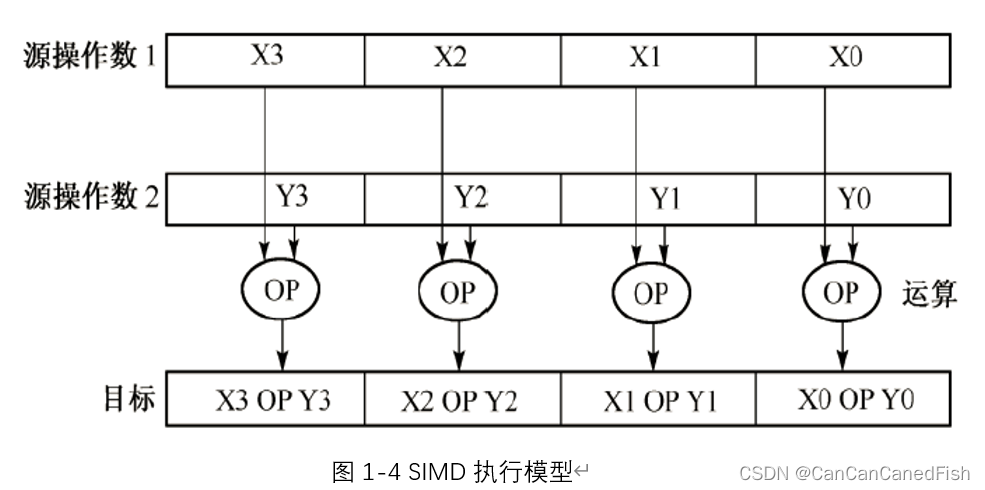
因此,SIMD是一种对于向量的编程模型。以Intel为例,其开发的向量数据类型有64-bit /128-bit/256-bit/512-bit这四种大小的;其执行模型如下图1-4所示。
SIMD在arm架构上的实现叫做NEON,其包含的数据类型有:float32x4_t, uint8x16_t, float64x2_t(vector)和uint8_t, float32_t, float64_t(scalar)。
通过在本地使用代码比较使用SIMD和不使用SIMD
二、GPU SIMD-CUDA installation information
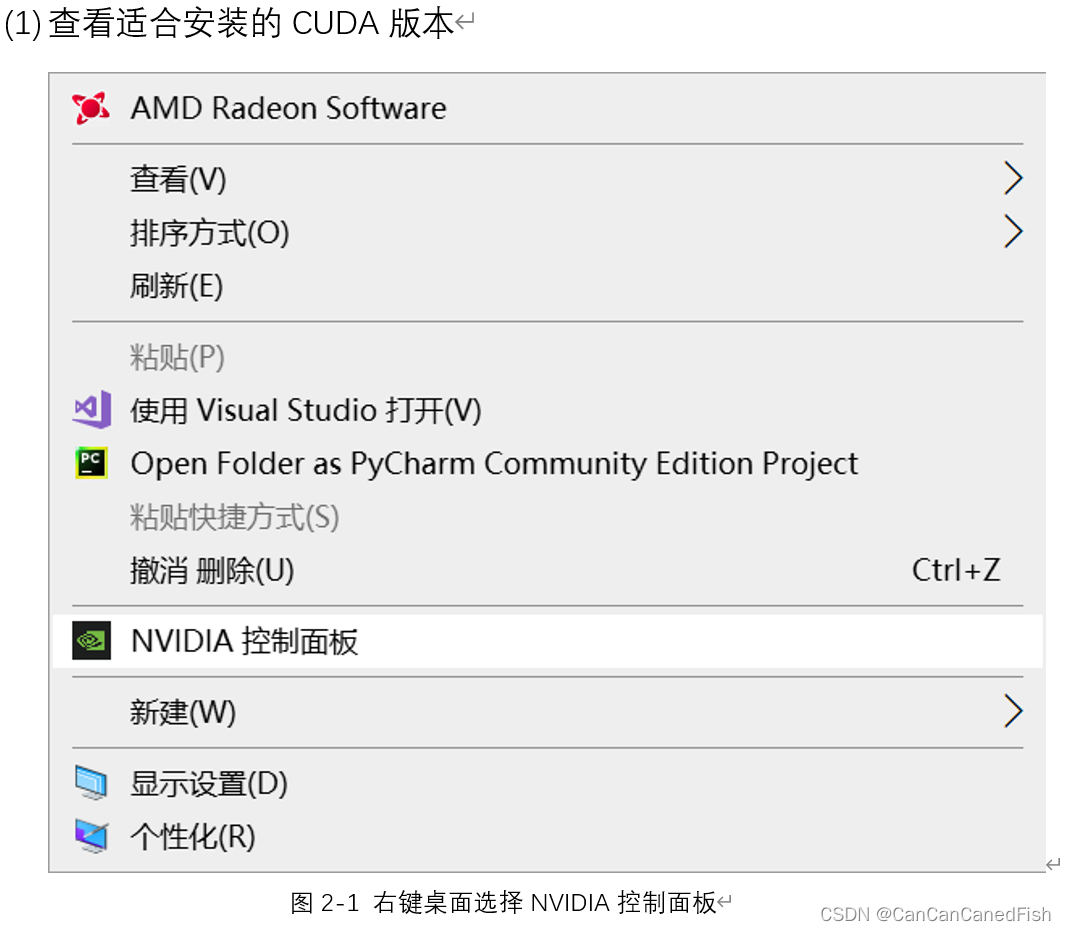
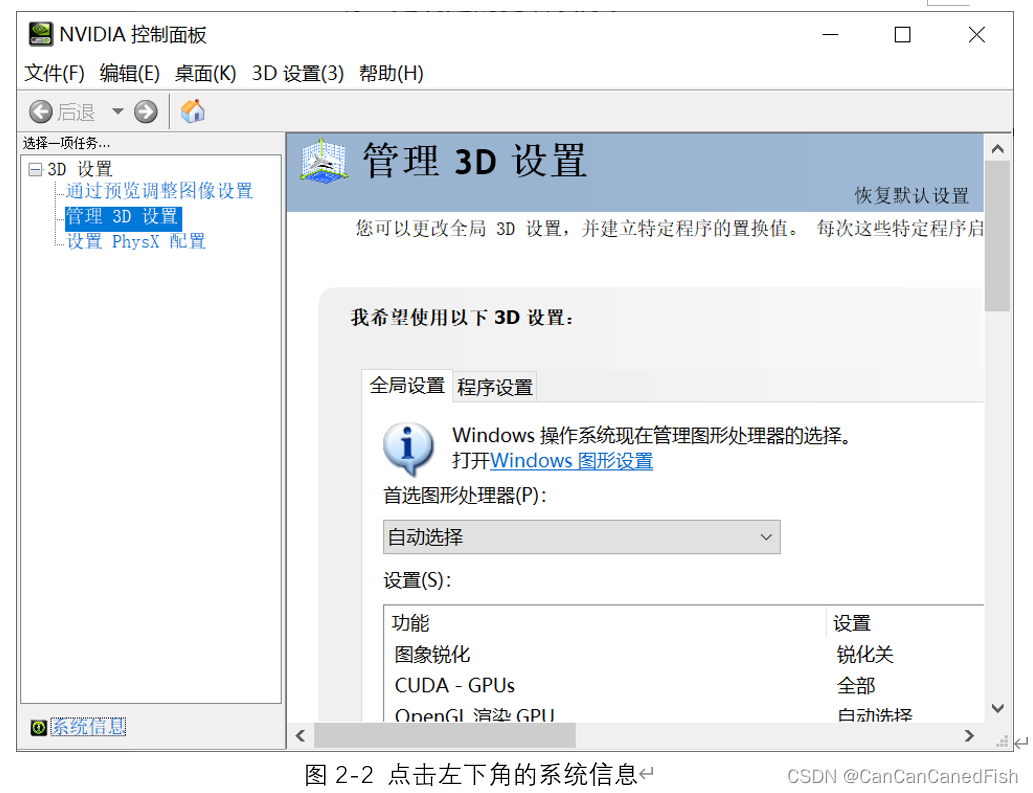
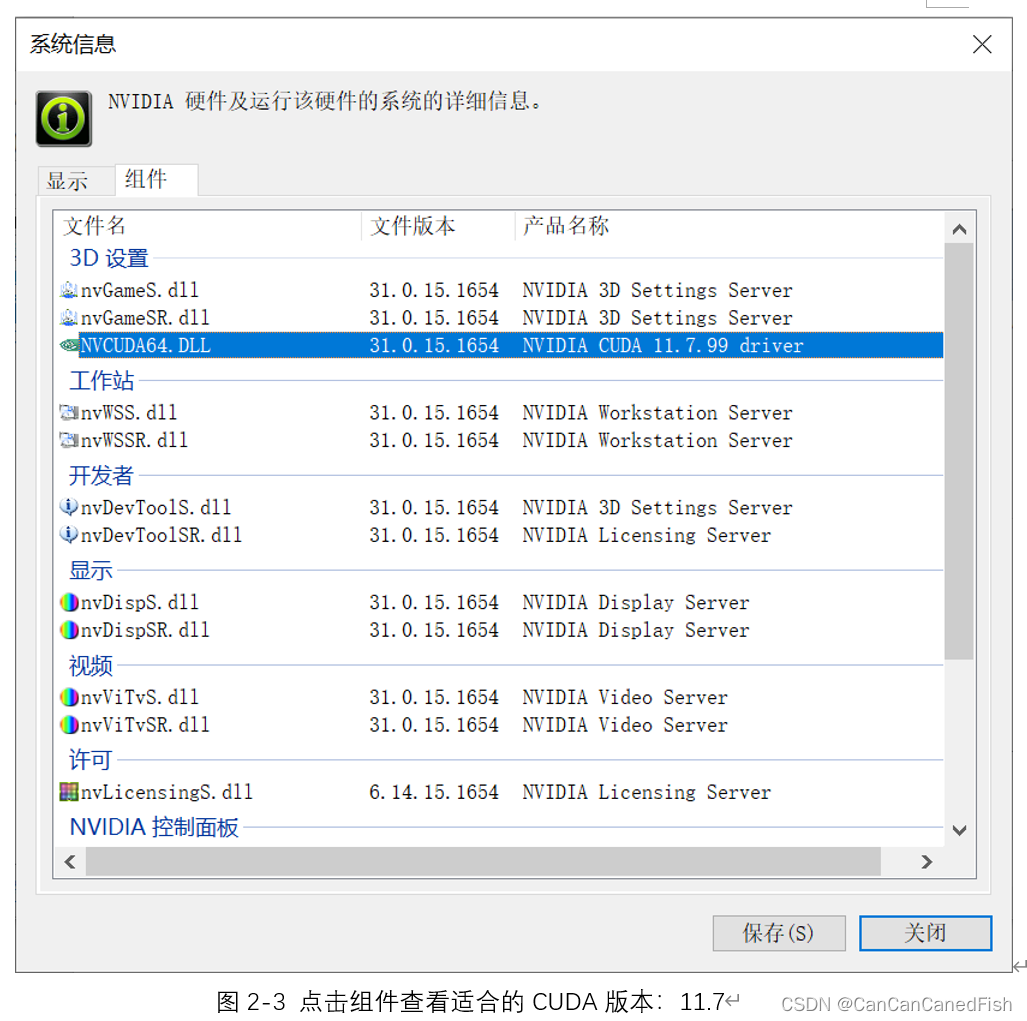
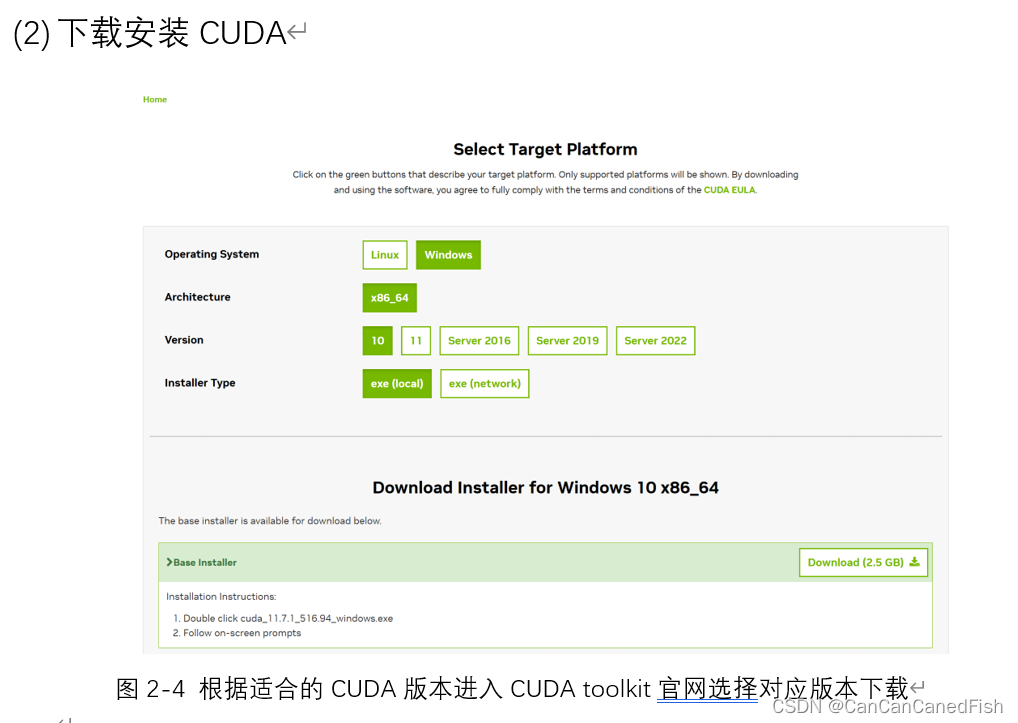
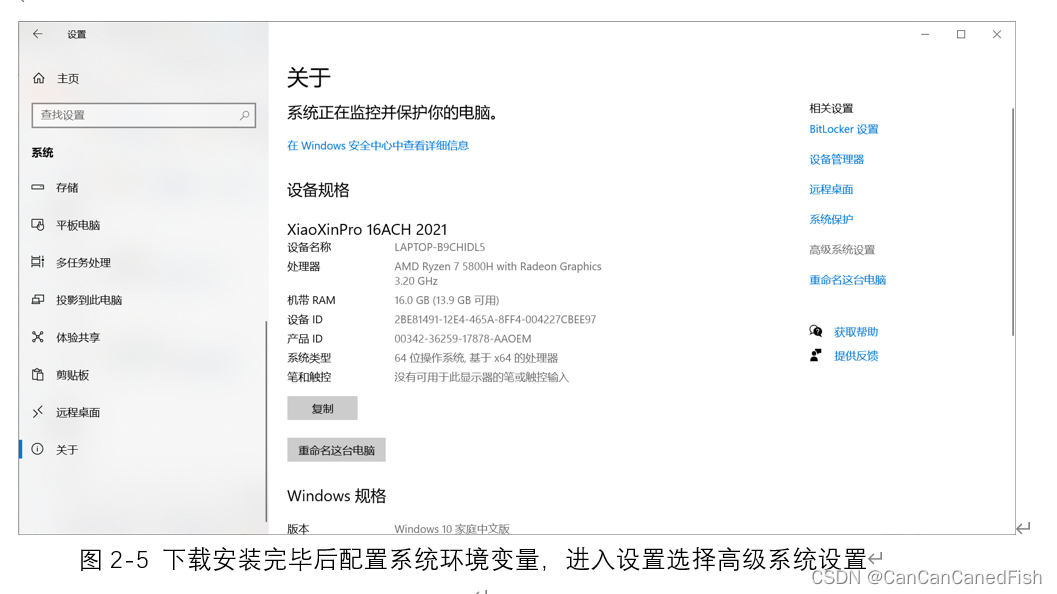
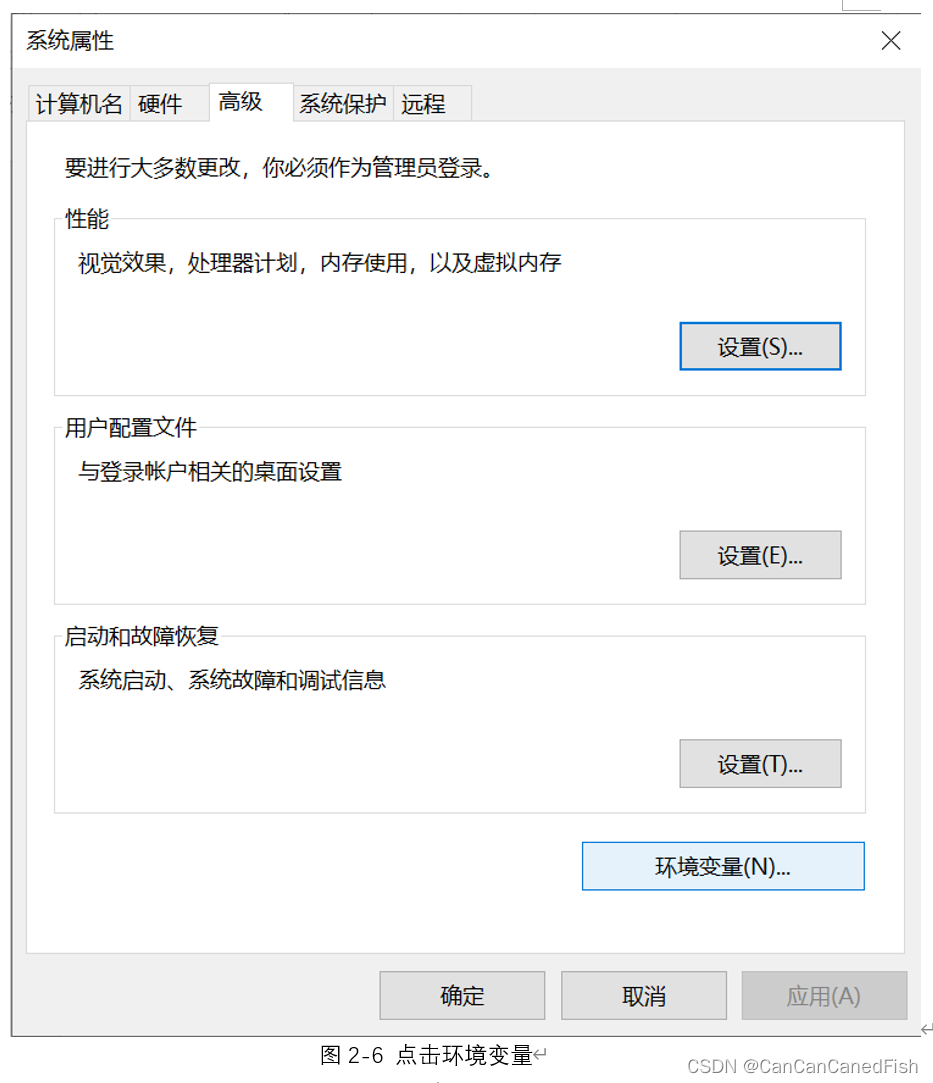
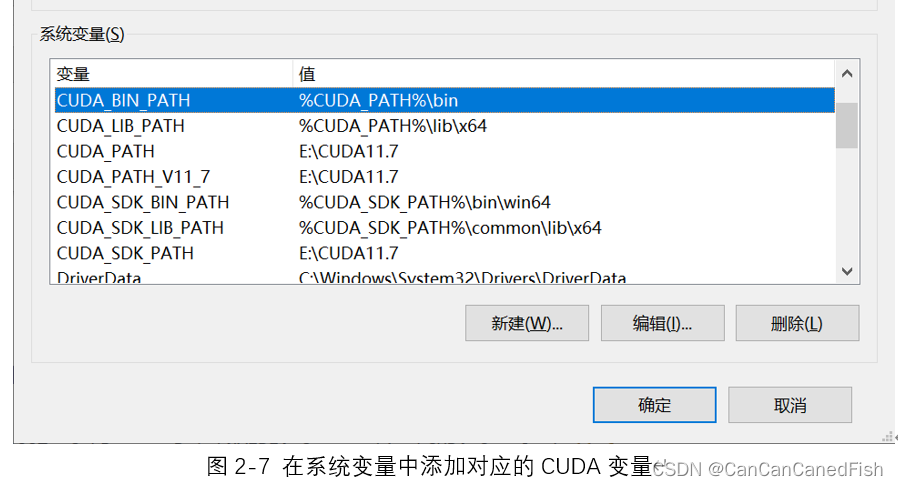


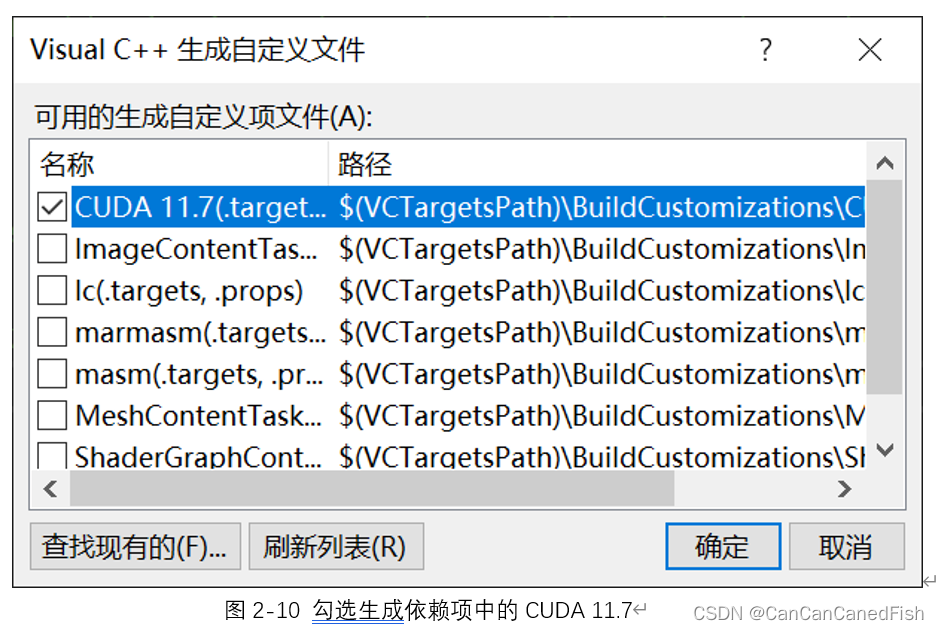
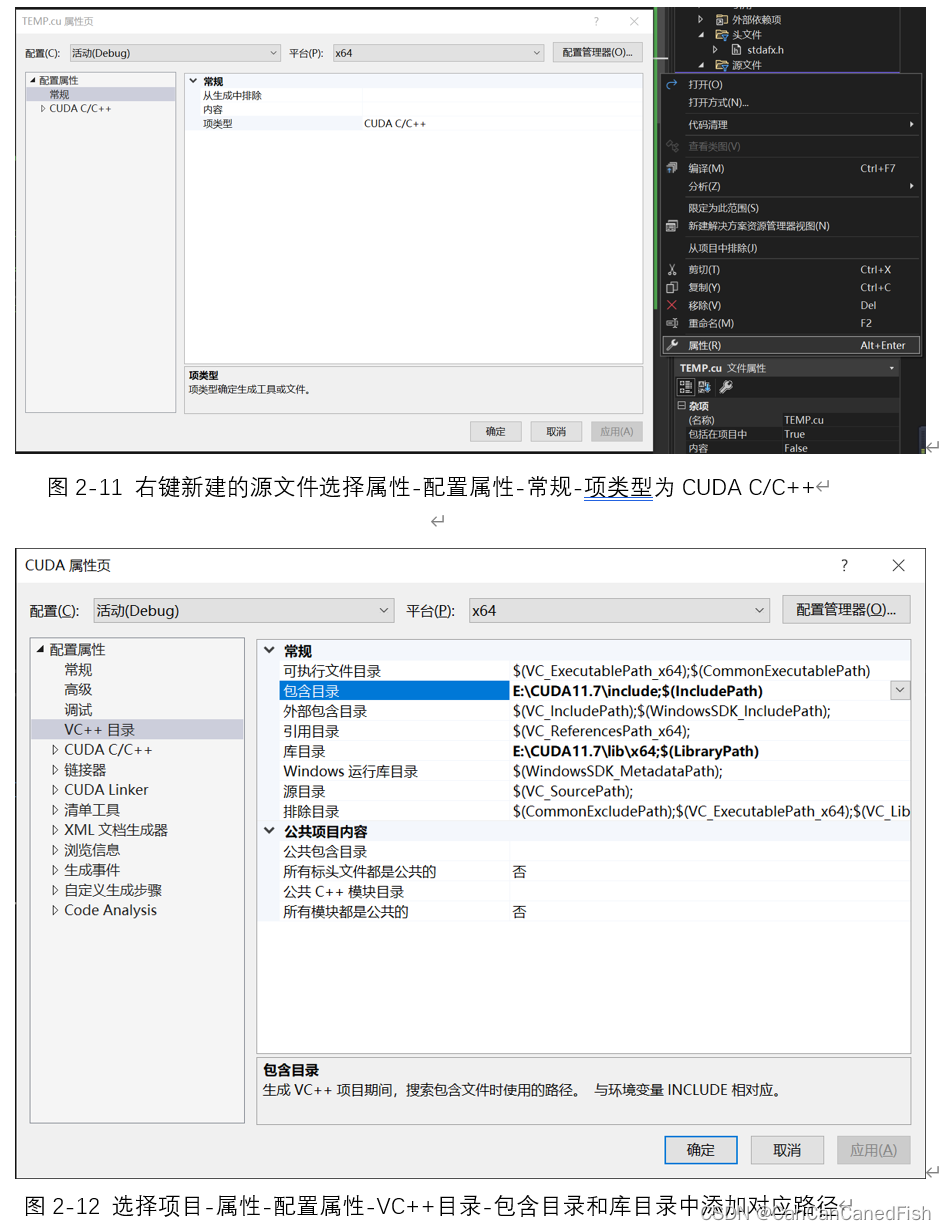
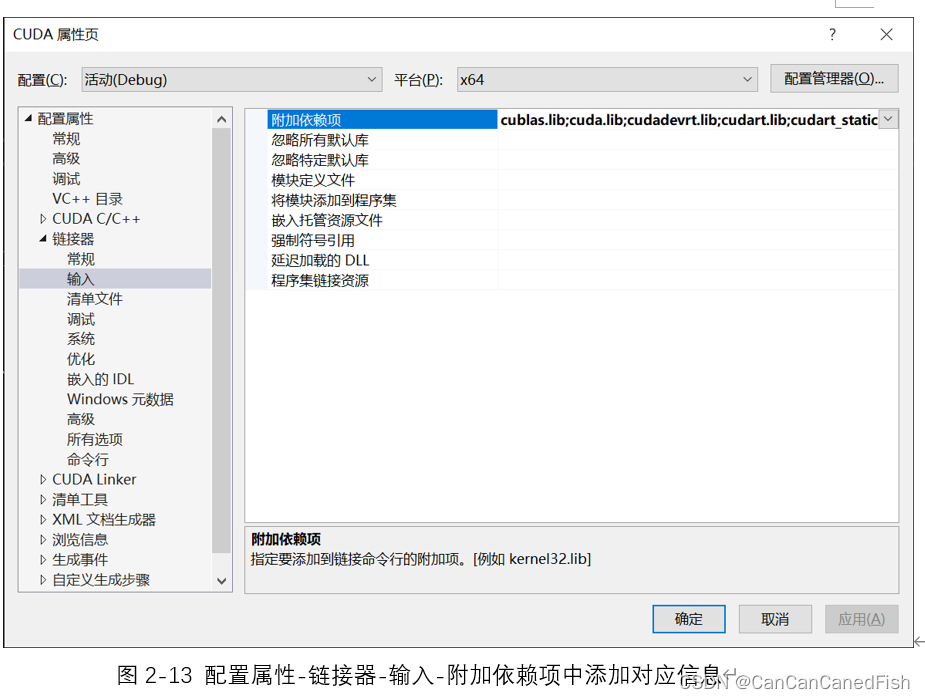
首先,在下载过程中,由于CUDA有不同的版本,因此需要根据自己的操作系统和显卡型号选择合适的版本,否则可能导致安装失败等问题。其次,安装CUDA是一个相对简单的过程,只需运行下载的安装程序并按照向导的指示进行操作。然后将CUDA与Visual Studio 2022环境集成,为了方便开发CUDA程序。最后运行了CUDA提供的一些示例代码,通过编译和运行它们来验证CUDA已经正确安装和配置,并可以帮助理解CUDA的基本概念和用法。
在这个实验过程中,我学习到了CUDA是一个强大而复杂的工具,正确安装和配置它需要查询相关帮助文档和指南手册,更要耐心和仔细,因为忽略任何一点细节都可能导致安装失败或编译错误。并且NVIDIA官方网站和CUDA开发者社区都提供了丰富的文档、教程和示例代码。利用这些资源和寻求社区支持,可以更快地解决问题并加深对CUDA的理解,拥有丰富的资源和社区支持是很宝贵的,这能够帮助我们解决很多问题,而之前做过的一些实验例如MPI等等,中文的教程支持和理论讲解并没有CUDA这么丰富。同时,通过编写和运行示例代码,我更好地理解了CUDA的概念和编程模型,与仅仅阅读理论知识相比,实际动手操作对于学习和掌握CUDA来说是至关重要的,更能够理解并行加速计算的实质,因此不仅理论,实践更是高性能计算领域的关键。
三、GPU SIMD-deviceQuery in CUDA
code:deviceQuery

CUDA的deviceQuery指令可以用于了解和测试自己电脑上的GPU设备。通过运行deviceQuery程序,能够获取到显卡设备的名称、计算能力、内存容量、线程数和网格的最大尺寸等信息。这些信息对于了解设备的能力和限制非常重要。deviceQuery不仅提供了硬件信息,还展示了设备的一些特性,例如支持的CUDA版本、存储器特性、并行计算能力等。通过理解这些特性,可以更好地了解设备的功能和性能,从而在编程时做出相应的优化和调整。
四、GPU SIMD-vector calculation in CUDA
1.	#include <stdio.h>
2.	#include <cuda.h>
3.	#include "device_launch_parameters.h"
4.	#include "cuda_runtime.h"
5.
6.	// Kernel that executes on the CUDA device
7.	__global__ void square_array(float *a, int N)
8.	{
9.	  int idx = blockIdx.x * blockDim.x + threadIdx.x;
10.	  if (idx<N) a[idx] = a[idx] * a[idx];
11.	}
12.
13.	int main()
14.	{
15.	  float *a_h, *a_d;  // Pointer to host & device arrays
16.	  const int N = 10;  // Number of elements in arrays
17.	  size_t size = N * sizeof(float);
18.	  a_h = (float *)malloc(size);        // Allocate array on host
19.	  cudaMalloc((void **) &a_d, size);   // Allocate array on device
20.	  // Initialize host array and copy it to CUDA device
21.	  for (int i=0; i<N; i++) a_h[i] = (float)i;
22.	  cudaMemcpy(a_d, a_h, size, cudaMemcpyHostToDevice);
23.	  // Do calculation on device:
24.	  int block_size = 32;
25.	  int n_blocks = N/block_size + (N%block_size == 0 ? 0:1);
26.	  square_array <<< n_blocks, block_size >>> (a_d, N);
27.	  // Retrieve result from device and store it in host array
28.	  cudaMemcpy(a_h, a_d, sizeof(float)*N, cudaMemcpyDeviceToHost);
29.	  // Print results
30.	  for (int i=0; i<N; i++) printf("%d %f\n", i, a_h[i]);
31.	  // Cleanup
32.	  free(a_h); cudaFree(a_d);
33.
34.	  return 0;
35.	}
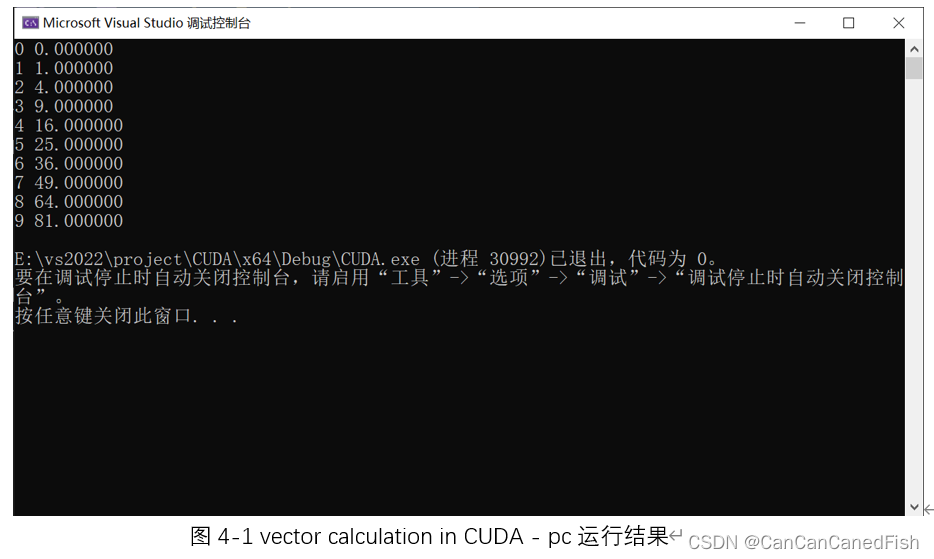
本题学习了如何在CUDA中进行向量计算,并使用CUDA实现了一个简单的用向量求正方形阵列的程序。
CUDA提供了并行计算的能力,可以直接对向量进行运算,即同时对多个数据进行计算,从而加速向量计算任务。相比于串行计算,使用CUDA进行向量计算可以显著提高计算性能。而其中的向量计算通常通过编写核函数来实现。核函数是在GPU上并行执行的函数,每个线程负责处理一个或多个向量元素。同时,在向量计算中,内存访问模式对性能影响很大。CUDA中常使用的是全局内存和共享内存,其访问速度慢于寄存器和共享内存。因此,合理地利用共享内存和寄存器,以及优化内存访问模式,可以提高向量计算的效率。
五、GPU SIMD-PI calculation in CUDA
1.	#include "cuda_runtime.h"
2.	#include "device_launch_parameters.h"
3.	// cudaPi.cpp : Defines the entry point for the console application.
4.	//
5.
6.	#include "stdafx.h"
7.	#include <stdio.h>
8.	#include <cuda.h>
9.	#include <math.h>
10.	#include<time.h>
11.	#include<tchar.h>
12.	#define NUM_THREAD 1024
13.	#define NUM_BLOCK 1
14.
15.	__global__ void cal_pi(double* sum, long long nbin, float step, long long nthreads, long long nblocks) {
16.
17.	    long long i;
18.	    float x;
19.	    long long idx = blockIdx.x * blockDim.x + threadIdx.x;
20.
21.	    for (i = idx; i < nbin; i += nthreads * nblocks) {
22.	        x = (i + 0.5) * step;
23.	        sum[idx] = sum[idx] + 4.0 / (1. + x * x);
24.	    }
25.
26.	}
27.
28.	int _tmain(int argc, _TCHAR* argv[])
29.	{
30.	    long long tid;
31.	    double pi = 0;
32.	    long long num_steps = 100000000;
33.
34.	    float step = 1. / (float)num_steps;
35.	    long long size = NUM_THREAD * NUM_BLOCK * sizeof(double);
36.	    clock_t before, after;
37.	    double* sumHost, * sumDev;
38.	    sumHost = (double*)malloc(size);
39.	    cudaMalloc((void**)&sumDev, size);
40.	    // Initialize array in device to 0
41.	    cudaMemset(sumDev, 0, size);
42.	    before = clock();
43.	    // Do calculation on device
44.	    printf("Before Compute \n\n");
45.	    dim3 numBlocks(NUM_BLOCK, 1, 1);
46.	    dim3 threadsPerBlock(NUM_THREAD, 1, 1);
47.	    cal_pi << <numBlocks, threadsPerBlock >> > (sumDev, (int)num_steps, step, NUM_THREAD, NUM_BLOCK); // call CUDA kernel
48.
49.	    printf("After Compute \n\n");
50.	    // Retrieve result from device and store it in host array
51.	    cudaMemcpy(sumHost, sumDev, size, cudaMemcpyDeviceToHost);
52.	    printf("After Copy \n\n");
53.	    for (tid = 0; tid < NUM_THREAD * NUM_BLOCK; tid++) {
54.	        pi = pi + sumHost[tid];
55.	    }
56.	    pi = pi * step;
57.	    after = clock();
58.	    printf("The value of PI is %15.12f\n", pi);
59.	    printf("The time to calculate PI was %f seconds\n", ((float)(after - before) / 1000.0));
60.	    free(sumHost);
61.	    cudaFree(sumDev);
62.	    return 0;
63.	}
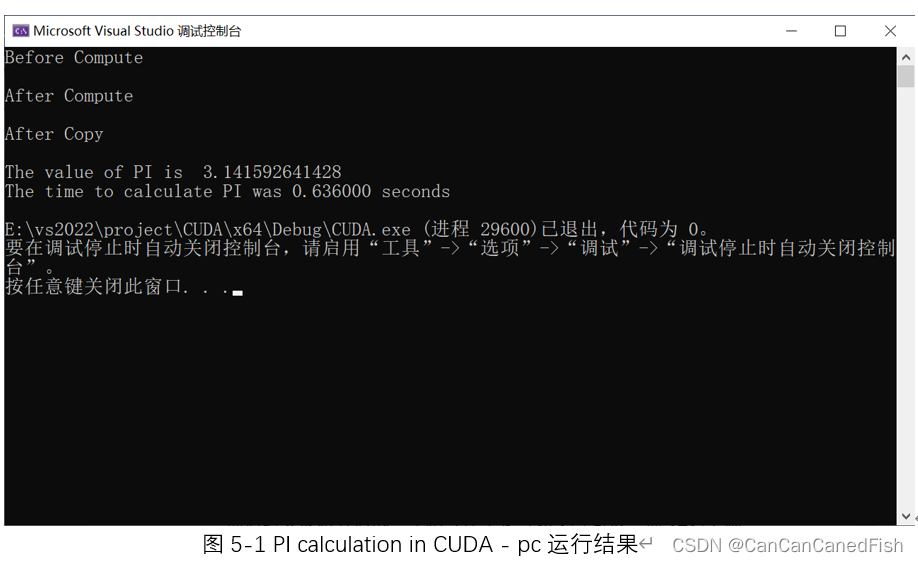
通过利用CUDA实现并行计算得到PI的取值并计时显示,可以学习到如何使用CUDA进行并行计算,以及如何利用并行计算加速PI的计算过程。这种并行计算的方式可以充分利用GPU的计算能力,提高计算性能。同时,也同时利用到了如何在主机和设备之间进行数据传输,并使用CUDA的内存管理函数来分配和释放内存的知识内容。
我通过这次实验进一步理解了CUDA的编程模式和语法,学习了如何在CUDA中进行并行计算。这种并行计算的方法不仅可以加速计算过程,还可以应用于其他计算密集型任务,提高计算效率和性能,为将来在高性能计算领域的学习和应用打下了基础


 1689
1689


 被折叠的 条评论
为什么被折叠?
被折叠的 条评论
为什么被折叠?
 到【灌水乐园】发言


