


实验要求:
用
Verilog HDL
设计一个
3
位数码管动态扫描显示电路,在实验箱的数码管上固定显示
显示自己学号的后
[4~2]
位数,例如
2024001234
显示
123
。采用层次化设计方法,只能使用
1
个
7
段译码器。不用的数码管位信号需设置为低电平,以关闭显示
实验思路:
采用层次化设计,分别设置计数器,调整SEL,根据SEL使用四选一选择器选择学号后四位输出Y,由Y通过译码器得到七位译码。同时由SEL使用2-4译码器得到SEG位置信号确定显示位置。
此外,为了使其他灯保持不亮,在顶层文件设置四位SEG2管理其他位置的显示。
实验代码:
顶层文件:
module zmj (clk,SEL,SEG,Y,codeout,SEG2);
	input clk;
	output [1:0] SEL;
	output [3:0] Y;
	output [3:0] SEG;
	output [6:0] codeout;
	output [3:0] SEG2=4'd0000;
	count a1(clk,SEL);
	choosedata a2(SEL,Y);
	trandata a3(Y,codeout);
	chooseposition a4(SEL,SEG);
endmodule
里面的SEG2全设置为0,其实你也可以设置八位信号SEG,在位置选择时让钱四个一直为0就行,我这是为了贴合实验要求做的四位四位分。
计数器:
module count(clk, SEL);
    input clk;
    output reg [1:0] SEL = 2'b00;

    always @(posedge clk) begin
        if (SEL == 2'b10) // 模拟除 3 操作
				begin
					SEL =2'b00;
				end
        else
				begin
					SEL <= SEL + 1;
				end
    end
endmodule
因为显示3位,所以清零做在三位处。
学号选择:
module choosedata(SEL,Y);
	input [1:0]SEL;
	output reg[3:0] Y;
	always@(SEL)
	begin
		case(SEL)
			2'b00:Y<=4'b0010;//2
			2'b01:Y<=4'b0011;//3
			2'b10:Y<=4'b0001;//1
			default: Y<=4'b0;
		endcase
	end
endmodule
不同情况不同选择,由于只要求三位,2‘b11没做,可以酌情加。
位置选择:
module chooseposition(SEL, SEG);
    input [1:0] SEL;
    output reg [3:0] SEG;

    always @(SEL) begin
        case (SEL)
            2'b00: SEG = 4'b0100; // 对应位置 2
            2'b01: SEG = 4'b0010; // 对应位置 3
            2'b10: SEG = 4'b0001; // 对应位置 1
            default: SEG = 4'b0000; // 默认值
        endcase
    end
endmodule
SEG就是控制哪个量的变量,为1的位置会亮。
译码器:
module trandata(DIN, codeout);
    input [3:0] DIN;
    output reg [6:0] codeout;

    always @(DIN) begin
        case (DIN)
            4'd0: codeout = 7'b1111110;
            4'd1: codeout = 7'b0110000;
            4'd2: codeout = 7'b1101101;
            4'd3: codeout = 7'b1111001;
            4'd4: codeout = 7'b0110011;
            4'd5: codeout = 7'b1011011;
            4'd6: codeout = 7'b1011111;
            4'd7: codeout = 7'b1110000;
            4'd8: codeout = 7'b1111111;
            4'd9: codeout = 7'b1111011;
            default: codeout = 7'b0000000;
        endcase
    end
endmodule
由显示器的显示规律得到上述译码的表示方式。
测试代码:
`timescale 1 ns/ 1 ns
module zmj_vlg_tst();
// constants
// general purpose registers
// test vector input registers
reg clk;
// wires
wire [3:0]  SEG;
wire [1:0]  SEL;
wire [3:0]  Y;
wire [6:0]  codeout;

// assign statements (if any)
zmj i1 (
// port map - connection between master ports and signals/registers
	.SEG(SEG),
	.SEL(SEL),
	.Y(Y),
	.clk(clk),
	.codeout(codeout)
);
initial
begin
// code that executes only once
// insert code here --> begin
     clk=1'b0;
// --> end
$display("Running testbench");
end
always
// optional sensitivity list
// @(event1 or event2 or .... eventn)
begin
// code executes for every event on sensitivity list
// insert code here --> begin
	#500000
	clk=~clk;
// --> end
end
endmodule
如上,只需要CLK的模仿,实验要求1000Hz,周期为1ms,占空比50%,则换算为纳秒计数就是500000一次取反。
实验仿真:
参考我的另一篇博客的MODULESIM仿真SWJTU数电实验:可控分频计数器-CSDN博客,你会得到如下仿真结果: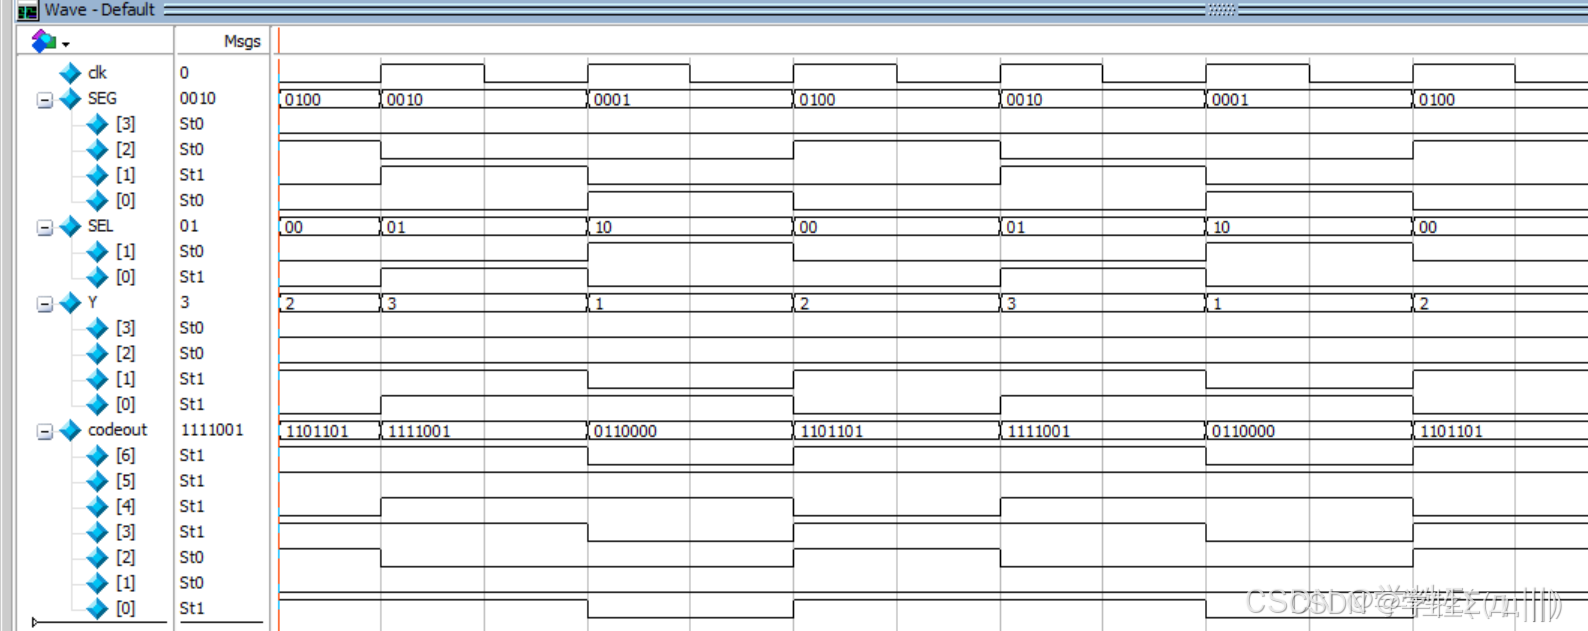
引脚锁定:
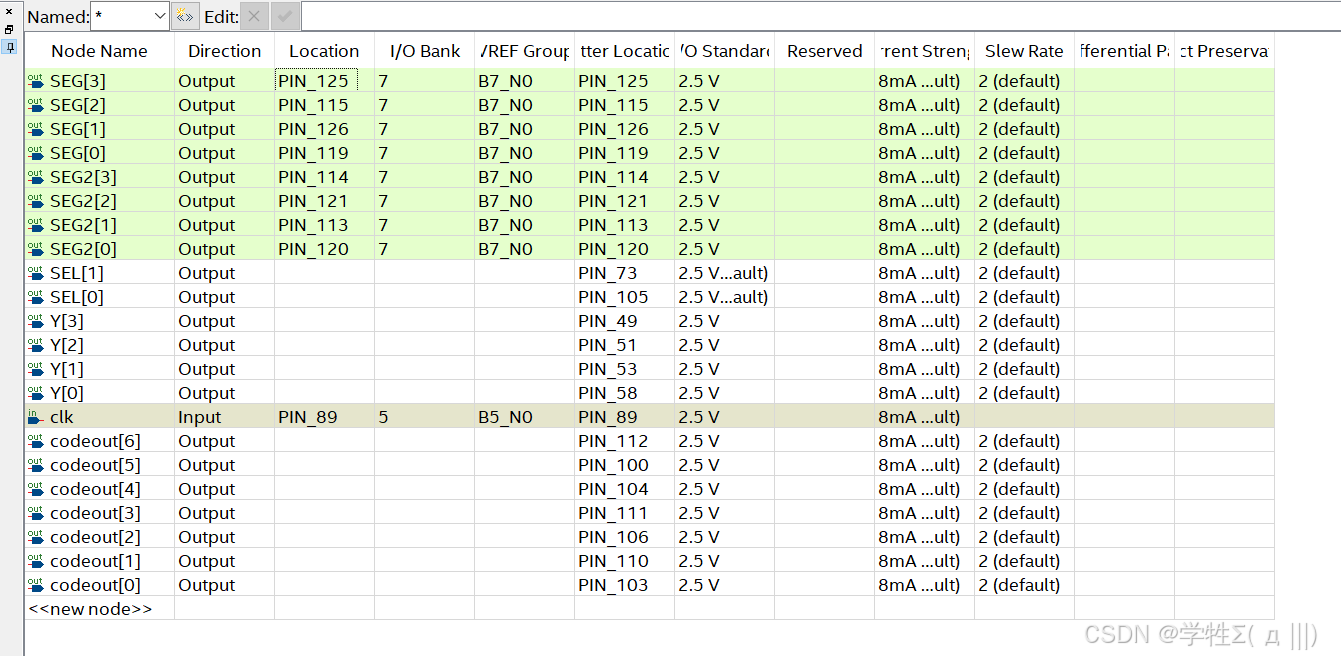
这些即可,需要别的显示可以酌情添加
OVER,本实验依据要求不用设置分频器,最后检查1hz时每次只亮一个灯就通过了。
留下你的学号吧!


 5782
5782

 被折叠的 条评论
为什么被折叠?
被折叠的 条评论
为什么被折叠?
 到【灌水乐园】发言


