


目录
一、 理论知识
BP解决了网络训练的软件问题(权重更新),pooling解决训练的硬件问题(对计算资源的需求)
1. DeepLab V1(2015)
- 针对VGG16,去掉了最后的全连接层
做语义分割使用全卷积网络是大势所趋
- 去掉了最后两个池化层
池化层缩小特征层的尺寸,可以快速扩大感受野
但是语义分割需要对每个像素进行精确的分类,对像素的位置很敏感,pooling是一个不断丢失位置信息的过程。提出空洞卷积可以在不增加计算量的情况下扩大感受野。
- 使用条件随机场CRF提高分类精度
这东西不够好,V3舍弃了CRF,不用管
2. DeepLab V2(2017)
- backbone由VGG16换为ResNet-101
在ResNet-101基础上改进
- 提出空洞空间金字塔池化ASPP,
对 Input Feature Map 以不同采样率的空洞卷积并行采样;将得到的结果 concat ,扩大通道数;最后通过 1 × 1 卷积将通道数降低到预期的数值。相当于以多个比例捕捉图像的上下文。
3. DeepLab V3
- 引入
Multi-grid; - 改进
ASPP结构; - 移除
CRFs;
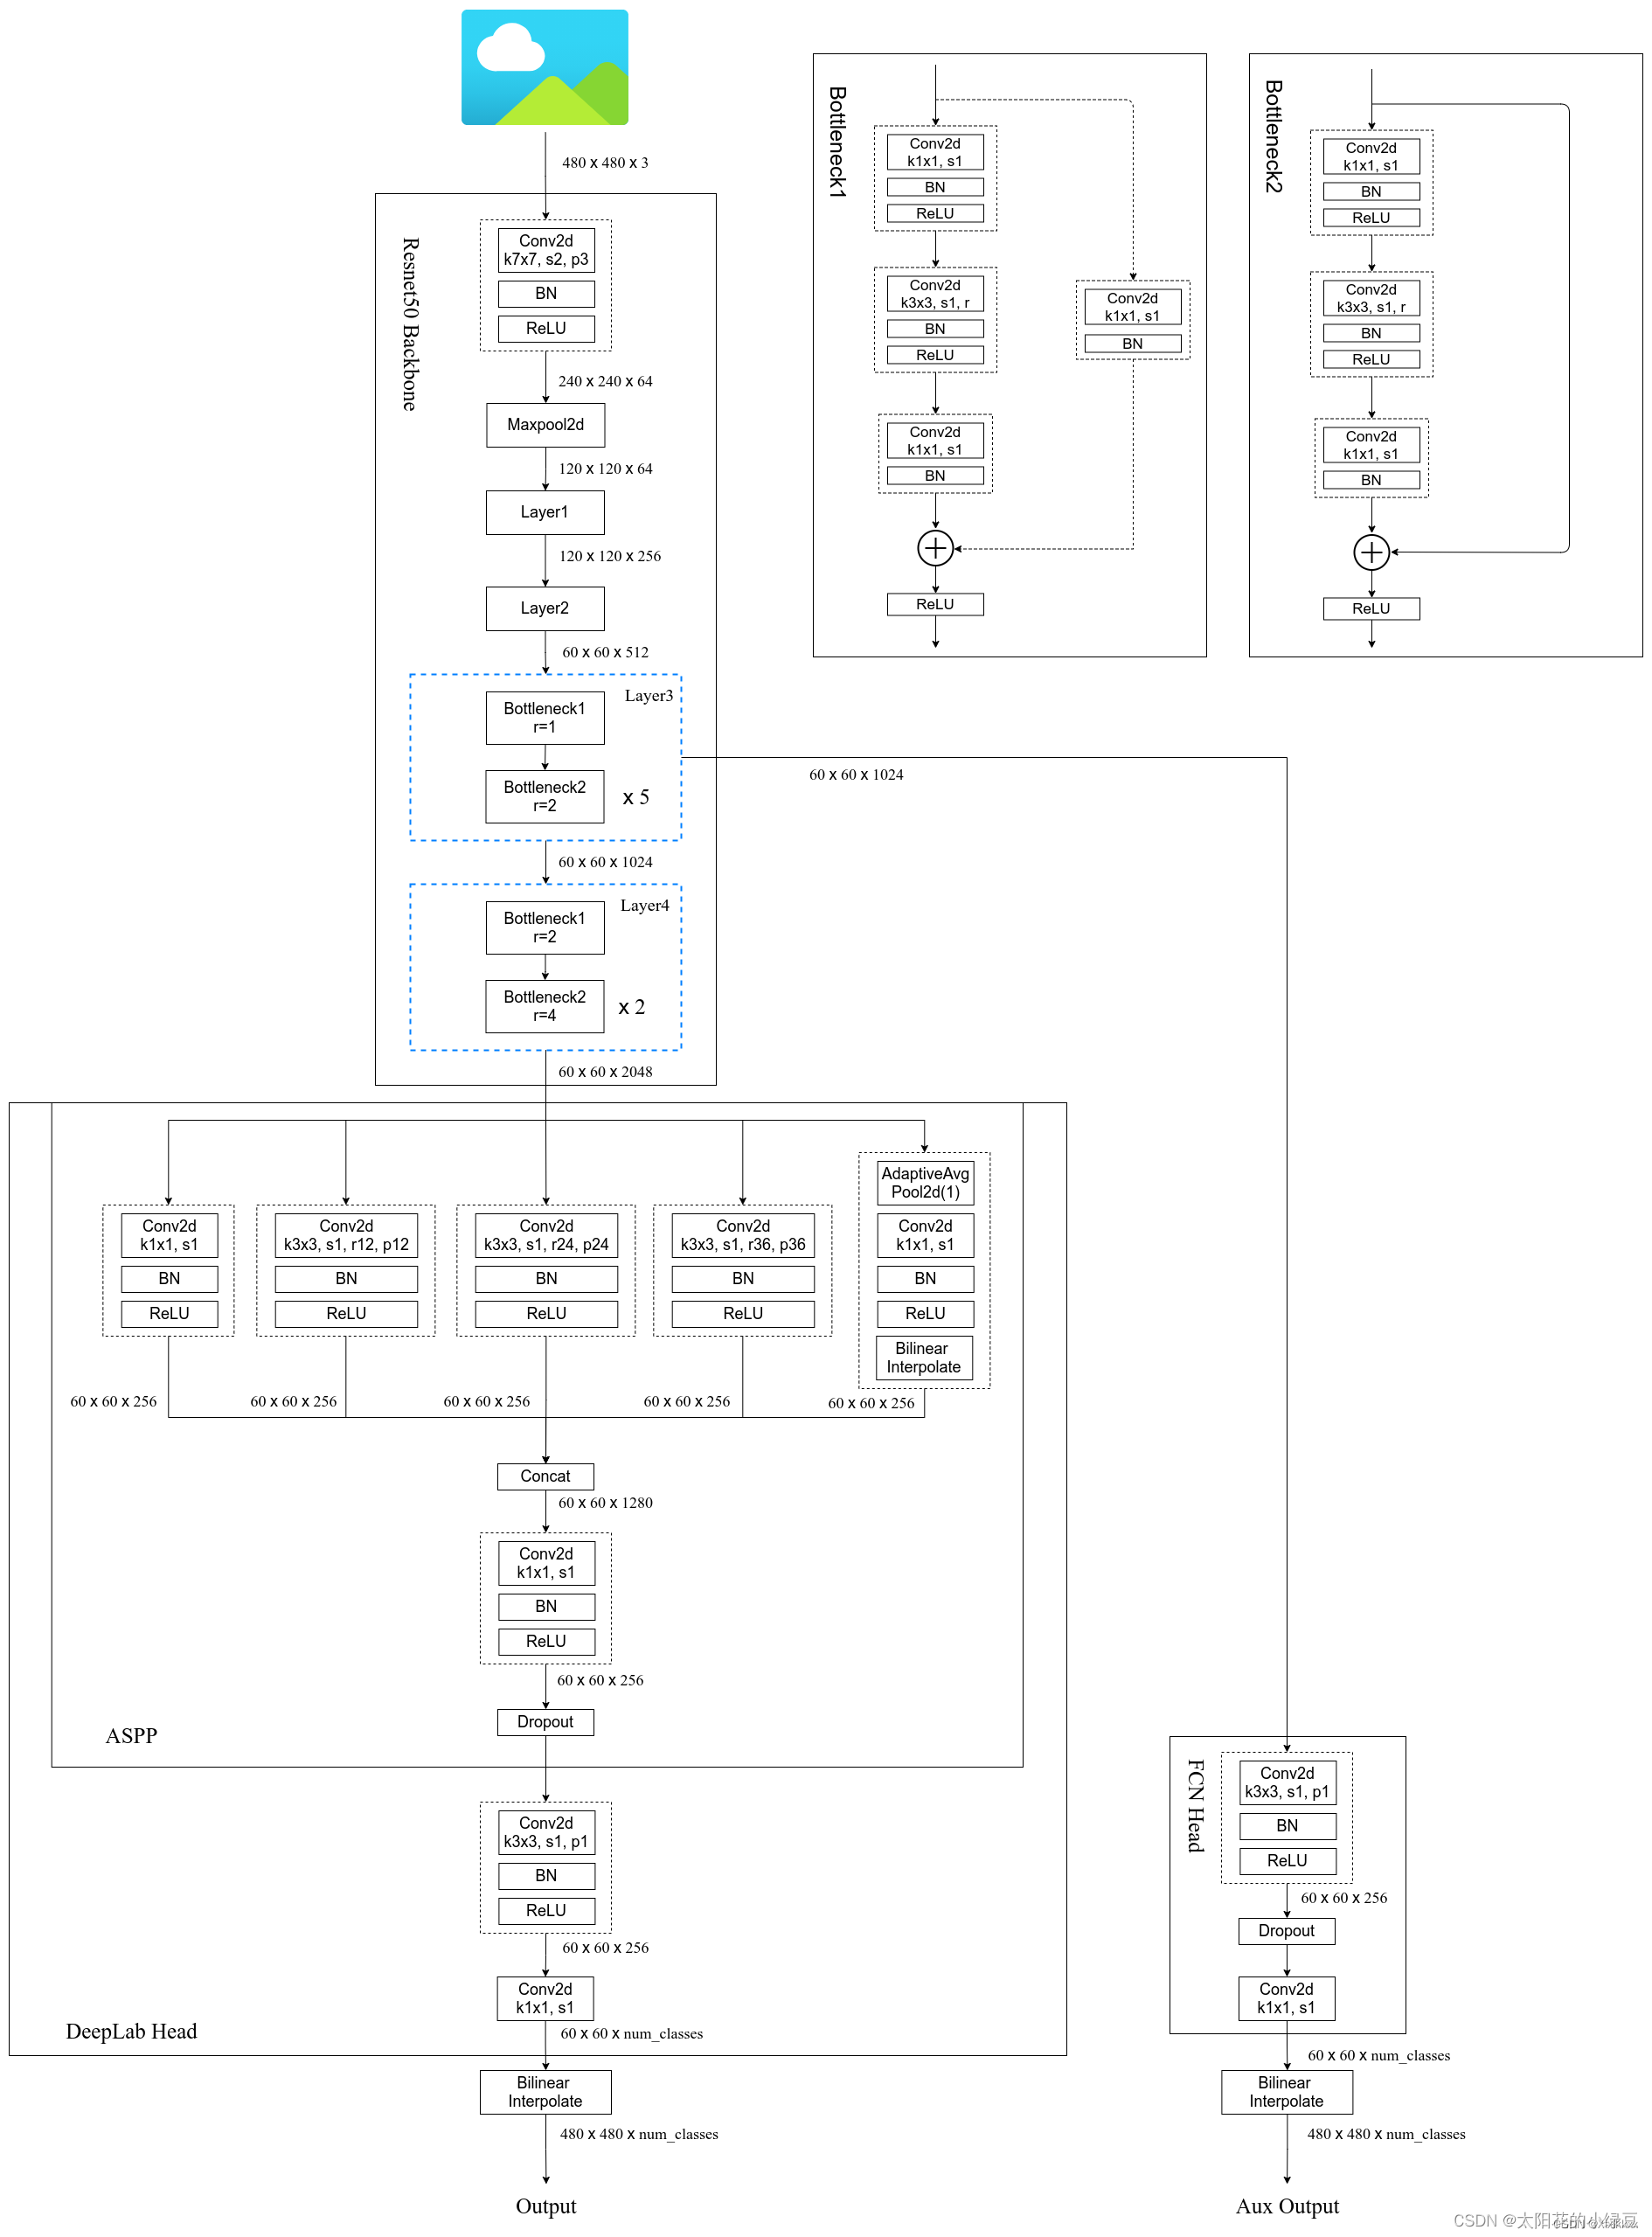
torch官方实现的网络框架如下图:
二、 代码实现
1. train
训练时:损失的计算
for image, target in metric_logger.log_every(data_loader, print_freq, header):
    image, target = image.to(device), target.to(device)
    with torch.cuda.amp.autocast(enabled=scaler is not None):
        output = model(image)
        loss = criterion(output, target)


############ 自定义loss计算-----输出target是列表,里面有两个或者一个字典
############   字典1:'out':data.shape(b,num_clas,h,w)
############   字典2:'aux':data.shape(b,num_clas,h,w)

def criterion(inputs, target):
    losses = {}
    for name, x in inputs.items():
        # 忽略target中值为255的像素,255的像素是目标边缘或者padding填充
        # x.shape(b,num_clas,h,w)  target.shape(b,h,w)
        losses[name] = nn.functional.cross_entropy(x, target, ignore_index=255)
                                    # torch 自带
    if len(losses) == 1:
        return losses['out']

    return losses['out'] + 0.5 * losses['aux']
验证时:损失计算,打印
confmat = evaluate(model, val_loader, device=device, num_classes=num_classes)
val_info = str(confmat)
print(val_info)


def evaluate(,,,,):
    ... ...
    confmat = utils.ConfusionMatrix(num_classes)
    for image, target in metric_logger.log_every(data_loader, 100, header):
        image, target = image.to(device), target.to(device)
        output = model(image)
        output = output['out']
        confmat.update(target.flatten(), output.argmax(1).flatten())
        confmat.reduce_from_all_processes()
    return confmat


###################### 混淆矩阵类--------适用于分割 #################
class ConfusionMatrix(object):
    def __init__(self, num_classes):
        self.num_classes = num_classes
        self.mat = None

    def update(self, a, b):                # 生成混淆矩阵
        n = self.num_classes
        if self.mat is None:
            # 创建混淆矩阵
            self.mat = torch.zeros((n, n), dtype=torch.int64, device=a.device)
        with torch.no_grad():
            # 寻找GT中为目标的像素索引
            k = (a >= 0) & (a < n)
            # 统计像素真实类别a[k]被预测成类别b[k]的个数(这里的做法很巧妙)
            inds = n * a[k].to(torch.int64) + b[k]
            self.mat += torch.bincount(inds, minlength=n**2).reshape(n, n)

    def reset(self):
        if self.mat is not None:
            self.mat.zero_()

    def compute(self):                     # 计算各项指标
        h = self.mat.float()
        # 计算全局预测准确率(混淆矩阵的对角线为预测正确的个数)
        acc_global = torch.diag(h).sum() / h.sum()
        # 计算每个类别的准确率
        acc = torch.diag(h) / h.sum(1)
        # 计算每个类别预测与真实目标的iou
        iu = torch.diag(h) / (h.sum(1) + h.sum(0) - torch.diag(h))
        return acc_global, acc, iu

    def reduce_from_all_processes(self):   # 不用管
        if not torch.distributed.is_available():
            return
        if not torch.distributed.is_initialized():
            return
        torch.distributed.barrier()
        torch.distributed.all_reduce(self.mat)

    def __str__(self):                     # 生成格式,方便后期打印
        acc_global, acc, iu = self.compute()
        return (
            'global correct: {:.1f}\n'
            'average row correct: {}\n'
            'IoU: {}\n'
            'mean IoU: {:.1f}').format(
                acc_global.item() * 100,
                ['{:.1f}'.format(i) for i in (acc * 100).tolist()],
                ['{:.1f}'.format(i) for i in (iu * 100).tolist()],
                iu.mean().item() * 100)
2. predict
预测一张图片为例:
########### 读取调色板
with open(palette_path, "rb") as f:
    pallette_dict = json.load(f)
    pallette = []
    for v in pallette_dict.values():
        pallette += v


# 读取图片
original_img = Image.open(img_path)
data_transform = transforms.Compose([transforms.Resize(520),
                                         transforms.ToTensor(),
                                         transforms.Normalize(mean=(0.485, 0.456, 0.406),
                                                              std=(0.229, 0.224, 0.225))])
img = data_transform(original_img)
img = torch.unsqueeze(img, dim=0)     # 添加batch维度


# 预测+伪彩色图转化
model.eval()  # 进入验证模式
with torch.no_grad():
    output = model(img.to(device))
    # (1,num_cla,h,w)---(h,w)
    prediction = output['out'].argmax(1).squeeze(0)
    prediction = prediction.to("cpu").numpy().astype(np.uint8)
    mask = Image.fromarray(prediction)
    # 添加调色板----伪彩色图转化
    mask.putpalette(pallette)
    # 保存
    mask.save("test_result.png")


 5618
5618


 被折叠的 条评论
为什么被折叠?
被折叠的 条评论
为什么被折叠?
 到【灌水乐园】发言


