


环境:ubuntu18.01 tensorrt6.0.1.5 yolov5s opencv3.4.7 (提前编译好的)cuda10.1 pytorch1.6 onnx
yolov5 项目:https://github.com/ultralytics/yolov5
tensorrt 项目:https://github.com/wang-xinyu/tensorrtx (还有一个更完整的https://github.com/AIpakchoi/yolov5_tensorrt)
v1.0模型下载链接:https://github.com/ultralytics/yolov5/releases
安装tensorrt https://blog.csdn.net/mathlxj/article/details/107810548
首先,下载以上两个项目代码并解压,下载yolov5s.pt 权重模型。
将tensorrt项目中的yolo5/gen_wts.py 拷贝 到yolov5 项目中:
copy tensorrtx/yolov5/gen_wts.py into ultralytics/yolov5pytorch .pt模型转onnx,生成yolov5s.wts文件:
go to ultralytics/yolov5
python gen_wts.py
在tensorrt 项目中编译yolov5:
注意以下配置:
- Choose the model s/m/l/x by
NETmacro in yolov5.cpp # 注意模型用的是那哪个s/m/l/x - Input shape defined in yololayer.h #
- Number of classes defined in yololayer.h, DO NOT FORGET TO ADAPT THIS, If using your own model # 记得改类别数量
- FP16/FP32 can be selected by the macro in yolov5.cpp
- GPU id can be selected by the macro in yolov5.cpp
- NMS thresh in yolov5.cpp
- BBox confidence thresh in yolov5.cpp
- Batch size in yolov5.cpp
# 要看自己的电脑配置是否支持FP16推理,如果要用FP32就在yolov5.cpp 中将 define USE_FP16 这句注释掉。
cd tensorrtx/yolov5 中的 CMakeLists.txt 中添加opencv 路径:
set(OpenCV_DIR /home/yao/opencv-3.4.7/opencv3/share/OpenCV) # 添加
否则会报错找不到opencv。
另一个注意更改tensorrt6.0.1.5的路径:
原文件中是:
include_directories(/usr/include/x86_64-linux-gnu/)
link_directories(/usr/lib/x86_64-linux-gnu/)
改成自己的安装路径:
include_directories(/home/yao/Downloads/TensorRT-6.0.1.5.Ubuntu-18.04.x86_64-gnu.cuda-10.1.cudnn7.6/TensorRT-6.0.1.5/include)
link_directories(/home/yao/Downloads/TensorRT-6.0.1.5.Ubuntu-18.04.x86_64-gnu.cuda-10.1.cudnn7.6/TensorRT-6.0.1.5/lib)
否则会报错找不到NvInfer.h 等等:
/home/yao/Documents/tensorrtx/yolov5/yololayer.cu(126): error: identifier "PluginTensorDesc" is undefined
/home/yao/Documents/tensorrtx/yolov5/yololayer.cu(126): error: identifier "PluginTensorDesc" is undefined
/home/yao/Documents/tensorrtx/yolov5/yololayer.cu(154): error: identifier "IPluginV2IOExt" is undefined
/home/yao/Documents/tensorrtx/yolov5/yololayer.cu(270): error: identifier "IPluginV2IOExt" is undefined
/home/yao/Documents/tensorrtx/yolov5/yololayer.cu(304): error: identifier "IPluginV2IOExt" is undefined
开始编译:
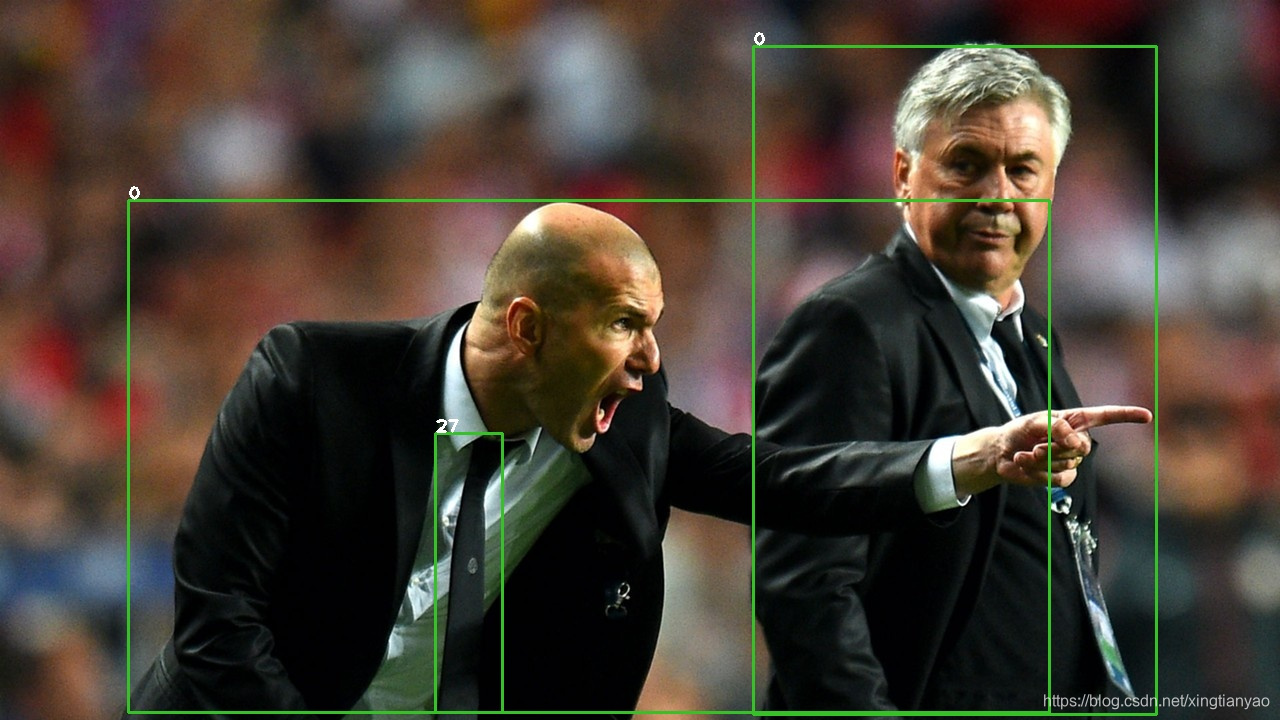
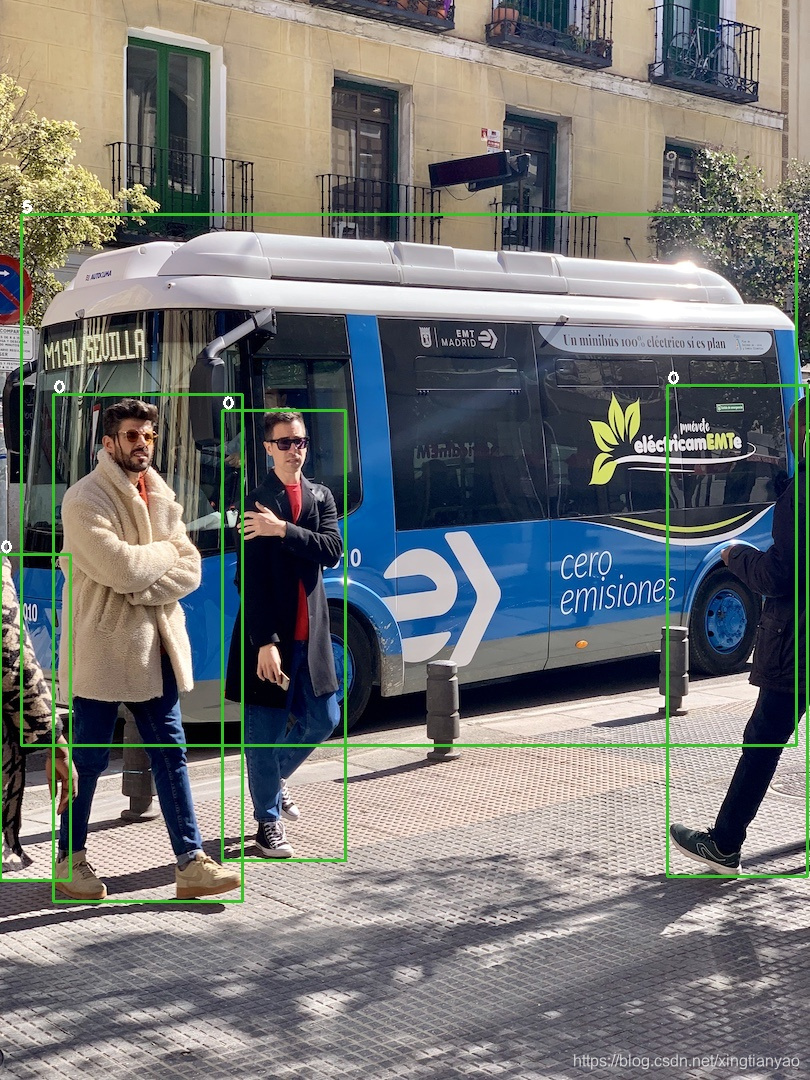
在tensorrtx/yolov5/ 下新建文件夹samples 放入两张照片:
// put yolov5s.wts into tensorrtx/yolov5
// go to tensorrtx/yolov5
// ensure the macro NET in yolov5.cpp is s
mkdir build
cd build
cmake ..
make
sudo ./yolov5 -s             // serialize model to plan file i.e. 'yolov5s.engine'
sudo ./yolov5 -d  ../samples // deserialize plan file and run inference, the images in samples will be processed.
编译结果如下:
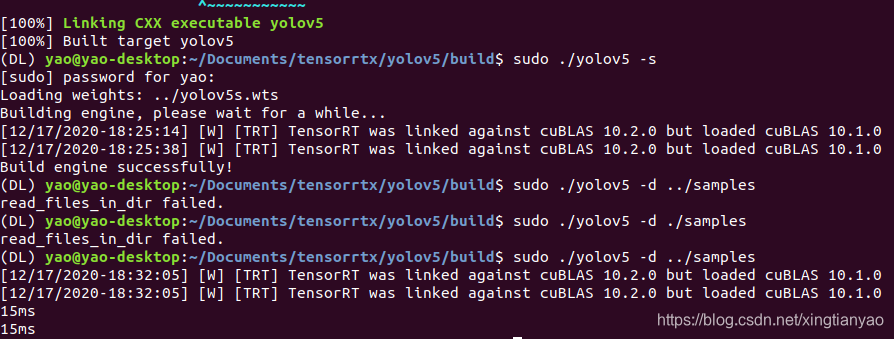
在tensorrtx/yolov5/build 文件夹下得到两张图像的结果:
其余v1.0 的m/l/x 版本模型同上部署。
下一部训练自己的模型部署。待续。


 462
462

 被折叠的 条评论
为什么被折叠?
被折叠的 条评论
为什么被折叠?
 到【灌水乐园】发言


