


通常GL在Unity中的用法是
1.在camera上贴脚本,并在OnPostRender()里执行。
2.挂在任何GameObject上,在OnRenderObject()里执行。
1.在camera上贴脚本,并在OnPostRender()里执行。
2.挂在任何GameObject上,在OnRenderObject()里执行。
注意:
1.GL的线等基本图元并没有uv. 所有是没有贴图纹理影射的,shader里仅仅做的是单色计算或者对之前的影像加以处理。
2.GL所使用的shader里必须有Cull off指令,否则显示会变成如下
本代码采用的是挂载在GameObject上面,然后使用OnRenderObject()里面运行GL程序。
关于具体的Unity图形化调试可以参考博客 http://blog.csdn.net/laipixiaoxi/article/details/53841598
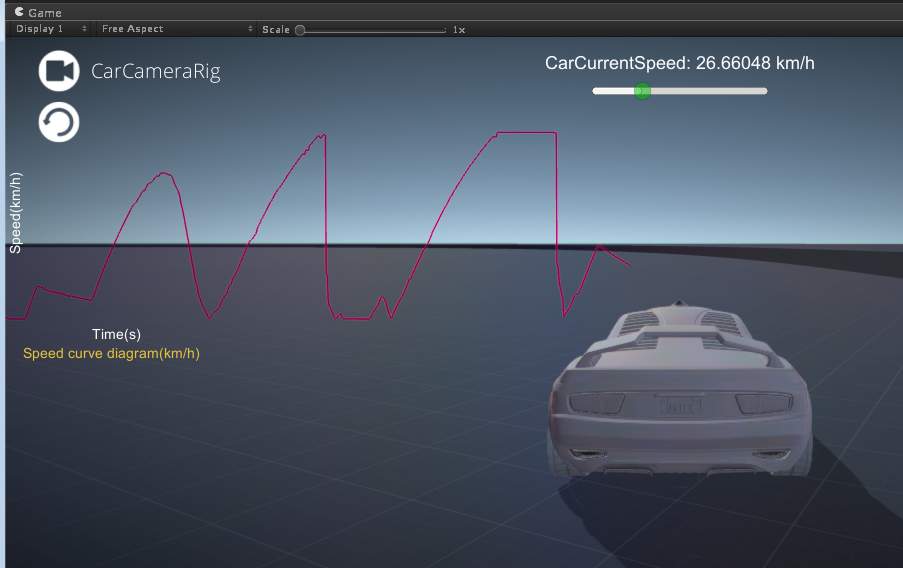
我在Unity运行界面的左上角绘制了场景中汽车的速度动态曲线,最终运行效果如图(界面很粗糙只是作为初步测试):
测试的源代码为:
using System.Collections;
using System.Collections.Generic;
using UnityEngine;
using UnityStandardAssets.Vehicles.Car;

public class CarSpeedCurve : MonoBehaviour {

    public Material material;
    public CarController carController;
    private List<Vector3> lineInfo;
    private bool startDraw = false;


    Vector3 carSpeedVector;
	// Use this for initialization
	void Start () {
        lineInfo = new List<Vector3>();
        carSpeedVector = new Vector3(0f, 0f, 0f);
	}

	// Update is called once per frame
	void Update () {
        carSpeedVector = new Vector3(Time.time, carController.CurrentSpeed, 0f);
        lineInfo.Add(carSpeedVector);
	}

    void OnRenderObject()
    {
        if (!material)
        {
        Debug.LogError("Material is null!");
            return;
        }

        material.SetPass(0);
        GL.LoadOrtho();
        GL.Begin(GL.LINES);

        int size = lineInfo.Count;

        for (int i = 0; i < size - 1; i++)
        {
            Vector3 start = lineInfo[i];
            Vector3 end = lineInfo[i + 1];
            DrawLineFunc(start.x, start.y, end.x, end.y);
        }
        GL.End();
    }

    void DrawLineFunc(float x1, float y1, float x2, float y2)
    {
        GL.Vertex(new Vector3((float)(x1 * 10 ) / Screen.width, (float)(y1 * 2  + 0.5 * Screen.height)/ Screen.height, 0));
        GL.Vertex(new Vector3((float)(x2 * 10 ) / Screen.width, (float)(y2 * 2  + 0.5 * Screen.height)/ Screen.height, 0));
    }


}


 1433
1433

 被折叠的 条评论
为什么被折叠?
被折叠的 条评论
为什么被折叠?
 到【灌水乐园】发言


