


一、模型结构查看
1. 进入虚拟上文安装好的虚拟环境中:
source hef_demo/bin/activate2. 打开瑞芯的onnx2hef 示例文件中,把自己转换好的onnx(基于yolov5) 文件放到文件夹下。

3. 查看onnx 模型结构
hailo parser onnx ./best.onnx --tensor-shapes [1,3,640,640]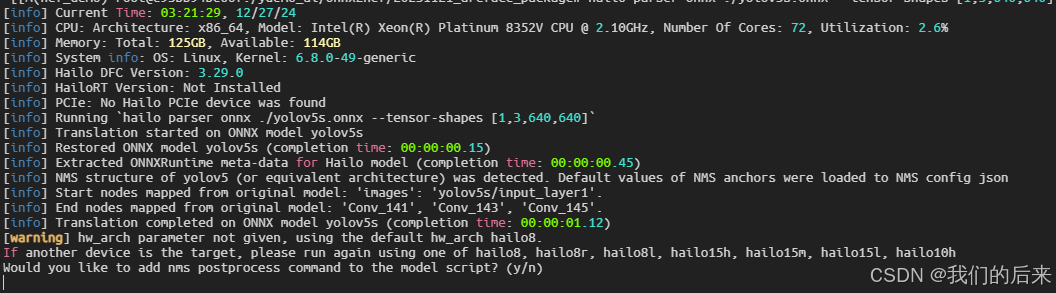
4. onnx 转换为hef,使用HAILO --Dataflow Compiler,构建过程包括将原始模型转换为 Hailo 模型、模型参数优化和编译等几个步骤
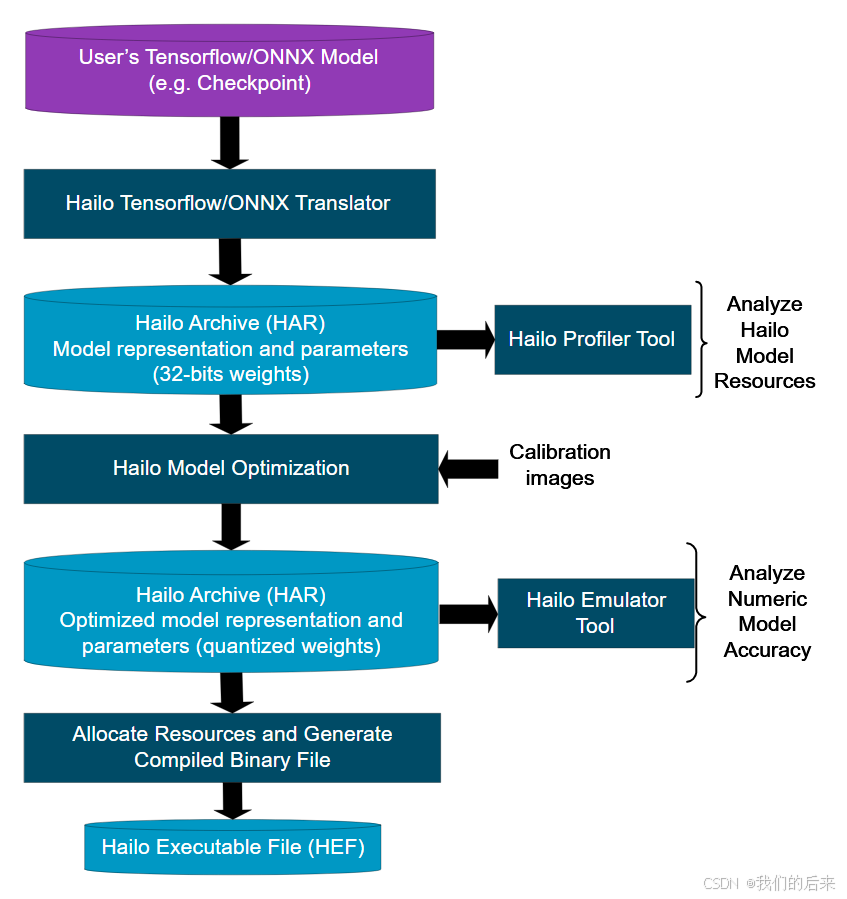
数据流编译器模拟器允许用户在没有实际硬件的情况下运行模型推理。模拟器支持三种主要模式:原生模式、fp_optimize 模式和量化模式。原生模式使用 float32 参数运行原始模型,fp_optimize 模式使用 float32 参数和所有模型修改运行,量化模式提供模拟硬件实现的输出。请注意,量化模拟器与 Hailo 硬件不是位精确匹配,但提供良好且快速的近似。原生模式可用于验证 Tensorflow/ONNX 翻译过程,fp_optimize 模式可用于验证模型修改,而量化模式可用于分析优化模型的准确性。yolov 模型也是float32 位,可以进行转化。
模型优化,量化,编译流程可以参考官网示例:编译量化示例
5. 优化量化,编译的参数 ![]()
把上文查看到的 nodes 的几个层替换到下面end_node 里面
start_node 替换成netron.app 里面第一个卷积层的名称:
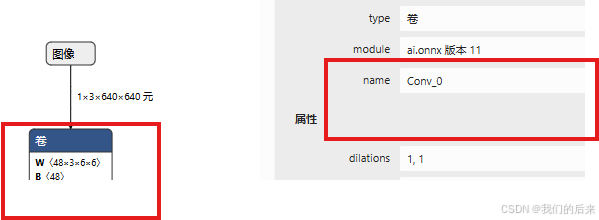
参考代码:onnx2hef.py
import numpy as np
import random
import os
import json
import cv2
from PIL import Image
import tensorflow as tf
from matplotlib import pyplot as plt
from tensorflow.python.eager.context import eager_mode
from hailo_sdk_client import ClientRunner, NNFramework
from PIL import ImageFile
ImageFile.LOAD_TRUNCATED_IMAGES = True
from utils import letterbox, letterbox_image
model_name = 'orc'
#onnx_path = 'run/model.fixed.onnx'
#onnx_path = 'run/modified.onnx'
onnx_path = '/ydemo_ai/onnx2hef/20231121_arcface_package/orc.onnx'
img_width = 640 #1280
img_height = 640 #720
channel = 3
batch_size = 1
max_image_for_quantization = 1100  #how many image you want to used for the quantization

#yolov5s
# start_node = ['Conv_0']
# #end_node = ['448', '471', '494', '451', '474', '497', '454', '477', '500']
# end_node = ['Conv_141', 'Conv_143', 'Conv_145']
# net_input_shapes = {'Conv_0':[batch_size, channel, img_height, img_width]}


# #yolov5m
# start_node = ['Conv_0']
# #end_node = ['448', '471', '494', '451', '474', '497', '454', '477', '500']
# end_node = [ 'Conv_141', 'Conv_143', 'Conv_145']
# net_input_shapes = {'Conv_0':[batch_size, channel, img_height, img_width]}
# ##parsing the model


#best
start_node = ['/model.0/conv/Conv']
#end_node = ['448', '471', '494', '451', '474', '497', '454', '477', '500']
end_node = ['/model.24/Transpose', '/model.24/Transpose_1', '/model.24/Transpose_2']
net_input_shapes = {'/model.0/conv/Conv':[batch_size, channel, img_height, img_width]}


runner = ClientRunner(hw_arch='hailo8')
#hn, npz = runner.translate_onnx_model(onnx_path, model_name, start_node_names=start_node, end_node_names=end_node, net_input_shapes=[2, 512, 960, 3])
hn, npz = runner.translate_onnx_model(onnx_path, model_name, start_node_names=start_node, end_node_names=end_node, net_input_shapes=[1,3,640,640])
model_har_path = '{}.har'.format(model_name)
runner.save_har(model_har_path)


#calib_dataset = np.random.rand(max_image_for_quantization, img_height, img_width, channel) #original
#calib_dataset = np.random.rand(max_image_for_quantization, img_width, img_height,  channel)
#calib_dataset = np.random.rand(max_image_for_quantization, channel, img_height, img_width)
images_path = 'mydata' #small debuging dataset, only to check if the script ok

#here we only provide a simple resize dataset preprocessing, you may need add your own dataset preprocessing function the same as your traing processing.
def preproc(image, output_height=img_height, output_width=img_width):
    resized_image, x, y = letterbox_image(image.copy(), (output_height,output_width))
    #resized_image = resized_image.transpose((2, 0, 1))[::-1]  # HWC to CHW, BGR to RGB
    #resized_image =(resized_image.astype(np.float32) - 127.5) / 128.0
    return resized_image

images_list = [img_name for img_name in os.listdir(images_path) if
os.path.splitext(os.path.join(images_path, img_name))[1] == '.jpg']
random.shuffle(images_list)
actural_calib_num = min(max_image_for_quantization, len(images_list))
print("acturally the calibset num: " + str(actural_calib_num))

calib_dataset = np.zeros((actural_calib_num, img_height, img_width, 3), dtype=np.float32)
for idx, img_name in enumerate(images_list):
    img = np.array(Image.open(os.path.join(images_path, img_name)))
    if img.ndim < 3 : #make sure the opened file had correct 3 chanel image.
        print("broken image name {0}, idx {1}".format(img_name,idx))
        idx -= 1
        continue
    if idx >= actural_calib_num: #we only get "actural_calib_num" iamges as the calibration dataset
        break
    #img_preproc = preproc(img)
    calib_dataset[idx,:,:,:] = preproc(img)

print(calib_dataset.shape)
#optimization script
script_name = 'simple.alls'
runner.load_model_script(script_name)
runner.optimize(calib_dataset)

quantized_model_har_path = '{}_quantized_model.har'.format(model_name)
runner.save_har(quantized_model_har_path)


##save the HEF
hef = runner.compile()
file_name = model_name + '.hef'
with open(file_name, 'wb') as f:
    f.write(hef)

#save the HAR
har_path = '{}_compiled_model.har'.format(model_name)
runner.save_har(har_path)

# import onnx

# # 加载模型
# model = onnx.load('/rk3588_demo/onnx2hef/20231121_arcface_package/yolov8n.onnx')

# # 遍历所有的初始权重(initializer)
# for tensor in model.graph.initializer:
#     print(f"Weight name: {tensor.name}")
#     print(f"Data type: {tensor.data_type}")
6. simple.alls 文件存放模型量化和激活的函数:
normalization1 = normalization([127.5, 127.5, 127.5], [128.0, 128.0, 128.0])
#transpose(input_layer1)
#transpose()
model_optimization_flavor(optimization_level=2,compression_level=0, batch_size=1)


change_output_activation(conv63, sigmoid)
change_output_activation(conv65, sigmoid)
change_output_activation(conv72, sigmoid)
change_output_activation(conv74, sigmoid)
change_output_activation(conv82, sigmoid)
model_optimization_flavor: 模型优化策略,optimization_level 更加自己测试数据进行调整,如果测试数据小于1000,则一般设为0。大于1000,则设为2或1 根据自己的数据进行调整。
激活函数change_output_activation() 确定哪些层要激活,一般方法参考编译时哪些层会需要激活:
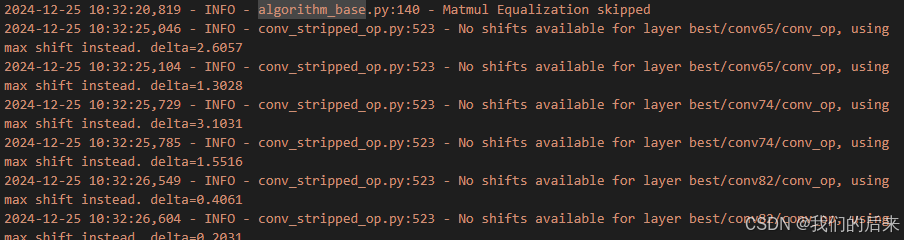 7. 执行onnx2hef.py,结果构建成功

8. 后续在hailo 板子上进行测试hef。测试流程后续会更新。


 4054
4054

 被折叠的 条评论
为什么被折叠?
被折叠的 条评论
为什么被折叠?
 到【灌水乐园】发言


