


1 AI Agent
1.1 为什么有智能体?
大语言模型的局限性:
- 幻觉:模型可能会产生虚假信息,与现实严重不符或脱节。
- 时效性:模型训练数据过时,无法反应最新趋势和信息。
- 可靠性:面对复杂任务时,可能频发错误输出现象,影响信任度。
1.2 什么是智能体?
智能体应该满足下面三个条件:
- 可以感知环境中的动态条件。
- 能采取动作影响环境。
- 能运用推理能力理解信息、解决问题、产生推断、决定动作。
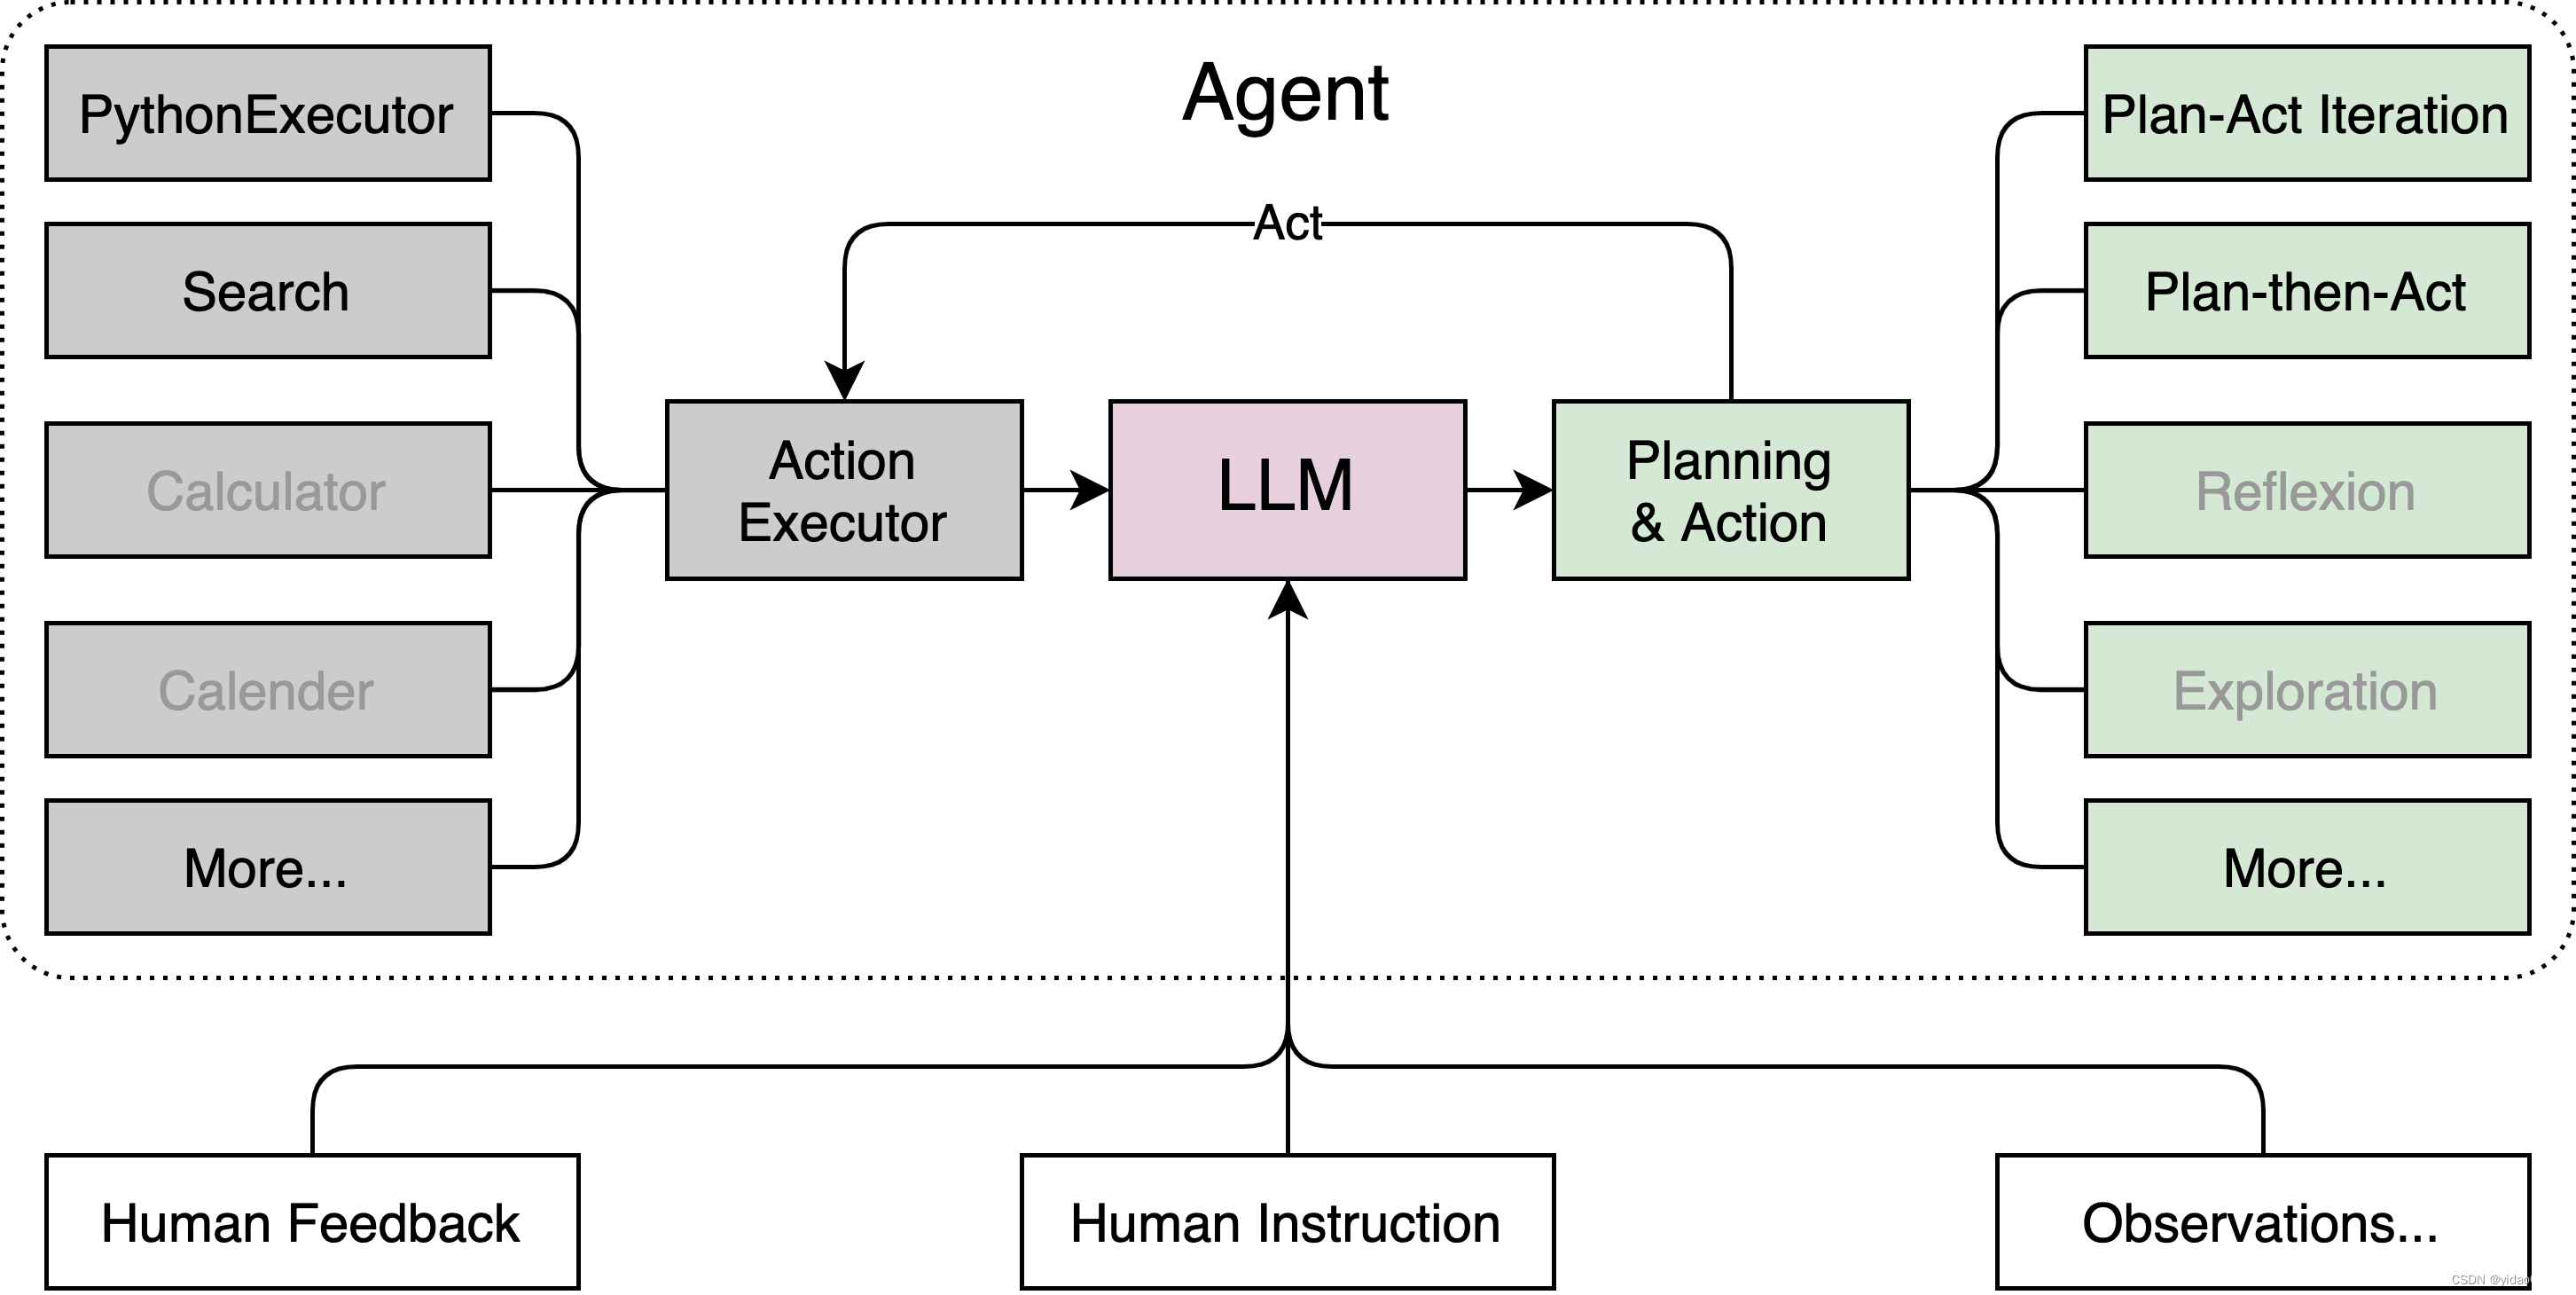
1.3 智能体组成
大脑:作为控制器,承担记忆、思考和决策任务。接受来自感知模块的信息,并采取相应动作。
感知:对外部环境的多模态信息进行感知和处理。包括但不限于图像、音频、视频、传感器等。
动作:利用并执行工具以影响环境。工具可能包括文本的检索、调用相关API、操控机械臂等。
1.4 Agent 范式
1.4.1 AutoGPT
用户将目标和任务输入给智能体系统后,系统将任务列表中的任务分配给对应智能体,智能体执行后,将相应的结果和任务存入记忆中,并将任务发送给另一个智能体,由另一个智能体创建出新的任务,循环多次直到达成预设目标。
1.4.2 ReWoo
Planer将用户的输入进行拆分,成为多个子任务,然后发送给worker执行,将各种工具的依赖形成一个有向无环图,并且在图中按计划执行直到达到预设目标。
1.4.3 ReAct
接收用户输入后选择相对应的工具去执行,达到工具的结束条件后,模型会进一步思考是否选择下一个工具去执行,直到达成用户的预设目标。
2 Lagent & AgentLego
2.1 Lagent
Lagent是一个轻量级开源智能体框架,旨在让用户可以搞笑的构建基于LLM的智能体,支持多种智能体范式(AutoGPT、ReWoo、ReAct),多种工具(谷歌搜索、Python解释器等)
2.2 AgentLego
AgentLego是一个多模态工具包,可以像搭乐高积木一样,快速拓展自定义工具,从而组装出自己的智能体。
2.3 两者的关系
经过上面的介绍,我们可以发现,Lagent 是一个智能体框架,而 AgentLego 与大模型智能体并不直接相关,而是作为工具包,在相关智能体的功能支持模块发挥作用。
两者之间的关系可以用下图来表示:

3 利用 Lagent & AgentLego 搭建智能体
3.1 配置环境
mkdir -p /root/agent

studio-conda -t agent -o pytorch-2.1.2

# 安装Lagent & AgentLego

cd /root/agent
conda activate agent
git clone https://gitee.com/internlm/lagent.git
cd lagent && git checkout 581d9fb && pip install -e . && cd ..
git clone https://gitee.com/internlm/agentlego.git
cd agentlego && git checkout 7769e0d && pip install -e . && cd ..

# 安装相关依赖

pip install lmdeploy==0.3.0
# 准备tutorial中写好的脚本
cd /root/agent
git clone -b camp2 https://gitee.com/internlm/Tutorial.git
3.2 Lagent 搭建智能体
3.2.1 部署
conda activate agent
lmdeploy serve api_server /root/share/new_models/Shanghai_AI_Laboratory/internlm2-chat-7b \
                            --server-name 127.0.0.1 \
                            --model-name internlm2-chat-7b \
                            --cache-max-entry-count 0.1

conda activate agent
cd /root/agent/lagent/examples
streamlit run internlm2_agent_web_demo.py --server.address 127.0.0.1 --server.port 7860

ssh -CNg -L 7860:127.0.0.1:7860 -L 23333:127.0.0.1:23333 root@ssh.intern-ai.org.cn -p 你的 ssh 端口号
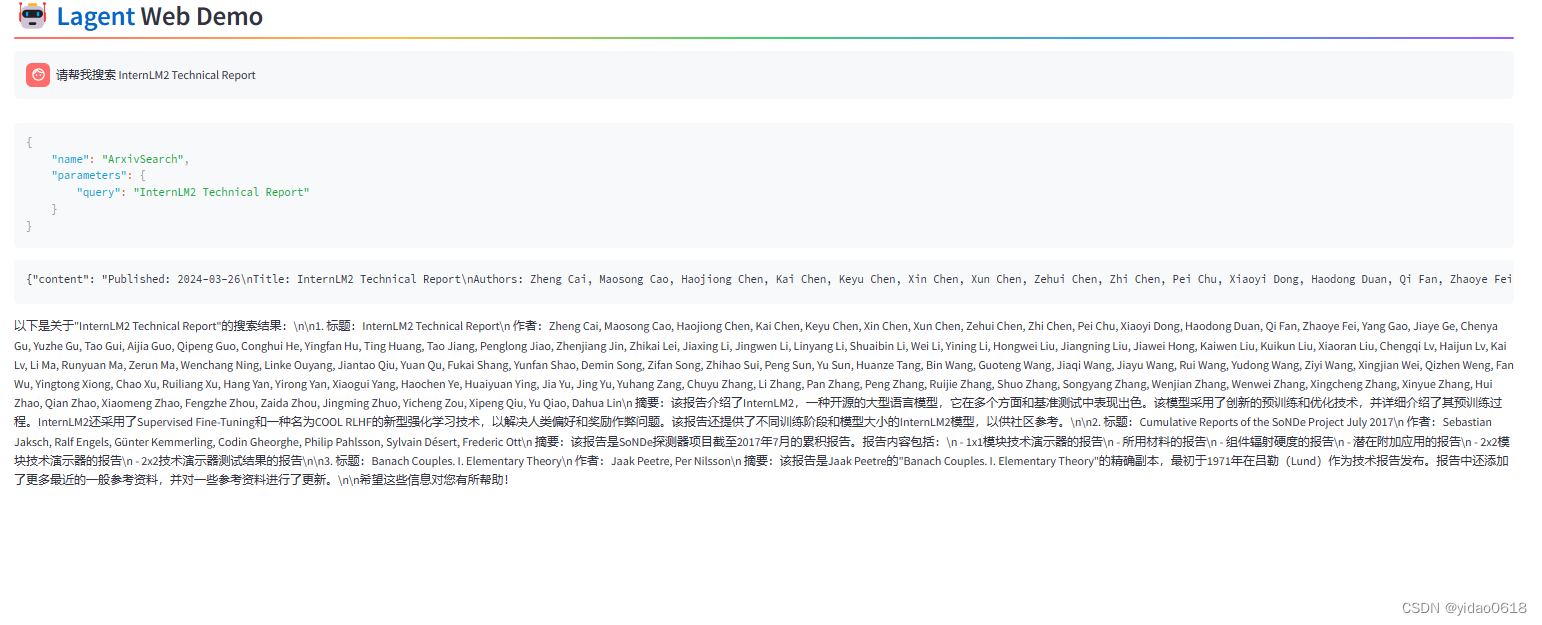
接下来在本地的浏览器页面中打开 http://localhost:7860 以使用 Lagent Web Demo。首先输入模型 IP 为 127.0.0.1:23333,在输入完成后按下回车键以确认。并选择插件为 ArxivSearch,以让模型获得在 arxiv 上搜索论文的能力。
3.2.2 自定义 Lagent 工具
使用 Lagent 自定义工具主要分为以下几步:
- 继承 BaseAction 类
- 实现简单工具的 run 方法;或者实现工具包内每个子工具的功能
- 简单工具的 run 方法可选被 tool_api 装饰;工具包内每个子工具的功能都需要被 tool_api 装饰
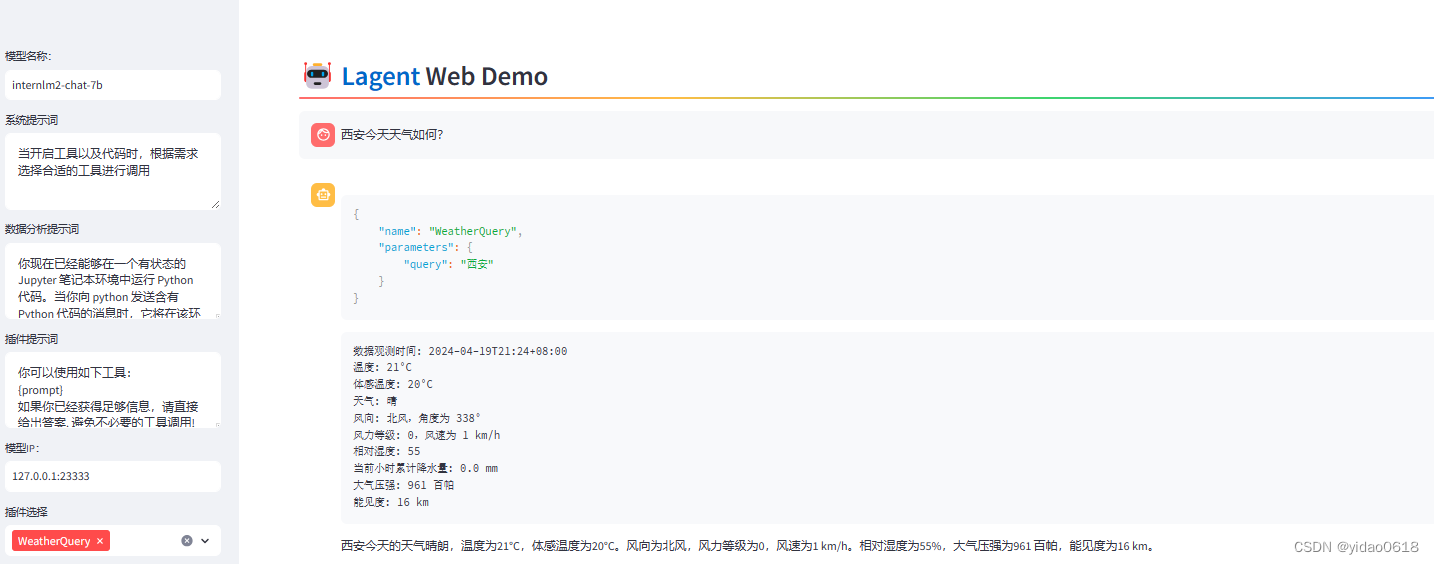
下面我们将实现一个调用和风天气 API 的工具以完成实时天气查询的功能。
step 1.自定义 Lagent 工具
touch /root/agent/lagent/lagent/actions/weather.py
import json
import os
import requests
from typing import Optional, Type

from lagent.actions.base_action import BaseAction, tool_api
from lagent.actions.parser import BaseParser, JsonParser
from lagent.schema import ActionReturn, ActionStatusCode

class WeatherQuery(BaseAction):
    """Weather plugin for querying weather information."""

    def __init__(self,
                 key: Optional[str] = None,
                 description: Optional[dict] = None,
                 parser: Type[BaseParser] = JsonParser,
                 enable: bool = True) -> None:
        super().__init__(description, parser, enable)
        key = os.environ.get('WEATHER_API_KEY', key)
        if key is None:
            raise ValueError(
                'Please set Weather API key either in the environment '
                'as WEATHER_API_KEY or pass it as `key`')
        self.key = key
        self.location_query_url = 'https://geoapi.qweather.com/v2/city/lookup'
        self.weather_query_url = 'https://devapi.qweather.com/v7/weather/now'

    @tool_api
    def run(self, query: str) -> ActionReturn:
        """一个天气查询API。可以根据城市名查询天气信息。

        Args:
            query (:class:`str`): The city name to query.
        """
        tool_return = ActionReturn(type=self.name)
        status_code, response = self._search(query)
        if status_code == -1:
            tool_return.errmsg = response
            tool_return.state = ActionStatusCode.HTTP_ERROR
        elif status_code == 200:
            parsed_res = self._parse_results(response)
            tool_return.result = [dict(type='text', content=str(parsed_res))]
            tool_return.state = ActionStatusCode.SUCCESS
        else:
            tool_return.errmsg = str(status_code)
            tool_return.state = ActionStatusCode.API_ERROR
        return tool_return

    def _parse_results(self, results: dict) -> str:
        """Parse the weather results from QWeather API.

        Args:
            results (dict): The weather content from QWeather API
                in json format.

        Returns:
            str: The parsed weather results.
        """
        now = results['now']
        data = [
            f'数据观测时间: {now["obsTime"]}',
            f'温度: {now["temp"]}°C',
            f'体感温度: {now["feelsLike"]}°C',
            f'天气: {now["text"]}',
            f'风向: {now["windDir"]},角度为 {now["wind360"]}°',
            f'风力等级: {now["windScale"]},风速为 {now["windSpeed"]} km/h',
            f'相对湿度: {now["humidity"]}',
            f'当前小时累计降水量: {now["precip"]} mm',
            f'大气压强: {now["pressure"]} 百帕',
            f'能见度: {now["vis"]} km',
        ]
        return '\n'.join(data)

    def _search(self, query: str):
        # get city_code
        try:
            city_code_response = requests.get(
                self.location_query_url,
                params={'key': self.key, 'location': query}
            )
        except Exception as e:
            return -1, str(e)
        if city_code_response.status_code != 200:
            return city_code_response.status_code, city_code_response.json()
        city_code_response = city_code_response.json()
        if len(city_code_response['location']) == 0:
            return -1, '未查询到城市'
        city_code = city_code_response['location'][0]['id']
        # get weather
        try:
            weather_response = requests.get(
                self.weather_query_url,
                params={'key': self.key, 'location': city_code}
            )
        except Exception as e:
            return -1, str(e)
        return weather_response.status_code, weather_response.json()
step 2.获取天气查询 API KEY (https://dev.qweather.com/docs/api/ )
step 3.部署
conda activate agent
lmdeploy serve api_server /root/share/new_models/Shanghai_AI_Laboratory/internlm2-chat-7b \
                            --server-name 127.0.0.1 \
                            --model-name internlm2-chat-7b \
                            --cache-max-entry-count 0.1

export WEATHER_API_KEY=获取的API KEY

# 比如 export WEATHER_API_KEY=1234567890abcdef

conda activate agent
cd /root/agent/Tutorial/agent
streamlit run internlm2_weather_web_demo.py --server.address 127.0.0.1 --server.port 7860

ssh -CNg -L 7860:127.0.0.1:7860 -L 23333:127.0.0.1:23333 root@ssh.intern-ai.org.cn -p 你的 ssh 端口号
3.3 AgentLego
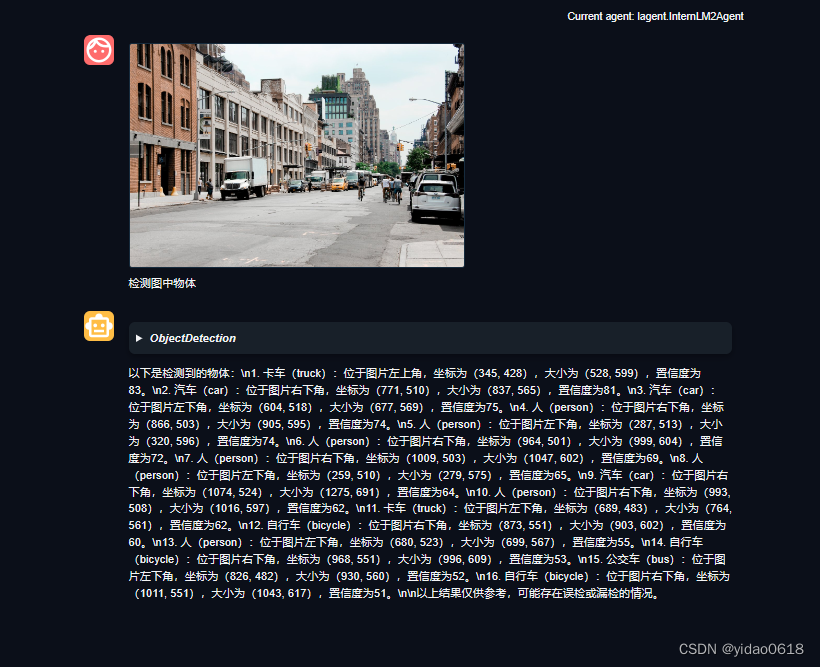
3.3.1 直接使用 AgentLego
cd /root/agent
wget http://download.openmmlab.com/agentlego/road.jpg

conda activate agent
pip install openmim==0.3.9
mim install mmdet==3.3.0
import re

import cv2
from agentlego.apis import load_tool

# load tool

tool = load_tool('ObjectDetection', device='cuda')

# apply tool

visualization = tool('/root/agent/road.jpg')
print(visualization)

# visualize

image = cv2.imread('/root/agent/road.jpg')

preds = visualization.split('\n')
pattern = r'(\w+) \((\d+), (\d+), (\d+), (\d+)\), score (\d+)'

for pred in preds:
    name, x1, y1, x2, y2, score = re.match(pattern, pred).groups()
    x1, y1, x2, y2, score = int(x1), int(y1), int(x2), int(y2), int(score)
    cv2.rectangle(image, (x1, y1), (x2, y2), (0, 255, 0), 1)
    cv2.putText(image, f'{name} {score}', (x1, y1), cv2.FONT_HERSHEY_SIMPLEX, 0.8, (0, 255, 0), 1)

cv2.imwrite('/root/agent/road_detection_direct.jpg', image)


3.3.2 使用 AgentLego WebUI
conda activate agent
lmdeploy serve api_server /root/share/new_models/Shanghai_AI_Laboratory/internlm2-chat-7b \
                            --server-name 127.0.0.1 \
                            --model-name internlm2-chat-7b \
                            --cache-max-entry-count 0.1

conda activate agent
cd /root/agent/agentlego/webui
python one_click.py

ssh -CNg -L 7860:127.0.0.1:7860 -L 23333:127.0.0.1:23333 root@ssh.intern-ai.org.cn -p 你的 ssh 端口号
启动WebUI后,需要配置Agent和Tools。


配置好之后选择工具,就可以使用模型调用了。


 1078
1078


 被折叠的 条评论
为什么被折叠?
被折叠的 条评论
为什么被折叠?
 到【灌水乐园】发言


