


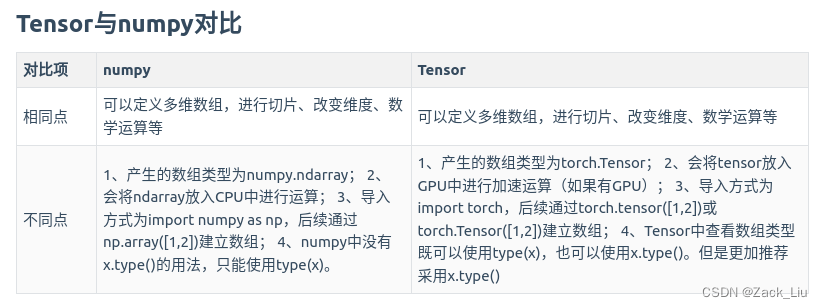
numpy & pytorch tensor 常用操作对比
0. 总体差别
1. 操作对比
| 操作 | Tensor | Numpy | 示例 |
|---|---|---|---|
| 增加维度 | torch.unsqueezeinput, dim, out=None) | np.expand_dims(input, axis) | |
| 改变数据类型 | input.type(torch.FloatTensor / torch.LongTensor) | input.astype(np.int64 / np.float64) | |
| 全1tensor | torch.ones(5,3,dtype= torch.float64) | ||
| 全0tensor | torch.zeros(5,3,dtype= torch.float64) | ||
| 对角线为1,其他为0 | torch.eye(5,3,dtype= torch.float64) | ||
| 从s到e,步长为step | torch.arange(s,e,step) | ||
| 从s到e,均匀切分成steps份 | torch.linspace(s,e,steps) | ||
| 均匀/标准分布 | torch.rand/randn(*sizes) | ||
| 正态分布/均匀分布 | normal(mean,std)/uniform(from,to) | ||
| 随机排列 | torch.randperm(m) | ||
| 整体维度转换 | ten.permute(2,0,1) |  | |
| 转换其中两个维度 | ten = ten.transpose(0,2) |  | |
| 值域限制 | torch.clamp(input, min, max, out=None) | numpy_a.clip(min, max ) | |
| 维度扩展 | c = b.unsqueeze(0) | c = np.expand_dims(b, axis=0) | |
| 矩阵乘法 | torch.mm(mat1, mat2, out=None) → Tensor // 二维矩阵相乘;torch.matmul(mat1, mat2, out=None) → Tensor // 多维矩阵相乘;torch.mul(mat1, other, out=None)// 矩阵逐元素相乘,又称为hadamard积; @为tensor矩阵相乘;*为tensor矩阵逐元素相乘 |
行优先存储,就是一行的数据存放在一起,然后逐行存放。
列优先存储,就是每一列的数据是存储在一起的,一列一列地存放在内存中。
这两种存储方法,对于编写遍历二维矩阵的循环语句,还是有一定影响的。比如,如果是按行优先存储的,那么在遍历时,一行一行的读取数据,肯定比一列一列地读取整个数组,要方便许多。
1.1 类型转换
1.1.1 numpy类型转换
numpy中的类型
bool_:布尔类型,1个字节。
int8:有符号8位整数,1个字节。
uint8:无符号8位整数,1个字节。
int16:有符号16位整数,2个字节。
uint16:无符号16位整数,2个字节。
int32:有符号32位整数,4个字节。
uint32:无符号32位整数,4个字节。
int64:有符号64位整数,8个字节。
unit64:无符号64位整数,8个字节。
float16:半精度浮点类型,2个字节。
float32:单精度浮点类型,4个字节。
float64:双精度浮点类型,8个字节。
类型转换函数
numpy.ndarray.astype(dtype, order='K', casting='unsafe', subok=True, copy=True) //函数定义
// dtype:指定要转换的数据类型。
// order:指定读取数据的顺序,K(保持读取顺序)、A(按照数组元素在内存中的位置读取)、C(按照C语言的行优先顺序读取)、F(按照Fortran语言的列优先顺序读取)。
// casting:指定转换时的方式。未指定时,当转换后的类型与原类型一致时,返回原数组的视图;当转换后的类型更低级别时,返回新的数组;否则会抛出异常。
// subok:如果为True,则返回子类;如果为False,则返回同类型。默认值为True。
// copy:如果为True,则始终返回新的数据;如果为False,则在数据类型未发生变化时返回原始数据的视图或者相关的子类。默认值为True。
实操:
import numpy as np

arr = np.array([10, 20, 30, 40, 50], dtype='int64')
print(arr.dtype)
arr_int32 = arr.astype('int32')
print(arr_int32.dtype)
1.1.2 pytorch tensor类型转换
pytorch tensor中的张量类型

类型转换函数
类型查看
    import torch

    a = torch.randn(2, 3)  # 2行3列,正态分布~N(0,1)
    print(a)
    print(type(a))
    print(a.type())
    print(isinstance(a, torch.FloatTensor))
类型查看运行结果:
   tensor([[-0.6646,  0.3935,  1.2683],
            [-1.8576,  0.2761,  1.4787]])
    <class 'torch.Tensor'>
    torch.FloatTensor
    True
类型转换:
Tensor类型的变量进行类型转换一般有两种方法:
1)Tensor类型的变量直接调用long(), int(), double(),float(),byte()等函数就能将Tensor进行类型转换;
2)在Tensor成员函数type()中直接传入要转换的数据类型。
当你不知道要转换为什么类型时,但需要求a1,a2两个张量的乘积,可以使用a1.type_as(a2)将a1转换为a2同类型。
    import torch

    a = torch.randn(2, 3)
    print(a.type())

    # 转换为IntTensort类型
    b = a.int()

    # 转换为LongTensor类型
    c = a.type(torch.LongTensor)

    print(b.type())
    print(c.type())

    # 将a转换为与b相同的类型
    a.type_as(b)
    print(a.type())
运行结果:
    torch.FloatTensor
    torch.IntTensor
    torch.LongTensor
    torch.FloatTensor
2. pytorch tensor重点操作理解
2.1 torch.Tensor 与torch.tensor区别
torch.Tensor是一个类,torch.Tensor(data)是将输入的data转化torch.FloatTensor。
torch.tensor是一个函数,torch.tensor(data):(当你未指定dype的类型时)将data转化为torch.FloatTensor、torch.LongTensor、torch.DoubleTensor等类型,转化类型依据于data的类型或者dtype的值
创建空tensor
tensor_without_data = torch.Tensor() # tensor([])
tensor_without_data = torch.tensor(()) # tensor([])
tensor_without_data = torch.empty([]) # tensor(0.)
使用优先级
torch.Tensor应该说是同时具有torch.tensor和torch.empty,但是使用torch.Tensor可能会使你的代码confusing,所以最好还是使用torch.tensor和torch.empty
2.2 cpu & gpu转换

2.3 Tensor的变形及其导致的不连续现象
import  torch
a = torch.tensor([0, 1, 2, 3, 4, 5, 6, 7, 8, 9]) //直接初始化
2.3.1 Tensor 底层存储机制
pytorch中一个tensor对象分为头信息区(Tensor)和存储区(Storage)两部分。
头信息区主要保存tensor的形状(size)、步长(stride)、数据类型(type)等信息;而真正的data(数据)则以连续一维数组(行优先顺序存储)的形式放在存储区,由torch.Storage实例管理着。
注意:storage永远是一维数组,任何维度的tensor的实际数据都存储在一维的storage中。
大部分情况下一个tensor有独立的头信息区和storage,但也可以多个不同的tensor共享一个storage,这么做是为了节省内存空间。也正因如此,当从一个已有的tensor创建一个新的tensor时总能很快,因为其在内存中只会创建一次。如下图所示:

2.3.2 语义相邻内存不相邻操作
某些Tensor操作(如transpose、permute、narrow、expand、.t())与原Tensor是共享内存中的数据,不会改变底层数组的存储;但原来在语义上相邻,内存里也相邻的元素在执行这样的操作后,在语义上相邻,但在内存不相邻,即不连续了。
2.3.3 要求contiguous的操作
view
2.4 特有操作
2.4.1 squeeze & unsqueeze
squeeze(a1):如果指定维度的厚度为1,返回删除该维度后的tensor。否则返回原tensor
unsqueeze(a1):插入一个维度,返回插入后的tensor
squeeze()和unsqueeze操作不修改数据量
>>> ten = torch.zeros(2,1,2)
>>> ten = ten.squeeze(1)
>>> tensor
tensor([[0., 0.],
        [0., 0.]])
>>> ten = ten.squeeze(1)
tensor([[0., 0.],
        [0., 0.]])
tensor([[0., 0.],
        [0., 0.]])

>>> ten = ten.unsqueeze(1)
>>> ten
tensor([[[0., 0.]],

        [[0., 0.]]])
2.4.2 clone(),detach(),new_tensor(),copy_()
2.4.2.1 clone()
clone()函数返回一个和源张量同shape、dtype和device的张量,与源张量不共享数据内存,但提供梯度的回溯。
import torch

a = torch.tensor(1.0, requires_grad=True)
y = a ** 2
a_ = a.clone()
z = a_ * 3
y.backward()
print(a.grad)  # 2
z.backward()
print(a_.grad)  # None, 无grad
print(a.grad)  # 5. a_的梯度会传递回给a,因此2+3=5

a = a + 1
print(a_) # 1
梯度回溯:对a_进行的运算梯度会加在a(叶子节点)的梯度上。
import torch

a = torch.tensor(1.0, requires_grad=True)
a_ = a.clone()
a_.add_(torch.tensor(1.0))
print(a)    # tensor(1., requires_grad=True)
print(a_)   # tensor(2., grad_fn=<AddBackward0>)
a_.backward()
print(a_.grad)  # None
print(a.grad)   # tensor(1.)
可以发现不共享内存空间。
2.4.2.2 detach()
detach()函数返回一个和源张量同shape、dtype和device的张量,并且与源张量共享数据内存,但不提供梯度的回溯。
import torch

a = torch.tensor(1.0, requires_grad=True)
y = a ** 2
a_ = a.detach()
print(a_.grad)  # None,requires_grad=False
a_.requires_grad_()  # set a_.requires_grad = True
z = a_ * 3
y.backward()
z.backward()
print(a_.grad)  # tensor(3.)
print(a.grad)  # tensor(2.)
可见,a_即使重新定义requires_grad=True,也与a的梯度没有关系。
import torch

a = torch.tensor(1.0, requires_grad=True)
a_ = a.detach()
a_.add_(torch.tensor(1.0))
print(a)    # tensor(2., requires_grad=True)
print(a_)   # tensor(2.)
# a_.backward()
# print(a.grad) # RuntimeError: element 0 of tensors does not require grad and does not have a grad_fn
容易验证a与a_共享内存空间
2.4.2.3 torch.clone().detach() (建议赋值方法)
clone()提供了非数据内存共享的梯度追溯功能,而detach又“舍弃”了梯度回溯功能,因此clone.detach()只做简单的数据复制,既不数据共享,也不梯度共享,从此两个张量无关联。
置于是先clone还是先detach,其返回值一样,一般采用sourcetensor.clone().detach()。
2.4.2.4 new_tensor()
new_tensor()可以将源张量中的数据复制到目标张量(数据不共享),同时提供了更细致的属性控制:
import torch

a = torch.tensor(1.0, device="cuda", dtype=torch.float32, requires_grad=True)
b = a.clone()
c = a.detach()
d = a.clone().detach()
e = a.new_tensor(a)  # more attributions could be setted
f = a.new_tensor(a, device="cpu", dtype=torch.float64, requires_grad=False)
print(a)  # tensor(1., device='cuda:0', requires_grad=True)
print(b)  # tensor(1., device='cuda:0', grad_fn=<CloneBackward>)
print(c)  # tensor(1., device='cuda:0')
print(d)  # tensor(1., device='cuda:0')
print(e)  # tensor(1., device='cuda:0')
print(f)  # tensor(1., dtype=torch.float64)
无参数默认情况下d = e。
2.4.2.5 copy_()
import torch

a = torch.tensor(1.0, device="cpu", requires_grad=False)
b = torch.tensor(2.0, device="cuda", requires_grad=True)
print(a)  # tensor(1.)
print(b)  # tensor(2., device='cuda:0', requires_grad=True)
a.copy_(b)
print(a)  # tensor(2., grad_fn=<CopyBackwards>)
print(a.device)  # cpu
print(a.requires_grad)  # True
copy_()会将b复制给a,同时改变a的requires_grad属性,但不改变device属性。(当a.requires_grad=False是copy_()方法会报错)
3. numpy重点操作理解
3.1 numpy基于scipy进行刚体旋转操作
import numpy as np
import math
from scipy.spatial.transform import Rotation as R


Rq=[-0.71934025092983234, 1.876085535681999e-06, 3.274841213980097e-08, 0.69465790385533299]

# 四元数到旋转矩阵
r = R.from_quat(Rq)
Rm = r.as_matrix()
# 0:array([ 1.00000000e+00, -2.74458557e-06,  2.55936079e-06])
# 1:array([-2.65358979e-06, -3.49007932e-02,  9.99390782e-01])
# 2:array([-2.65358979e-06, -9.99390782e-01, -3.49007932e-02])

# 符号相反的四元数, 仍表示同一个旋转
Rq1= [0.71934025092983234, -1.876085535681999e-06, -3.274841213980097e-08, -0.69465790385533299]
# 四元数到旋转矩阵
r1 = R.from_quat(Rq1)
Rm1 = r1.as_matrix()
# 0:array([ 1.00000000e+00, -2.74458557e-06,  2.55936079e-06])
# 1:array([-2.65358979e-06, -3.49007932e-02,  9.99390782e-01])
# 2:array([-2.65358979e-06, -9.99390782e-01, -3.49007932e-02])

# 四元数到欧拉角
euler0 = r.as_euler('xyz', degrees=True)
# ([-9.20000743e+01,  1.52039496e-04, -1.52039496e-04])
euler3 = r.as_euler('xzy', degrees=True)
#([-9.20000743e+01, -1.52039496e-04,  1.52039496e-04])
euler1 = r.as_euler('zxy', degrees=True)
#([-179.99564367,  -87.99992566,  179.99579836])
euler2 = r.as_euler('zyx', degrees=True)
#([ 1.57253169e-04,  1.46640571e-04, -9.20000743e+01])

euler4 = r.as_euler('yxz', degrees=True)
#([179.99564367, -87.99992566, 179.99549428])

euler5 = r.as_euler('yzx', degrees=True)
#([ 1.46640571e-04,  1.57253169e-04, -9.20000743e+01])


# 旋转矩阵到四元数
r3 = R.from_matrix(Rm)
qua = r3.as_quat()
#[0.7193402509298323, -1.8760855356819988e-06, -3.2748412139801076e-08, -0.694657903855333] #与原始相反,但等价

# 旋转矩阵到欧拉角
euler_1 = r3.as_euler('zxy', degrees=True)
#([-179.99564367,  -87.99992566,  179.99579836])

# 欧拉角到旋转矩阵
r4 = R.from_euler('zxy', [-179.99564367,  -87.99992566,  179.99579836], degrees=True)
rm = r4.as_matrix()
# 0:array([ 1.00000000e+00, -2.74452529e-06,  2.55936075e-06])
# 1:array([-2.65358765e-06, -3.49007933e-02,  9.99390782e-01])
# 2:array([-2.65352955e-06, -9.99390782e-01, -3.49007933e-02])

# 欧拉角到四元数
qua1 = r4.as_quat()
#([-7.19340251e-01,  1.87606384e-06,  3.27274889e-08,  6.94657904e-01])


#----测试--------------------------------------------------------------------
theta=[-116,    0. , -105]
r6 = R.from_euler('xyz', theta, degrees=True)
rm = r6.as_matrix()
# 0:array([-0.25881905, -0.42343401,  0.86816838])
# 1:array([-0.96592583,  0.1134588 , -0.23262502])
# 2:array([ 0.        , -0.89879405, -0.43837115])

qua3 = r6.as_quat()
#array([-0.52720286,  0.68706415, -0.39667667,  0.30438071])

print(qua3)
3.2 numpy矩阵元素交换
(1)元素交换
import numpy as np

# 创建一个一维数组
arr1 = np.array([1, 2, 3])
# 交换元素
arr1[[1, 2]] = arr1[[2, 1]]
print(arr1)  # [1 3 2]
(2)行列交换
import numpy as np

# 创建一个二维数组
arr2 = np.array([[1, 2, 3], [4, 5, 6]])
# 交换第1行和第2行
arr2[[0, 1], :] = arr2[[1, 0], :]
# 交换第1列和第2列
arr2[:, [0, 1]] = arr2[:, [1, 0]]
print(arr2)
"""
[[5 4 6]
 [2 1 3]]
"""
4. python list/ numpy/torch.tensor 相互转换
4.1 list & numpy相互转换
a = np.array(a)   【将list转换成numpy】
a = a.tolist()        【将numpy转换成list】
4.2 list & torch.tensor相互转换
a = torch.Tensor(a)        【将list转换成torch.Tensor】
a = tensor.numpy().tolist()        【将torch.Tensor转换成list】
4.3 numpy & torch.tensor相互转换
a = tensor.numpy()        【将torch.Tensor转换成numpy】
a = tensor.cpu().numpy()        【GPU上的tensor不能直接转换成numpy, 转换到CPU上再转换】
a = torch.from_numpy(a)        【将numpy转换成torch.Tensor】


 被折叠的 条评论
为什么被折叠?
被折叠的 条评论
为什么被折叠?
 到【灌水乐园】发言


