


我们可以用神经网络图(NNGraph)创建简单网络。
首先我们需要:
require 'nngraph';简单网络
我们先创建一个简单的前馈网络。
-- it is common style to mark inputs with identity nodes for clarity.
input = nn.Identity()()

-- each hidden layer is achieved by connecting the previous one
-- here we define a single hidden layer network
h1 = nn.Tanh()(nn.Linear(20, 10)(input))
output = nn.Linear(10, 1)(h1)
mlp = nn.gModule({input}, {output})
x = torch.rand(20)
dx = torch.rand(1)
mlp:updateOutput(x)
mlp:updateGradInput(x, dx)
mlp:accGradParameters(x, dx)
-- draw graph (the forward graph, '.fg')
-- this will produce an SVG in the runtime directory
graph.dot(mlp.fg, 'MLP', 'MLP')
itorch.image('MLP.svg')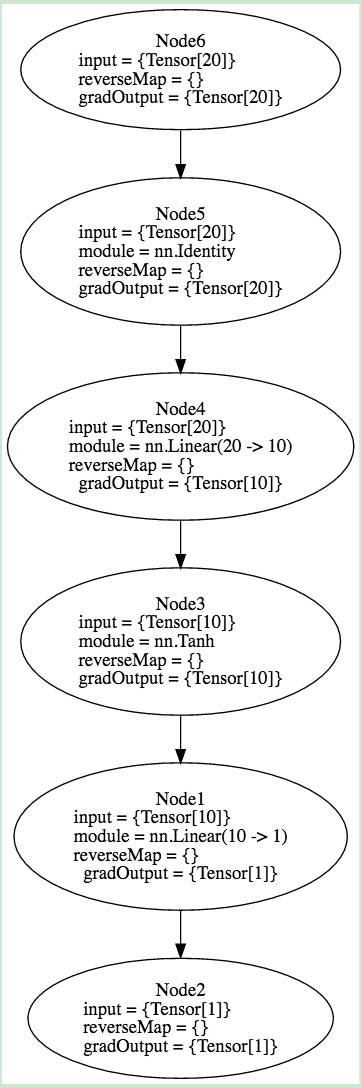
节点名称
当我们创建复杂网络的时候,节点名称设置可以化繁为简。
local function get_network()
    -- it is common style to mark inputs with identity nodes for clarity.
    local input = nn.Identity()()
   -- each hidden layer is achieved by connecting the previous one
    -- here we define a single hidden layer network
    local h1 = nn.Linear(20, 10)(input)
    local h2 = nn.Sigmoid()(h1)
    local output = nn.Linear(10, 1)(h2)
     -- the following function call inspects the local variables in this
    -- function and finds the nodes corresponding to local variables.
    nngraph.annotateNodes()
    return nn.gModule({input}, {output})
end
mlp = get_network()
x = torch.rand(20)
dx = torch.rand(1)
mlp:updateOutput(x)
mlp:updateGradInput(x, dx)
mlp:accGradParameters(x, dx)
-- draw graph (the forward graph, '.fg')
-- this will produce an SVG in the runtime directory
graph.dot(mlp.fg, 'MLP', 'MLP_Annotated')
itorch.image('MLP_Annotated.svg')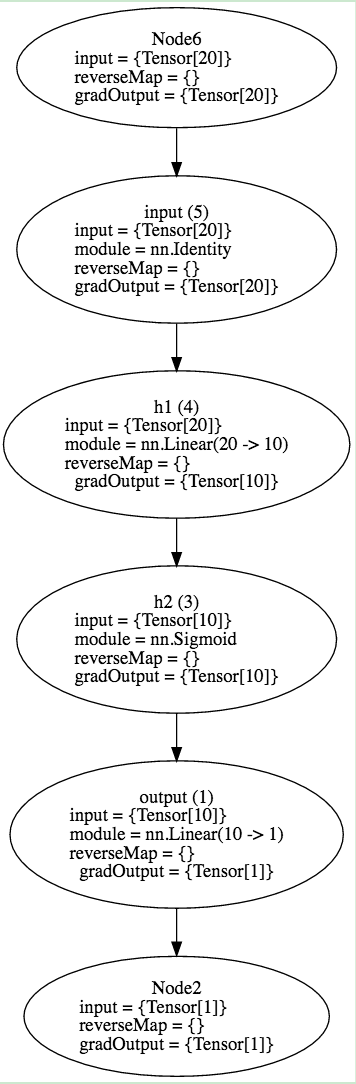
确认运行时错误
-- We need to set debug flag to true
nngraph.setDebug(true)
local function get_network()
    -- it is common style to mark inputs with identity nodes for clarity.
    local input = nn.Identity()()
 -- each hidden layer is achieved by connecting the previous one
    -- here we define a single hidden layer network
    local h1 = nn.Linear(20, 10)(input)
    local h2 = nn.Sigmoid()(h1)
    local output = nn.Linear(10, 1)(h2)
    -- the following function call inspects the local variables in this
    -- function and finds the nodes corresponding to local variables.
    nngraph.annotateNodes()
    return nn.gModule({input}, {output})
end
mlp = get_network()
mlp.name = 'MyMLPError'
x = torch.rand(15) -- note that this input will cause runtime error
-- We do protected call to avoid real error interrupting the notebook
local o, err = pcall(function() mlp:updateOutput(x) end)
itorch.image('MyMLPError.svg')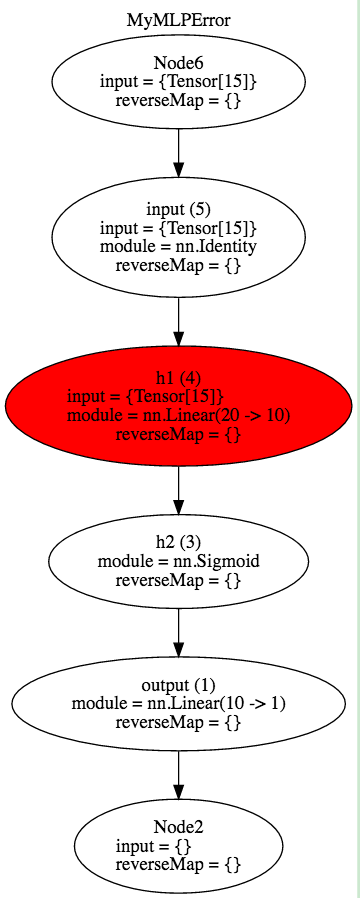
我们很容易看到h1出了点问题。
更复杂的例子
下面我们来创建RNN的核心模块。
function get_rnn(input_size, rnn_size)
      -- there are n+1 inputs (hiddens on each layer and x)
    local input = nn.Identity()()
    local prev_h = nn.Identity()()
  -- RNN tick
    local i2h = nn.Linear(input_size, rnn_size)(input)
    local h2h = nn.Linear(rnn_size, rnn_size)(prev_h)
    local added_h = nn.CAddTable()({i2h, h2h})
    local next_h = nn.Tanh()(added_h)
    nngraph.annotateNodes()
    return nn.gModule({input, prev_h}, {next_h})
end
local rnn_net = get_rnn(128, 128)
graph.dot(rnn_net.fg, 'rnn_net', 'rnn_net')
itorch.image('rnn_net.svg')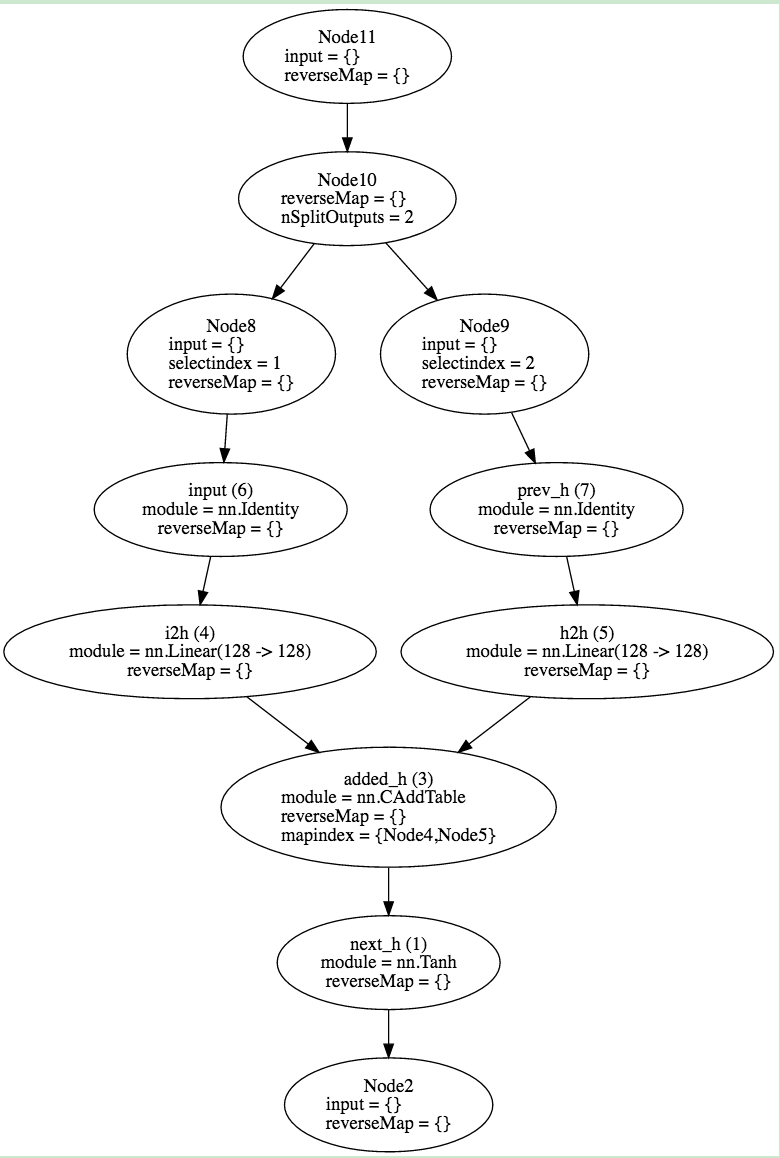
在时域上连接
下面我们把RNN核心模块在时域上进行连接:
local function get_rnn2(input_size, rnn_size)
    local input1 = nn.Identity()()
    local input2 = nn.Identity()()
    local prev_h = nn.Identity()()
    local rnn_net1 = get_rnn(128, 128)({input1, prev_h})
    local rnn_net2 = get_rnn(128, 128)({input2, rnn_net1})
    nngraph.annotateNodes()
    return nn.gModule({input1, input2, prev_h}, {rnn_net2})
end
local rnn_net2 = get_rnn2(128, 128)
graph.dot(rnn_net2.fg, 'rnn_net2', 'rnn_net2')
itorch.image('rnn_net2.svg')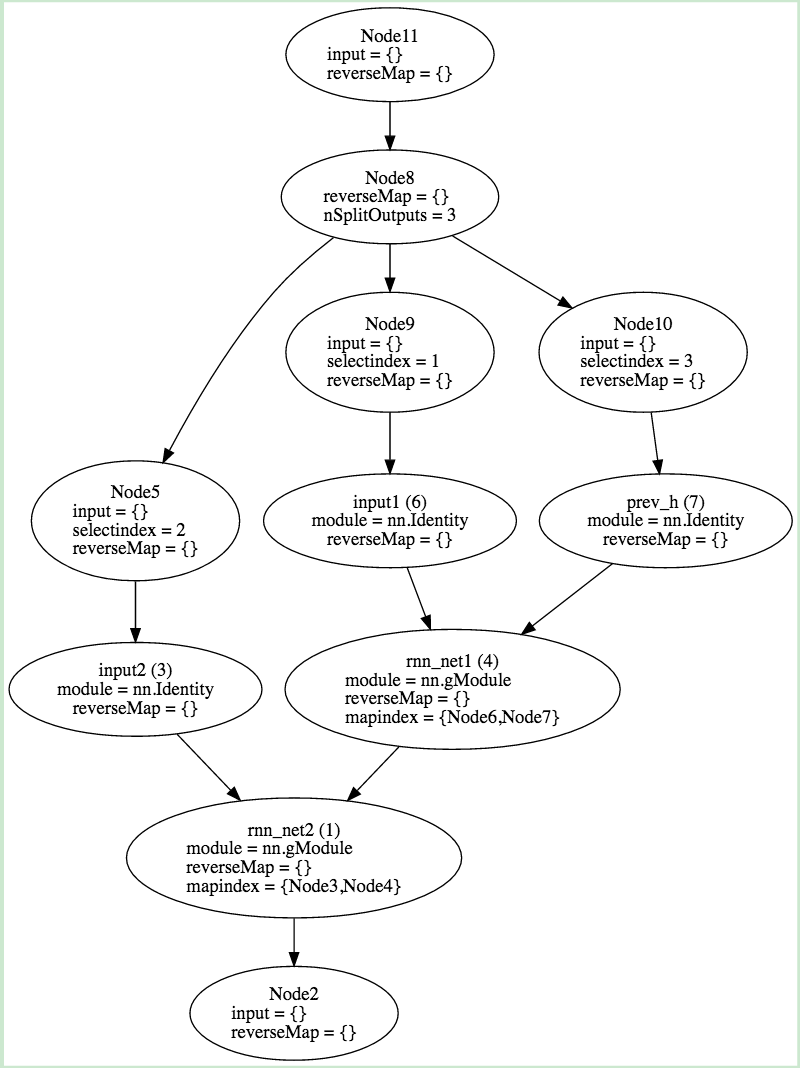
更多debug方法
即使用不同的命名,网络图也会变得很复杂,我们还可以用标记来标记路径。
local function get_rnn2(input_size, rnn_size)
    local input1 = nn.Identity()():annotate{graphAttributes = {style='filled', fillcolor='blue'}}
    local input2 = nn.Identity()():annotate{graphAttributes = {style='filled', fillcolor='blue'}}
    local prev_h = nn.Identity()():annotate{graphAttributes = {style='filled', fillcolor='blue'}}
    local rnn_net1 = get_rnn(128, 128)({input1, prev_h}):annotate{graphAttributes = {style='filled', fillcolor='yellow'}}
    local rnn_net2 = get_rnn(128, 128)({input2, rnn_net1}):annotate{graphAttributes = {style='filled', fillcolor='green'}}
    nngraph.annotateNodes()
    return nn.gModule({input1, input2, prev_h}, {rnn_net2})
end
local rnn_net3 = get_rnn2(128, 128)
graph.dot(rnn_net3.fg, 'rnn_net3', 'rnn_net3')
itorch.image('rnn_net3.svg')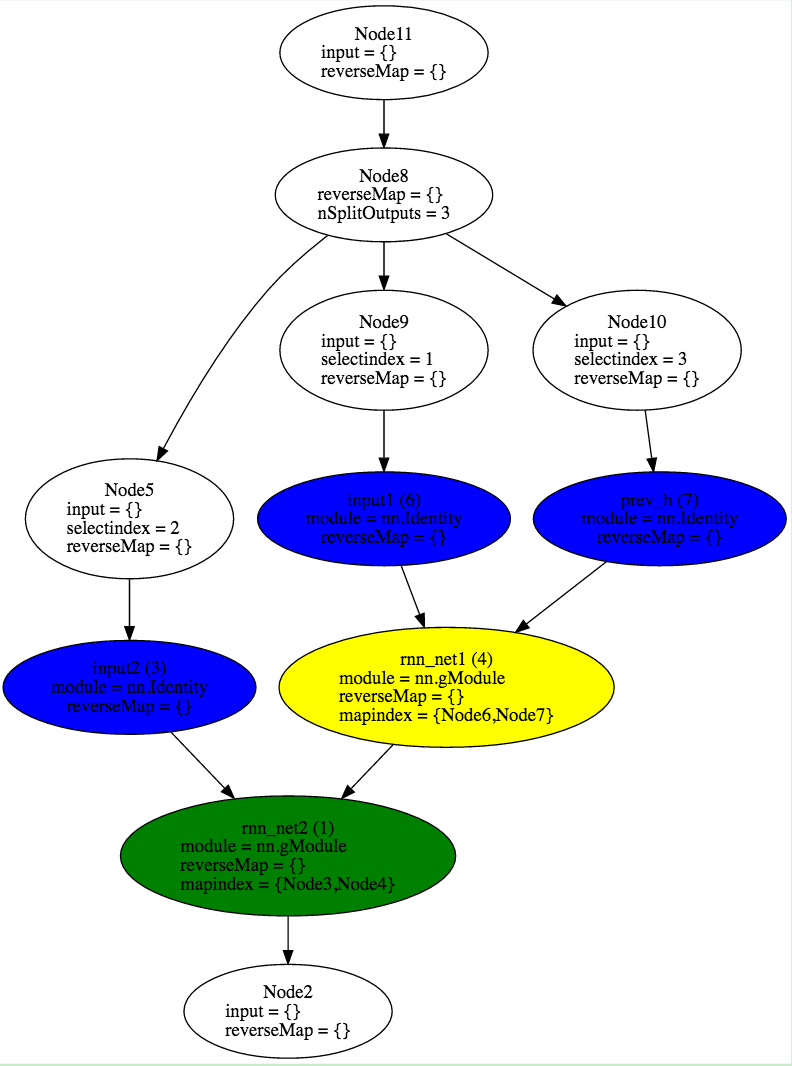


 569
569

 被折叠的 条评论
为什么被折叠?
被折叠的 条评论
为什么被折叠?
 到【灌水乐园】发言


