原文地址:http://blog.csdn.net/madcloudsong/article/details/54408103
这篇文章主要分享unity中与editor插件等相关的使用,比较基础,不过如果都掌握了就可以扩展写一些unity插件了,平时开发中也会提升工作效率。
editor相关脚本一定要放在Editor文件夹下,继承monobehaviour的文件不要放到Editor文件夹下。
monobehaviour相关的编辑器功能
首先常用的在继承monobehaviour类中写public变量可以在inspector中序列化可编辑一般人都知道了,下面是一些可以更有效率更酷的方法。
增强序列化属性
public bool isGood = false;
[Tooltip("hp")]
public int life = 0;
[Range(0f, 1f)]
public float CloudRange = 0.5f;
[Range(0, 15)]
public int CloudRangeInt = 1;
[Header("OtherAttr")]
public float CloudHeader = 1f;
[Space(30)]
public float CloudSpace = 1f;
[HideInInspector]
public float CloudHideInInspector = 1f;
[NonSerialized]
public float CloudNonSerialized = 1f;
[SerializeField]
private bool CloudSerializeField = true;
- 1
- 2
- 3
- 4
- 5
- 6
- 7
- 8
- 9
- 10
- 11
- 12
- 13
- 14
- 15
- 16
- 17
- 18
- 19
- 20
- 21
- 22
- 23
- 24
- 25
- 1
- 2
- 3
- 4
- 5
- 6
- 7
- 8
- 9
- 10
- 11
- 12
- 13
- 14
- 15
- 16
- 17
- 18
- 19
- 20
- 21
- 22
- 23
- 24
- 25
效果如下图,对于一些有范围的数值可以用range做个slider让策划来调节,可以用header和space来组织面板的外观,也可以针对不同的属性进行是否序列化的选择。

序列化类
也可以序列化一个类
[Serializable]
public class SerializableClass {
public int x = 0;
public Vector2 pos;
public Color color;
public Sprite sprite;
}
public SerializableClass serializedObject;

组件面板的上下文菜单
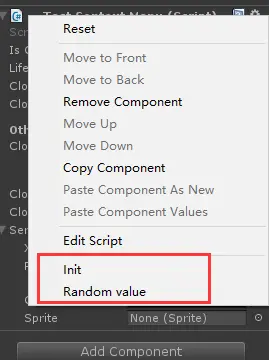
有时在monobehaviour中写一些方法可以初始化一些值或者随机产生某个值这种需求,都可以在菜单中触发,只要简单的加一行即可。
[ContextMenu("Init")]
void Init()
{
isGood = false;
life = 0;
}
[ContextMenu("Random value")]
void RandomValue()
{
Debug.Log("TestContextMenu " + gameObject.name);
isGood = true;
life = UnityEngine.Random.Range(1, 100);
}
效果如下图,点击init就会赋一个初始的值,点击randomvalue可以随机产生一个life的值,这就是最简单的editor工具了
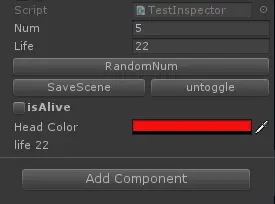
inspector相关的编辑器功能
如果要在inspector中加上一些更高级的功能就需要使用editor相关的方法了
这是要使用的TestInspector类代码
[CustomEditor(typeof(TestInspector))]
public class CloudTools : Editor {
#region inspector
TestInspector script;
GameObject rootObject;
SerializedObject seriObject;
SerializedProperty headColor;
private static bool toggle = true;
public void OnEnable()
{
seriObject = base.serializedObject;
headColor = seriObject.FindProperty("headColor");
var tscript = (TestInspector)(base.serializedObject.targetObject);
if (tscript != null)
{
script = tscript;
rootObject = script.gameObject;
}else
{
Console.Error.WriteLine("tscript is null");
}
}
public void OnDisable()
{
var tscript = (TestInspector)(base.serializedObject.targetObject);
if (tscript == null)
{
Debug.Log("tscript == null");
}
else
{
Debug.Log("tscript != null");
}
seriObject = null;
script = null;
rootObject = null;
}
public override void OnInspectorGUI()
{
base.OnInspectorGUI();
seriObject.Update();
script = target as TestInspector;
if (GUILayout.Button("RandomNum"))
{
Undo.RecordObject(script, "revert random num");
script.RandomNum(script.num);
}
GUILayout.BeginHorizontal();
{
if (GUILayout.Button("SaveScene"))
{
EditorSceneManager.SaveCurrentModifiedScenesIfUserWantsTo();
}
if(GUILayout.Button(toggle ? "untoggle" : "toggle"))
{
toggle = !toggle;
}
}
GUILayout.EndHorizontal();
script.isAlive = EditorGUILayout.BeginToggleGroup("isAlive", script.isAlive);
if (script.isAlive)
{
script.life = EditorGUILayout.Slider("life", script.life, 0, 100f);
}
EditorGUILayout.EndToggleGroup();
EditorGUILayout.PropertyField(headColor);
seriObject.ApplyModifiedProperties();
EditorGUILayout.LabelField("life " + script.life, GUILayout.Width(200));
Repaint();
}
#endregion
}
- 1
- 2
- 3
- 4
- 5
- 6
- 7
- 8
- 9
- 10
- 11
- 12
- 13
- 14
- 15
- 16
- 17
- 18
- 19
- 20
- 21
- 22
- 23
- 24
- 25
- 26
- 27
- 28
- 29
- 30
- 31
- 32
- 33
- 34
- 35
- 36
- 37
- 38
- 39
- 40
- 41
- 42
- 43
- 44
- 45
- 46
- 47
- 48
- 49
- 50
- 51
- 52
- 53
- 54
- 55
- 56
- 57
- 58
- 59
- 60
- 61
- 62
- 63
- 64
- 65
- 66
- 67
- 68
- 69
- 70
- 71
- 72
- 73
- 74
- 75
- 76
- 77
- 78
- 79
- 80
- 81
- 82
- 83
- 84
- 85
- 86
- 87
- 88
- 89
- 90
其中需要用OnEnable和OnDisable来做初始化和清理工作,OnInspectorGUI方法可以类比monobehaviour中的OnGUI,做ui渲染和ui事件处理。
里面还注册了UnDo,好处是可以通过ctrl+z来进行撤销操作,这样才更完美更像一个完善的unity插件。
代码也没什么难度,我也做了下简单的注释,执行一下看看效果大部分人就都理解了。效果如下图

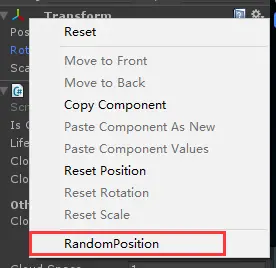
各种上下文菜单
组件菜单
之前可以在monobehaviour中加入[ContextMenu("Random value")]来生成对应脚本组件面板的上下文菜单,那么如果要生成一个在transform组件上的菜单怎么办
[MenuItem("CONTEXT/Transform/RandomPosition")]
static void ContextMenu_TransformRandomPosition()//随机改变transform组件的position
{
Debug.Log("ContextMenu_Transform")
Transform[] transforms = Selection.GetTransforms(SelectionMode.TopLevel | SelectionMode.OnlyUserModifiable)
foreach (Transform transform in transforms)
{
transform.localPosition = new Vector3(UnityEngine.Random.Range(-10, 10),
UnityEngine.Random.Range(-10, 10),
UnityEngine.Random.Range(-10, 10))
Debug.Log(transform.localPosition)
}
}
效果如下图,如果策划或者美术需要对transform的position干这种随机的事,是不是就可以这么搞了?或者对collider、rigibody之类的组件加上一些属性模板的设置,会很方便吧
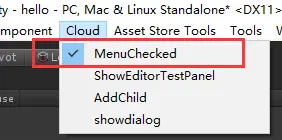
带勾选的菜单
在editor中加个菜单item是件很容易的事情,那么如果这个菜单是可以勾选的呢?是不是可以解决一些开关的问题?
const string Menu_Checked = "Cloud/MenuChecked";
const string Key_MenuChecked = "MenuChecked";
[MenuItem(Menu_Checked)]
static void MenuChecked()
{
bool flag = Menu.GetChecked(Menu_Checked);
if (flag)
{
Debug.Log("Key_MenuChecked to 0");
PlayerPrefs.SetInt(Key_MenuChecked, 0);
}
else
{
Debug.Log("Key_MenuChecked to 1");
PlayerPrefs.SetInt(Key_MenuChecked, 1);
}
Menu.SetChecked(Menu_Checked, !flag);
}
[MenuItem(Menu_Checked, true)]
public static bool IsMenuChecked()
{
Menu.SetChecked(Menu_Checked, PlayerPrefs.GetInt(Key_MenuChecked, 0) == 1);
return true;
}
- 1
- 2
- 3
- 4
- 5
- 6
- 7
- 8
- 9
- 10
- 11
- 12
- 13
- 14
- 15
- 16
- 17
- 18
- 19
- 20
- 21
- 22
- 23
- 24
- 25
- 26
- 1
- 2
- 3
- 4
- 5
- 6
- 7
- 8
- 9
- 10
- 11
- 12
- 13
- 14
- 15
- 16
- 17
- 18
- 19
- 20
- 21
- 22
- 23
- 24
- 25
- 26
效果如下图,其中需要一个菜单的valid函数来判断菜单是否在勾选状态,这里用了playprefs,在windows上就写到注册表里了
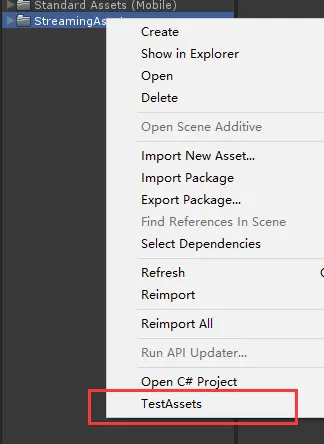
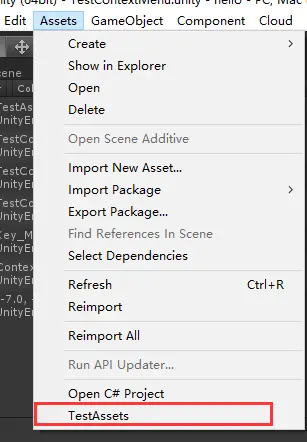
project面板中的菜单
这个菜单是加到了Assets下面,那么在project面板中右键也可以看到,这种菜单可以干什么呢,我也没想好,不过干些修改assetsimport属性或者修改一些资源等等还是挺好用的吧
[MenuItem("Assets/TestAssets")]
static void MenuAssets()
{
    if(Selection.activeObject == null)
    {
        Debug.Log("TestAssets choose null");
    }
    else
    {
        Debug.Log("TestAssets name = " + Selection.activeObject.name);
    }

}
一般这种菜单都可以通过Selection.activeObject/activeGameObject等等来获取选中对象,当然也可以获取多选的多个对象,这个看下api就知道了
hierarchy面板菜单
这个菜单还是比较实用的,相对来说也不太一样
[MenuItem("GameObject/Create Other/TestGameObject")]
static void MenuGameObject()
{
Debug.Log("TestGameObject");
}
将菜单加到GameObject下面,就可以在hierarchy里右键看到了
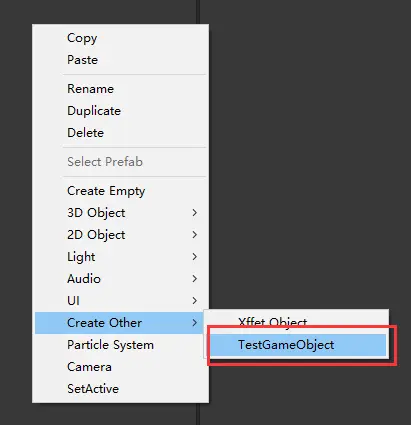
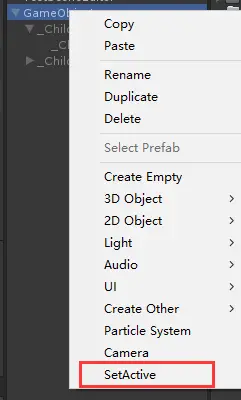
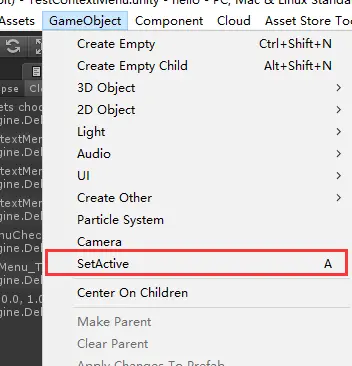
那么基于这个菜单我们可以做个比较实用的功能,例如右键hierarchy中场景的一个GameObject并且对它进行SetActive为true or false的操作,代码如下:
//快捷键可以为%=ctrl/cmd #=shift &=alt LEFT/RIGHT/UP/DOWN F1-F12,HOME END PGUP PGDN _a~_z
[MenuItem("GameObject/SetActive _a", false, 11)] //11及以后可以在Camera之后显示
static void MenuGameObjectSetActive()//通过按a键来设置所选择GameObject的active状态
{
Debug.Log("MenuGameObjectSetActive")
if(Selection.activeGameObject != null)
{
Undo.RecordObject(Selection.activeGameObject, "SetActive" + Selection.activeGameObject.activeSelf + " " + Selection.activeGameObject.name)
Selection.activeGameObject.SetActive(!Selection.activeGameObject.activeSelf)
}
Debug.Log(Selection.activeObject.name)
}
[MenuItem("GameObject/SetActive", true, 11)]
static bool CheckIsGameObject()//判断是否显示该菜单的校验方法,如果没选择GameObject为灰
{
UnityEngine.Object selectedObject = Selection.activeObject
if(selectedObject != null && selectedObject.GetType() == typeof(GameObject))
{
Debug.Log(selectedObject.name)
return true
}
return false
}
- 1
- 2
- 3
- 4
- 5
- 6
- 7
- 8
- 9
- 10
- 11
- 12
- 13
- 14
- 15
- 16
- 17
- 18
- 19
- 20
- 21
- 22
- 23
- 24
- 1
- 2
- 3
- 4
- 5
- 6
- 7
- 8
- 9
- 10
- 11
- 12
- 13
- 14
- 15
- 16
- 17
- 18
- 19
- 20
- 21
- 22
- 23
- 24
其中做校验的方法是为了在不选中GameObject的时候能够将菜单灰掉。另外这种菜单可以绑定一个快捷键,这个例子是绑定了a键,菜单中也可以看出来。
最终效果就成了:我选中一个GameObject,只要按下a键就可以SetActive(false),再按下变成true,还是比较实用的吧,基于此可以做很多实用的东西。效果如下图
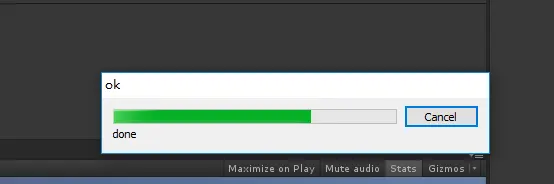
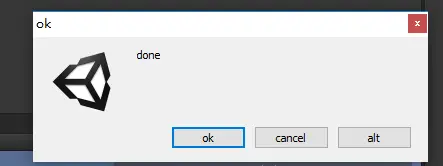
对话框
对话框比较简单,就是一些内置的api,具体可以查看api,支持了例如简单和复杂对话框、打开保存文件对话框、进度条等等功能
EditorUtility.DisplayCancelableProgressBar("ok", "done", 0.7f)
EditorUtility.ClearProgressBar();
EditorUtility.OpenFilePanel("open", "d:/", ".txt");
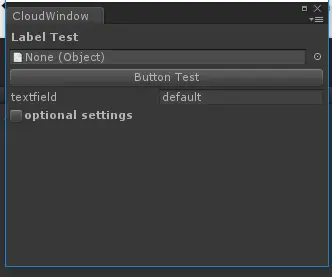
新窗口
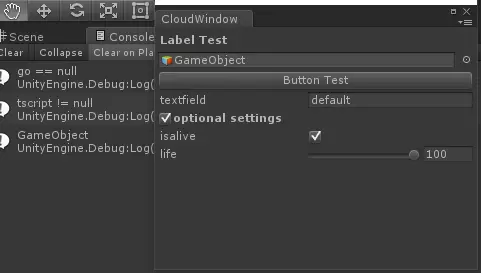
如果要做的事情可能不是与某个GameObject相关,inspector不能满足要求,那么可以创建一个新的窗口,创建新的editor窗口需要继承EditorWindow,代码如下
[CustomEditor(typeof(CloudWindow))]
public class CloudWindow : EditorWindow {
#region 对话框
[MenuItem("Cloud/ShowEditorTestPanel")]
public static void ConfigDialog()
{
EditorWindow.GetWindow(typeof(CloudWindow));
}
public UnityEngine.Object go = null;
string goName= "default";
float life = 100f;
bool isAlive = true;
bool toggleEnabled;
void OnGUI()
{
GUILayout.Label("Label Test", EditorStyles.boldLabel);
go = EditorGUILayout.ObjectField(go, typeof(UnityEngine.Object), true);
if (GUILayout.Button("Button Test"))
{
if (go == null)
{
Debug.Log("go == null");
}
else
{
Debug.Log(go.name);
}
}
goName = EditorGUILayout.TextField("textfield", goName);
toggleEnabled = EditorGUILayout.BeginToggleGroup("optional settings", toggleEnabled);
if (toggleEnabled)
{
isAlive = EditorGUILayout.Toggle("isalive", isAlive);
life = EditorGUILayout.Slider("life", life, 0, 100);
}
EditorGUILayout.EndToggleGroup();
}
#endregion
}
- 1
- 2
- 3
- 4
- 5
- 6
- 7
- 8
- 9
- 10
- 11
- 12
- 13
- 14
- 15
- 16
- 17
- 18
- 19
- 20
- 21
- 22
- 23
- 24
- 25
- 26
- 27
- 28
- 29
- 30
- 31
- 32
- 33
- 34
- 35
- 36
- 37
- 38
- 39
- 40
- 41
- 42
- 43
- 44
- 45
- 46
- 47
- 48
- 49
- 1
- 2
- 3
- 4
- 5
- 6
- 7
- 8
- 9
- 10
- 11
- 12
- 13
- 14
- 15
- 16
- 17
- 18
- 19
- 20
- 21
- 22
- 23
- 24
- 25
- 26
- 27
- 28
- 29
- 30
- 31
- 32
- 33
- 34
- 35
- 36
- 37
- 38
- 39
- 40
- 41
- 42
- 43
- 44
- 45
- 46
- 47
- 48
- 49
好像代码也不复杂,也没什么难度就是常见的ui绘制,效果如下:
后续
如果有更高的需求可能需要更深入的研究一下unity中editor的相关api和文档
unity还提供了可以在scene窗口中做一些操作,例如画一些辅助线、显示label、操作handler等,具体可以参考
http://blog.csdn.net/kun1234567/article/details/19421471
结语
如果把这些代码执行一遍,改改调试一下,理解基本流程,那么已经可以写一些提高工作效率的unity插件了


 1158
1158

 被折叠的 条评论
为什么被折叠?
被折叠的 条评论
为什么被折叠?
 到【灌水乐园】发言


