


最近在做部署相关工作,为了验证MNN的编译是否有问题,使用MobilenetV2在MNN上进行了部署测试。
我实现模型在ARM CPU上使用MNN的部署,主要有六个步骤:
1.使用pytorch完成模型代码,并用torch.jit.script生成静态模型;
2.使用ONNX完成模型转换;
3.编译MNN环境;
4.使用MNNConvert将ONNX文件转为MNN文件;
5.使用C++完成MNN模型类;
6.调用模型推理代码,编译代码进行测试;
下面分开介绍一下每个步骤:
1.第一个步骤从GitHub上找到一个mobilenet-v2的开源代码(GitHub - tonylins/pytorch-mobilenet-v2: A PyTorch implementation of MobileNet V2 architecture and pretrained model.)可以直接用,下载代码并同时下载权重。注意在加载权重时,会报missing keys的错误,需要修改mobilenet_v2方法。
def mobilenet_v2(tar_file,pretrained=True):
    model = MobileNetV2(width_mult=1)

    if tar_file:
        state_dict = torch.load(tar_file)
        new_state_dict = collections.OrderedDict()
        for k,v in state_dict.items():
            if k == "classifier.1.weight":
                new_state_dict["classifier.weight"] = v
            elif k == "classifier.1.bias":
                new_state_dict["classifier.bias"] = v
            else:
                new_state_dict[k] = v

        model.load_state_dict(new_state_dict)

    return model
同时使用torch.jit.scritpt将pytorch模型转为静态图模式:
c_model = mobilenet_v2(torch_ckpt)
model_script = torch.jit.script(c_model)
2.使用onnx完成模型转换:
这个mobilenet-v2开源模型使用Imagenet数据集训练,找一张Imagenet的图片作为示例输入,一只可爱又不屑眼神看你的小狗:

随后使用开源代码的方法对图像进行数据预处理:
normalize = transforms.Normalize(mean=[0.485, 0.456, 0.406],
                                         std=[0.229, 0.224, 0.225])
transform_test = transforms.Compose([
                transforms.RandomResizedCrop(224),
                transforms.RandomHorizontalFlip(),
                transforms.ToTensor(),
                normalize,
            ])

in_data=Image.open(input_data_path)
in_data=transform_test(in_data)
in_data.unsqueeze_(0)
然后使用onnx进行模型转换:
dummy_output = model_script(in_data)
output_names = ["preds"]

torch.onnx.export(model_script,
                    in_data,
                    onnx_path,
                    opset_version=11,
                    # do_constant_folding=True,	# 是否执行常量折叠优化
                    input_names=["input"],		# 输入名
                    output_names=output_names,
                    example_outputs=dummy_output	# 输出名
                    )
这样就得到ONNX模型。同时对结果进行验证:
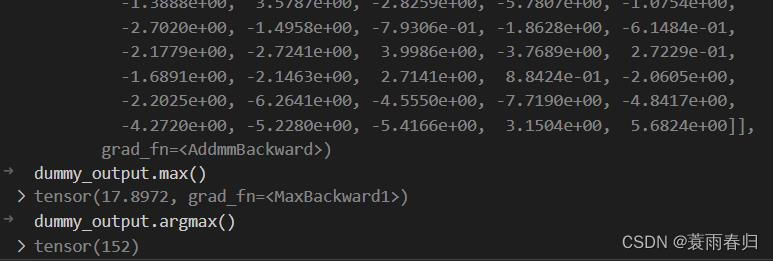
经过查询,再ImageNet数据的1000类中,152对应的是Japanese spaniel,转换后的静态图模型的推理结果是正确的。

3.编译MNN环境比NCNN简单一些,可参考(Ubuntu,Windows下编译MNN的推理和模型转化工具_donkey_1993的博客-CSDN博客_mnn 转换工具),注意要打开-DMNN_BUILD_CONVERTER编译选项,需要使用MMN的转换工具完成下一步ONNX到MNN的转换,配置项目环境将编译好的目录添加到项目cmakelist中;
4.使用MNNCONVERT工具将ONNX模型转为MNN模型,可参考(三、模型转换MNNConvert_北方的杨先生的博客-CSDN博客_mnnconvert);
./MNNConvert -f ONNX --modelFile {ONNX_FILE_PATH} --MNNModel {MNN_FILE_PATH} --bizCode {自定义flag}
5.使用C++完成MNN模型类,写两个文件,一个mnn_model.h,mnn_model.cpp:
class MNN_RECOGNIZER
    {

        public:
            shared_ptr<Interpreter> net;
            Session* session;

            void load_model(string model_path);

            void infer_result(vector<float> flat_data,,
                              vector<string>& output_names);
    };
void MNN_RECOGNIZER::load_model(string model_path){
// load model parameters
shared_ptr<Interpreter> net = shared_ptr<Interpreter>(Interpreter::createFromFile(model_path.c_str()));
// Setting MNN configuration
ScheduleConfig config;
config.numThread = 4;
config.backupType = MNN_FORWARD_CPU;
BackendConfig backendConfig;
backendConfig.memory = BackendConfig::Memory_Normal; // 内存
backendConfig.power = BackendConfig::Power_Normal; // 功耗
backendConfig.precision = BackendConfig::PrecisionMode::Precision_Low; // 精度
// backendConfig.precision = BackendConfig::PrecisionMode::Precision_Normal; // 精度
config.backendConfig = &backendConfig;
Session* session = net->createSession(config);
this->net = net;
this->session = session;
}
void MNN_RECOGNIZER::infer_result(vector<float> flat_data,
vector<string>& output_names){
auto model_infer_start = std::chrono::steady_clock::now();
std::string input_name = "input";
Tensor* input = this->net->getSessionInput(this->session, input_name.c_str());
Tensor* input_tensor = Tensor::create<float>(input->shape(), flat_data.data(), Tensor::CAFFE);
std::cout << "mnn feed data Elapsed(ms)=" << since(model_infer_start).count() << std::endl;
auto model_start = std::chrono::steady_clock::now();
// 将赋值的tensorcopy给input用户session计算
input->copyFromHostTensor(input_tensor);
// run session
this->net->runSession(this->session);
Tensor* output_scores_tensor = this->net->getSessionOutput(this->session, output_names[0].c_str());
auto output_scores = new Tensor(output_scores_tensor, Tensor::CAFFE);
output_scores_tensor->copyToHostTensor(output_scores);
std::cout << "mbn_v2 infer Elapsed(ms)=" << since(model_start).count() << std::endl;
cout << "mbn_v2 scores: " <<output_scores->host<float>()[152] << endl;
}6.调用模型推理代码,编译代码进行测试:
先调用推理代码:
MNN_RECOGNIZER MNN_Recog;
MNN_Recog.load_model(mnn_model_path);


string  input_data_file ="***/input_Japanese_spaniel.npy";
vector<string> output_names ={"preds"};

std::vector<unsigned long> in_shape;
std::vector<float> in_data; // 必须指定<dtype>类型与npy对应
load_numpy_array(input_data_file,in_data,in_shape);


MNN_Recog.infer_result(in_data,output_names);
随后编译运行:

打印的输出结果为logits的152位置的score,与pytorch模型输出结果接近。耗时为46ms,比benchmark测试的mobilnet v2慢不到10ms。
以上就是MobilenetV2 在ARM CPU上的MNN部署流程,本人部署经验较少,如表述有误,还请批评指正。


 595
595


 被折叠的 条评论
为什么被折叠?
被折叠的 条评论
为什么被折叠?
 到【灌水乐园】发言


