


在我进一步深入代码之前,这是最终结果:
-
为了达到上述结果,我们需要执行以下步骤:
- 创建自定义模块
- 创建特定资产
- 创建我们自己的详细信息面板(将扩展默认面板)
测试功能
这篇文章不会涵盖该过程的第一步,因为我已经在这里写了一篇关于它的教程。
添加所需的依赖项
对于这篇文章,我创建了一个名为“BlogpostModule”的自定义模块。在它的 .build.cs 文件中,我添加了以下依赖项:
公共依赖模块名称。AddRange ( new string [ ] { "Core" , "CoreUObject" , "Engine" , "PropertyEditor" , "Slate" , "SlateCore" } ) ;
我们需要这些依赖项的原因是因为我们将使用 Slate 来扩展详细信息面板。
在继续之前,请确保编译您的代码。
创建测试 Actor
为了让我们的自定义详细信息面板正常工作,我们需要告诉我们的模块我们想要绑定一个特定的详细信息面板,以便在我们修改特定类时出现。这就是我们要添加一个测试类来展示功能的原因。我将我的类命名为“FancyCube”,并将其也放入 BlogpostModule。这是它的代码:
#pragma once

#include "CoreMinimal.h"
#include "GameFramework/Actor.h"
#include "FancyCube.generated.h"

UCLASS()
class BLOGPOSTMODULE_API AFancyCube : public AActor
{
	GENERATED_BODY()

public:
	// Sets default values for this actor's properties
	AFancyCube();

	void AddKeyValue();

protected:
	// Called when the game starts or when spawned
	virtual void BeginPlay() override;

	UPROPERTY(VisibleAnywhere)
	UStaticMeshComponent* CubeSM;

public:
	// Called every frame
	virtual void Tick(float DeltaTime) override;


};
#include "FancyCube.h"


// Sets default values
AFancyCube::AFancyCube()
{
 	// Set this actor to call Tick() every frame.  You can turn this off to improve performance if you don't need it.
	PrimaryActorTick.bCanEverTick = true;
	CubeSM = CreateDefaultSubobject<UStaticMeshComponent>("CubeSM");
}

void AFancyCube::AddKeyValue()
{
	if (CubeSM)
	{
		//Do Some Thing
	}

}

// Called when the game starts or when spawned
void AFancyCube::BeginPlay()
{
	Super::BeginPlay();

}

// Called every frame
void AFancyCube::Tick(float DeltaTime)
{
	Super::Tick(DeltaTime);

}
一旦我们创建了自定义详细信息面板,我们将告诉我们的模块将其分配给上面的“AFancyCube”类。现在,根据上面的类创建一个蓝图,并将以下材质分配给它的网格:
扩展详细信息面板
为了扩展详细信息面板,您必须添加一个继承对象类的类。请记住,此类不会使用典型的 UCLASS 宏进行标记,稍后我们将替换默认的构造函数和析构函数。创建类后,在其头文件中输入以下代码:
#pragma once

#include "CoreMinimal.h"
#include "Input/Reply.h"
#include "IDetailCustomization.h"

class FCustomDetailsPanel : public IDetailCustomization
{

private:

	/* Contains references to all selected objects inside in the viewport */
	TArray<TWeakObjectPtr<UObject>> SelectedObjects;

public:

	/* Makes a new instance of this detail layout class for a specific detail view requesting it */
	static TSharedRef<IDetailCustomization> MakeInstance();

	/* IDetalCustomization interface */
	virtual void CustomizeDetails(IDetailLayoutBuilder& DetailBuilder) override;

	/* The code that fires when we click the "ChangeColor" button */
	FReply ClickedOnButton();

};
然后,在源文件中键入以下代码:
#include "CustomDetailsPanel.h" //make sure to replace this include to match your class name
#include "IDetailsView.h"
#include "DetailLayoutBuilder.h"
#include "DetailWidgetRow.h"
#include "DetailCategoryBuilder.h"
#include "Widgets/SNullWidget.h"
#include "Widgets/Text/STextBlock.h"
#include "Widgets/Input/SButton.h"
#include "Widgets/SBoxPanel.h"
#include "Text.h"
#include "FancyCube.h"
#include "UObject/Class.h"
TSharedRef<IDetailCustomization> FCustomDetailsPanel::MakeInstance()
{
return MakeShareable(new FCustomDetailsPanel);
}
void FCustomDetailsPanel::CustomizeDetails(IDetailLayoutBuilder& DetailBuilder)
{
//Edits a category. If it doesn't exist it creates a new one
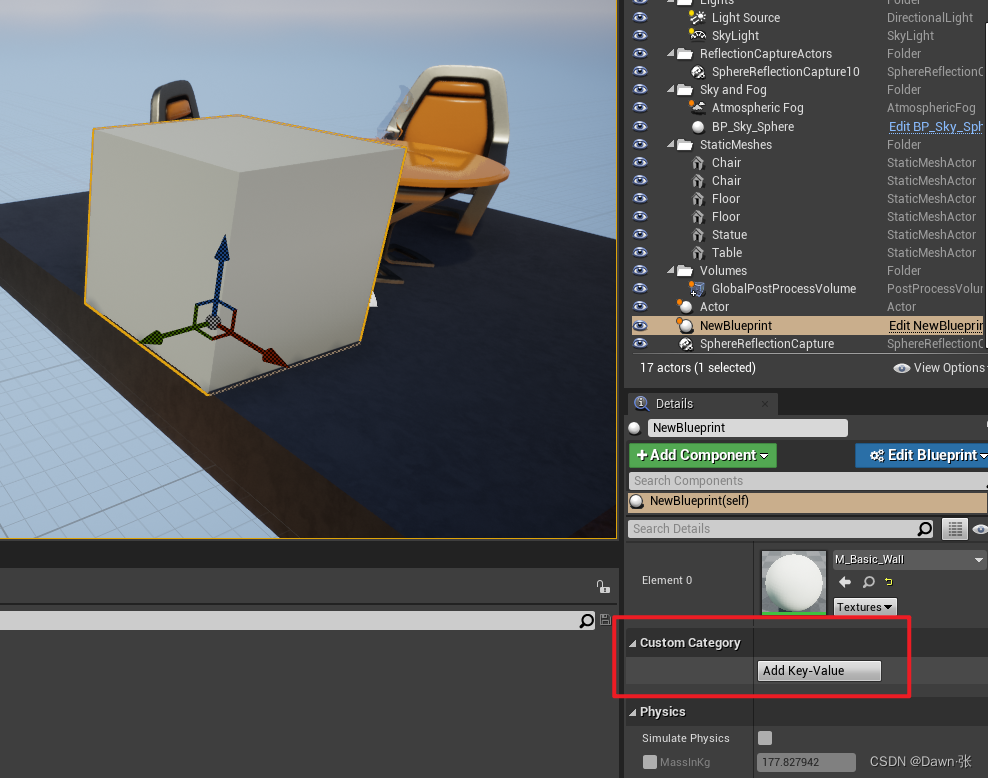
IDetailCategoryBuilder& CustomCategory = DetailBuilder.EditCategory("CustomCategory");
//Store the currently selected objects from the viewport to the SelectedObjects array.
DetailBuilder.GetObjectsBeingCustomized(SelectedObjects);
//Adding a custom row
CustomCategory.AddCustomRow(FText::FromString("Add Key-Value"))
.ValueContent()
.VAlign(VAlign_Center) // set vertical alignment to center
.MaxDesiredWidth(250)
[ //With this operator we declare a new slate object inside our widget row
//In this case the slate object is a button
SNew(SButton)
.VAlign(VAlign_Center)
.OnClicked(this, &FCustomDetailsPanel::ClickedOnButton) //Binding the OnClick function we want to execute when this object is clicked
.Content()
[ //We create a new slate object inside our button. In this case a text block with the content of "Change Color"
//If you ever coded a UMG button with a text on top of it you will notice that the process is quite the same
//Meaning, you first declare a button which has various events and properties and then you place a Text Block widget
//inside the button's widget to display text
SNew(STextBlock).Text(FText::FromString("Add Key-Value"))
]
];
}
FReply FCustomDetailsPanel::ClickedOnButton()
{
if (GEngine)
{
for (const TWeakObjectPtr<UObject>& Object : SelectedObjects)
{
AFancyCube* FancyCube = Cast<AFancyCube>(Object.Get());
if (FancyCube)
{
FancyCube->AddKeyValue();
}
}
GLog->Log("Add a Key-Value!");
}
return FReply::Handled();
}
正如您在 CustomizeDetails 函数中看到的那样,我们使用“[ ]”运算符来输入“不寻常”的代码。本质上,在 slate 中,这些运算符创建了一个新的 Slate Widget,我们在其中提供了描述其功能的属性(例如其外观和/或内容)。如果您深入研究引擎的代码,例如 第 113 行的 DetailWidgetRow.h,您会注意到该运算符背后的逻辑非常简单。(即每次使用此运算符时,您都必须提供一个新的 Slate Widget)。如果你仔细想想,这个逻辑类似于 UMG 小部件的工作方式。
将详细信息面板绑定到Actor
在这一点上,我们需要做的最后一件事是将所有内容联系在一起。进入模块的启动函数并输入以下代码:
#include "BlogpostModule.h"
#include "FancyCube.h"
#include "CustomDetailsPanel.h"
#include "PropertyEditorModule.h"

DEFINE_LOG_CATEGORY(BlogpostModule);

#define LOCTEXT_NAMESPACE "FBlogpostModule"

void FBlogpostModule::StartupModule()
{
	UE_LOG(BlogpostModule, Warning, TEXT("BlogpostModule module has started!"));
	//Get the property module
	FPropertyEditorModule& PropertyModule = FModuleManager::LoadModuleChecked<FPropertyEditorModule>("PropertyEditor");
	//Register the custom details panel we have created
	PropertyModule.RegisterCustomClassLayout(AFancyCube::StaticClass()->GetFName(), FOnGetDetailCustomizationInstance::CreateStatic(&FCustomDetailsPanel::MakeInstance));
}

void FBlogpostModule::ShutdownModule()
{
	UE_LOG(BlogpostModule, Warning, TEXT("BlogpostModule module has shut down"));
}

#undef LOCTEXT_NAMESPACE

IMPLEMENT_MODULE(FBlogpostModule,BlogpostModule)
此时,编译你的模块,当你选择任何“FancyCube”Actor时,你应该会看到自定义详细信息面板。请记住,您可能必须重新启动编辑器才能看到更改。
但是这个方式有个巨大的问题,当
PropertyModule.RegisterCustomClassLayout(AFancyCube::StaticClass()->GetFName(), FOnGetDetailCustomizationInstance::CreateStatic(&FCustomDetailsPanel::MakeInstance));
改为
PropertyModule.RegisterCustomClassLayout(AActor::StaticClass()->GetFName(), FOnGetDetailCustomizationInstance::CreateStatic(&FCustomDetailsPanel::MakeInstance));
时是完全不生效的,因为这个方法只适用于继承于UObject的自定义的类,而不能是引擎自带的类,所以如果想在原来的Actor基类上进行添加是需要修改引擎源码的


 7347
7347


 被折叠的 条评论
为什么被折叠?
被折叠的 条评论
为什么被折叠?
 到【灌水乐园】发言


